Thursday, January 31, 2019
Many frontend frameworks rely on JavaScript to show content. This can mean Google might take some time to index your content or update the indexed content.
A workaround we discussed at Google I/O this year is dynamic rendering. There are many ways to implement this. This blog post shows an example implementation of dynamic rendering using Rendertron, which is an open source solution based on headless Chromium.
Which sites should consider dynamic rendering?
Not all search engines or social media bots visiting your website can run JavaScript. Googlebot might take time to run your JavaScript and has some limitations, for example.
Dynamic rendering is useful for content that changes often and needs JavaScript to display. Your site's user experience (especially the time to first meaningful paint) may benefit from considering hybrid rendering (for example, Angular Universal).
How does dynamic rendering work?

Dynamic rendering means switching between client-side rendered and pre-rendered content for specific user agents.
You will need a renderer to execute the JavaScript and produce static HTML. Rendertron is an open source project that uses headless Chromium to render. Single Page Apps often load data in the background or defer work to render their content. Rendertron has mechanisms to determine when a website has completed rendering. It waits until all network requests have finished and there is no outstanding work.
This post covers:
- Take a look at a sample web app
- Set up a small
express.jsserver to serve the web app - Install and configure Rendertron as a middleware for dynamic rendering
The sample web app
The "kitten corner" web app uses JavaScript to load a variety of cat images from an API and displays them in a grid.
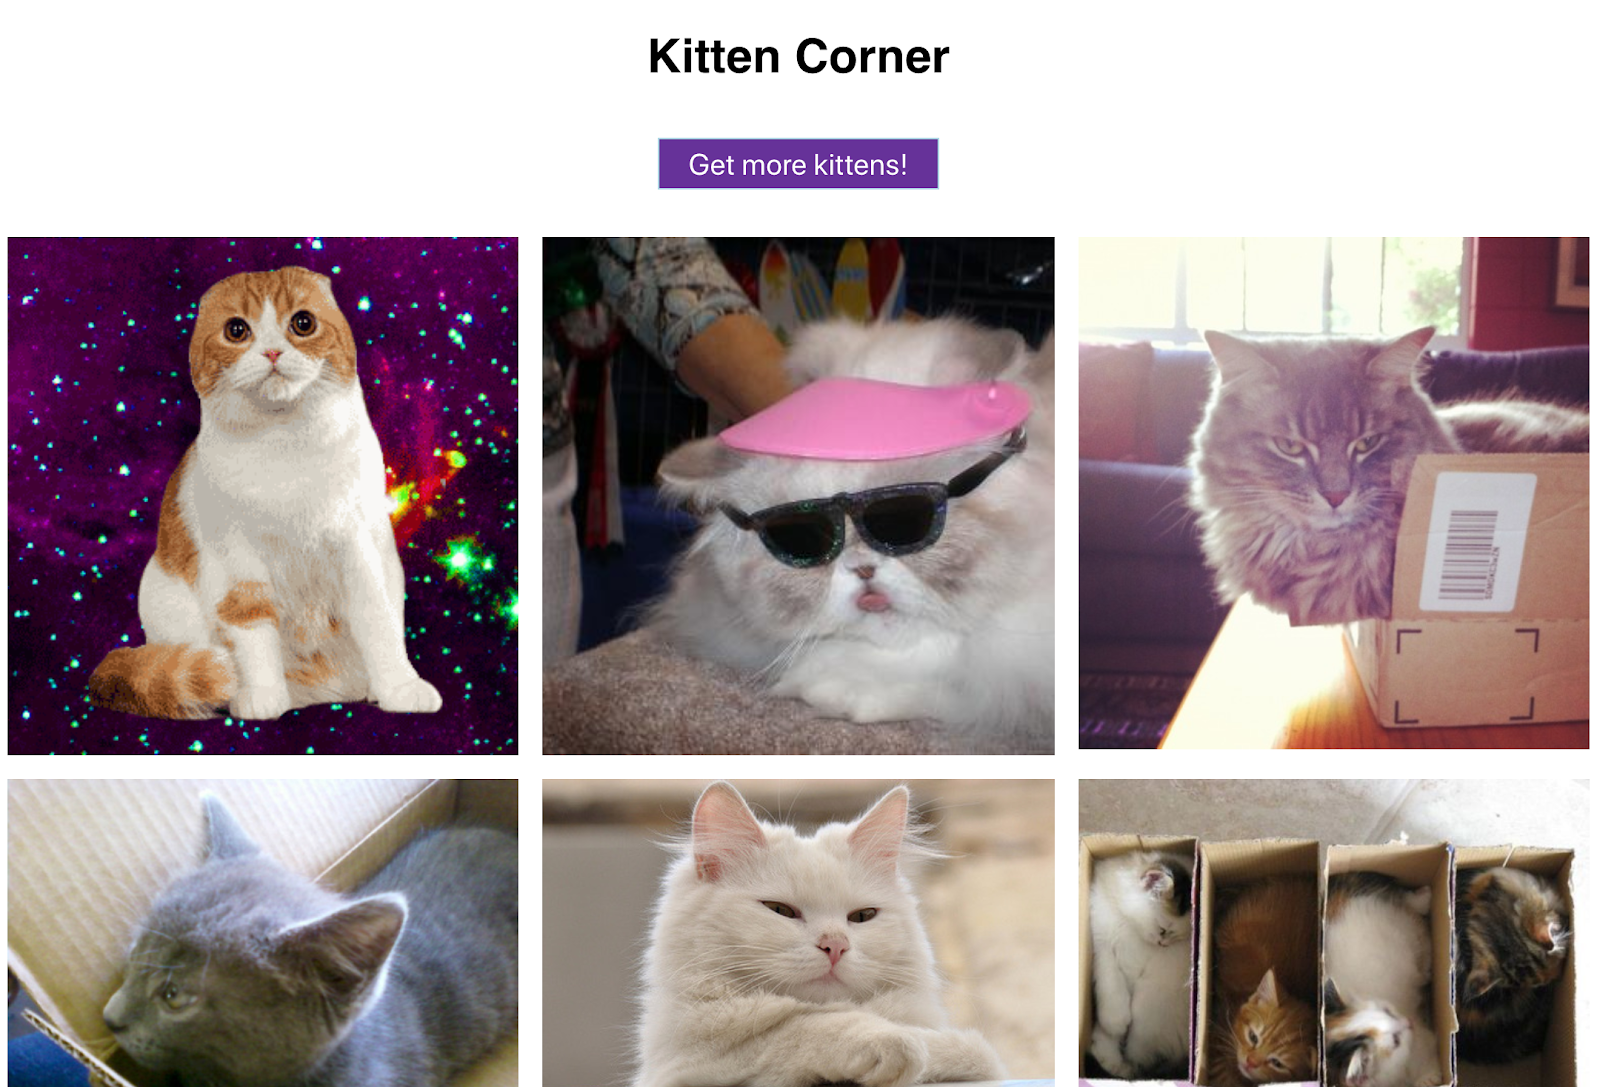
Here is the JavaScript:
const apiUrl = 'https://api.thecatapi.com/v1/images/search?limit=50';
   const tpl = document.querySelector('template').content;
   const container = document.querySelector('ul');
   function init () {
     fetch(apiUrl)
     .then(response => response.json())
     .then(cats => {
       container.innerHTML = '';
       cats
         .map(cat => { const li = document.importNode(tpl, true); li.querySelector('img').src = cat.url; return li;
         }).forEach(li => container.appendChild(li));
     })
   }
   init();
   document.querySelector('button').addEventListener('click', init);
The web app uses modern JavaScript (ES6), which isn't supported in Googlebot yet. We can use the mobile-friendly test to check if Googlebot can see the content:
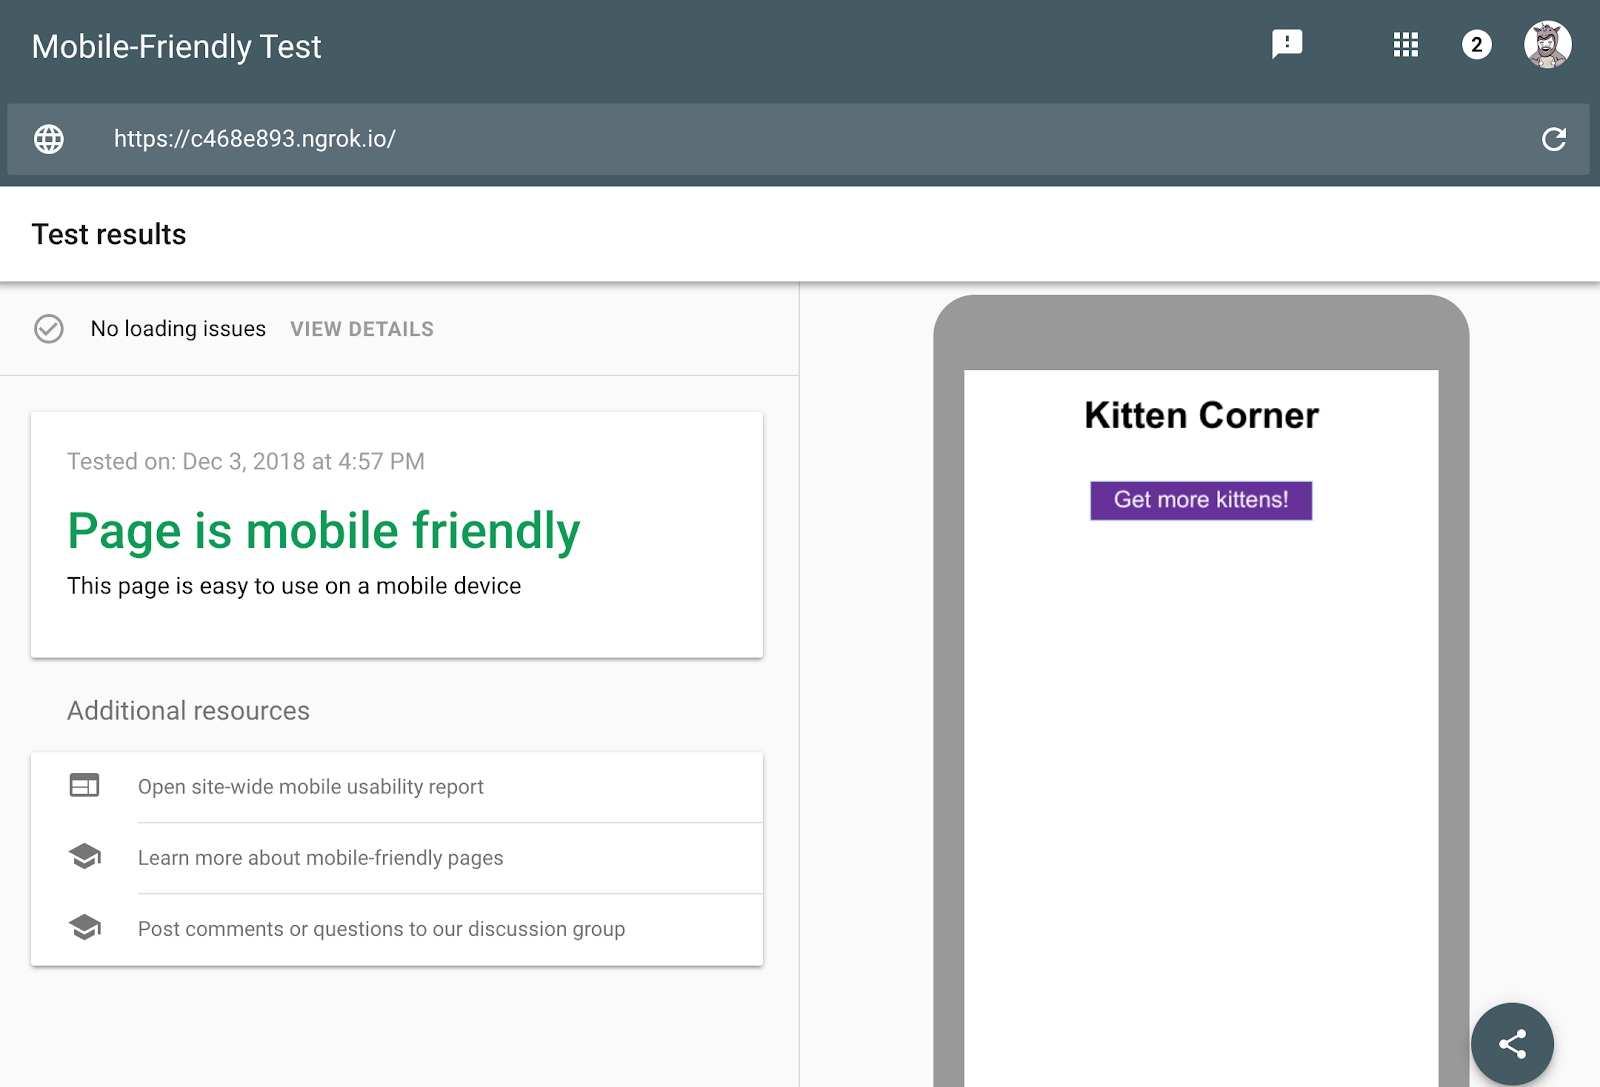
While this problem is simple to fix, it's a good exercise to learn how to setup dynamic rendering. Dynamic rendering will allow Googlebot to see the cat pictures without changes to the web app code.
Set up the server
To serve the web application, let's use
express, a node.js
library, to build web servers.
The server code looks like this (find the full project source code here):
const express = require('express');
const app = express();
const DIST_FOLDER = process.cwd() + '/docs';
const PORT = process.env.PORT || 8080;
// Serve static assets (images, css, etc.)
app.get('*.*', express.static(DIST_FOLDER));
// Point all other URLs to index.html for our single page app
app.get('*', (req, res) => {
  res.sendFile(DIST_FOLDER + '/index.html');
});
// Start Express Server
app.listen(PORT, () => {
  console.log(`Node Express server listening on https://localhost:${PORT} from ${DIST_FOLDER}`);
});
You can
try the live example - you
should see a bunch of cat pictures, if you are using a modern browser. To run the project from
your computer, you need
node.js to run the following
commands:
npm install --save express rendertron-middleware
node server.js
Then point your browser to
https://localhost:8080.
Now it's time to set up dynamic rendering.
Deploy a Rendertron instance
Rendertron runs a server that takes a URL and returns static HTML for the URL by using headless Chromium. We'll follow the recommendation from the Rendertron project and use Google Cloud Platform.

Please note that you can get started with the usage tier that's available without payment; using this setup in production may incur costs according to the Google Cloud Platform pricing.
- Create a new project in the Google Cloud console. Take note of the "Project ID" below the input field.
- Install the Google Cloud SDK as described in the documentation and log in.
-
Clone the Rendertron repository from GitHub with:
git clone https://github.com/GoogleChrome/rendertron.git
cd rendertron
-
Run the following commands to install dependencies and build Rendertron on your computer:
npm install && npm run build
-
Enable Rendertron's cache by creating a new file called
config.jsonin the rendertron directory with the following content:{ "datastoreCache": true } -
Run the following command from the rendertron directory. Substitute
YOUR_PROJECT_IDwith your project ID from step 1.gcloud app deploy app.yaml --project YOUR_PROJECT_ID
- Select a region of your choice and confirm the deployment. Wait for it to finish.
- Enter the URL
YOUR_PROJECT_ID.appspot.com. You should see Rendertron's interface with an input field and a few buttons.
When you see the Rendertron web interface, you have successfully deployed your own Rendertron
instance. Take note of your project's URL (YOUR_PROJECT_ID.appspot.com) as
you will need it in the next part of the process.
Add Rendertron to the server
The web server is using express.js and Rendertron has an express.js
middleware. Run the following command in the directory of the server.js file:
npm install --save rendertron-middleware
This command installs the rendertron-middleware from npm so we can add it to the server:
const express = require('express');
const app = express();
const rendertron = require('rendertron-middleware');
Configure the bot list
Rendertron uses the user-agent HTTP header to determine if a request comes from a bot
or a user's browser. It has a
well-maintained list of bot user agents
to compare with. By default this list does not include Googlebot, because Googlebot can execute
JavaScript. To make Rendertron render Googlebot requests as well, add Googlebot to the list of
user agents:
const BOTS = rendertron.botUserAgents.concat('googlebot');
const BOT_UA_PATTERN = new RegExp(BOTS.join('|'), 'i');
Rendertron compares the user-agent header against this regular expression later.
Add the middleware
To send bot requests to the Rendertron instance, we need to add the middleware to our
express.js server. The middleware checks the requesting user agent and forwards
requests from known bots to the Rendertron instance. Add the following code to server.js and don't
forget to substitute YOUR_PROJECT_ID with your Google Cloud Platform
project ID:
app.use(rendertron.makeMiddleware({
  proxyUrl: 'https://YOUR_PROJECT_ID.appspot.com/render',
  userAgentPattern: BOT_UA_PATTERN
}));
Bots requesting the sample website receive the static HTML from Rendertron, so the bots don't need to run JavaScript to display the content.
Testing our setup
To test if the Rendertron setup was successful, run the Mobile-Friendly Test again.
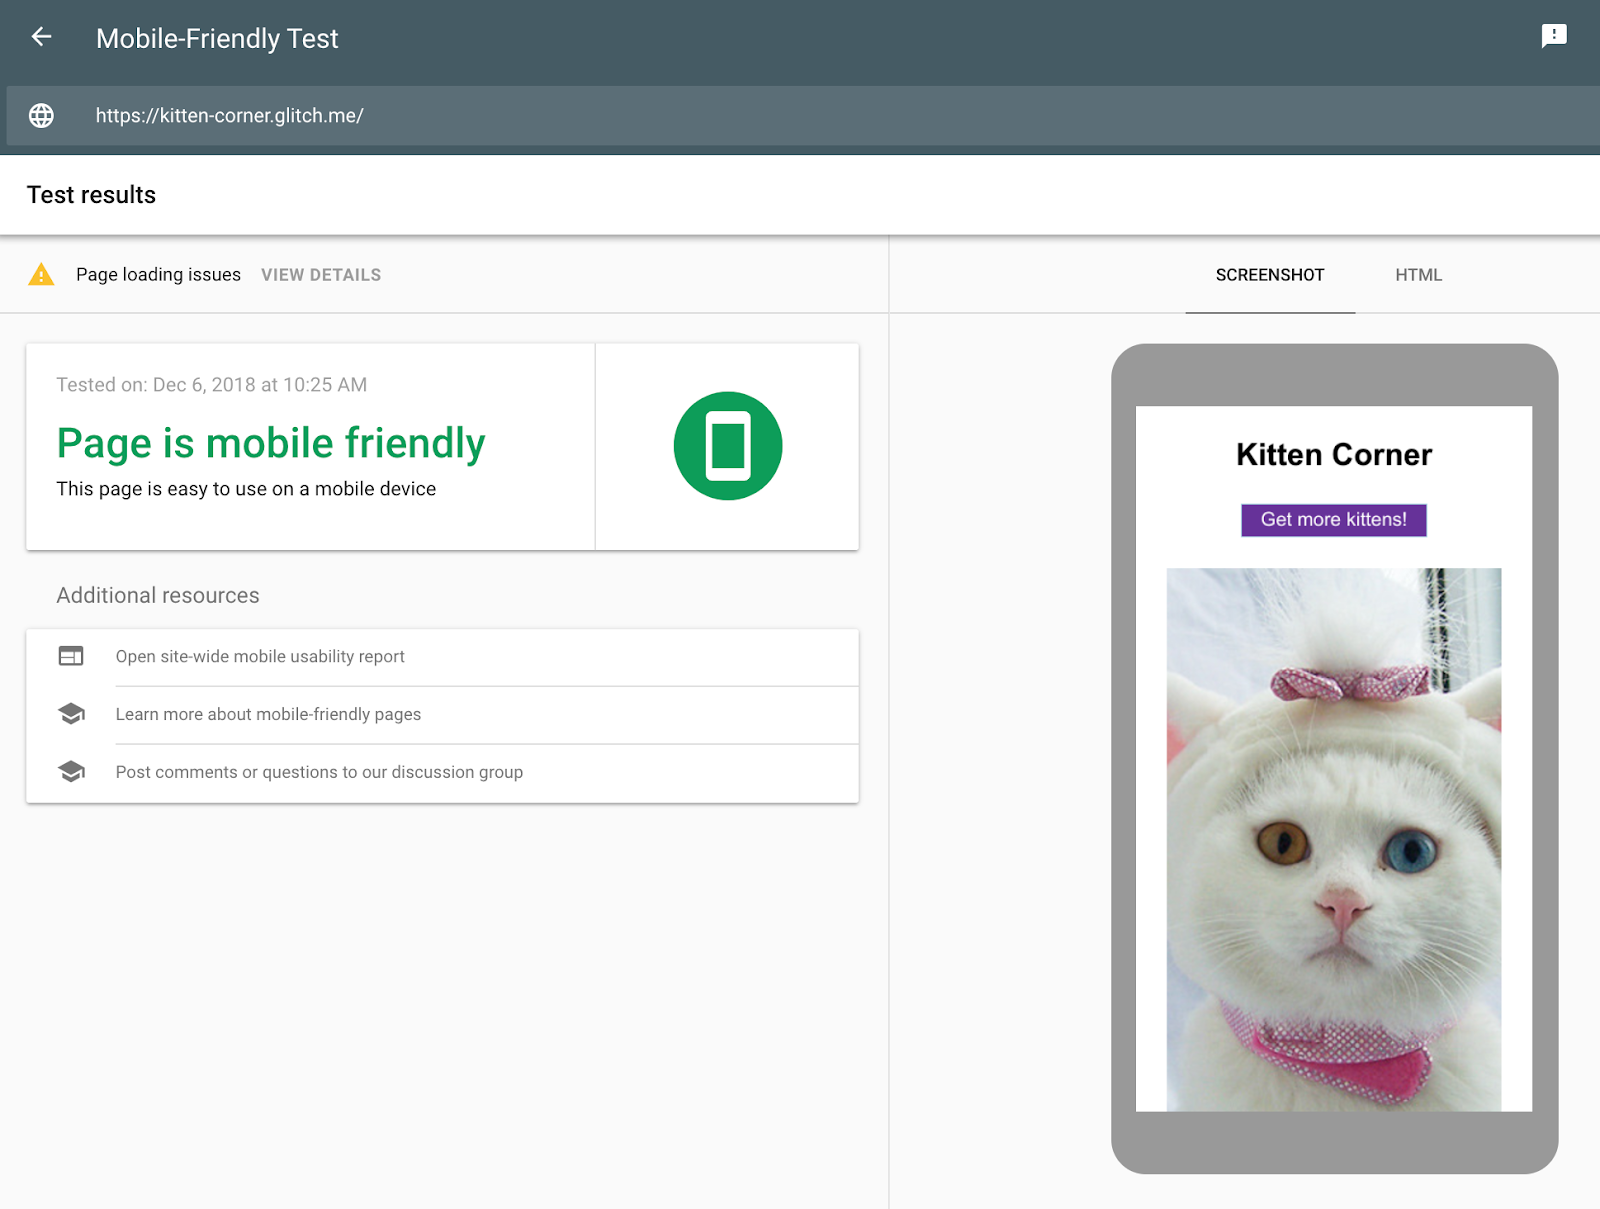
Unlike the first test, the cat pictures are visible. In the HTML tab we can see all HTML the JavaScript code generated and that Rendertron has removed the need for JavaScript to display the content.
Conclusion
You created a dynamic rendering setup without making any changes to the web app. With these changes, you can serve a static HTML version of the web app to crawlers.