
이 빠른 시작 가이드에서는 Google Ads API에 대한 첫 번째 API 호출을 실행하는 방법을 설명합니다.
주요 개념
- 개발자 토큰: 개발자 토큰은 Google Ads API 서버에 앱을 식별하는 22자의 영숫자 문자열입니다. API 호출을 실행하려면 이 토큰이 필요합니다.
- API 액세스 수준: 개발자 토큰의 API 액세스 수준은 하루에 실행할 수 있는 API 호출 수와 API 호출을 실행할 수 있는 환경을 제어합니다.
- Google Ads 관리자 계정: Google Ads 관리자 계정은 다른 Google Ads 계정을 관리하는 데 사용됩니다. Google Ads 관리자 계정은 Google Ads 고객 계정 또는 다른 Google Ads 관리자 계정을 관리하는 데 사용할 수 있습니다. 개발자 토큰을 얻으려면 Google Ads 관리자 계정이 필요합니다.
- Google Ads 고객 계정: API 호출을 실행하는 Google Ads 계정입니다.
- 클라이언트 고객 ID: Google Ads 고객 계정을 식별하는 10자리 숫자입니다. Google Ads UI에서 이 ID를 복사한 경우 하이픈을 삭제해야 합니다.
- OAuth 2.0: OAuth 2.0은 모든 Google API에서 사용하는 승인에 대한 업계 표준 프로토콜입니다. API 호출을 실행하기 위해 OAuth 2.0 사용자 인증 정보를 생성하려면 서비스 계정 및 키가 필요합니다.
- Google Cloud 프로젝트: Google Cloud 프로젝트는 API 및 OAuth 2.0 API 사용자 인증 정보 관리를 비롯한 모든 Google 서비스를 만들고 사용 설정하고 사용하기 위한 기반을 형성합니다. Google Cloud 콘솔에서 만들 수 있습니다 .
- 서비스 계정: 개별 사용자가 아닌 애플리케이션에 속하는 특별한 유형의 Google 계정입니다. Google Ads API에 애플리케이션을 인증하는 데 사용됩니다. 서비스 계정을 얻으려면 Google Cloud 프로젝트가 필요합니다.
- 서비스 계정 키: 서비스 계정의 비공개 키가 포함된 JSON 앱 사용자 인증 정보 파일입니다. Google Ads API API 호출을 실행할 때 서비스 계정을 인증하기 위해 OAuth 2.0 사용자 인증 정보를 생성하는 데 사용됩니다. 서비스 계정 키를 얻으려면 서비스 계정이 필요합니다.
기본 요건
Google Ads API 호출을 실행하려면 다음 단계를 완료해야 합니다.
개발자 토큰 가져오기
이전에 개발자 토큰을 신청한 경우 Google Ads 관리자 계정에 로그인한 상태에서 API 센터를 방문하여 개발자 토큰을 찾을 수 있습니다.
개발자 토큰이 없는 경우 API 센터에서 신청할 수 있습니다.
개발자 토큰을 신청하는 방법
대신 데이터 관리자 API를 사용하세요. 자세한 내용은 기능 지원 중단 을 참고하세요.- 웹브라우저에서 API 센터로 이동합니다. 메시지가 표시되면 Google Ads 관리자 계정에 로그인합니다. Google Ads 관리자 계정이 없는 경우 만듭니다.
- API 액세스 양식 을 작성하고
이용약관 에 동의합니다.
- 정보가 올바르고 회사 웹사이트 URL이 작동하는지 확인합니다. 웹사이트가 게시되지 않은 경우 Google에서 신청서를 처리하지 못하고 거부할 수 있습니다.
- 제공하는 API 연락처 이메일이 정기적으로 모니터링되는 받은편지함으로 연결되는지 확인합니다. Google의 API 규정 준수팀에서 검토 과정에서 설명을 위해 이 이메일 주소로 연락할 수 있습니다. 연락이 불가능한 경우 Google에서 신청서를 계속 처리하지 않을 수 있습니다.
- API 센터 에서 API 연락처 이메일 을 수정할 수 있습니다. 신청 절차가 완료된 후에도 이 정보를 최신 상태로 유지하여 Google에서 중요한 서비스 공지를 보낼 수 있도록 하세요.
신청 절차를 완료하면 개발자 토큰이 API 센터에 승인 대기 중 상태로 표시됩니다. 이제 개발자 토큰 의 액세스 수준이 테스트 계정 액세스 입니다.
Google API 콘솔 프로젝트 구성
Google API 콘솔 프로젝트는 Google API 및 OAuth 2.0 API 사용자 인증 정보를 관리하는 데 사용됩니다. Google API 콘솔을 방문하여 기존 Google API 콘솔 프로젝트를 찾거나 프로젝트를 만들 수 있습니다.
먼저 프로젝트에서 Google Ads API를 사용 설정합니다.
다음으로 API 호출을 실행하려면 서비스 계정 및 서비스 계정 키가 필요합니다. 이미 다른 Google API를 사용하고 있으며 OAuth 2.0 서비스 계정 및 키를 만든 경우 이 단계를 건너뛰고 기존 사용자 인증 정보를 재사용할 수 있습니다.
서비스 계정 및 키를 만드는 방법
- Google Cloud 콘솔에서 메뉴 > IAM 및 관리자 > 서비스 계정으로 이동합니다.
- 서비스 계정을 선택합니다.
- 키 > 키 추가 > 새 키 만들기를 클릭합니다.
- JSON 을 선택한 후 만들기 를 클릭합니다.
새 공개 키/비공개 키 쌍이 생성되어 새 파일로 기기에 다운로드됩니다. 다운로드한 JSON 파일을 작업 디렉터리에
credentials.json으로 저장합니다. 이 파일은 이 키의 유일한 사본입니다. - 닫기 를 클릭합니다.
Google Ads 고객 계정 구성
먼저 API 호출을 실행하는 Google Ads 계정을 식별합니다. API 호출을 실행할 수 있는 계정 유형은 개발자 토큰의 API 액세스 수준에 따라 다릅니다. API API 센터에서 API 액세스 수준을 확인하세요.
탐색기, 기본, 표준 액세스 수준
Google Ads 프로덕션 계정을 호출할 수 있습니다. 하지만 필요한 경우 테스트 계정 액세스 탭의 안내에 따라 Google Ads 테스트 계정을 만들 수 있습니다.
테스트 계정 액세스 수준
개발자 토큰은 Google Ads 프로덕션 계정에 API 호출을 실행하는 데 사용할 수 없습니다. Google Ads 테스트 계정에 대해서만 API 호출을 실행할 수 있습니다.
Google Ads 테스트 계정을 만드는 방법
다음 안내에 따라 Google Ads 테스트 관리자 계정과 그 아래에 Google Ads 테스트 Google Ads 광고주 계정을 만듭니다.
파란색 버튼을 클릭하여 Google Ads 테스트 관리자 계정을 만듭니다. 메시지가 표시되면 Google Ads 프로덕션 관리자 계정에 연결되지 않은 Google 계정으로 로그인합니다. Google 계정이 없는 경우 해당 페이지의 계정 만들기 버튼을 사용하여 새 Google 계정을 만듭니다.
- Google Ads 테스트 관리자 계정에서 Google Ads 테스트 고객 계정을 만듭니다. 계정 > > 새 계정 만들기 를 클릭하고 양식을 작성합니다. Google Ads 테스트 관리자 계정에서 만드는 모든 Google Ads 계정은 자동으로 Google Ads 테스트 계정이 됩니다.
- 선택적으로 Google Ads 페이지에서 Google Ads 테스트 고객 계정 아래에 몇 개의 캠페인을 만듭니다.
Google Ads 고객에게 API 호출을 실행하려면 서비스 계정에 Google Ads 고객 계정에 대한 액세스 권한과 적절한 권한을 부여해야 합니다. 이렇게 하려면 고객 계정에 대한 관리자 액세스 권한이 있어야 합니다.
Google Ads 계정에 서비스 계정 액세스 권한을 부여하는 방법
- 먼저 관리자로 Google Ads 계정에 로그인합니다.
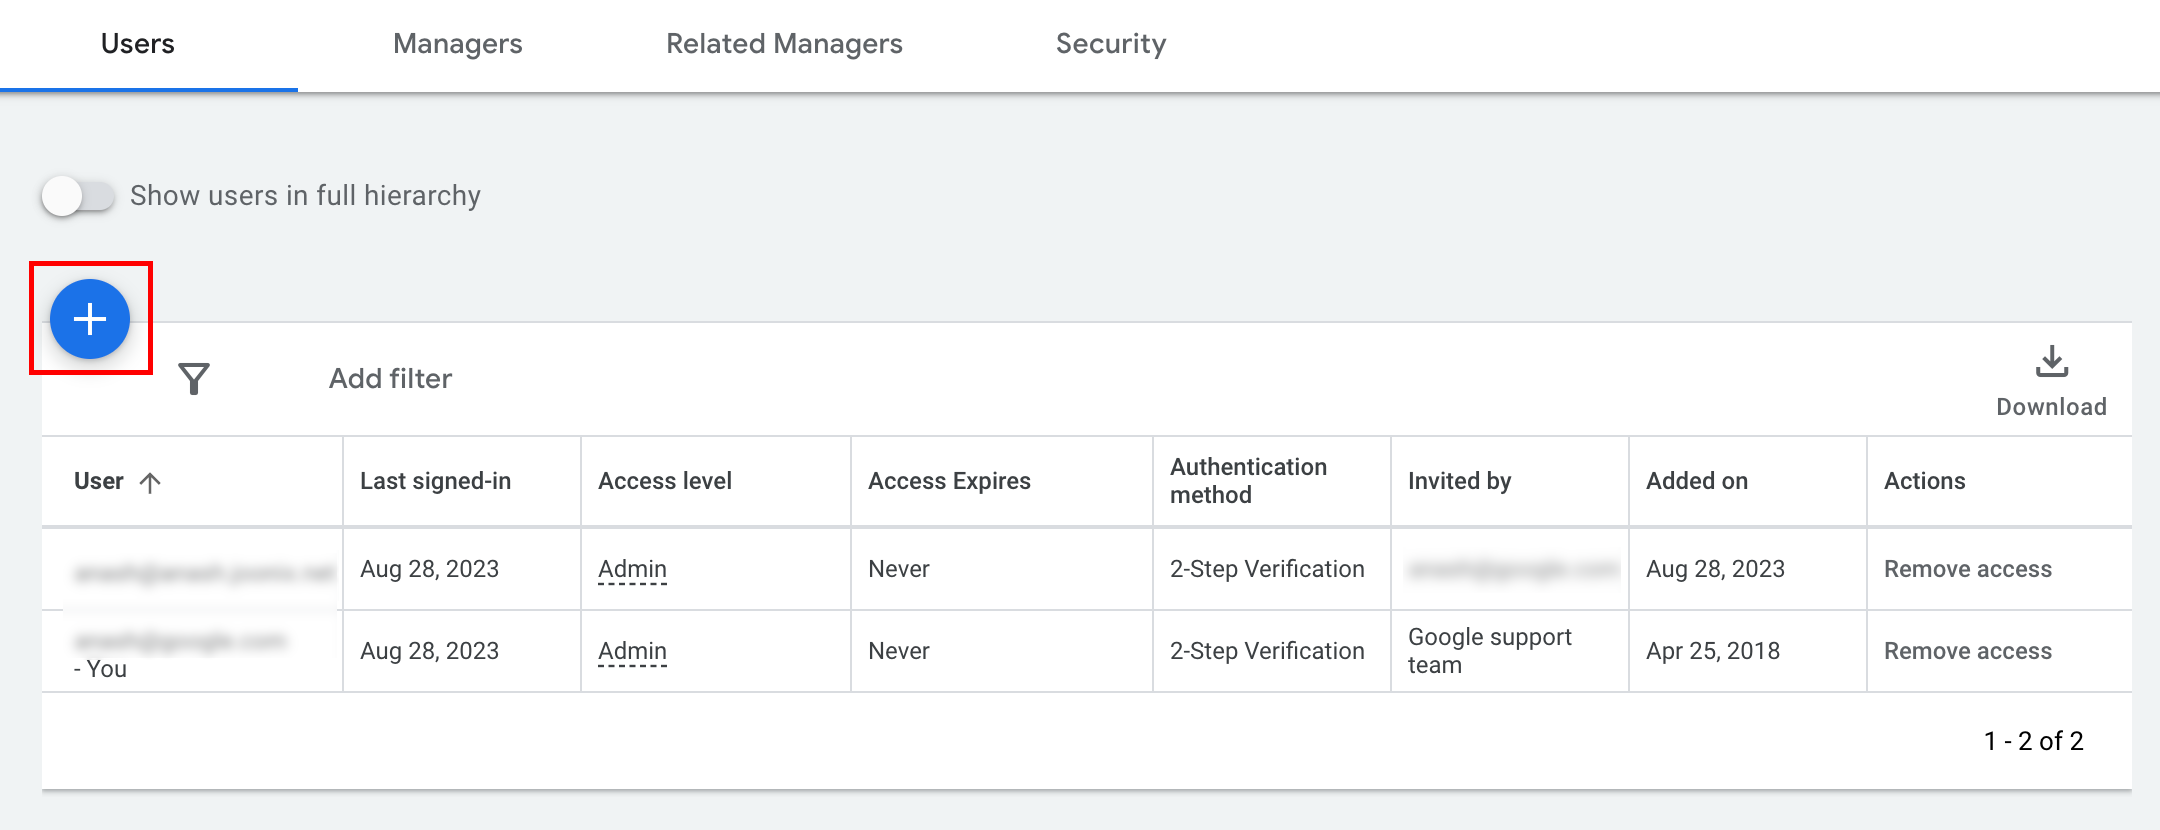
- 관리 > 액세스 및 보안 으로 이동합니다.
-
버튼을 사용자 탭에서 클릭합니다.
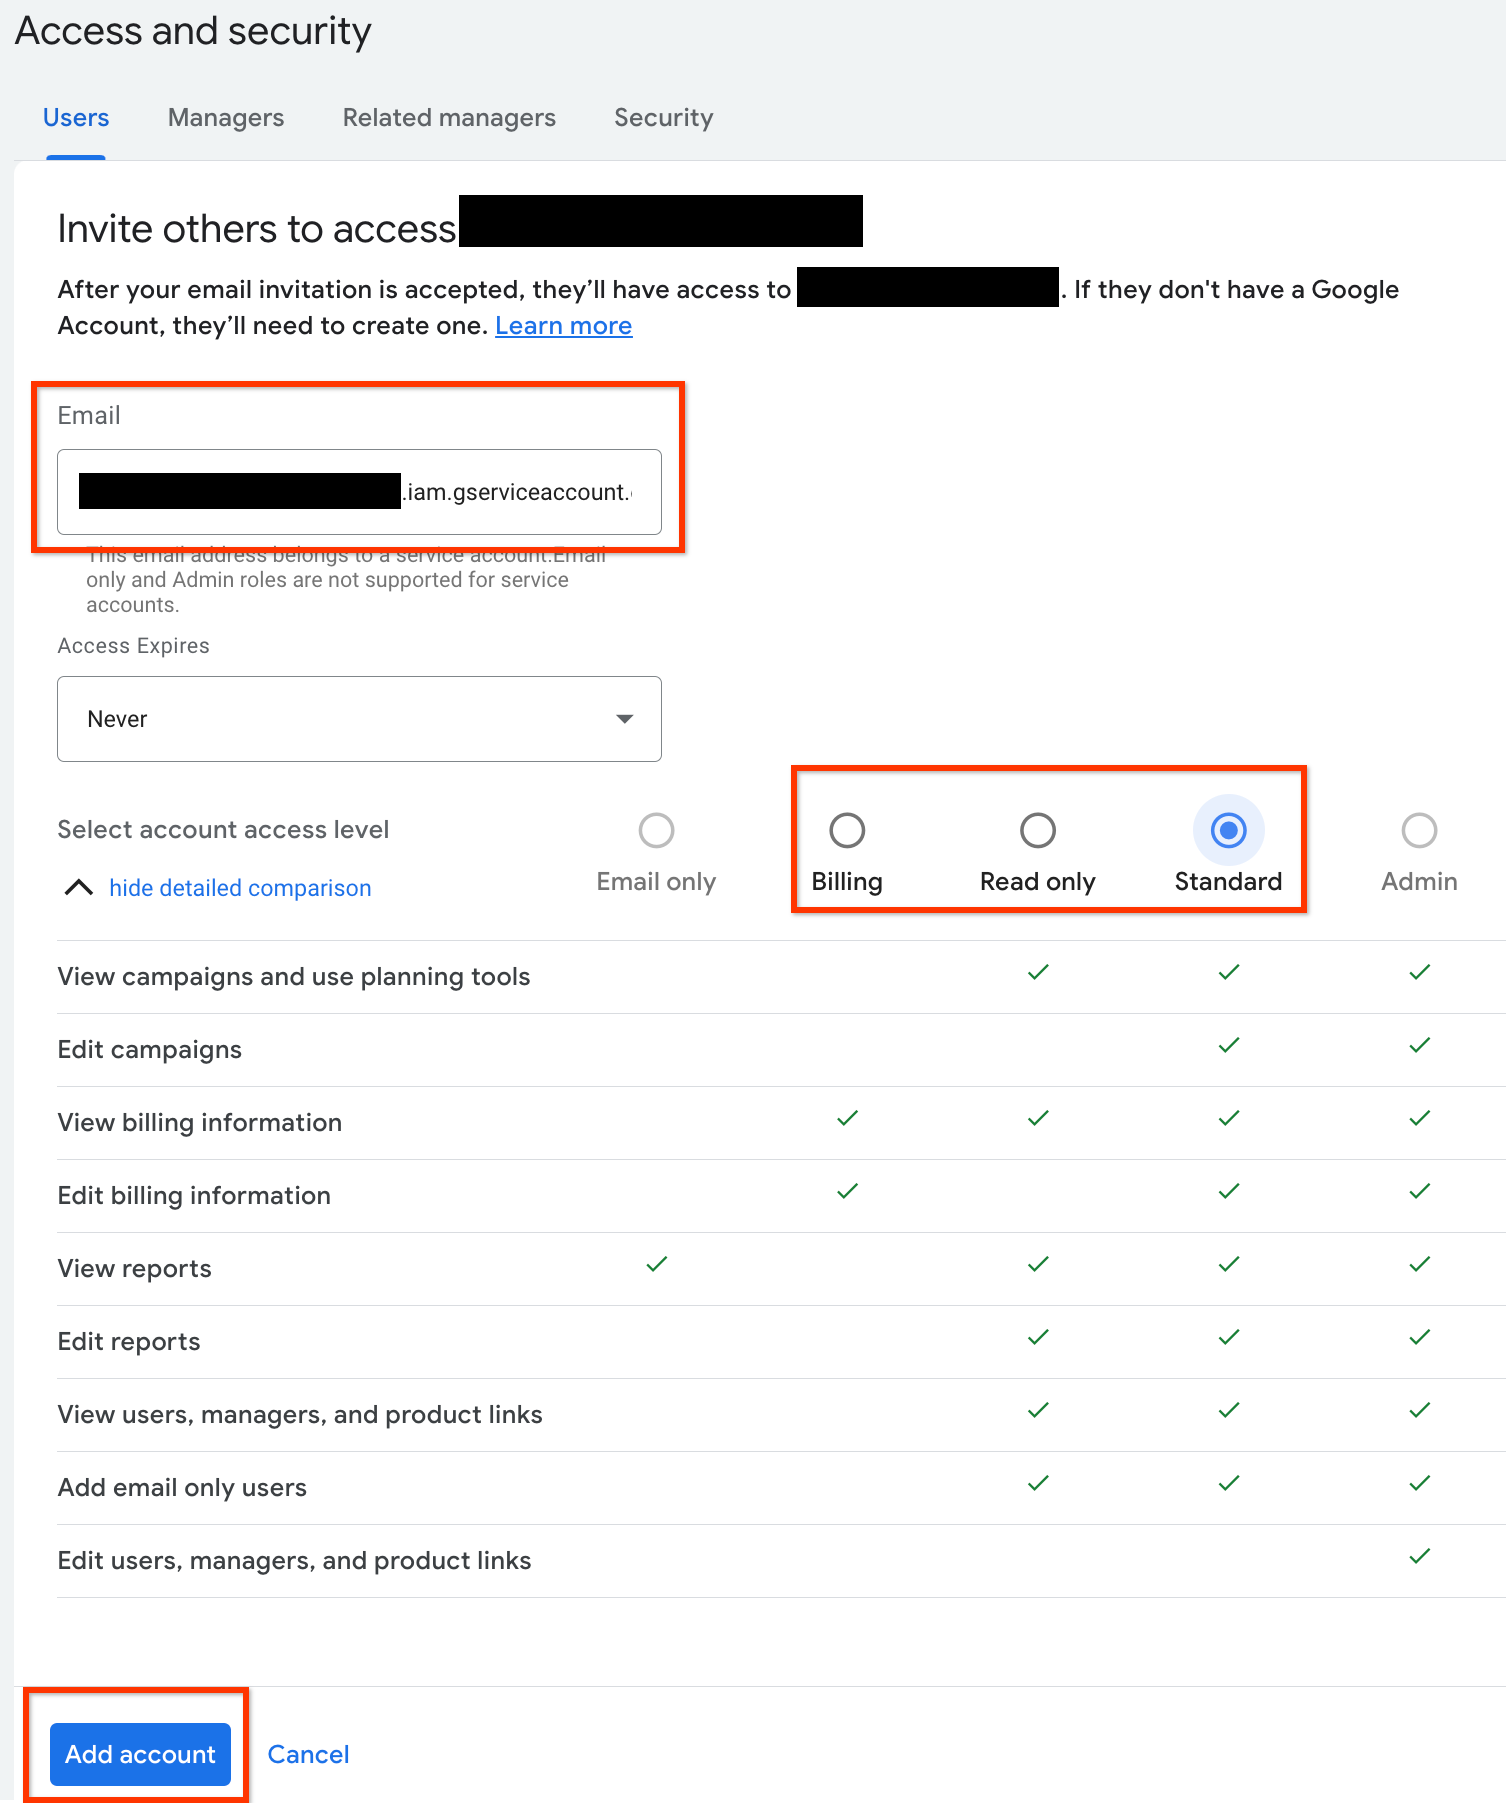
- 이메일 입력 상자에 서비스 계정 이메일 주소를 입력합니다.
적절한 계정 액세스 수준을 선택하고
계정 추가 버튼을 클릭합니다. 서비스 계정에는 이메일 액세스 수준이 지원되지 않습니다.
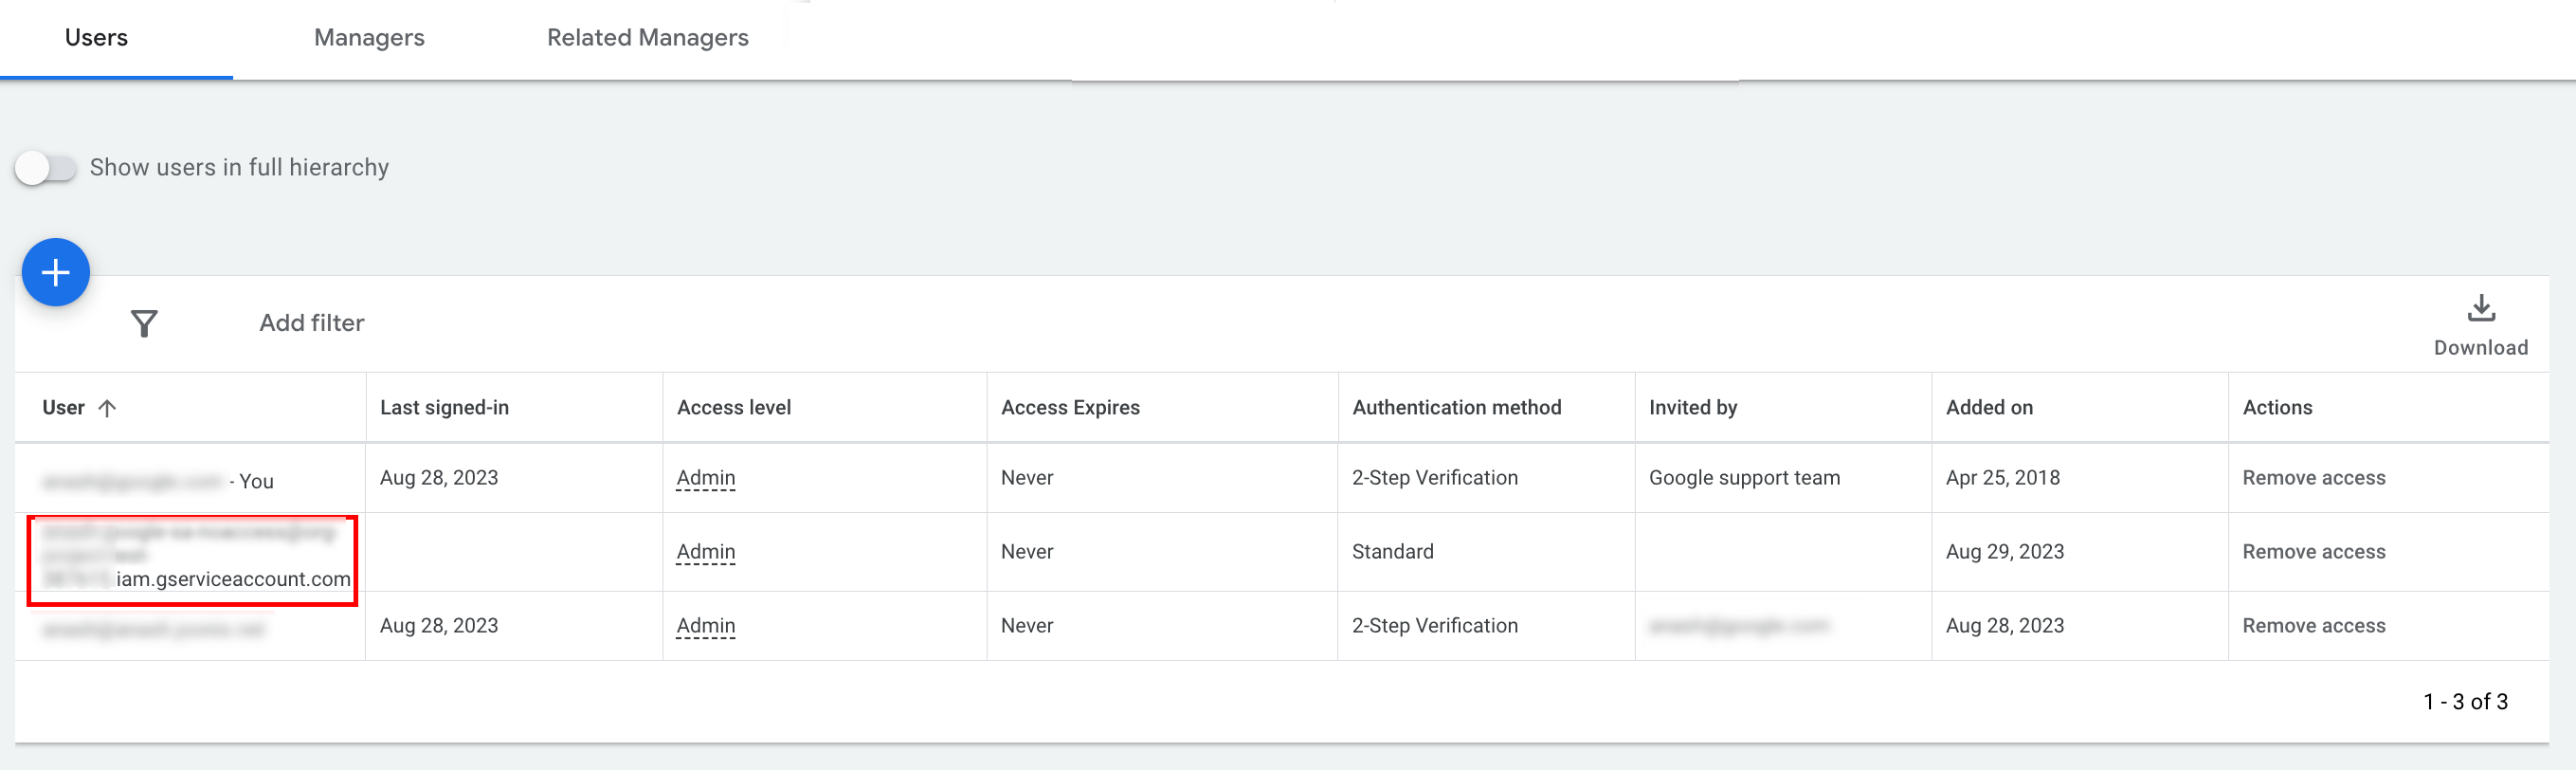
- 서비스 계정에 액세스 권한이 부여됩니다.
- [선택사항] 기본적으로 서비스 계정에 관리자 액세스 권한을 부여할 수 없습니다. API 호출에 관리자 액세스 권한이 필요한 경우 다음과 같이 액세스 권한을
업그레이드할 수 있습니다.
- 액세스 수준 열에서 서비스 계정의 액세스 수준 옆에 있는 드롭다운 화살표를 클릭합니다.
- 드롭다운 목록에서 관리자 를 선택합니다.
도구 및 클라이언트 라이브러리 다운로드
API 호출을 실행하려는 방식에 따라 클라이언트 라이브러리 또는 HTTP 클라이언트를 다운로드할 수 있습니다.
클라이언트 라이브러리 사용
원하는 클라이언트 라이브러리를 다운로드하여 설치합니다.
HTTP 클라이언트 (REST) 사용
curl
URL을 통해 데이터를 전송하는 명령줄 도구인 curl을 다운로드하여 설치합니다.
Google Cloud CLI
안내에 따라 gcloud CLI를 설치합니다.
이 가이드의 나머지 안내는 다음 버전의 gcloud 도구에서 작동하는 것으로 확인되었으며 애플리케이션 동작 또는 명령줄 옵션의 차이로 인해 이전 버전에서는 작동하지 않을 수 있습니다.
:~$ gcloud version
Google Cloud SDK 492.0.0
alpha 2024.09.06
beta 2024.09.06
bq 2.1.8
bundled-python3-unix 3.11.9
core 2024.09.06
enterprise-certificate-proxy 0.3.2
gcloud-crc32c 1.0.0
gsutil 5.30
API 호출
API 호출을 실행하는 방법에 대한 안내는 원하는 클라이언트를 선택하세요.
자바
클라이언트 라이브러리 아티팩트는 Maven Central Repository에 게시됩니다. 다음과 같이 클라이언트 라이브러리를 프로젝트에 종속 항목으로 추가합니다.
Maven 종속 항목은 다음과 같습니다.
<dependency>
  <groupId>com.google.api-ads</groupId>
  <artifactId>google-ads</artifactId>
  <version>43.1.0</version>
</dependency>
Gradle 종속 항목은 다음과 같습니다.
implementation 'com.google.api-ads:google-ads:43.1.0'
종속 항목 버전을 관리하려면 Google Ads API 재료명세서 (BOM)를 사용하는 것이 좋습니다. 안내는 BOM 가이드를 참고하세요.
다음 콘텐츠로 ~/ads.properties 파일을 만듭니다.
api.googleads.serviceAccountSecretsPath=JSON_KEY_FILE_PATH
api.googleads.developerToken=INSERT_DEVELOPER_TOKEN_HERE
api.googleads.loginCustomerId=INSERT_LOGIN_CUSTOMER_ID_HERE
다음과 같이 GoogleAdsClient 객체를 만듭니다.
GoogleAdsClient googleAdsClient = null;
try {
  googleAdsClient = GoogleAdsClient.newBuilder().fromPropertiesFile().build();
} catch (FileNotFoundException fnfe) {
  System.err.printf(
      "Failed to load GoogleAdsClient configuration from file. Exception: %s%n",
      fnfe);
  System.exit(1);
} catch (IOException ioe) {
  System.err.printf("Failed to create GoogleAdsClient. Exception: %s%n", ioe);
  System.exit(1);
}
다음으로 GoogleAdsService.SearchStream 메서드를 사용하여 캠페인 보고서를 실행하여 계정의
캠페인을 가져옵니다.
private void runExample(GoogleAdsClient googleAdsClient, long customerId) {
try (GoogleAdsServiceClient googleAdsServiceClient =
googleAdsClient.getLatestVersion().createGoogleAdsServiceClient()) {
String query = "SELECT campaign.id, campaign.name FROM campaign ORDER BY campaign.id";
// Constructs the SearchGoogleAdsStreamRequest.
SearchGoogleAdsStreamRequest request =
SearchGoogleAdsStreamRequest.newBuilder()
.setCustomerId(Long.toString(customerId))
.setQuery(query)
.build();
// Creates and issues a search Google Ads stream request that will retrieve all campaigns.
ServerStream<SearchGoogleAdsStreamResponse> stream =
googleAdsServiceClient.searchStreamCallable().call(request);
// Iterates through and prints all of the results in the stream response.
for (SearchGoogleAdsStreamResponse response : stream) {
for (GoogleAdsRow googleAdsRow : response.getResultsList()) {
System.out.printf(
"Campaign with ID %d and name '%s' was found.%n",
googleAdsRow.getCampaign().getId(), googleAdsRow.getCampaign().getName());
}
}
}
}
C#
클라이언트 라이브러리 패키지는 Nuget.org
저장소에 게시됩니다. 먼저 Google.Ads.GoogleAds 패키지에 nuget 참조를 추가합니다.
dotnet add package Google.Ads.GoogleAds --version 26.0.0관련 설정으로 GoogleAdsConfig 객체를 만들고 이를 사용하여 GoogleAdsClient 객체를 만듭니다.
GoogleAdsConfig config = new GoogleAdsConfig()
{
    DeveloperToken = "******",
    OAuth2Mode = OAuth2Flow.SERVICE_ACCOUNT,
    OAuth2SecretsJsonPath = "PATH_TO_CREDENTIALS_JSON",
    LoginCustomerId = ******
};
GoogleAdsClient client = new GoogleAdsClient(config);
다음으로 GoogleAdsService.SearchStream 메서드를 사용하여 캠페인 보고서를 실행하여 계정의
캠페인을 가져옵니다. 이 가이드에서는 보고서의 세부정보를 다루지 않습니다.
보고.
public void Run(GoogleAdsClient client, long customerId)
{
// Get the GoogleAdsService.
GoogleAdsServiceClient googleAdsService = client.GetService(
Services.V24.GoogleAdsService);
// Create a query that will retrieve all campaigns.
string query = @"SELECT
campaign.id,
campaign.name,
campaign.network_settings.target_content_network
FROM campaign
ORDER BY campaign.id";
try
{
// Issue a search request.
googleAdsService.SearchStream(customerId.ToString(), query,
delegate (SearchGoogleAdsStreamResponse resp)
{
foreach (GoogleAdsRow googleAdsRow in resp.Results)
{
Console.WriteLine("Campaign with ID {0} and name '{1}' was found.",
googleAdsRow.Campaign.Id, googleAdsRow.Campaign.Name);
}
}
);
}
catch (GoogleAdsException e)
{
Console.WriteLine("Failure:");
Console.WriteLine($"Message: {e.Message}");
Console.WriteLine($"Failure: {e.Failure}");
Console.WriteLine($"Request ID: {e.RequestId}");
throw;
}
}
PHP
클라이언트 라이브러리 패키지는 Packagist
저장소에 게시됩니다. 프로젝트의 루트 디렉터리로 변경하고 다음 명령어를 실행하여 라이브러리와 모든 종속 항목을 프로젝트 루트 디렉터리의 vendor/ 디렉터리에 설치합니다.
composer require googleads/google-ads-php:33.4.0GitHub 저장소에서
google_ads_php.ini
파일의 사본을 만들고 사용자 인증 정보를 포함하도록 수정합니다.
[GOOGLE_ADS]
developerToken = "INSERT_DEVELOPER_TOKEN_HERE"
loginCustomerId = "INSERT_LOGIN_CUSTOMER_ID_HERE"

[OAUTH2]
jsonKeyFilePath = "INSERT_ABSOLUTE_PATH_TO_OAUTH2_JSON_KEY_FILE_HERE"
scopes = "https://www.googleapis.com/auth/adwords"
GoogleAdsClient 객체의 인스턴스를 만듭니다.
$oAuth2Credential = (new OAuth2TokenBuilder())
    ->fromFile('/path/to/google_ads_php.ini')
    ->build();

$googleAdsClient = (new GoogleAdsClientBuilder())
    ->fromFile('/path/to/google_ads_php.ini')
    ->withOAuth2Credential($oAuth2Credential)
    ->build();
다음으로 GoogleAdsService.SearchStream 메서드를 사용하여 캠페인 보고서를 실행하여 계정의
캠페인을 가져옵니다.
public static function runExample(GoogleAdsClient $googleAdsClient, int $customerId)
{
$googleAdsServiceClient = $googleAdsClient->getGoogleAdsServiceClient();
// Creates a query that retrieves all campaigns.
$query = 'SELECT campaign.id, campaign.name FROM campaign ORDER BY campaign.id';
// Issues a search stream request.
/** @var GoogleAdsServerStreamDecorator $stream */
$stream = $googleAdsServiceClient->searchStream(
SearchGoogleAdsStreamRequest::build($customerId, $query)
);
// Iterates over all rows in all messages and prints the requested field values for
// the campaign in each row.
foreach ($stream->iterateAllElements() as $googleAdsRow) {
/** @var GoogleAdsRow $googleAdsRow */
printf(
"Campaign with ID %d and name '%s' was found.%s",
$googleAdsRow->getCampaign()->getId(),
$googleAdsRow->getCampaign()->getName(),
PHP_EOL
);
}
}
Python
클라이언트 라이브러리는 PyPI
에 배포되며 다음과 같이 pip
명령어를 사용하여 설치할 수 있습니다.
python -m pip install google-ads==31.0.0GitHub 저장소에서
google-ads.yaml 파일의 사본을 만들고 사용자 인증 정보를 포함하도록 수정합니다.
developer_token: INSERT_DEVELOPER_TOKEN_HERE
login_customer_id: INSERT_LOGIN_CUSTOMER_ID_HERE
json_key_file_path: JSON_KEY_FILE_PATH_HERE
GoogleAdsClient 인스턴스를 만들려면
GoogleAdsClient.load_from_storage 메서드를 호출합니다. 호출할 때 google-ads.yaml의 경로를 문자열로 메서드에 전달합니다.
from google.ads.googleads.client import GoogleAdsClient
client = GoogleAdsClient.load_from_storage("path/to/google-ads.yaml")
로그를 출력할 위치를 알려주는 핸들러를 라이브러리의 로거에 추가합니다.
다음은 라이브러리의 로거에 콘솔(stdout)에 출력하도록 지시합니다.
import logging
import sys

logger = logging.getLogger('google.ads.googleads.client')
logger.addHandler(logging.StreamHandler(sys.stdout))
다음으로 GoogleAdsService.SearchStream 메서드를 사용하여 캠페인 보고서를 실행하여 계정의
캠페인을 가져옵니다.
def main(client: GoogleAdsClient, customer_id: str) -> None:
ga_service: GoogleAdsServiceClient = client.get_service("GoogleAdsService")
query: str = """
SELECT
campaign.id,
campaign.name
FROM campaign
ORDER BY campaign.id"""
# Issues a search request using streaming.
stream: Iterator[SearchGoogleAdsStreamResponse] = ga_service.search_stream(
customer_id=customer_id, query=query
)
for batch in stream:
rows: List[GoogleAdsRow] = batch.results
for row in rows:
print(
f"Campaign with ID {row.campaign.id} and name "
f'"{row.campaign.name}" was found.'
)
Ruby
클라이언트 라이브러리의 Ruby gem은 Rubygems gem 호스팅 사이트에 게시됩니다. 설치하는 데 권장되는 방법은 번들러를 사용하는 것입니다. Gemfile에 줄을 추가합니다.
gem 'google-ads-googleads', '~> 41.0.0'
그런 후 다음을 실행합니다.
bundle installGitHub 저장소에서
google_ads_config.rb
파일의 사본을 만들고 사용자 인증 정보를 포함하도록 수정합니다.
Google::Ads::GoogleAds::Config.new do |c|
  c.developer_token = 'INSERT_DEVELOPER_TOKEN_HERE'
  c.login_customer_id = 'INSERT_LOGIN_CUSTOMER_ID_HERE'
  c.keyfile = 'JSON_KEY_FILE_PATH'
end
이 파일이 있는 경로를 전달하여 GoogleAdsClient 인스턴스를 만듭니다.
client = Google::Ads::GoogleAds::GoogleAdsClient.new('path/to/google_ads_config.rb')
다음으로 GoogleAdsService.SearchStream 메서드를 사용하여 캠페인 보고서를 실행하여 계정의
캠페인을 가져옵니다.
def get_campaigns(customer_id)
# GoogleAdsClient will read a config file from
# ENV['HOME']/google_ads_config.rb when called without parameters
client = Google::Ads::GoogleAds::GoogleAdsClient.new
responses = client.service.google_ads.search_stream(
customer_id: customer_id,
query: 'SELECT campaign.id, campaign.name FROM campaign ORDER BY campaign.id',
)
responses.each do |response|
response.results.each do |row|
puts "Campaign with ID #{row.campaign.id} and name '#{row.campaign.name}' was found."
end
end
end
Perl
라이브러리는
CPAN에 배포됩니다. 먼저 원하는 디렉터리에서 google-ads-perl 저장소를 클론합니다.
git clone https://github.com/googleads/google-ads-perl.gitgoogle-ads-perl 디렉터리로 변경하고 명령 프롬프트에서 다음 명령어를 실행하여 라이브러리를 사용하는 데 필요한 모든 종속 항목을 설치합니다.
cd google-ads-perlcpan install Module::Buildperl Build.PLperl Build installdeps
GitHub 저장소에서
googleads.properties
파일의 사본을 만들고 사용자 인증 정보를 포함하도록 수정합니다.
jsonKeyFilePath=JSON_KEY_FILE_PATH
developerToken=INSERT_DEVELOPER_TOKEN_HERE
loginCustomerId=INSERT_LOGIN_CUSTOMER_ID_HERE
이 파일이 있는 경로를 전달하여 Client 인스턴스를 만듭니다.
my $properties_file = "/path/to/googleads.properties";

my $api_client = Google::Ads::GoogleAds::Client->new({
  properties_file => $properties_file
});
다음으로 GoogleAdsService.SearchStream 메서드를 사용하여 캠페인 보고서를 실행하여 계정의
캠페인을 가져옵니다.
sub get_campaigns {
my ($api_client, $customer_id) = @_;
# Create a search Google Ads stream request that will retrieve all campaigns.
my $search_stream_request =
Google::Ads::GoogleAds::V24::Services::GoogleAdsService::SearchGoogleAdsStreamRequest
->new({
customerId => $customer_id,
query =>
"SELECT campaign.id, campaign.name FROM campaign ORDER BY campaign.id"
});
# Get the GoogleAdsService.
my $google_ads_service = $api_client->GoogleAdsService();
my $search_stream_handler =
Google::Ads::GoogleAds::Utils::SearchStreamHandler->new({
service => $google_ads_service,
request => $search_stream_request
});
# Issue a search request and process the stream response to print the requested
# field values for the campaign in each row.
$search_stream_handler->process_contents(
sub {
my $google_ads_row = shift;
printf "Campaign with ID %d and name '%s' was found.\n",
$google_ads_row->{campaign}{id}, $google_ads_row->{campaign}{name};
});
return 1;
}
curl
먼저 서비스 계정을 gcloud CLI의 활성 사용자 인증 정보로 설정합니다.
gcloud auth login --cred-file=PATH_TO_CREDENTIALS_JSON다음으로 Google Ads API의 OAuth 2.0 액세스 토큰을 가져옵니다.
gcloud auth \
  print-access-token \
  --scopes='https://www.googleapis.com/auth/adwords'
다음으로 GoogleAdsService.SearchStream 메서드를 사용하여 캠페인 보고서를 실행하여 계정의
캠페인을 가져옵니다.
curl -i -X POST https://googleads.googleapis.com/v24/customers/CUSTOMER_ID/googleAds:searchStream \
   -H "Content-Type: application/json" \
   -H "Authorization: Bearer ACCESS_TOKEN" \
   -H "developer-token: DEVELOPER_TOKEN" \
   -H "login-customer-id: LOGIN_CUSTOMER_ID" \
--data-binary "@query.json"query.json의 콘텐츠는 다음과 같습니다.
{
  "query": "SELECT campaign.id, campaign.name, campaign.network_settings.target_content_network FROM campaign ORDER BY campaign.id"
}
첫 번째 호출을 실행할 때 오류가 발생하면 문제 해결에 대한 안내는 API 오류 처리를 참고하세요.