

このクイックスタート ガイドでは、Google Ads API に対して最初の API 呼び出しを行う方法について説明します。
主なコンセプト
- Google Cloud プロジェクト: Google Cloud プロジェクトは、 API や OAuth 2.0 API 認証情報の管理など、すべての Google サービスの作成、有効化、使用の基礎となります。これは Google Cloud コンソールから作成できます。
- API アクセスレベル: Google Cloud プロジェクトの API アクセスレベルによって、1 日に実行できる API 呼び出しの数と、API 呼び出しを行うことができる環境が制御されます。プロジェクトの API アクセスレベルは、プロジェクトの Google Ads API の概要ページに表示されます。
- Google 広告のクライアント センター(MCC)アカウント: Google 広告のクライアント センター(MCC)アカウントは、他の Google 広告アカウント(Google 広告クライアント アカウントのコレクションや他の Google 広告のクライアント センター(MCC)アカウントなど)を管理するために使用されます。
- Google 広告クライアント アカウント: API 呼び出しのターゲットとする広告の掲載に使用する Google 広告アカウント。
- クライアントのお客様 ID: Google 広告クライアント アカウントを識別する 10 桁の数字。この ID を Google 広告 UI からコピーした場合は、ハイフンを削除してください。
- **OAuth 2.0:** OAuth 2.0 は、すべての Google API で使用される、業界標準の承認プロトコルです。API 呼び出しを行うための OAuth 2.0 認証情報を生成するには、サービス アカウントとキーが必要です。
- サービス アカウント: 個々のユーザーではなくアプリケーションに属する特殊なタイプの Google アカウント。 Google Ads API に対してアプリケーションを認証するために使用されます。サービス アカウントを取得するには、Google Cloud プロジェクトが必要です。
- サービス アカウント キー: サービス アカウントの秘密鍵を含む JSON アプリの認証情報ファイル。Google Ads API API 呼び出しを行うときにサービス アカウントを認証するための OAuth 2.0 認証情報を生成するために使用されます。サービス アカウント キーを取得するには、サービス アカウントが必要です。
前提条件
Google Ads API 呼び出しを行うには、次の手順を完了する必要があります。
Google Ads API アクセス用に Google API Console プロジェクトを構成する
Google Cloud プロジェクトは、Google API と OAuth 2.0 API 認証情報の管理に使用されます。既存の Google Cloud プロジェクトを確認したり、新しいプロジェクトを作成したりするには、 Google Cloud コンソールにアクセスします。
まず、プロジェクトで Google Ads API を有効にします。
次に、Google Ads API の概要ページにアクセスします。このページには、現在の API アクセスレベルが表示されます。現在の API アクセスレベルが [Test Account Access level] の場合は、[Apply for next access level] セクションを開きます。 手順に沿って [エクスプローラ アクセスレベル] を申請します。
申請が完了すると、Google が自動的に申請内容を確認し、ほとんどの場合、エクスプローラ アクセスにアップグレードされます。エクスプローラ アクセスが付与されなかった場合でも、心配する必要はありません。このガイドでは、Google 広告クライアント アカウントを構成する際に適切な手順を説明します。
サービス アカウントを作成する
API 呼び出しを行うには、サービス アカウントとサービス アカウント キーが必要です。別の Google API をすでに使用していて、OAuth 2.0 サービス アカウントとキーを作成している場合は、この手順をスキップして既存の認証情報を再利用できます。
サービス アカウントとキーを作成する方法
- Google Cloud コンソールで、メニュー アイコン > [**IAM と管理**] > [**サービス アカウント**] に移動します。
- サービス アカウントを選択します。
- [Keys] > [Add key] > [Create new key] をクリックします。
- [JSON] を選択し、[作成] をクリックします。
新しい公開鍵と秘密鍵のペアが生成され、新しいファイルとしてパソコンにダウンロードされます。ダウンロードした JSON ファイルを、作業ディレクトリに
credentials.jsonとして保存します。このファイルは このキーの唯一のコピーです。 - [閉じる] をクリックします。
Google 広告クライアント アカウントを構成する
まず、API 呼び出しを行う Google 広告アカウントを特定します。API 呼び出しを行うことができるアカウントの タイプは、Google Cloud プロジェクトの API アクセスレベルによって異なります。API アクセスレベルを確認するには、 Google Ads API の概要ページをご覧ください。
エクスプローラ、ベーシック、スタンダードのアクセスレベル
Google 広告の本番環境アカウントに対して呼び出しを行うことができます。ただし、必要に応じて、[テスト アカウントのアクセス] タブの手順に沿って Google 広告のテスト アカウントを作成できます。
テスト アカウントのアクセスレベル
Google Cloud プロジェクトを使用して、Google 広告の本番環境アカウントに対して API 呼び出しを行うことはできません 。API 呼び出しを行うことができるのは、Google 広告のテスト アカウントに対してのみです。
Google 広告のテスト アカウントを作成する方法
次の手順では、Google 広告のテスト用のクライアント センター(MCC)アカウントと、その下に Google 広告のテスト用の広告主アカウントを作成します。
青色のボタンをクリックして、Google 広告のテスト用のクライアント センター(MCC)アカウントを作成します。 メッセージが表示されたら、Google 広告の本番環境のクライアント センター(MCC)アカウントにリンクされていない Google アカウントでログインします。アカウントをお持ちでない場合は、そのページの [**アカウントを作成**] ボタンを使用して新しい Google アカウントを作成します。
- Google 広告のテスト用のクライアント センター(MCC)アカウントで、Google 広告のテスト用 のお客様アカウントを作成します。[アカウント > > 新しいアカウントを作成] をクリックして、フォームに記入します。Google 広告のテスト用の クライアント センター(MCC)アカウントから作成した Google 広告アカウントは、すべて自動的に Google 広告のテスト アカウントになります。
- 必要に応じて、Google 広告のページから Google 広告のテスト用のクライアント アカウントの下にキャンペーンをいくつか作成します。
Google 広告のお客様に対して API 呼び出しを行うには、Google 広告のお客様アカウントに対するアクセス権と適切な権限をサービス アカウントに付与する必要があります。これを行うには、お客様アカウントに対する管理者権限が必要です。
サービス アカウントに Google 広告 アカウントへのアクセス権を付与する方法
- まず、管理者として Google 広告アカウントにログインします。
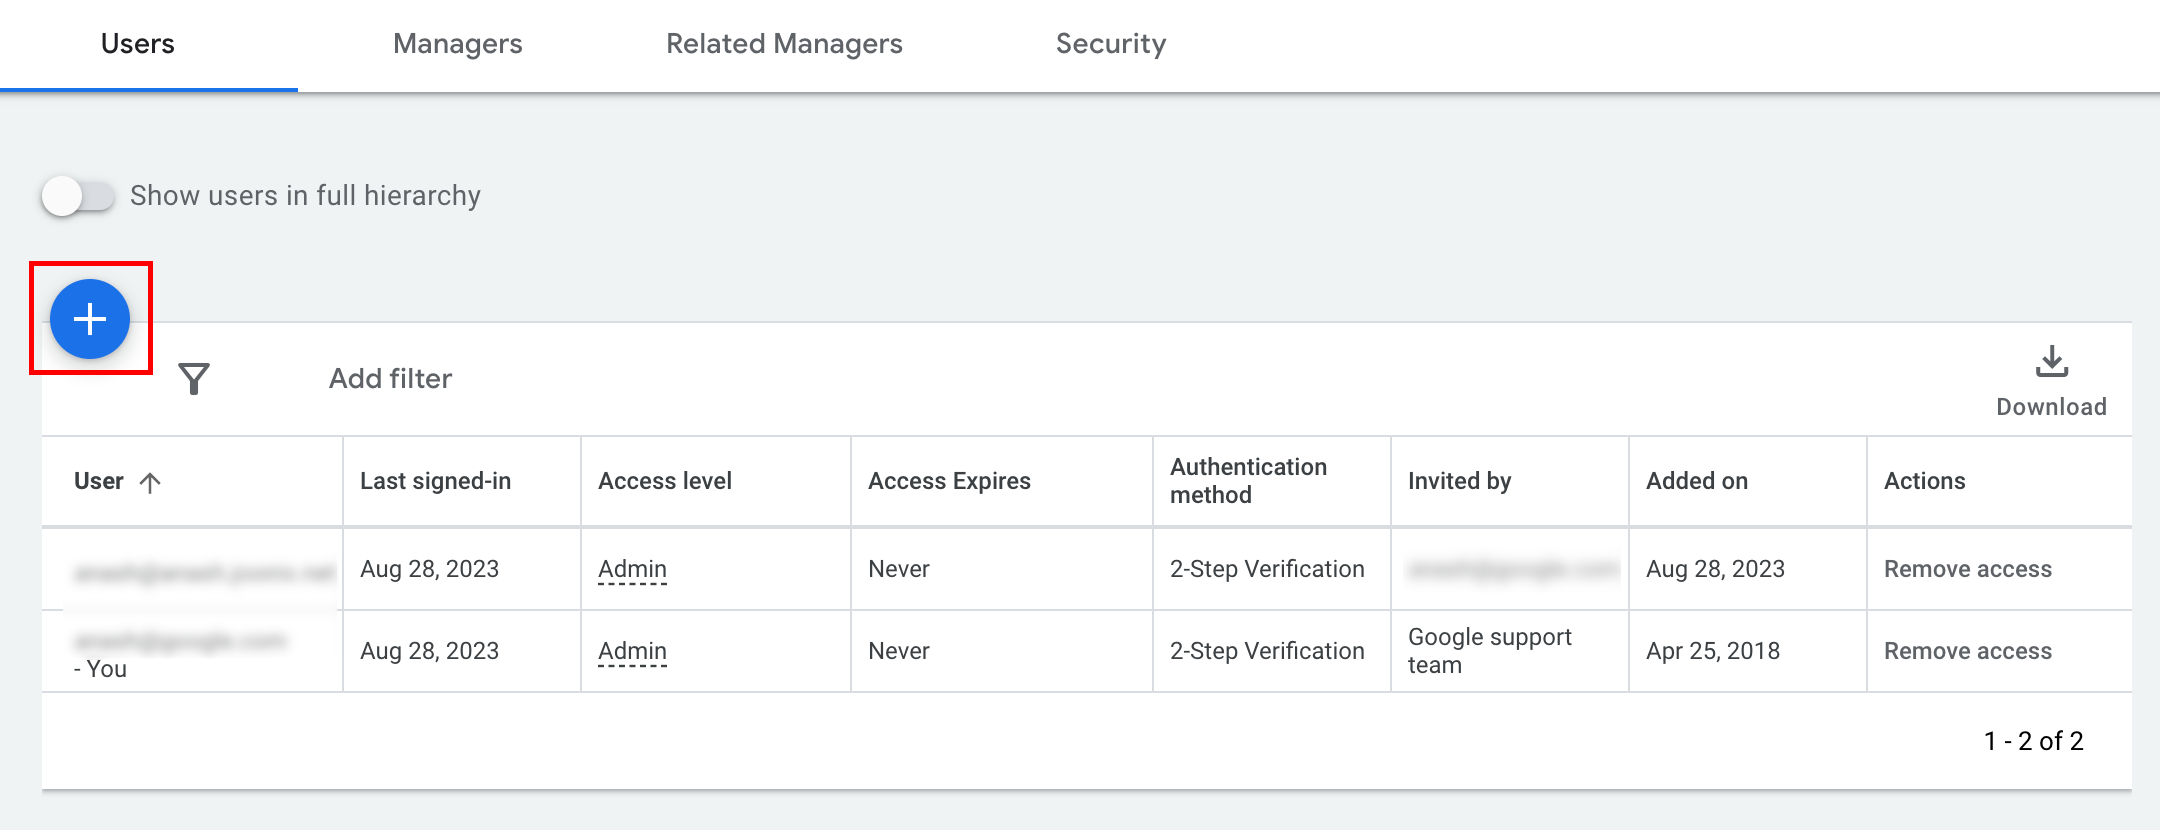
- [管理者 > アクセスとセキュリティ] に移動します。
-
ボタンを [ユーザー] タブの下でクリックします。
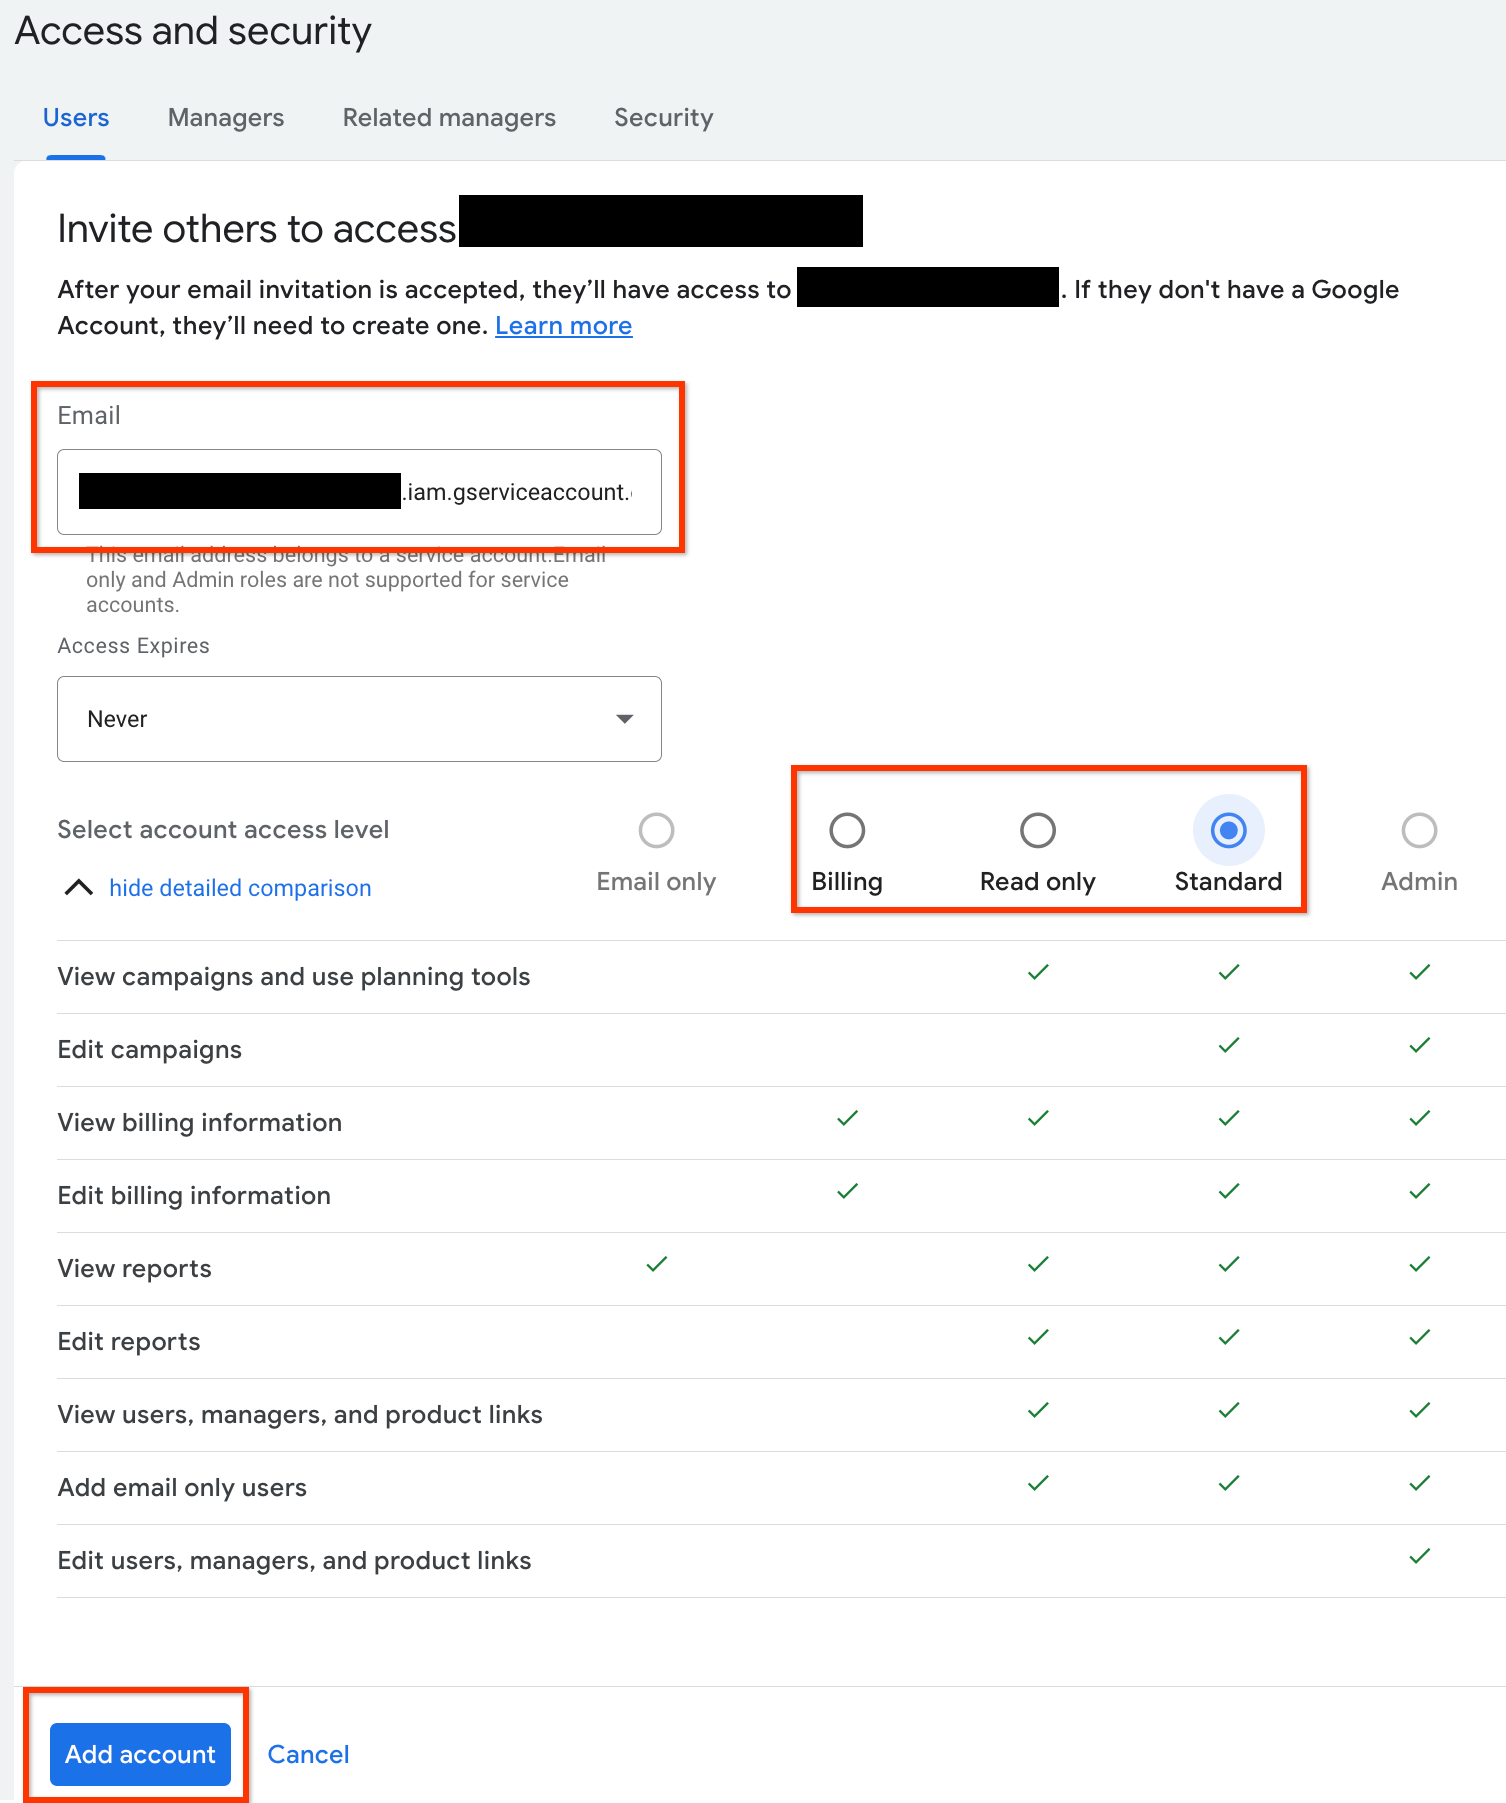
- [メール] 入力ボックスにサービス アカウントのメールアドレスを入力します。
適切なアカウントのアクセスレベルを選択し、
[アカウントを追加] ボタンをクリックします。サービス アカウントでは、メールのアクセスレベルはサポートされていません。
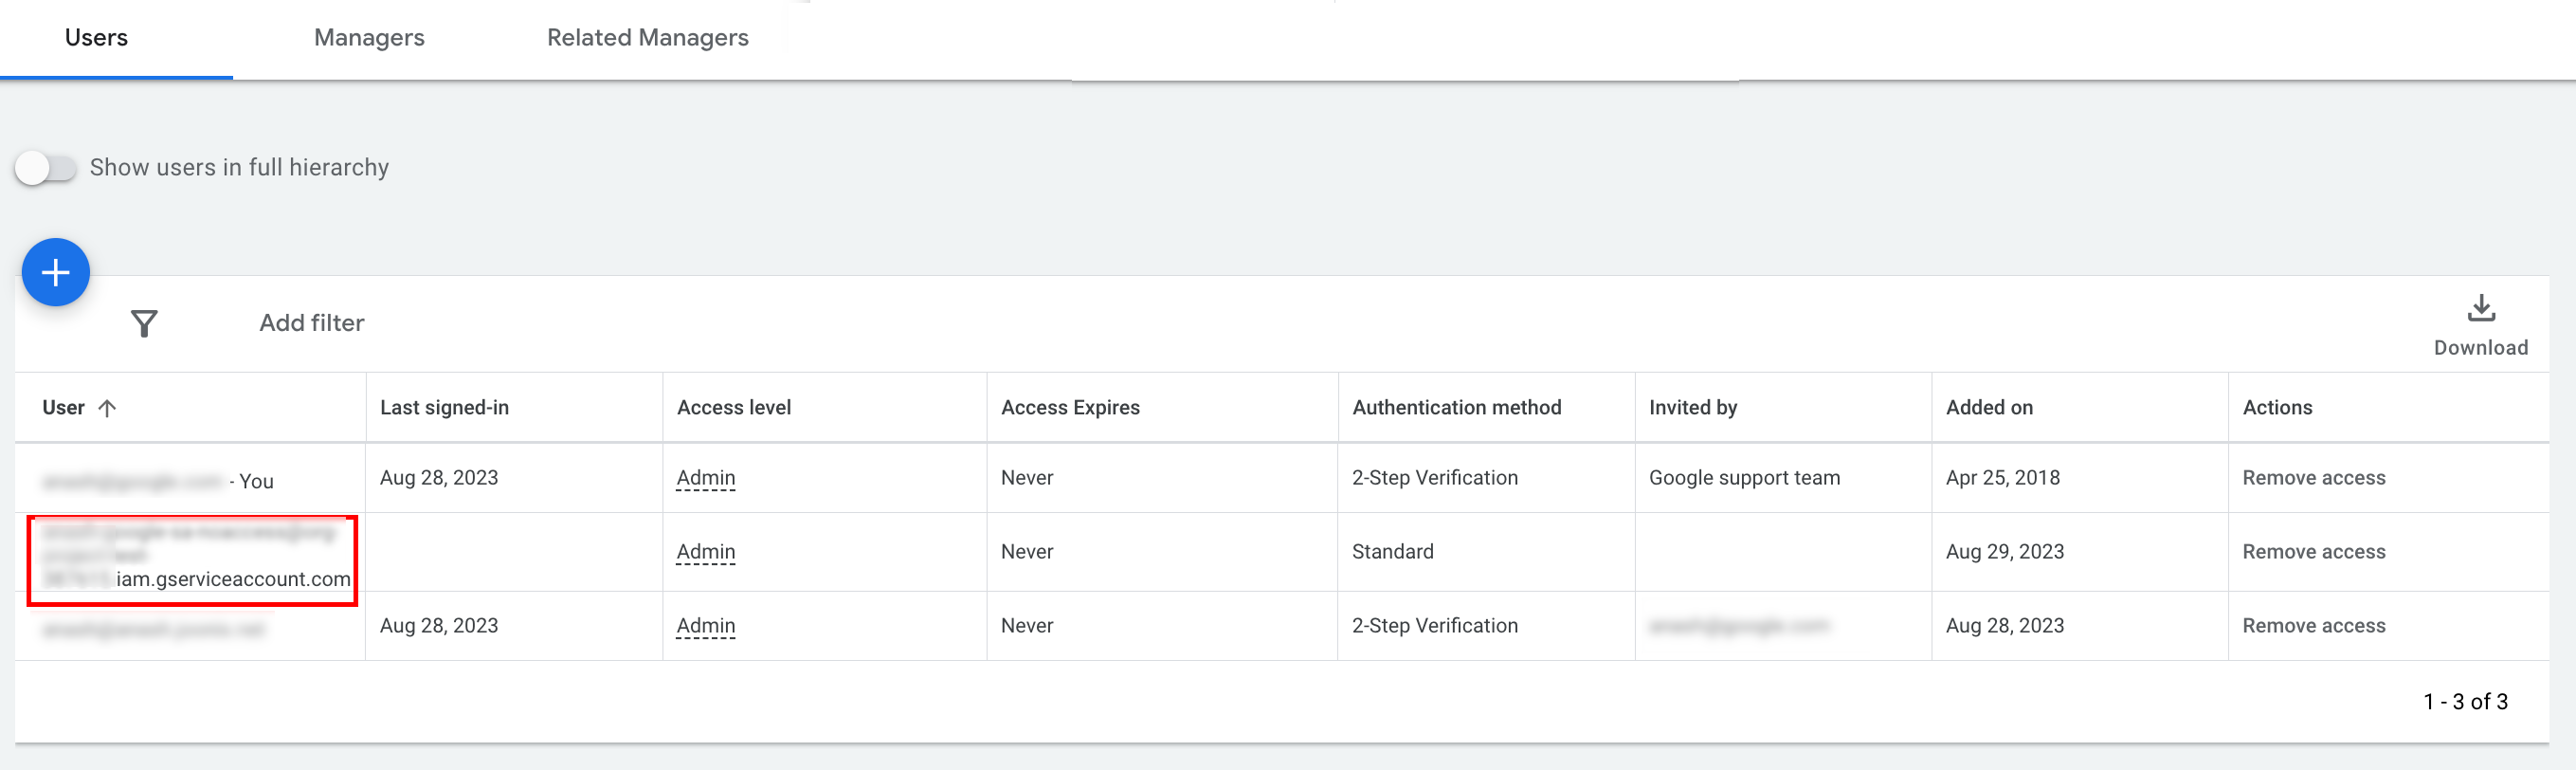
- サービス アカウントにアクセス権が付与されます。
- [省略可]デフォルトでは、サービス アカウントに管理者権限を付与することはできません。API 呼び出しに管理者権限が必要な場合は、次のようにアクセス権をアップグレードできます。
- [**アクセスレベル**] 列で、サービス アカウントのアクセスレベルの横にあるプルダウン矢印をクリックします。
- プルダウン リストから [管理者] を選択します。
ツールとクライアント ライブラリをダウンロードする
API 呼び出しを行う方法に応じて、クライアント ライブラリまたは HTTP クライアントをダウンロードできます。
クライアント ライブラリを使用する
任意のクライアント ライブラリをダウンロードしてインストールします。
HTTP クライアント(REST)を使用する
curl
URL を介してデータを転送するためのコマンドライン ツールである curl をダウンロードしてインストールします。
Google Cloud CLI
手順に沿って gcloud CLI をインストールします。
このガイドの残りの手順は、gcloud ツールの次のバージョンで動作することが確認されています。アプリケーションの動作やコマンドライン オプションが異なるため、以前のバージョンでは動作しない可能性があります。
:~$ gcloud version
Google Cloud SDK 492.0.0
alpha 2024.09.06
beta 2024.09.06
bq 2.1.8
bundled-python3-unix 3.11.9
core 2024.09.06
enterprise-certificate-proxy 0.3.2
gcloud-crc32c 1.0.0
gsutil 5.30
API 呼び出しを行う
API 呼び出しを行う方法の手順については、使用するクライアントを選択してください。
Java
クライアント ライブラリのアーティファクトは、Maven 中央 リポジトリに公開されています。次のように、クライアント ライブラリを依存関係としてプロジェクトに追加します。
Maven の依存関係は次のとおりです。
<dependency>
  <groupId>com.google.api-ads</groupId>
  <artifactId>google-ads</artifactId>
  <version>46.0.0</version>
</dependency>
Gradle の依存関係は次のとおりです。
implementation 'com.google.api-ads:google-ads:46.0.0'
依存関係のバージョンを管理するには、Google Ads API の部品構成表 (BOM)を使用することをおすすめします。手順については、BOM ガイドをご覧ください。
次の内容のファイル ~/ads.properties を作成します。
api.googleads.serviceAccountSecretsPath=JSON_KEY_FILE_PATH
api.googleads.loginCustomerId=INSERT_LOGIN_CUSTOMER_ID_HERE
次のように GoogleAdsClient オブジェクトを作成します。
GoogleAdsClient googleAdsClient = null;
try {
  googleAdsClient = GoogleAdsClient.newBuilder().fromPropertiesFile().build();
} catch (FileNotFoundException fnfe) {
  System.err.printf(
      "Failed to load GoogleAdsClient configuration from file. Exception: %s%n",
      fnfe);
  System.exit(1);
} catch (IOException ioe) {
  System.err.printf("Failed to create GoogleAdsClient. Exception: %s%n", ioe);
  System.exit(1);
}
次に、GoogleAdsService.SearchStream メソッドを使用してキャンペーン レポートを実行し、
アカウント内のキャンペーンを取得します。
private void runExample(GoogleAdsClient googleAdsClient, long customerId) {
try (GoogleAdsServiceClient googleAdsServiceClient =
googleAdsClient.getLatestVersion().createGoogleAdsServiceClient()) {
String query = "SELECT campaign.id, campaign.name FROM campaign ORDER BY campaign.id";
// Constructs the SearchGoogleAdsStreamRequest.
SearchGoogleAdsStreamRequest request =
SearchGoogleAdsStreamRequest.newBuilder()
.setCustomerId(Long.toString(customerId))
.setQuery(query)
.build();
// Creates and issues a search Google Ads stream request that will retrieve all campaigns.
ServerStream<SearchGoogleAdsStreamResponse> stream =
googleAdsServiceClient.searchStreamCallable().call(request);
// Iterates through and prints all of the results in the stream response.
for (SearchGoogleAdsStreamResponse response : stream) {
for (GoogleAdsRow googleAdsRow : response.getResultsList()) {
System.out.printf(
"Campaign with ID %d and name '%s' was found.%n",
googleAdsRow.getCampaign().getId(), googleAdsRow.getCampaign().getName());
}
}
}
}
C#
クライアント ライブラリ パッケージは Nuget.org
リポジトリ に公開されています。まず、Google.Ads.GoogleAds パッケージに nuget 参照を追加します。
dotnet add package Google.Ads.GoogleAds --version 26.1.0関連する設定で GoogleAdsConfig オブジェクトを作成し、それを使用して GoogleAdsClient オブジェクトを作成します。
GoogleAdsConfig config = new GoogleAdsConfig()
{
    OAuth2Mode = OAuth2Flow.SERVICE_ACCOUNT,
    OAuth2SecretsJsonPath = "PATH_TO_CREDENTIALS_JSON",
    LoginCustomerId = ******
};
GoogleAdsClient client = new GoogleAdsClient(config);
次に、GoogleAdsService.SearchStream メソッドを使用してキャンペーン レポートを実行し、
アカウント内のキャンペーンを取得します。このガイドでは、
レポートの詳細については説明しません。
public void Run(GoogleAdsClient client, long customerId)
{
// Get the GoogleAdsService.
GoogleAdsServiceClient googleAdsService = client.GetService(
Services.V25.GoogleAdsService);
// Create a query that will retrieve all campaigns.
string query = @"SELECT
campaign.id,
campaign.name,
campaign.network_settings.target_content_network
FROM campaign
ORDER BY campaign.id";
try
{
// Issue a search request.
googleAdsService.SearchStream(customerId.ToString(), query,
delegate (SearchGoogleAdsStreamResponse resp)
{
foreach (GoogleAdsRow googleAdsRow in resp.Results)
{
Console.WriteLine("Campaign with ID {0} and name '{1}' was found.",
googleAdsRow.Campaign.Id, googleAdsRow.Campaign.Name);
}
}
);
}
catch (GoogleAdsException e)
{
Console.WriteLine("Failure:");
Console.WriteLine($"Message: {e.Message}");
Console.WriteLine($"Failure: {e.Failure}");
Console.WriteLine($"Request ID: {e.RequestId}");
throw;
}
}
PHP
クライアント ライブラリ パッケージは Packagist
リポジトリ に公開されています。プロジェクトのルート ディレクトリに移動し、次のコマンドを実行して、ライブラリとそのすべての依存関係をプロジェクトのルート ディレクトリの vendor/ ディレクトリにインストールします。
composer require googleads/google-ads-php:33.6.0GitHub リポジトリから
google_ads_php.ini
ファイルのコピーを作成し、認証情報を含めるように変更します。
[GOOGLE_ADS]
loginCustomerId = "INSERT_LOGIN_CUSTOMER_ID_HERE"

[OAUTH2]
jsonKeyFilePath = "INSERT_ABSOLUTE_PATH_TO_OAUTH2_JSON_KEY_FILE_HERE"
scopes = "https://www.googleapis.com/auth/adwords"
GoogleAdsClient オブジェクトのインスタンスを作成します。
$oAuth2Credential = (new OAuth2TokenBuilder())
    ->fromFile('/path/to/google_ads_php.ini')
    ->build();

$googleAdsClient = (new GoogleAdsClientBuilder())
    ->fromFile('/path/to/google_ads_php.ini')
    ->withOAuth2Credential($oAuth2Credential)
    ->build();
次に、GoogleAdsService.SearchStream メソッドを使用してキャンペーン レポートを実行し、
アカウント内のキャンペーンを取得します。
public static function runExample(GoogleAdsClient $googleAdsClient, int $customerId)
{
$googleAdsServiceClient = $googleAdsClient->getGoogleAdsServiceClient();
// Creates a query that retrieves all campaigns.
$query = 'SELECT campaign.id, campaign.name FROM campaign ORDER BY campaign.id';
// Issues a search stream request.
/** @var GoogleAdsServerStreamDecorator $stream */
$stream = $googleAdsServiceClient->searchStream(
SearchGoogleAdsStreamRequest::build($customerId, $query)
);
// Iterates over all rows in all messages and prints the requested field values for
// the campaign in each row.
foreach ($stream->iterateAllElements() as $googleAdsRow) {
/** @var GoogleAdsRow $googleAdsRow */
printf(
"Campaign with ID %d and name '%s' was found.%s",
$googleAdsRow->getCampaign()->getId(),
$googleAdsRow->getCampaign()->getName(),
PHP_EOL
);
}
}
Python
クライアント ライブラリは PyPI
で配布されており、pip
コマンドを使用して次のようにインストールできます。
python -m pip install google-ads==31.2.0GitHub リポジトリから
google-ads.yaml ファイルのコピーを作成し、認証情報を含めるように変更します。
login_customer_id: INSERT_LOGIN_CUSTOMER_ID_HERE
json_key_file_path: JSON_KEY_FILE_PATH_HERE
GoogleAdsClient インスタンスを、
GoogleAdsClient.load_from_storage メソッドを呼び出して作成します。呼び出すときに、google-ads.yaml へのパスを文字列としてメソッドに渡します。
from google.ads.googleads.client import GoogleAdsClient
client = GoogleAdsClient.load_from_storage("path/to/google-ads.yaml")
ライブラリのロガーにハンドラを追加して、ログの出力先を指定します。
次の例では、ライブラリのロガーにコンソール(stdout)に出力するように指示します。
import logging
import sys

logger = logging.getLogger('google.ads.googleads.client')
logger.addHandler(logging.StreamHandler(sys.stdout))
次に、GoogleAdsService.SearchStream メソッドを使用してキャンペーン レポートを実行し、
アカウント内のキャンペーンを取得します。
def main(client: GoogleAdsClient, customer_id: str) -> None:
ga_service: GoogleAdsServiceClient = client.get_service("GoogleAdsService")
query: str = """
SELECT
campaign.id,
campaign.name
FROM campaign
ORDER BY campaign.id"""
# Issues a search request using streaming.
stream: Iterator[SearchGoogleAdsStreamResponse] = ga_service.search_stream(
customer_id=customer_id, query=query
)
for batch in stream:
rows: List[GoogleAdsRow] = batch.results
for row in rows:
print(
f"Campaign with ID {row.campaign.id} and name "
f'"{row.campaign.name}" was found.'
)
Ruby
クライアント ライブラリの Ruby gem は、Rubygems gem ホスティング サイトに公開されています。インストールには bundler を使用することをおすすめします。Gemfile に次の行を追加します。
gem 'google-ads-googleads', '~> 43.0.0'
次のコマンドを実行します。
bundle installGitHub リポジトリから
google_ads_config.rb
ファイルのコピーを作成し、認証情報を含めるように変更します。
Google::Ads::GoogleAds::Config.new do |c|
  c.login_customer_id = 'INSERT_LOGIN_CUSTOMER_ID_HERE'
  c.keyfile = 'JSON_KEY_FILE_PATH'
end
このファイルを保存するパスを渡して、GoogleAdsClient インスタンスを作成します。
client = Google::Ads::GoogleAds::GoogleAdsClient.new('path/to/google_ads_config.rb')
次に、GoogleAdsService.SearchStream メソッドを使用してキャンペーン レポートを実行し、
アカウント内のキャンペーンを取得します。
def get_campaigns(customer_id)
# GoogleAdsClient will read a config file from
# ENV['HOME']/google_ads_config.rb when called without parameters
client = Google::Ads::GoogleAds::GoogleAdsClient.new
responses = client.service.google_ads.search_stream(
customer_id: customer_id,
query: 'SELECT campaign.id, campaign.name FROM campaign ORDER BY campaign.id',
)
responses.each do |response|
response.results.each do |row|
puts "Campaign with ID #{row.campaign.id} and name '#{row.campaign.name}' was found."
end
end
end
Perl
ライブラリは
CPANで配布されています。まず、任意のディレクトリに google-ads-perl リポジトリのクローンを作成します。
git clone https://github.com/googleads/google-ads-perl.gitgoogle-ads-perl ディレクトリに移動し、コマンド プロンプトで次のコマンドを実行して、ライブラリの使用に必要なすべての依存関係をインストールします。
cd google-ads-perlcpan install Module::Buildperl Build.PLperl Build installdeps
GitHub リポジトリから
googleads.properties
ファイルのコピーを作成し、認証情報を含めるように変更します。
jsonKeyFilePath=JSON_KEY_FILE_PATH
loginCustomerId=INSERT_LOGIN_CUSTOMER_ID_HERE
このファイルを保存するパスを渡して、Client インスタンスを作成します。
my $properties_file = "/path/to/googleads.properties";

my $api_client = Google::Ads::GoogleAds::Client->new({
  properties_file => $properties_file
});
次に、GoogleAdsService.SearchStream メソッドを使用してキャンペーン レポートを実行し、
アカウント内のキャンペーンを取得します。
sub get_campaigns {
my ($api_client, $customer_id) = @_;
# Create a search Google Ads stream request that will retrieve all campaigns.
my $search_stream_request =
Google::Ads::GoogleAds::V25::Services::GoogleAdsService::SearchGoogleAdsStreamRequest
->new({
customerId => $customer_id,
query =>
"SELECT campaign.id, campaign.name FROM campaign ORDER BY campaign.id"
});
# Get the GoogleAdsService.
my $google_ads_service = $api_client->GoogleAdsService();
my $search_stream_handler =
Google::Ads::GoogleAds::Utils::SearchStreamHandler->new({
service => $google_ads_service,
request => $search_stream_request
});
# Issue a search request and process the stream response to print the requested
# field values for the campaign in each row.
$search_stream_handler->process_contents(
sub {
my $google_ads_row = shift;
printf "Campaign with ID %d and name '%s' was found.\n",
$google_ads_row->{campaign}{id}, $google_ads_row->{campaign}{name};
});
return 1;
}
curl
まず、gcloud CLI でサービス アカウントをアクティブな認証情報として設定します。
gcloud auth login --cred-file=PATH_TO_CREDENTIALS_JSON次に、Google Ads API の OAuth 2.0 アクセス トークンを取得します。
gcloud auth \
  print-access-token \
--scopes='https://www.googleapis.com/auth/adwords'次に、GoogleAdsService.SearchStream メソッドを使用してキャンペーン レポートを実行し、
アカウント内のキャンペーンを取得します。
curl -i -X POST https://googleads.googleapis.com/v25/customers/CUSTOMER_ID/googleAds:searchStream \
   -H "Content-Type: application/json" \
   -H "Authorization: Bearer ACCESS_TOKEN" \
   -H "developer-token: DEVELOPER_TOKEN" \
   -H "login-customer-id: LOGIN_CUSTOMER_ID" \
   --data-binary "@query.json"
query.json の内容は次のとおりです。
{
  "query": "SELECT campaign.id, campaign.name, campaign.network_settings.target_content_network FROM campaign ORDER BY campaign.id"
}
最初の呼び出しでエラーが発生した場合は、 API エラーの処理で トラブルシューティングの方法をご確認ください。