
המדריך למתחילים הזה יעזור לכם לבצע את הקריאה הראשונה ל-Google Ads API.
מושגים מרכזיים
- קוד מפתח: קוד מפתח הוא מחרוזת אלפאנומרית באורך 22 תווים שמזהה את האפליקציה שלכם בשרתים של Google Ads API. הוא נדרש כדי לבצע קריאות API.
- רמת הגישה ל-API: רמת הגישה ל-API של קוד המפתח שלך קובעת את מספר הקריאות ל-API שניתן לבצע ביום ואת הסביבות שאליהן ניתן לבצע קריאות ל-API.
- חשבון ניהול ב-Google Ads: חשבון ניהול ב-Google Ads משמש לניהול של חשבונות Google Ads אחרים. אפשר להשתמש בחשבון ניהול ב-Google Ads כדי לנהל חשבונות לקוח ב-Google Ads או חשבונות ניהול אחרים ב-Google Ads. כדי לקבל קוד מפתח, צריך להיות לכם חשבון ניהול ב-Google Ads.
- חשבון לקוח ב-Google Ads: חשבון Google Ads שמתבצעות מולו קריאות ל-API.
- מספר לקוח של חשבון לקוח: מספר בן 10 ספרות שמזהה חשבון לקוח ב-Google Ads. אם העתקתם את המזהה הזה מממשק המשתמש של Google Ads, הקפידו להסיר את המקפים.
- OAuth 2.0: OAuth 2.0 הוא פרוטוקול הרשאה בתקן התעשייה, שמשמש את כל ממשקי ה-API של Google. כדי ליצור פרטי כניסה מסוג OAuth 2.0 ולבצע קריאות ל-API, צריך חשבון שירות ומפתח.
- פרויקט Google Cloud: פרויקט Google Cloud הוא הבסיס ליצירה, להפעלה ולשימוש בכל שירותי Google, כולל ניהול ממשקי API ופרטי כניסה של OAuth 2.0 API. אפשר ליצור פרויקט חדש במסוף Google Cloud.
- חשבון שירות: סוג מיוחד של חשבון Google ששייך לאפליקציה ולא למשתמש פרטי. הוא משמש לאימות האפליקציה שלכם ב-Google Ads API. כדי לקבל חשבון שירות, צריך פרויקט ב-Google Cloud.
- מפתח לחשבון שירות: קובץ JSON של פרטי כניסה לאפליקציה שמכיל את המפתח הפרטי של חשבון השירות. הוא משמש ליצירת פרטי כניסה מסוג OAuth 2.0 כדי לאמת חשבון שירות כשמבצעים קריאה ל-Google Ads API. כדי לקבל מפתח לחשבון שירות, צריך חשבון שירות.
דרישות מוקדמות
כדי לבצע קריאה ל-Google Ads API, צריך לבצע את השלבים הבאים.
קבלת קוד מפתח
אם נרשמתם בעבר לקבלת קוד מפתח, תוכלו למצוא אותו במרכז ה-API כשאתם מחוברים לחשבון הניהול שלכם ב-Google Ads.
אם אין לכם קוד מפתח, אתם יכולים להירשם כדי לקבל קוד כזה במרכז ה-API.
איך נרשמים לקוד מפתח
- בדפדפן האינטרנט, עוברים אל מרכז ה-API. אם תתבקשו, נכנסים לחשבון הניהול ב-Google Ads. אם אין לכם חשבון ניהול, יוצרים חשבון ניהול ב-Google Ads.
- ממלאים את טופס הגישה ל-API ומאשרים את התנאים וההגבלות.
- חשוב לוודא שהפרטים נכונים וכתובת האתר של החברה פועלת. אם האתר לא פעיל, יכול להיות ש-Google לא תוכל לעבד את הבקשה שלכם ותדחה אותה.
- חשוב לוודא שכתובת האימייל של איש הקשר בנושא API שציינתם מובילה לתיבת דואר נכנס שנבדקת באופן קבוע. יכול להיות שצוות התאימות ל-API של Google יפנה לכתובת האימייל הזו במהלך תהליך הבדיקה כדי לקבל הבהרות. אם לא נוכל ליצור איתכם קשר, יכול להיות ש-Google לא תמשיך בתהליך הבקשה.
- אפשר לערוך את כתובת האימייל של איש הקשר בנושא API במרכז ה-API. חשוב לשמור את הפרטים האלה עדכניים, גם אחרי תהליך הגשת הבקשה, כדי ש-Google תוכל לשלוח לכם הודעות שירות חשובות.
אחרי שמסיימים את תהליך הבקשה, קוד המפתח מופיע במרכז ה-API עם הסטטוס בהמתנה לאישור. ל-קוד מפתח שלך יש עכשיו רמת גישה של Test Account Access.
הגדרת הפרויקט ב-Google API Console
הפרויקט ב-Google API Console משמש לניהול ממשקי Google API ופרטי הכניסה של OAuth 2.0 API. אפשר למצוא את הפרויקטים הקיימים ב-Google API Console או ליצור פרויקט חדש בכתובת Google API Console.
כדי להתחיל, מפעילים את Google Ads API בפרויקט:
בשלב הבא, צריך חשבון שירות ומפתח של חשבון שירות כדי לבצע קריאות ל-API. אם אתם כבר משתמשים ב-Google API אחר ויצרתם מפתח וחשבון שירות OAuth 2.0, אתם יכולים לדלג על השלב הזה ולהשתמש שוב בפרטי הכניסה הקיימים.
איך יוצרים חשבון שירות ומפתח
- במסוף Google Cloud, לוחצים על סמל התפריט > IAM & Admin (IAM ומנהל מערכת) > Service Accounts (חשבונות שירות).
- בוחרים את חשבון השירות.
- לוחצים על מפתחות > הוספת מפתח > יצירת מפתח חדש.
- בוחרים באפשרות JSON ולוחצים על Create.
צמד המפתחות הציבורי והפרטי החדש נוצר ומורד למחשב שלכם כקובץ חדש. שומרים את קובץ ה-JSON שהורדתם בשם
credentials.jsonבספריית העבודה. זהו העותק היחיד של המפתח הזה. - לוחצים על סגירה.
הגדרת חשבון לקוח ב-Google Ads
קודם צריך לזהות את חשבון Google Ads שמתבצעות מולו קריאות ל-API. סוג החשבון שאליו אפשר לבצע קריאות ל-API תלוי ברמת הגישה ל-API של קוד המפתח שלכם. כדי לגלות מה רמת הגישה שלכם ל-API, אפשר להיכנס אל מרכז ה-API.
רמות הגישה Explorer, Basic ו-Standard
אתם יכולים להתקשר לחשבון הייצור שלכם ב-Google Ads. עם זאת, אפשר ליצור חשבון בדיקה ב-Google Ads על ידי ביצוע ההוראות בכרטיסייה גישה לחשבון בדיקה, אם נדרש.
בדיקת רמת הגישה לחשבון
אי אפשר להשתמש בקוד המפתח כדי לבצע קריאות ל-API בחשבון פעיל ב-Google Ads. אפשר לבצע קריאות ל-API רק בחשבונות בדיקה של Google Ads.
איך יוצרים חשבון בדיקה ב-Google Ads
ההוראות הבאות מתייחסות ליצירה של חשבון ניהול לבדיקה ב-Google Ads וחשבון פרסום לבדיקה ב-Google Ads שמשויך אליו.
לוחצים על הלחצן הכחול כדי ליצור חשבון ניהול לבדיקה ב-Google Ads. אם מופיעה בקשה, נכנסים לחשבון Google שלא מקושר לחשבון הניהול שלכם בייצור ב-Google Ads. אם אין לכם חשבון, אתם יכולים ללחוץ על הלחצן יצירת חשבון בדף הזה כדי ליצור חשבון Google חדש.
- בחשבון הניהול של הבדיקות ב-Google Ads, יוצרים חשבון לקוח ב-Google Ads: לוחצים על חשבונות > > יצירת חשבון חדש וממלאים את הטופס. כל חשבון Google Ads שיוצרים מחשבון הניהול של חשבון הבדיקה ב-Google Ads הוא אוטומטית חשבון בדיקה ב-Google Ads.
- אפשרות נוספת היא ליצור כמה קמפיינים בחשבון הלקוח לבדיקה ב-Google Ads מתוך הדף של Google Ads.
כדי לבצע קריאה ל-API של לקוח Google Ads, צריך לתת לחשבון השירות גישה והרשאות מתאימות לחשבון הלקוח ב-Google Ads. כדי לעשות את זה, צריך הרשאת אדמין בחשבון הלקוח.
איך מעניקים לחשבון השירות גישה לחשבון Google Ads
- כדי להתחיל, נכנסים לחשבון Google Ads כאדמין.
- עוברים אל ניהול > אבטחה וגישה.
- לוחצים על הלחצן
בכרטיסייה משתמשים.

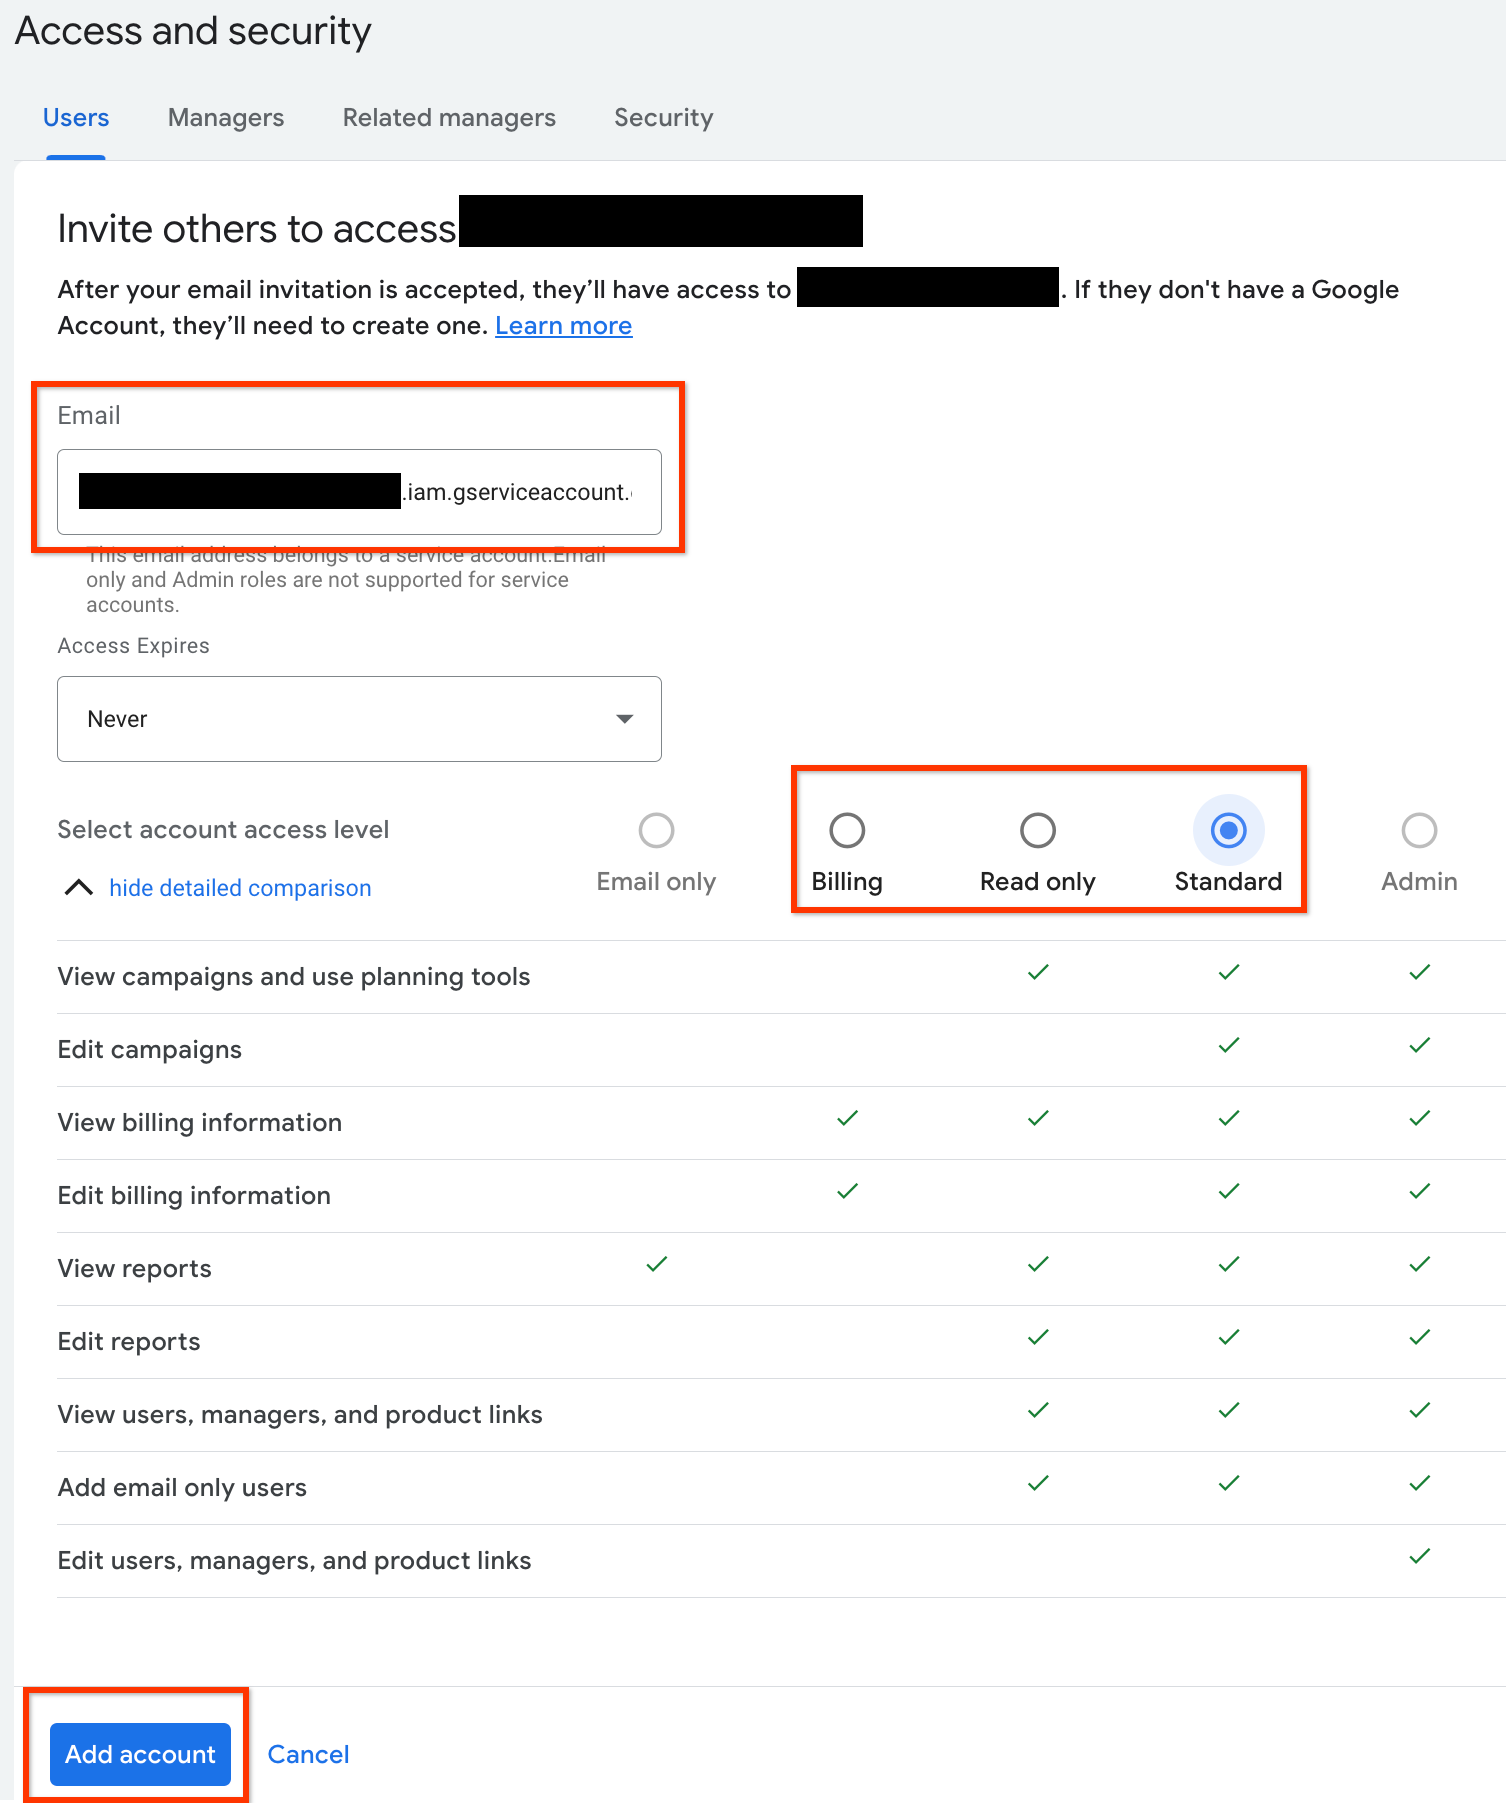
- מקלידים את כתובת האימייל של חשבון השירות בתיבת הקלט Email. בוחרים את רמת הגישה המתאימה לחשבון ולוחצים על הלחצן Add account. שימו לב: חשבונות שירות לא תומכים ברמת גישה לאימייל בלבד.
- ניתנת גישה לחשבון השירות.
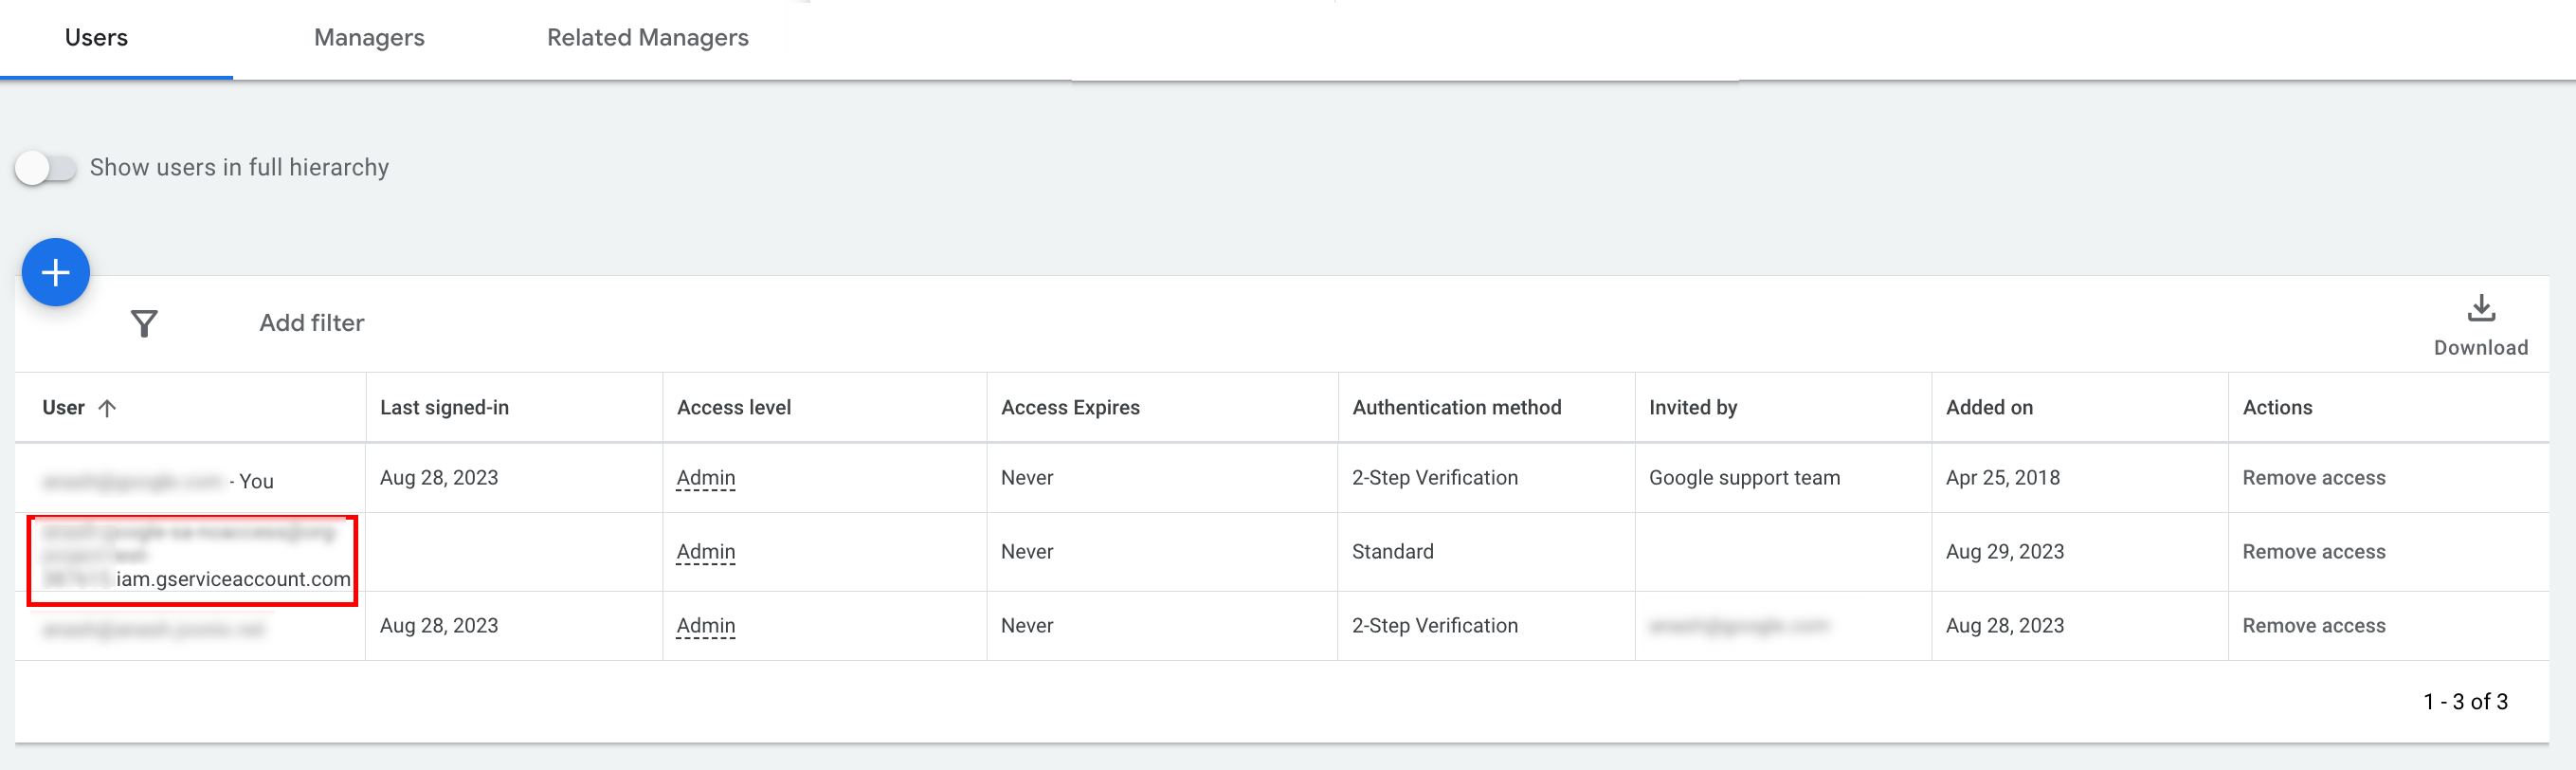
- [אופציונלי] כברירת מחדל, אי אפשר לתת לחשבון שירות הרשאות אדמין. אם קריאות ה-API שלכם דורשות הרשאות אדמין, אתם יכולים לשדרג את הגישה באופן הבא:
- לוחצים על החץ לתפריט נפתח בעמודה רמת גישה לצד רמת הגישה של חשבון השירות.
- בתפריט הנפתח, בוחרים באפשרות אדמין.
הורדת כלים וספריות לקוח
אתם יכולים לבחור להוריד ספריית לקוח או לקוח HTTP, בהתאם לאופן שבו אתם רוצים לבצע קריאות ל-API.
שימוש בספריית לקוח
מורידים ומתקינים ספריית לקוח לפי בחירה.
שימוש בלקוח HTTP (REST)
curl
מורידים ומתקינים את curl, כלי שורת הפקודה להעברת נתונים באמצעות כתובת URL.
Google Cloud CLI
פועלים לפי ההוראות כדי להתקין את ה-CLI של gcloud.
ההוראות בחלקים הבאים של המדריך הזה אומתו כך שהן פועלות עם הגרסה הבאה של כלי gcloud, ויכול להיות שהן לא יפעלו עם גרסאות קודמות בגלל הבדלים בהתנהגות האפליקציה או באפשרויות של שורת הפקודה.
:~$ gcloud version
Google Cloud SDK 492.0.0
alpha 2024.09.06
beta 2024.09.06
bq 2.1.8
bundled-python3-unix 3.11.9
core 2024.09.06
enterprise-certificate-proxy 0.3.2
gcloud-crc32c 1.0.0
gsutil 5.30
ביצוע קריאה ל-API
בוחרים את הלקוח הרצוי כדי לקבל הוראות לגבי ביצוע קריאה ל-API:
Java
הארטיפקטים של ספריות הלקוח מתפרסמים במאגר Maven Central. מוסיפים את ספריית הלקוח כתלות לפרויקט באופן הבא:
התלות ב-Maven היא:
<dependency>
  <groupId>com.google.api-ads</groupId>
  <artifactId>google-ads</artifactId>
  <version>43.2.0</version>
</dependency>
התלות ב-Gradle היא:
implementation 'com.google.api-ads:google-ads:43.2.0'
מומלץ גם להשתמש ב-Bill of Materials (BOM) של Google Ads API כדי לנהל גרסאות של תלות. הוראות מפורטות אפשר למצוא במדריך ל-BOM.
יוצרים קובץ ~/ads.properties עם התוכן הבא:
api.googleads.serviceAccountSecretsPath=JSON_KEY_FILE_PATH
api.googleads.developerToken=INSERT_DEVELOPER_TOKEN_HERE
api.googleads.loginCustomerId=INSERT_LOGIN_CUSTOMER_ID_HERE
כדי ליצור אובייקט GoogleAdsClient:
GoogleAdsClient googleAdsClient = null;
try {
  googleAdsClient = GoogleAdsClient.newBuilder().fromPropertiesFile().build();
} catch (FileNotFoundException fnfe) {
  System.err.printf(
      "Failed to load GoogleAdsClient configuration from file. Exception: %s%n",
      fnfe);
  System.exit(1);
} catch (IOException ioe) {
  System.err.printf("Failed to create GoogleAdsClient. Exception: %s%n", ioe);
  System.exit(1);
}
לאחר מכן, מריצים דוח קמפיינים באמצעות השיטה GoogleAdsService.SearchStream כדי לאחזר את הקמפיינים בחשבון.
private void runExample(GoogleAdsClient googleAdsClient, long customerId) {
try (GoogleAdsServiceClient googleAdsServiceClient =
googleAdsClient.getLatestVersion().createGoogleAdsServiceClient()) {
String query = "SELECT campaign.id, campaign.name FROM campaign ORDER BY campaign.id";
// Constructs the SearchGoogleAdsStreamRequest.
SearchGoogleAdsStreamRequest request =
SearchGoogleAdsStreamRequest.newBuilder()
.setCustomerId(Long.toString(customerId))
.setQuery(query)
.build();
// Creates and issues a search Google Ads stream request that will retrieve all campaigns.
ServerStream<SearchGoogleAdsStreamResponse> stream =
googleAdsServiceClient.searchStreamCallable().call(request);
// Iterates through and prints all of the results in the stream response.
for (SearchGoogleAdsStreamResponse response : stream) {
for (GoogleAdsRow googleAdsRow : response.getResultsList()) {
System.out.printf(
"Campaign with ID %d and name '%s' was found.%n",
googleAdsRow.getCampaign().getId(), googleAdsRow.getCampaign().getName());
}
}
}
}
C#
חבילות של ספריות לקוח מתפרסמות במאגר Nuget.org. מתחילים בהוספת הפניה ל-NuGet לחבילה Google.Ads.GoogleAds.
dotnet add package Google.Ads.GoogleAds --version 26.0.0יוצרים אובייקט GoogleAdsConfig עם ההגדרות הרלוונטיות, ומשתמשים בו כדי ליצור אובייקט GoogleAdsClient.
GoogleAdsConfig config = new GoogleAdsConfig()
{
    DeveloperToken = "******",
    OAuth2Mode = OAuth2Flow.SERVICE_ACCOUNT,
    OAuth2SecretsJsonPath = "PATH_TO_CREDENTIALS_JSON",
    LoginCustomerId = ******
};
GoogleAdsClient client = new GoogleAdsClient(config);
לאחר מכן, מריצים דוח קמפיינים באמצעות השיטה GoogleAdsService.SearchStream כדי לאחזר את הקמפיינים בחשבון. במדריך הזה לא מוסבר בפירוט על דיווח.
public void Run(GoogleAdsClient client, long customerId)
{
// Get the GoogleAdsService.
GoogleAdsServiceClient googleAdsService = client.GetService(
Services.V24.GoogleAdsService);
// Create a query that will retrieve all campaigns.
string query = @"SELECT
campaign.id,
campaign.name,
campaign.network_settings.target_content_network
FROM campaign
ORDER BY campaign.id";
try
{
// Issue a search request.
googleAdsService.SearchStream(customerId.ToString(), query,
delegate (SearchGoogleAdsStreamResponse resp)
{
foreach (GoogleAdsRow googleAdsRow in resp.Results)
{
Console.WriteLine("Campaign with ID {0} and name '{1}' was found.",
googleAdsRow.Campaign.Id, googleAdsRow.Campaign.Name);
}
}
);
}
catch (GoogleAdsException e)
{
Console.WriteLine("Failure:");
Console.WriteLine($"Message: {e.Message}");
Console.WriteLine($"Failure: {e.Failure}");
Console.WriteLine($"Request ID: {e.RequestId}");
throw;
}
}
PHP
חבילות של ספריית הלקוח מתפרסמות במאגר Packagist. עוברים לספריית הבסיס של הפרויקט ומריצים את הפקודה הבאה כדי להתקין את הספרייה ואת כל התלות שלה בספרייה vendor/ של ספריית הבסיס של הפרויקט.
composer require googleads/google-ads-php:33.4.0יוצרים עותק של הקובץ
google_ads_php.ini
מהמאגר ב-GitHub ומשנים אותו כך שיכלול את פרטי הכניסה שלכם.
[GOOGLE_ADS]
developerToken = "INSERT_DEVELOPER_TOKEN_HERE"
loginCustomerId = "INSERT_LOGIN_CUSTOMER_ID_HERE"

[OAUTH2]
jsonKeyFilePath = "INSERT_ABSOLUTE_PATH_TO_OAUTH2_JSON_KEY_FILE_HERE"
scopes = "https://www.googleapis.com/auth/adwords"
יוצרים מופע של אובייקט GoogleAdsClient.
$oAuth2Credential = (new OAuth2TokenBuilder())
    ->fromFile('/path/to/google_ads_php.ini')
    ->build();

$googleAdsClient = (new GoogleAdsClientBuilder())
    ->fromFile('/path/to/google_ads_php.ini')
    ->withOAuth2Credential($oAuth2Credential)
    ->build();
לאחר מכן, מריצים דוח קמפיינים באמצעות השיטה GoogleAdsService.SearchStream כדי לאחזר את הקמפיינים בחשבון.
public static function runExample(GoogleAdsClient $googleAdsClient, int $customerId)
{
$googleAdsServiceClient = $googleAdsClient->getGoogleAdsServiceClient();
// Creates a query that retrieves all campaigns.
$query = 'SELECT campaign.id, campaign.name FROM campaign ORDER BY campaign.id';
// Issues a search stream request.
/** @var GoogleAdsServerStreamDecorator $stream */
$stream = $googleAdsServiceClient->searchStream(
SearchGoogleAdsStreamRequest::build($customerId, $query)
);
// Iterates over all rows in all messages and prints the requested field values for
// the campaign in each row.
foreach ($stream->iterateAllElements() as $googleAdsRow) {
/** @var GoogleAdsRow $googleAdsRow */
printf(
"Campaign with ID %d and name '%s' was found.%s",
$googleAdsRow->getCampaign()->getId(),
$googleAdsRow->getCampaign()->getName(),
PHP_EOL
);
}
}
Python
ספריית הלקוח מופצת ב-PyPI ואפשר להתקין אותה באמצעות הפקודה pip באופן הבא:
python -m pip install google-ads==31.0.0יוצרים עותק של הקובץ google-ads.yaml ממאגר GitHub ומשנים אותו כך שיכלול את פרטי הכניסה שלכם.
developer_token: INSERT_DEVELOPER_TOKEN_HERE
login_customer_id: INSERT_LOGIN_CUSTOMER_ID_HERE
json_key_file_path: JSON_KEY_FILE_PATH_HERE
יוצרים מכונת GoogleAdsClient על ידי קריאה ל-method GoogleAdsClient.load_from_storage. מעבירים את הנתיב אל google-ads.yaml כמחרוזת ל-method כשמבצעים קריאה אליה:
from google.ads.googleads.client import GoogleAdsClient
client = GoogleAdsClient.load_from_storage("path/to/google-ads.yaml")
מוסיפים ל-logger של הספרייה handler שמציין איפה להדפיס את היומנים.
הפקודה הבאה תגרום ליומן של הספרייה להדפיס את הפלט במסוף (stdout).
import logging
import sys

logger = logging.getLogger('google.ads.googleads.client')
logger.addHandler(logging.StreamHandler(sys.stdout))
לאחר מכן, מריצים דוח קמפיינים באמצעות השיטה GoogleAdsService.SearchStream כדי לאחזר את הקמפיינים בחשבון.
def main(client: GoogleAdsClient, customer_id: str) -> None:
ga_service: GoogleAdsServiceClient = client.get_service("GoogleAdsService")
query: str = """
SELECT
campaign.id,
campaign.name
FROM campaign
ORDER BY campaign.id"""
# Issues a search request using streaming.
stream: Iterator[SearchGoogleAdsStreamResponse] = ga_service.search_stream(
customer_id=customer_id, query=query
)
for batch in stream:
rows: List[GoogleAdsRow] = batch.results
for row in rows:
print(
f"Campaign with ID {row.campaign.id} and name "
f'"{row.campaign.name}" was found.'
)
Ruby
קבצי ה-gem של Ruby לספריית הלקוח מתפרסמים באתר האירוח של Rubygems gem. הדרך המומלצת להתקין היא באמצעות bundler. מוסיפים שורה לקובץ Gemfile:
gem 'google-ads-googleads', '~> 41.0.0'
ואז מריצים:
bundle installיוצרים עותק של הקובץ
google_ads_config.rb
מהמאגר ב-GitHub ומשנים אותו כך שיכלול את פרטי הכניסה שלכם.
Google::Ads::GoogleAds::Config.new do |c|
  c.developer_token = 'INSERT_DEVELOPER_TOKEN_HERE'
  c.login_customer_id = 'INSERT_LOGIN_CUSTOMER_ID_HERE'
  c.keyfile = 'JSON_KEY_FILE_PATH'
end
יוצרים מופע GoogleAdsClient על ידי העברת הנתיב למיקום שבו שומרים את הקובץ הזה.
client = Google::Ads::GoogleAds::GoogleAdsClient.new('path/to/google_ads_config.rb')
לאחר מכן, מריצים דוח קמפיינים באמצעות השיטה GoogleAdsService.SearchStream כדי לאחזר את הקמפיינים בחשבון.
def get_campaigns(customer_id)
# GoogleAdsClient will read a config file from
# ENV['HOME']/google_ads_config.rb when called without parameters
client = Google::Ads::GoogleAds::GoogleAdsClient.new
responses = client.service.google_ads.search_stream(
customer_id: customer_id,
query: 'SELECT campaign.id, campaign.name FROM campaign ORDER BY campaign.id',
)
responses.each do |response|
response.results.each do |row|
puts "Campaign with ID #{row.campaign.id} and name '#{row.campaign.name}' was found."
end
end
end
Perl
הספרייה מופצת ב-CPAN. מתחילים בשיבוט
מאגר google-ads-perl בספרייה הרצויה.
git clone https://github.com/googleads/google-ads-perl.gitעוברים לספרייה google-ads-perl ומריצים את הפקודה הבאה בשורת הפקודה כדי להתקין את כל התלויות שנדרשות לשימוש בספרייה.
cd google-ads-perlcpan install Module::Buildperl Build.PLperl Build installdeps
יוצרים עותק של הקובץ
googleads.properties
מהמאגר ב-GitHub ומשנים אותו כך שיכלול את פרטי הכניסה שלכם.
jsonKeyFilePath=JSON_KEY_FILE_PATH
developerToken=INSERT_DEVELOPER_TOKEN_HERE
loginCustomerId=INSERT_LOGIN_CUSTOMER_ID_HERE
יוצרים מופע של Client על ידי העברת הנתיב למיקום שבו שומרים את הקובץ הזה.
my $properties_file = "/path/to/googleads.properties";

my $api_client = Google::Ads::GoogleAds::Client->new({
  properties_file => $properties_file
});
לאחר מכן, מריצים דוח קמפיינים באמצעות השיטה GoogleAdsService.SearchStream כדי לאחזר את הקמפיינים בחשבון.
sub get_campaigns {
my ($api_client, $customer_id) = @_;
# Create a search Google Ads stream request that will retrieve all campaigns.
my $search_stream_request =
Google::Ads::GoogleAds::V24::Services::GoogleAdsService::SearchGoogleAdsStreamRequest
->new({
customerId => $customer_id,
query =>
"SELECT campaign.id, campaign.name FROM campaign ORDER BY campaign.id"
});
# Get the GoogleAdsService.
my $google_ads_service = $api_client->GoogleAdsService();
my $search_stream_handler =
Google::Ads::GoogleAds::Utils::SearchStreamHandler->new({
service => $google_ads_service,
request => $search_stream_request
});
# Issue a search request and process the stream response to print the requested
# field values for the campaign in each row.
$search_stream_handler->process_contents(
sub {
my $google_ads_row = shift;
printf "Campaign with ID %d and name '%s' was found.\n",
$google_ads_row->{campaign}{id}, $google_ads_row->{campaign}{name};
});
return 1;
}
curl
מתחילים בהגדרת חשבון השירות כפרטי הכניסה הפעילים ב-CLI של gcloud.
gcloud auth login --cred-file=PATH_TO_CREDENTIALS_JSONלאחר מכן, מאחזרים אסימון גישה מסוג OAuth 2.0 ל-Google Ads API.
gcloud auth \
  print-access-token \
  --scopes='https://www.googleapis.com/auth/adwords'
לאחר מכן, מריצים דוח קמפיינים באמצעות השיטה GoogleAdsService.SearchStream כדי לאחזר את הקמפיינים בחשבון.
curl -i -X POST https://googleads.googleapis.com/v24/customers/CUSTOMER_ID/googleAds:searchStream \
   -H "Content-Type: application/json" \
   -H "Authorization: Bearer ACCESS_TOKEN" \
   -H "developer-token: DEVELOPER_TOKEN" \
   -H "login-customer-id: LOGIN_CUSTOMER_ID" \
   --data-binary "@query.json"
התוכן של query.json הוא:
{
  "query": "SELECT campaign.id, campaign.name, campaign.network_settings.target_content_network FROM campaign ORDER BY campaign.id"
}
אם נתקלתם בשגיאות כשביצעתם את הקריאה הראשונה, במאמר טיפול בשגיאות ב-API מוסבר איך לפתור בעיות.