Stay organized with collections
Save and categorize content based on your preferences.
Use the Android Emulator
to test AR scenarios without a physical device. The Android Emulator lets you
run ARCore apps in a virtual environment with an emulated device that you
control.
In Android Studio open the Device Manager by clicking Tools > Device Manager.
Click Create Device, at the top of the Device Manager panel.
Select or create your desired Phone hardware profile and select Next.
Select an x86 or x86_64 system image running API Level 27 or later
and select Next.
While physical ARCore devices are supported on API Level 24 or later,
Android Emulator support requires API Level 27 or later.
Only x86-based Android Emulator architectures are supported. Other
architectures such as arm64-v8a, armeabi-v7, are not currently
supported.
Verify that your virtual device is configured correctly:
Click Show Advanced Settings.
Make sure that Camera Back is set to VirtualScene.
Click Finish to create your AVD.
Run your app
Test an ARCore app on an AR-supported virtual device in the emulator. To do
this, you can follow the Android Studio instructions to
Run an app in the Android Emulator.
Update Google Play Services for AR
The version of Google Play Services for AR on the emulator is likely out of
date. Follow these instructions to update it:
Download the latest Google_Play_Services_for_AR_1.50.0_x86_for_emulator.apk from the GitHub
releases page.
Install the downloaded APK into each AVD you'd like to use:
Start the desired AVD, then drag the downloaded APK from your system folder
(i.e., Downloads) onto the running
emulator, or install it using adb while the virtual device is running:
Repeat these steps process for any additional AVDs you'd like to use.
Control the virtual scene
When your app connects to ARCore, you’ll see an overlay describing how to control
the camera and a status bar below the emulator window.
Move the virtual camera
Press and hold Shift to access camera movement controls.
Use the following controls to move the camera:
Action
What to do
Move left or right
Hold Shift + press A or D
Move down or up
Hold Shift + press Q or E
Move forward or back
Hold Shift + press W or S
Change device orientation
Hold Shift + move mouse
Release Shift to return to interactive mode in the emulator.
Use the Virtual Sensors tab in Extended controls
for more precise device positioning.
Add Augmented Images to the scene
Load images into the emulator’s simulated environment to test Augmented Images.
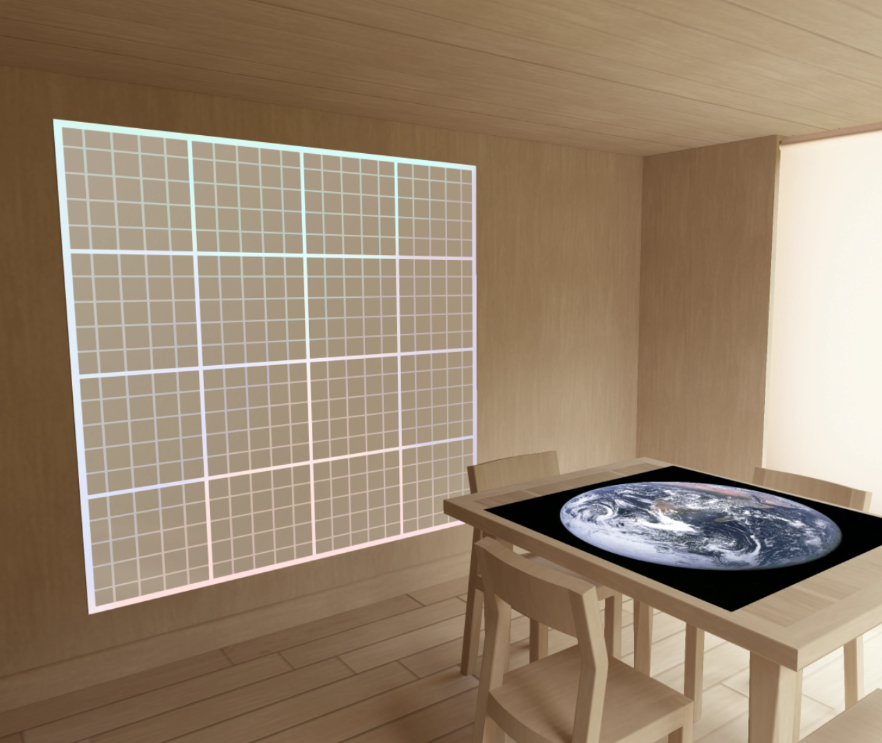
Use the Camera tab in Extended controls to add or modify Scene images.
There are two image locations, one on the wall and one on the table.
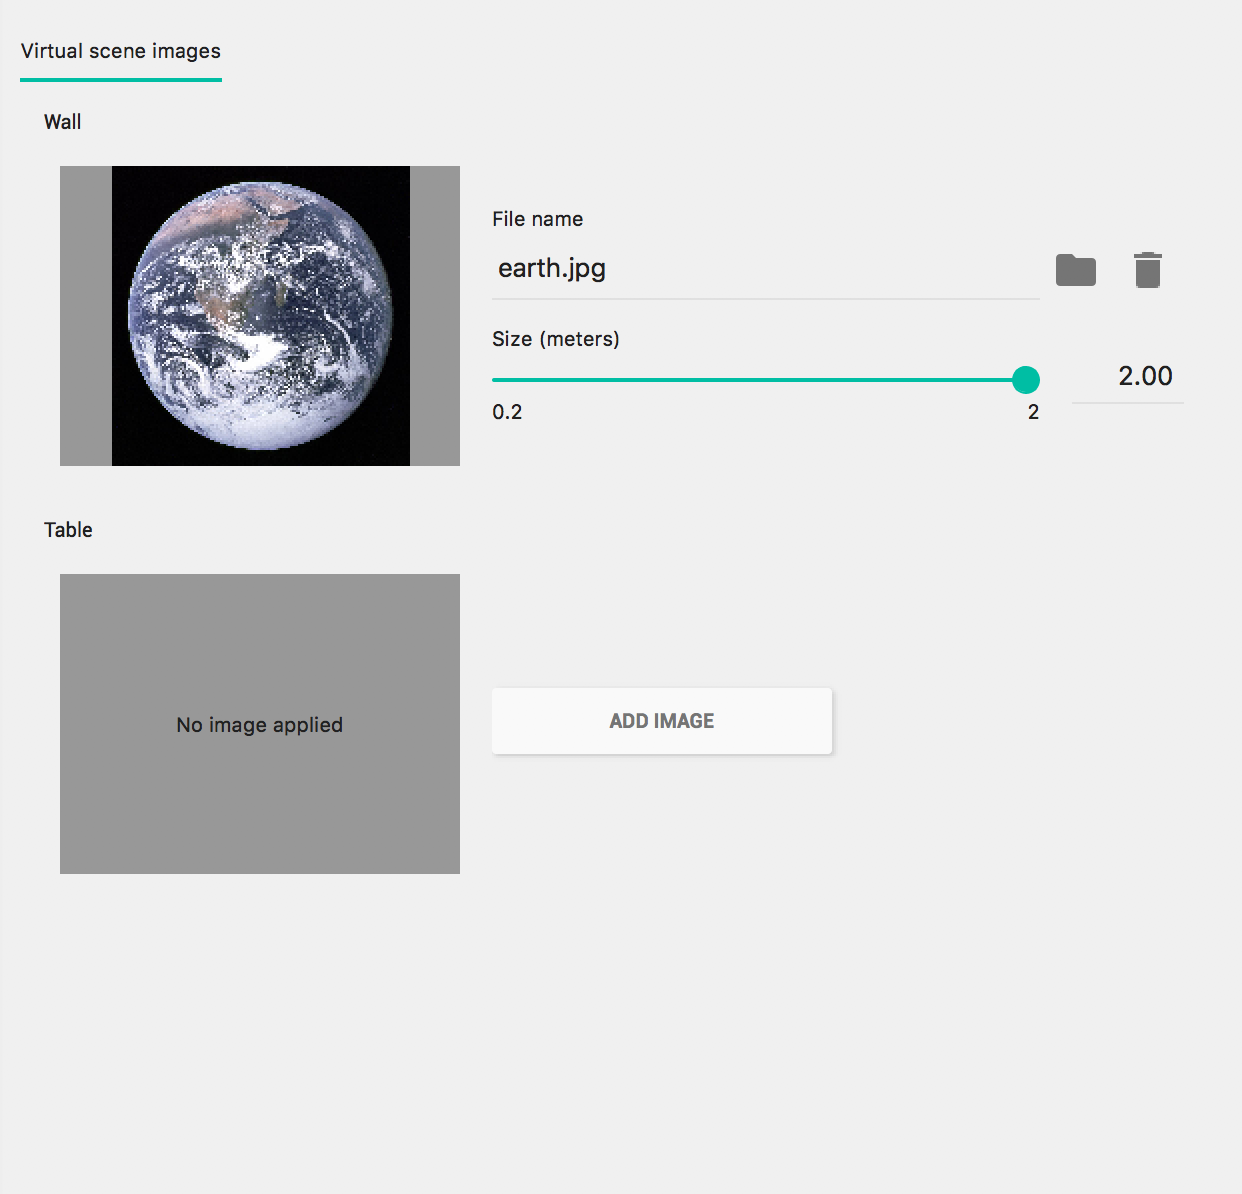
To view these image locations in the scene, launch your emulator, then move the
camera to the dining room area through the door behind the camera’s starting
position.
Troubleshooting tips
If your ARCore app launches and you see a "This device does not support AR"
message, check the revision on your system image. Make sure you are using
API Level 27 Revision 4 or later.
If your ARCore app fails to open the camera when it launches, make sure that
Camera Back is set to VirtualScene,
as described in the configuration steps above.
If your ARCore app fails to open with the error message "Failed to create AR
session" check the app log. If you find a java.lang.UnsatisfiedLinkError
with a message that contains /lib/arm/libarcore_c.so" is for EM_ARM (40)
instead of EM_386 (3), you may have installed the wrong version of the
Google Play Services for AR apk. Create a new virtual device and install
the x86 version.
[[["Easy to understand","easyToUnderstand","thumb-up"],["Solved my problem","solvedMyProblem","thumb-up"],["Other","otherUp","thumb-up"]],[["Missing the information I need","missingTheInformationINeed","thumb-down"],["Too complicated / too many steps","tooComplicatedTooManySteps","thumb-down"],["Out of date","outOfDate","thumb-down"],["Samples / code issue","samplesCodeIssue","thumb-down"],["Other","otherDown","thumb-down"]],["Last updated 2025-07-14 UTC."],[[["\u003cp\u003eUse the Android Emulator to test AR scenarios without a physical device by running ARCore apps in a virtual environment.\u003c/p\u003e\n"],["\u003cp\u003eSet up your development environment by installing Android Studio 3.1 or later and Android Emulator 27.2.9 or later, then create a virtual device with AR support by configuring it with an x86 or x86_64 system image running API Level 27 or later and setting the Camera Back to VirtualScene.\u003c/p\u003e\n"],["\u003cp\u003eUpdate Google Play Services for AR on the emulator by downloading and installing the latest APK from the GitHub releases page.\u003c/p\u003e\n"],["\u003cp\u003eControl the virtual scene by pressing and holding Shift for camera movements and using the Virtual Sensors tab in Extended controls for precise positioning, while adding Augmented Images using the Camera tab in Extended controls to load images into the simulated environment.\u003c/p\u003e\n"]]],["To test AR apps without a physical device, use the Android Emulator. First, install Android Studio and the required SDK tools (Android Emulator 27.2.9+ and Google APIs Intel x86 Atom System Image API Level 27+). Create a new Android Virtual Device (AVD) with an x86 system image, ensuring \"Camera Back\" is set to \"VirtualScene.\" Update Google Play Services for AR by installing the correct APK. Control the virtual camera using Shift and WASDQE keys. Add scene images via Extended Controls.\n"],null,["Use the [Android Emulator](https://developer.android.com/studio/run/emulator.html)\nto test AR scenarios without a physical device. The Android Emulator lets you\nrun ARCore apps in a virtual environment with an emulated device that you\ncontrol.\n\nSet up your development environment\n\nSoftware requirements:\n\n- [Android Studio](https://developer.android.com/studio/) **3.1** or later.\n\n- [Android Emulator](https://developer.android.com/studio/run/emulator.html#Requirements)\n **27.2.9** or later.\n\nGet Android Studio and SDK tools for ARCore\n\n1. Install [Android Studio](https://developer.android.com/studio/) 3.1 or later.\n\n2. In Android Studio, go to **Preferences \\\u003e Appearance and Behavior \\\u003e System Settings \\\u003e Android SDK**.\n\n3. Select the **SDK Platforms** tab and check **Show Package Details**.\n\n Under the appropriate Android version select: \n\n **Google APIs Intel x86 Atom System Image** API Level 27 or later.\n4. Select the **SDK Tools** tab and add **Android Emulator** 27.2.9 or later.\n\n5. Click **OK** to install the selected packages and tools.\n\n6. Click **OK** again to confirm changes.\n\n7. **Accept** the license agreement for the Component Installer.\n\n8. Click **Finish**.\n\nCreate a virtual device with AR support\n\nFor more information, see the Android Studio instructions to [Create a\nVirtual Device](https://developer.android.com/studio/run/managing-avds.html#createavd).\n\nCreate a new Android Virtual Device (AVD)\n\n1. In Android Studio open the *Device Manager* by clicking **Tools \\\u003e Device Manager**.\n\n2. Click **Create Device** , at the top of the *Device Manager* panel.\n\n3. Select or create your desired *Phone* hardware profile and select **Next**.\n\n4. Select an `x86` or `x86_64` system image running **API Level 27 or later**\n and select **Next** . \n\n - While physical ARCore devices are supported on API Level 24 or later,\n Android Emulator support requires API Level 27 or later.\n\n - Only x86-based Android Emulator architectures are supported. Other\n architectures such as `arm64-v8a`, `armeabi-v7`, are not currently\n supported.\n\n5. Verify that your virtual device is configured correctly:\n\n - Click **Show Advanced Settings**.\n\n - Make sure that **Camera Back** is set to **VirtualScene**.\n\n6. Click **Finish** to create your AVD.\n\nRun your app\n\nTest an ARCore app on an AR-supported virtual device in the emulator. To do\nthis, you can follow the Android Studio instructions to\n[Run an app in the Android Emulator](https://developer.android.com/studio/run/emulator.html#runningapp).\n| **Note:** To run apps with NDK components in the Android Emulator, your app must be built with [**x86 ABIs**](https://developer.android.com/ndk/guides/abis.html). For an example, see the [**ARCore HelloAR C sample app**](https://github.com/google-ar/arcore-android-sdk/tree/master/samples/hello_ar_c).\n\nUpdate Google Play Services for AR\n\nThe version of Google Play Services for AR on the emulator is likely out of\ndate. Follow these instructions to update it:\n\n1. Download the latest **Google_Play_Services_for_AR_1.50.0_x86_for_emulator.apk** from the GitHub\n [releases](https://github.com/google-ar/arcore-android-sdk/releases) page.\n\n2. Install the downloaded APK into each AVD you'd like to use:\n\n Start the desired AVD, then drag the downloaded APK from your system folder\n (i.e., **Downloads** ) onto the running\n emulator, or install it using `adb` while the virtual device is running: \n\n ```\n adb install -r Google_Play_Services_for_AR_1.50.0_x86_for_emulator.apk\n ```\n\n \u003cbr /\u003e\n\nRepeat these steps process for any additional AVDs you'd like to use.\n\nControl the virtual scene\n\nWhen your app connects to ARCore, you'll see an overlay describing how to control\nthe camera and a status bar below the emulator window.\n\nMove the virtual camera\n\nPress and hold **Shift** to access camera movement controls.\nUse the following controls to move the camera:\n\n\u003cbr /\u003e\n\n| Action | What to do |\n|---------------------------|---------------------------------------|\n| Move left or right | Hold **Shift** + press **A** or **D** |\n| Move down or up | Hold **Shift** + press **Q** or **E** |\n| Move forward or back | Hold **Shift** + press **W** or **S** |\n| Change device orientation | Hold **Shift** + move mouse |\n\n\u003cbr /\u003e\n\nRelease **Shift** to return to interactive mode in the emulator.\n\nUse the **Virtual Sensors** tab in [Extended controls](https://developer.android.com/studio/run/emulator.html#extended)\nfor more precise device positioning.\n\nAdd Augmented Images to the scene\n\nLoad images into the emulator's simulated environment to test [Augmented Images](/ar/develop/augmented-images).\n\nUse the **Camera** tab in **Extended controls** to add or modify **Scene images**.\nThere are two image locations, one on the wall and one on the table.\n\nTo view these image locations in the scene, launch your emulator, then move the\ncamera to the dining room area through the door behind the camera's starting\nposition.\n\nTroubleshooting tips\n\n- If your ARCore app launches and you see a \"This device does not support AR\"\n message, check the revision on your system image. Make sure you are using\n **API Level 27 Revision 4 or later**.\n\n- If your ARCore app fails to open the camera when it launches, make sure that\n **Camera Back** is set to **VirtualScene** ,\n as described in the [configuration steps above](#configure_the_virtual_device).\n\n- If your ARCore app fails to open with the error message \"Failed to create AR\n session\" check the app log. If you find a `java.lang.UnsatisfiedLinkError`\n with a message that contains `/lib/arm/libarcore_c.so\" is for EM_ARM (40)\n instead of EM_386 (3)`, you may have installed the wrong version of the\n **Google Play Services for AR** apk. Create a new virtual device and install\n the x86 version."]]