建構以 Android 12 (SDK 級別 31) 為目標的 Android 專案時,您可能會遇到下列錯誤:
Could not determine the dependencies of task ':launcher:compileDebugJavaWithJavac'.
> Installed Build Tools revision 31.0.0 is corrupted. Remove and install again using the SDK Manager.
> Configure project :launcher
WARNING: The option 'android.enableR8' is deprecated and should not be used anymore.
It will be removed in a future version of the Android Gradle plugin, and will no longer allow you to disable R8.
Build-tool 31.0.0 is missing DX at <android-sdk-path>/sdk/build-tools/31.0.0/dx
File ~/.android/repositories.cfg could not be loaded.
Build-tool 31.0.0 is missing DX at <android-sdk-path>/sdk/build-tools/31.0.0/dx
這是由於 Android Build Tools 31.0.0 版與 Unity 建構系統不相容所致。自 Android Build Tools 31.0.0 版起,DX 已遭移除,改用 D8,導致 Unity 的 Android 版本無法正常建構。
這項錯誤可能會在下列情況下觸發:
- 升級至 Unity 的 AR Foundation 1.26 版專用的 ARCore 擴充功能
- 在任何 Unity 專案中指定 Android SDK 級別 31,不論 ARCore Extensions 版本為何
- 在安裝 Build Tools 31.0.0 時,無論 ARCore Extensions 版本為何,在任何 Unity 專案中指定 Android SDK 30 級別。
解決方法
我們正在與 Unity 合作,解決這個不相容問題。在此同時,請按照操作說明建構指定 Android 12 的專案:
在 Project Settings > Player > Android > Publishing Settings > Build 中選取兩者:
- Custom Main Gradle Template、
- Custom Launcher Gradle Template。
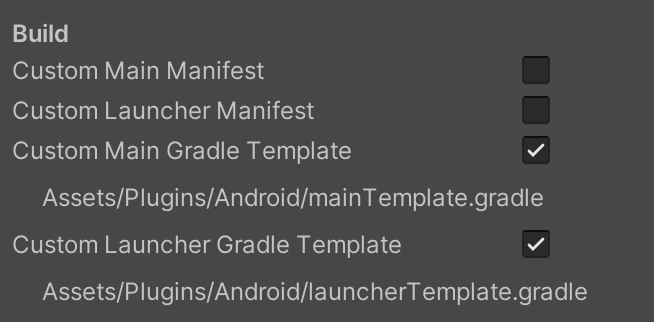
對兩個產生的檔案套用下列變更:
Assets/Plugins/Android/mainTemplate.gradleAssets/Plugins/Android/launcherTemplate.gradle
請移除檔案頂端的以下註解 (如有):
// GENERATED BY UNITY. REMOVE THIS COMMENT TO PREVENT OVERWRITING WHEN EXPORTING AGAIN然後修改
compileSdkVersion和buildToolsVersion,如下所示:buildToolsVersion '30.0.3'
建構時,Unity 會下載 Build-Tools 30.0.3 版,並使用該版本建構專案,同時保留所選 targetSdkVersion。
建立自訂 Gradle 建構作業
如果您使用舊版建構的 2019.4、2020.1 和 2020.2 版的 Unity,請將自訂 Gradle 版本設為 Gradle 6.1.1 以上版本。也需要 Android Gradle 外掛程式 4.0.1 以上版本。
目標 SDK 31 的應用程式需要使用 Gradle 6.1.1 以上版本。
- 前往 Preferences > External Tools > Android > Gradle,並將自訂 Gradle 版本設為 Gradle 6.1.1 以上版本。如要查看下載內容,請參閱 Gradle 建構工具。
對兩個產生的檔案套用下列變更:
Assets/Plugins/Android/mainTemplate.gradleAssets/Plugins/Android/launcherTemplate.gradle
buildscript {
    repositories {
        google()
        jcenter()
    }
    dependencies {
        // Must be Android Gradle Plugin 4.0.1 or later. For a list of
        // compatible Gradle versions refer to:
        // https://developer.android.com/studio/releases/gradle-plugin
        classpath 'com.android.tools.build:gradle:4.0.1'
    }
}

allprojects {
   repositories {
      google()
      jcenter()
      flatDir {
        dirs 'libs'
      }
   }
}
為指定 Android 12 為目標版本的應用程式套用變更
如果您的應用程式指定 Android 12 為目標版本,則必須明確宣告 android:exported 屬性。如要瞭解 Android 12 的所有變更,請參閱「Android 12 的行為變更」。
在 Project Settings > Player > Android > Publishing Settings > Build 中選取 Custom Main Manifest。
將下列變更套用至
Assets/Plugins/Android/AndroidManifest.xml:請移除檔案頂端的以下註解 (如有):
<!-- GENERATED BY UNITY. REMOVE THIS COMMENT TO PREVENT OVERWRITING WHEN EXPORTING AGAIN-->在
<activity>標記中加入android:exported屬性:<application> <activity android:name="com.unity3d.player.UnityPlayerActivity" android:theme="@style/UnityThemeSelector" android:exported="true"> <intent-filter> <action android:name="android.intent.action.MAIN" /> <category android:name="android.intent.category.LAUNCHER" /> </intent-filter> <meta-data android:name="unityplayer.UnityActivity" android:value="true" /> </activity> </application>