Usa el Android Emulator para probar situaciones de RA sin un dispositivo físico. Android Emulator te permite ejecutar apps de ARCore en un entorno virtual con un dispositivo emulado que controlas.
Configura tu entorno de desarrollo
Requisitos de software:
Android Studio 3.1 o versiones posteriores
Android Emulator 27.2.9 o versiones posteriores.
Obtén Android Studio y las herramientas del SDK para ARCore
Instala Android Studio 3.1 o versiones posteriores.
En Android Studio, ve a Preferences > Appearance and Behavior > System Settings > Android SDK.
Selecciona la pestaña SDK Platforms y marca Show Package Details.
En la versión de Android correspondiente, selecciona:
Google APIs Intel x86 Atom System Image API nivel 27 o versiones posteriores.Selecciona la pestaña SDK Tools y agrega Android Emulator 27.2.9 o versiones posteriores.
Haz clic en OK para instalar los paquetes y las herramientas seleccionados.
Vuelve a hacer clic en OK para confirmar los cambios.
Accept el contrato de licencia del instalador de componentes.
Haz clic en Finish.
Crea un dispositivo virtual con compatibilidad con RA
Para obtener más información, consulta las instrucciones de Android Studio para crear un dispositivo virtual.
Crea un nuevo dispositivo virtual de Android (AVD)
En Android Studio, abre el Administrador de dispositivos haciendo clic en Tools > Device Manager.
Haz clic en Create Device, en la parte superior del panel Administrador de dispositivos.
Selecciona o crea el perfil de hardware Phone que desees y selecciona Next.
Selecciona una imagen del sistema
x86ox86_64que ejecute el nivel de API 27 o versiones posteriores y selecciona Next.Si bien los dispositivos ARCore físicos son compatibles con el nivel de API 24 o versiones posteriores, la compatibilidad con Android Emulator requiere el nivel de API 27 o versiones posteriores.
Solo se admiten arquitecturas de Android Emulator basadas en x86. Actualmente, no se admiten otras arquitecturas, como
arm64-v8ayarmeabi-v7.
Verifica que tu dispositivo virtual esté configurado correctamente:
Haz clic en Show Advanced Settings.
Asegúrate de que Camera Back esté configurado como VirtualScene.
Haz clic en Finish para crear tu AVD.
Ejecuta tu app
Prueba una app de ARCore en un dispositivo virtual compatible con RA en el emulador. Para hacer esto, puedes seguir las instrucciones de Android Studio para ejecutar una app en Android Emulator.
Actualiza los Servicios de Google Play para RA
Es probable que la versión de los Servicios de Google Play para RA en el emulador esté desactualizada. Sigue estas instrucciones para actualizarla:
Descarga la versión más reciente de Google_Play_Services_for_AR_1.54.0_x86_for_emulator.apk desde la página de versiones de GitHub.
Instala el APK descargado en cada AVD que quieras usar:
Inicia el AVD deseado y, luego, arrastra el APK descargado desde la carpeta del sistema (es decir, Downloads) al emulador en ejecución o instálalo con
adbmientras se ejecuta el dispositivo virtual:adb install -r Google_Play_Services_for_AR_1.54.0_x86_for_emulator.apk
Repite estos pasos para los AVD adicionales que quieras usar.
Controla la escena virtual
Cuando tu app se conecte a ARCore, verás una superposición que describe cómo controlar la cámara y una barra de estado debajo de la ventana del emulador.
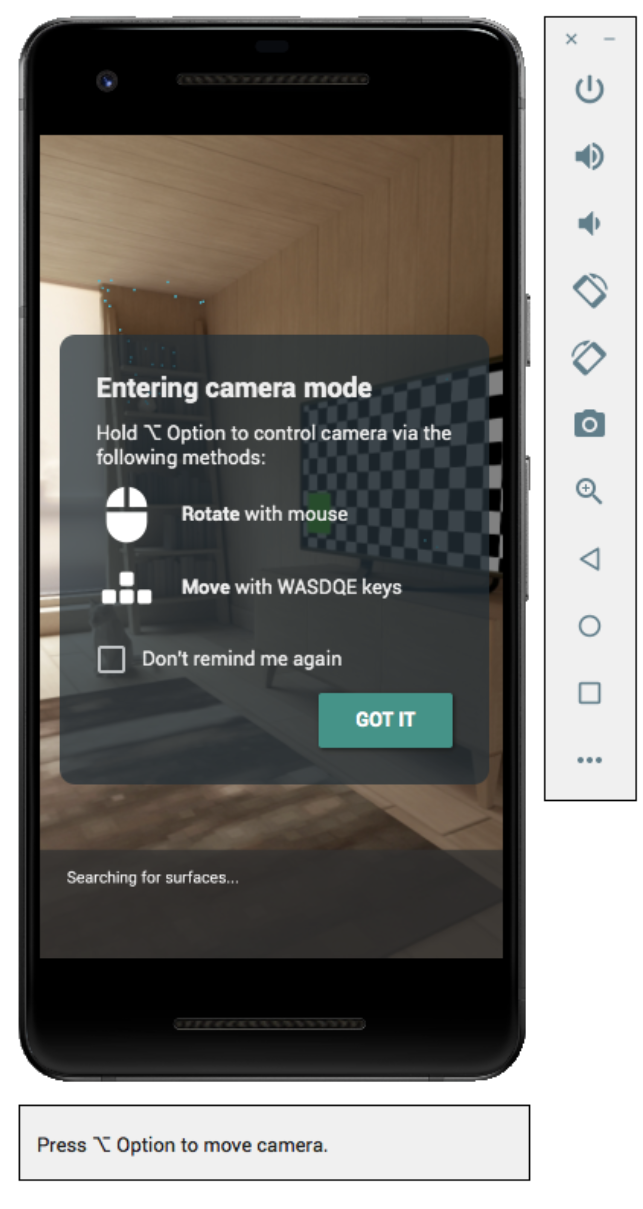
Mueve la cámara virtual
Mantén presionado Shift para acceder a los controles de movimiento de la cámara. Usa los siguientes controles para mover la cámara:
| Acción | Qué hacer |
|---|---|
| Mover a la izquierda o a la derecha | Mantén presionada la tecla Mayús + presiona A o D. |
| Mover hacia abajo o hacia arriba | Mantén presionada la tecla Mayús + presiona Q o E. |
| Avanzar o retroceder | Mantén presionada la tecla Mayús + presiona W o S. |
| Cambiar la orientación del dispositivo | Mantén presionada la tecla Mayús + mueve el mouse. |
Suelta la tecla Shift para volver al modo interactivo en el emulador.
Usa la pestaña Virtual Sensors en Controles extendidos para obtener un posicionamiento más preciso del dispositivo.
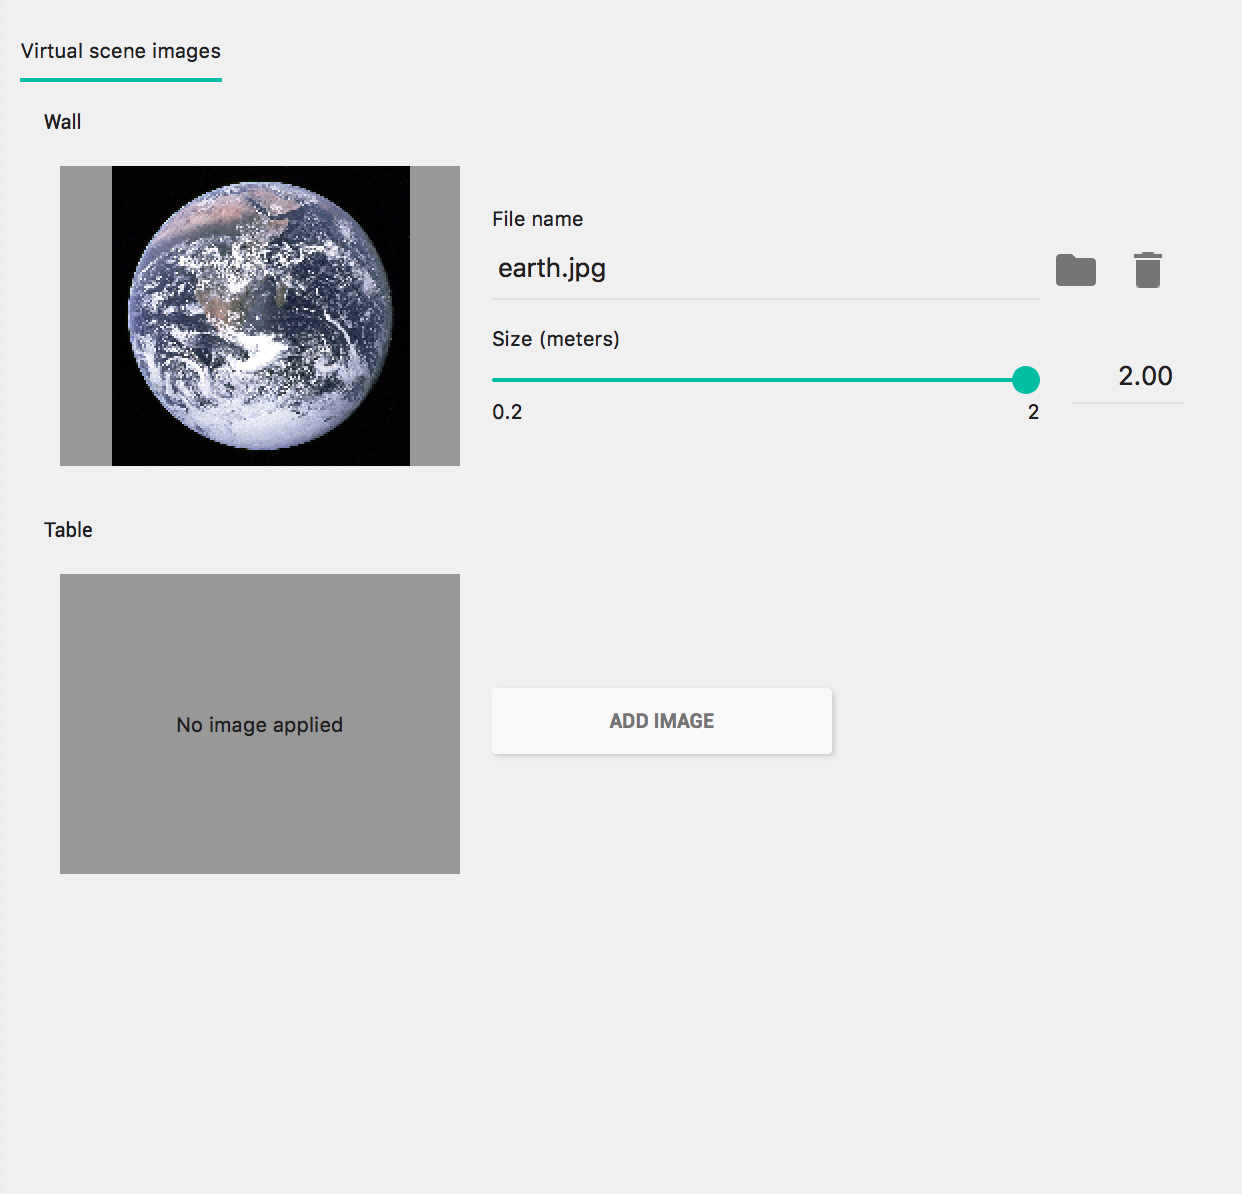
Agrega imágenes aumentadas a la escena
Carga imágenes en el entorno simulado del emulador para probar las imágenes aumentadas.
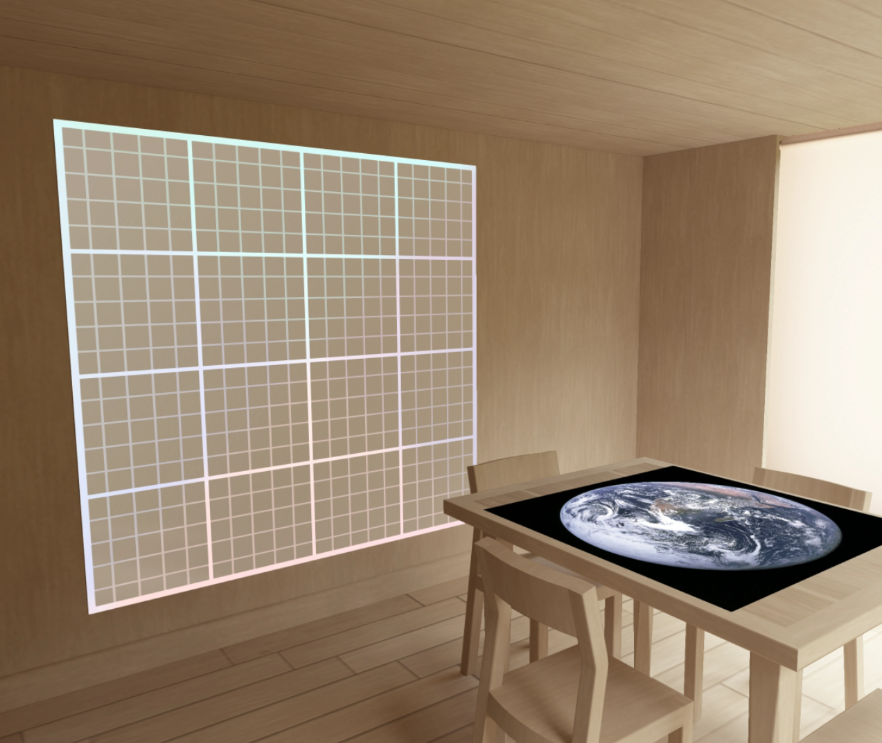
Usa la pestaña Camera en Extended controls para agregar o modificar Scene images. Hay dos ubicaciones de imágenes: una en la pared y otra en la mesa.
Para ver estas ubicaciones de imágenes en la escena, inicia el emulador y, luego, mueve la cámara al área del comedor a través de la puerta que se encuentra detrás de la posición inicial de la cámara.
Sugerencias para solucionar problemas
Si se inicia tu app de ARCore y ves el mensaje "This device does not support AR", verifica la revisión en la imagen del sistema. Asegúrate de usar el nivel de API 27, revisión 4 o versiones posteriores.
Si tu app de ARCore no puede abrir la cámara cuando se inicia, asegúrate de que Camera Back esté configurado como VirtualScene, como se describe en los pasos de configuración anteriores.
Si tu app de ARCore no se abre con el mensaje de error "Failed to create AR session", revisa el registro de la app. Si encuentras un
java.lang.UnsatisfiedLinkErrorcon un mensaje que contiene/lib/arm/libarcore_c.so" is for EM_ARM (40) instead of EM_386 (3), es posible que hayas instalado la versión incorrecta del APK de Servicios de Google Play para RA. Crea un nuevo dispositivo virtual y, luego, instala la versión x86.