Depth API একটি দৃশ্যের বাস্তব বস্তুর আকার এবং আকৃতি বুঝতে একটি ডিভাইসের ক্যামেরাকে সাহায্য করে। এটি গভীরতার চিত্র বা গভীরতার মানচিত্র তৈরি করতে ক্যামেরা ব্যবহার করে, যার ফলে আপনার অ্যাপগুলিতে এআর বাস্তবতার একটি স্তর যুক্ত করা হয়। ভার্চুয়াল অবজেক্টগুলিকে বাস্তব জগতের বস্তুর সামনে বা পিছনে সঠিকভাবে দেখানোর জন্য আপনি গভীরতার চিত্র দ্বারা প্রদত্ত তথ্য ব্যবহার করতে পারেন, নিমজ্জনশীল এবং বাস্তবসম্মত ব্যবহারকারীর অভিজ্ঞতা সক্ষম করে৷
গভীরতার তথ্য গতি থেকে গণনা করা হয় এবং একটি হার্ডওয়্যার গভীরতা সেন্সর থেকে তথ্যের সাথে মিলিত হতে পারে, যেমন একটি টাইম-অফ-ফ্লাইট (ToF) সেন্সর, যদি উপলব্ধ থাকে। Depth API সমর্থন করার জন্য একটি ডিভাইসের একটি ToF সেন্সর প্রয়োজন হয় না ।
পূর্বশর্ত
এগিয়ে যাওয়ার আগে নিশ্চিত করুন যে আপনি মৌলিক AR ধারণা এবং কীভাবে একটি ARCore সেশন কনফিগার করবেন তা বুঝতে পেরেছেন।
গভীরতা-সমর্থিত ডিভাইসগুলিতে অ্যাক্সেস সীমাবদ্ধ করুন
যদি আপনার অ্যাপের ডেপথ এপিআই সমর্থনের প্রয়োজন হয়, কারণ হয় AR অভিজ্ঞতার একটি মূল অংশ গভীরতার উপর নির্ভর করে বা গভীরতা ব্যবহার করে এমন অ্যাপের অংশগুলির জন্য কোনও আকর্ষণীয় ফলব্যাক না থাকায়, আপনি Google Play-তে আপনার অ্যাপের বিতরণ সীমাবদ্ধ করতে বেছে নিতে পারেন ARCore সক্ষম করুন গাইডে বর্ণিত AndroidManifest.xml পরিবর্তনগুলি ছাড়াও আপনার AndroidManifest.xml এ নিম্নলিখিত লাইন যোগ করে Depth API সমর্থন করে এমন ডিভাইসগুলিতে সঞ্চয় করুন:
<uses-feature android:name="com.google.ar.core.depth" />
গভীরতা সক্ষম করুন
একটি নতুন ARCore সেশনে , ব্যবহারকারীর ডিভাইস Depth সমর্থন করে কিনা তা পরীক্ষা করুন৷ প্রসেসিং পাওয়ার সীমাবদ্ধতার কারণে সমস্ত ARCore-সামঞ্জস্যপূর্ণ ডিভাইস ডেপথ API সমর্থন করে না। সম্পদ সংরক্ষণ করতে, ARCore-এ ডিফল্টরূপে গভীরতা অক্ষম করা হয়। আপনার অ্যাপ ডেপথ এপিআই ব্যবহার করতে গভীরতা মোড সক্ষম করুন।
জাভা
Config config = session.getConfig();

// Check whether the user's device supports the Depth API.
boolean isDepthSupported = session.isDepthModeSupported(Config.DepthMode.AUTOMATIC);
if (isDepthSupported) {
  config.setDepthMode(Config.DepthMode.AUTOMATIC);
}
session.configure(config);
কোটলিন
val config = session.config

// Check whether the user's device supports the Depth API.
val isDepthSupported = session.isDepthModeSupported(Config.DepthMode.AUTOMATIC)
if (isDepthSupported) {
  config.depthMode = Config.DepthMode.AUTOMATIC
}
session.configure(config)
গভীরতা ছবি অর্জন
বর্তমান ফ্রেমের জন্য গভীরতার চিত্র পেতে Frame.acquireDepthImage16Bits() এ কল করুন।
জাভা
// Retrieve the depth image for the current frame, if available.
Image depthImage = null;
try {
  depthImage = frame.acquireDepthImage16Bits();
  // Use the depth image here.
} catch (NotYetAvailableException e) {
  // This means that depth data is not available yet.
  // Depth data will not be available if there are no tracked
  // feature points. This can happen when there is no motion, or when the
  // camera loses its ability to track objects in the surrounding
  // environment.
} finally {
  if (depthImage != null) {
    depthImage.close();
  }
}
কোটলিন
// Retrieve the depth image for the current frame, if available.
try {
  frame.acquireDepthImage16Bits().use { depthImage ->
    // Use the depth image here.
  }
} catch (e: NotYetAvailableException) {
  // This means that depth data is not available yet.
  // Depth data will not be available if there are no tracked
  // feature points. This can happen when there is no motion, or when the
  // camera loses its ability to track objects in the surrounding
  // environment.
}
প্রত্যাবর্তিত চিত্রটি কাঁচা চিত্রের বাফার প্রদান করে, যা প্রতিটি রেন্ডার করা বস্তুর জন্য GPU-তে ব্যবহারের জন্য একটি ফ্র্যাগমেন্ট শেডারে প্রেরণ করা যেতে পারে। এটি OPENGL_NORMALIZED_DEVICE_COORDINATES এ ভিত্তিক এবং Frame.transformCoordinates2d() কল করে TEXTURE_NORMALIZED এ পরিবর্তন করা যেতে পারে। একবার অবজেক্ট শেডারের মধ্যে গভীরতার চিত্রটি অ্যাক্সেসযোগ্য হয়ে গেলে, এই গভীরতা পরিমাপগুলি অক্লুশন পরিচালনার জন্য সরাসরি অ্যাক্সেস করা যেতে পারে।
গভীরতার মান বুঝুন
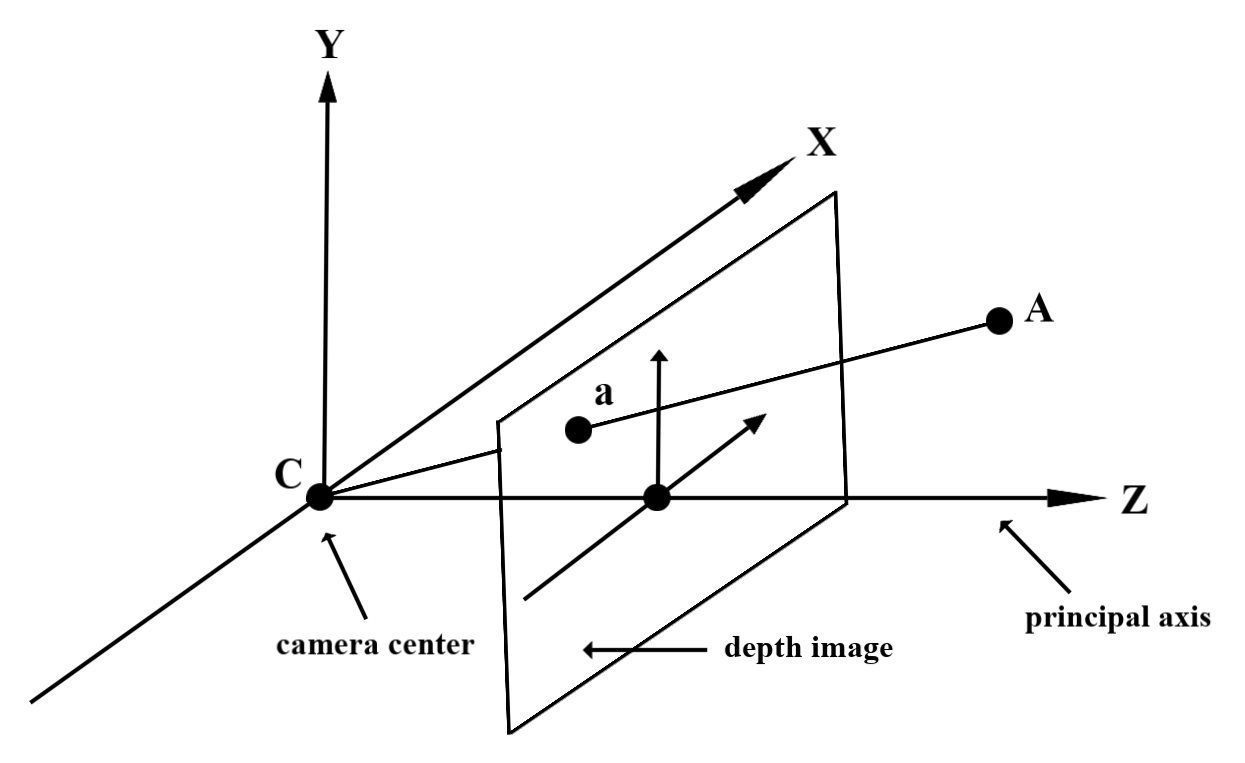
পর্যবেক্ষিত বাস্তব-বিশ্ব জ্যামিতিতে বিন্দু A এবং একটি 2D বিন্দু a গভীরতার চিত্রে একই বিন্দুকে উপস্থাপন করে, a তে Depth API দ্বারা প্রদত্ত মানটি প্রধান অক্ষের উপর প্রক্ষিপ্ত CA এর দৈর্ঘ্যের সমান। এটিকে ক্যামেরার উৎপত্তি C এর সাথে A এর z-অর্ডিনেট হিসাবেও উল্লেখ করা যেতে পারে। Depth API এর সাথে কাজ করার সময়, এটা বোঝা গুরুত্বপূর্ণ যে গভীরতার মানগুলি রশ্মির CA এর দৈর্ঘ্য নয়, বরং এটির অভিক্ষেপ ।
শেডারে গভীরতা ব্যবহার করুন
বর্তমান ফ্রেমের জন্য গভীরতার তথ্য পার্স করুন
বর্তমান স্ক্রিনের অবস্থানের জন্য গভীরতার তথ্য অ্যাক্সেস করতে একটি ফ্র্যাগমেন্ট শেডারে সাহায্যকারী ফাংশন DepthGetMillimeters() এবং DepthGetVisibility() ব্যবহার করুন। তারপরে রেন্ডার করা অবজেক্টের কিছু অংশ বেছে নিতে এই তথ্যটি ব্যবহার করুন।
// Use DepthGetMillimeters() and DepthGetVisibility() to parse the depth image
// for a given pixel, and compare against the depth of the object to render.
float DepthGetMillimeters(in sampler2D depth_texture, in vec2 depth_uv) {
  // Depth is packed into the red and green components of its texture.
  // The texture is a normalized format, storing millimeters.
  vec3 packedDepthAndVisibility = texture2D(depth_texture, depth_uv).xyz;
  return dot(packedDepthAndVisibility.xy, vec2(255.0, 256.0 * 255.0));
}

// Return a value representing how visible or occluded a pixel is relative
// to the depth image. The range is 0.0 (not visible) to 1.0 (completely
// visible).
float DepthGetVisibility(in sampler2D depth_texture, in vec2 depth_uv,
                         in float asset_depth_mm) {
  float depth_mm = DepthGetMillimeters(depth_texture, depth_uv);

  // Instead of a hard Z-buffer test, allow the asset to fade into the
  // background along a 2 * kDepthTolerancePerMm * asset_depth_mm
  // range centered on the background depth.
  const float kDepthTolerancePerMm = 0.015f;
  float visibility_occlusion = clamp(0.5 * (depth_mm - asset_depth_mm) /
    (kDepthTolerancePerMm * asset_depth_mm) + 0.5, 0.0, 1.0);

 // Use visibility_depth_near to set the minimum depth value. If using
 // this value for occlusion, avoid setting it too close to zero. A depth value
 // of zero signifies that there is no depth data to be found.
  float visibility_depth_near = 1.0 - InverseLerp(
      depth_mm, /*min_depth_mm=*/150.0, /*max_depth_mm=*/200.0);

  // Use visibility_depth_far to set the maximum depth value. If the depth
  // value is too high (outside the range specified by visibility_depth_far),
  // the virtual object may get inaccurately occluded at further distances
  // due to too much noise.
  float visibility_depth_far = InverseLerp(
      depth_mm, /*min_depth_mm=*/7500.0, /*max_depth_mm=*/8000.0);

  const float kOcclusionAlpha = 0.0f;
  float visibility =
      max(max(visibility_occlusion, kOcclusionAlpha),
          max(visibility_depth_near, visibility_depth_far));

  return visibility;
}
ভার্চুয়াল বস্তু বন্ধ করুন
ফ্র্যাগমেন্ট শেডারের বডিতে ভার্চুয়াল অবজেক্ট আটকান। এর গভীরতার উপর ভিত্তি করে অবজেক্টের আলফা চ্যানেল আপডেট করুন। এটি একটি অবজেক্টেড অবজেক্ট রেন্ডার করবে।
// Occlude virtual objects by updating the object’s alpha channel based on its depth.
const float kMetersToMillimeters = 1000.0;

float asset_depth_mm = v_ViewPosition.z * kMetersToMillimeters * -1.;

// Compute the texture coordinates to sample from the depth image.
vec2 depth_uvs = (u_DepthUvTransform * vec3(v_ScreenSpacePosition.xy, 1)).xy;

gl_FragColor.a *= DepthGetVisibility(u_DepthTexture, depth_uvs, asset_depth_mm);
আপনি টু-পাস রেন্ডারিং বা প্রতি-অবজেক্ট, ফরওয়ার্ড-পাস রেন্ডারিং ব্যবহার করে অক্লুশন রেন্ডার করতে পারেন। প্রতিটি পদ্ধতির কার্যকারিতা দৃশ্যের জটিলতা এবং অন্যান্য অ্যাপ-নির্দিষ্ট বিবেচনার উপর নির্ভর করে।
প্রতি-অবজেক্ট, ফরোয়ার্ড-পাস রেন্ডারিং
প্রতি-অবজেক্ট, ফরওয়ার্ড-পাস রেন্ডারিং বস্তুর প্রতিটি পিক্সেল এর উপাদান শেডারে থাকা নির্ধারণ করে। যদি পিক্সেলগুলি দৃশ্যমান না হয় তবে সেগুলি ক্লিপ করা হয়, সাধারণত আলফা ব্লেন্ডিংয়ের মাধ্যমে, এইভাবে ব্যবহারকারীর ডিভাইসে বাধা অনুকরণ করে।
দুই-পাস রেন্ডারিং
টু-পাস রেন্ডারিংয়ের সাথে, প্রথম পাসটি সমস্ত ভার্চুয়াল সামগ্রীকে একটি মধ্যস্থতাকারী বাফারে রেন্ডার করে। দ্বিতীয় পাস ভার্চুয়াল দৃশ্যের গভীরতার সাথে বাস্তব জগতের গভীরতার পার্থক্যের উপর ভিত্তি করে ভার্চুয়াল দৃশ্যকে পটভূমিতে মিশ্রিত করে। এই পদ্ধতির জন্য কোনও অতিরিক্ত অবজেক্ট-নির্দিষ্ট শেডার কাজের প্রয়োজন নেই এবং সাধারণত ফরোয়ার্ড-পাস পদ্ধতির তুলনায় আরও অভিন্ন-সুদর্শন ফলাফল তৈরি করে।
গভীরতার ছবি থেকে দূরত্ব বের করুন
ভার্চুয়াল অবজেক্টগুলি আটকানো বা গভীরতার ডেটা ভিজ্যুয়ালাইজ করা ছাড়া অন্য উদ্দেশ্যে ডেপথ এপিআই ব্যবহার করতে, গভীরতার চিত্র থেকে তথ্য বের করুন।
জাভা
/** Obtain the depth in millimeters for depthImage at coordinates (x, y). */
public int getMillimetersDepth(Image depthImage, int x, int y) {
  // The depth image has a single plane, which stores depth for each
  // pixel as 16-bit unsigned integers.
  Image.Plane plane = depthImage.getPlanes()[0];
  int byteIndex = x * plane.getPixelStride() + y * plane.getRowStride();
  ByteBuffer buffer = plane.getBuffer().order(ByteOrder.nativeOrder());
  return Short.toUnsignedInt(buffer.getShort(byteIndex));
}
কোটলিন
/** Obtain the depth in millimeters for [depthImage] at coordinates ([x], [y]). */
fun getMillimetersDepth(depthImage: Image, x: Int, y: Int): UInt {
  // The depth image has a single plane, which stores depth for each
  // pixel as 16-bit unsigned integers.
  val plane = depthImage.planes[0]
  val byteIndex = x * plane.pixelStride + y * plane.rowStride
  val buffer = plane.buffer.order(ByteOrder.nativeOrder())
  val depthSample = buffer.getShort(byteIndex)
  return depthSample.toUInt()
}
ক্যামেরা ইমেজ এবং গভীরতা ইমেজ মধ্যে স্থানাঙ্ক রূপান্তর
getCameraImage() ব্যবহার করে প্রাপ্ত চিত্রগুলির গভীরতার চিত্রগুলির তুলনায় একটি ভিন্ন আকৃতির অনুপাত থাকতে পারে৷ এই ক্ষেত্রে, গভীরতা চিত্রটি ক্যামেরা চিত্রের একটি ক্রপ, এবং ক্যামেরা চিত্রের সমস্ত পিক্সেলের একটি সংশ্লিষ্ট বৈধ গভীরতার অনুমান নেই।
CPU ইমেজে স্থানাঙ্কের জন্য গভীরতার চিত্র স্থানাঙ্ক পেতে:
জাভা
float[] cpuCoordinates = new float[] {cpuCoordinateX, cpuCoordinateY};
float[] textureCoordinates = new float[2];
frame.transformCoordinates2d(
    Coordinates2d.IMAGE_PIXELS,
    cpuCoordinates,
    Coordinates2d.TEXTURE_NORMALIZED,
    textureCoordinates);
if (textureCoordinates[0] < 0 || textureCoordinates[1] < 0) {
  // There are no valid depth coordinates, because the coordinates in the CPU image are in the
  // cropped area of the depth image.
  return null;
}
return new Pair<>(
    (int) (textureCoordinates[0] * depthImage.getWidth()),
    (int) (textureCoordinates[1] * depthImage.getHeight()));
কোটলিন
val cpuCoordinates = floatArrayOf(cpuCoordinateX.toFloat(), cpuCoordinateY.toFloat())
val textureCoordinates = FloatArray(2)
frame.transformCoordinates2d(
  Coordinates2d.IMAGE_PIXELS,
  cpuCoordinates,
  Coordinates2d.TEXTURE_NORMALIZED,
  textureCoordinates,
)
if (textureCoordinates[0] < 0 || textureCoordinates[1] < 0) {
  // There are no valid depth coordinates, because the coordinates in the CPU image are in the
  // cropped area of the depth image.
  return null
}
return (textureCoordinates[0] * depthImage.width).toInt() to
  (textureCoordinates[1] * depthImage.height).toInt()
গভীরতার চিত্র স্থানাঙ্কের জন্য CPU চিত্র স্থানাঙ্ক পেতে:
জাভা
float[] textureCoordinates =
    new float[] {
      (float) depthCoordinateX / (float) depthImage.getWidth(),
      (float) depthCoordinateY / (float) depthImage.getHeight()
    };
float[] cpuCoordinates = new float[2];
frame.transformCoordinates2d(
    Coordinates2d.TEXTURE_NORMALIZED,
    textureCoordinates,
    Coordinates2d.IMAGE_PIXELS,
    cpuCoordinates);
return new Pair<>((int) cpuCoordinates[0], (int) cpuCoordinates[1]);
কোটলিন
val textureCoordinates =
  floatArrayOf(
    depthCoordinatesX.toFloat() / depthImage.width.toFloat(),
    depthCoordinatesY.toFloat() / depthImage.height.toFloat(),
  )
val cpuCoordinates = FloatArray(2)
frame.transformCoordinates2d(
  Coordinates2d.TEXTURE_NORMALIZED,
  textureCoordinates,
  Coordinates2d.IMAGE_PIXELS,
  cpuCoordinates,
)
return cpuCoordinates[0].toInt() to cpuCoordinates[1].toInt()
ডেপথ হিট-টেস্ট
হিট-টেস্ট ব্যবহারকারীদের দৃশ্যের একটি বাস্তব-বিশ্বের অবস্থানে বস্তু স্থাপন করার অনুমতি দেয়। পূর্বে, হিট-পরীক্ষাগুলি শুধুমাত্র সনাক্ত করা প্লেনে পরিচালিত হতে পারে, অবস্থানগুলিকে বড়, সমতল পৃষ্ঠগুলিতে সীমাবদ্ধ করে, যেমন সবুজ অ্যান্ড্রয়েড দ্বারা দেখানো ফলাফলগুলি। গভীরতা হিট-পরীক্ষাগুলি মসৃণ এবং কাঁচা গভীরতার উভয় তথ্যেরই সুবিধা নেয় যাতে আরও সঠিক হিট ফলাফল পাওয়া যায়, এমনকি নন-প্লানার এবং লো-টেক্সচার সারফেসগুলিতেও। এটি লাল অ্যান্ড্রয়েডের সাথে দেখানো হয়েছে।
গভীরতা-সক্ষম হিট-টেস্ট ব্যবহার করতে, hitTest() কল করুন এবং রিটার্ন তালিকায় DepthPoints চেক করুন।
জাভা
// Create a hit test using the Depth API.
List<HitResult> hitResultList = frame.hitTest(tap);
for (HitResult hit : hitResultList) {
  Trackable trackable = hit.getTrackable();
  if (trackable instanceof Plane
      || trackable instanceof Point
      || trackable instanceof DepthPoint) {
    useHitResult(hit);
    break;
  }
}
কোটলিন
// Create a hit test using the Depth API.
val hitResult =
  frame
    .hitTest(tap)
    .filter {
      val trackable = it.trackable
      trackable is Plane || trackable is Point || trackable is DepthPoint
    }
    .firstOrNull()
useHitResult(hitResult)
এরপর কি
- Raw Depth API দিয়ে আরও সঠিক সেন্সিং সক্ষম করুন৷
- ARCore Depth Lab দেখুন, যা গভীরতার ডেটা অ্যাক্সেস করার বিভিন্ন উপায় দেখায়।
Depth API একটি দৃশ্যের বাস্তব বস্তুর আকার এবং আকৃতি বুঝতে একটি ডিভাইসের ক্যামেরাকে সাহায্য করে। এটি গভীরতার চিত্র বা গভীরতার মানচিত্র তৈরি করতে ক্যামেরা ব্যবহার করে, যার ফলে আপনার অ্যাপগুলিতে এআর বাস্তবতার একটি স্তর যুক্ত করা হয়। ভার্চুয়াল অবজেক্টগুলিকে বাস্তব জগতের বস্তুর সামনে বা পিছনে সঠিকভাবে দেখানোর জন্য আপনি গভীরতার চিত্র দ্বারা প্রদত্ত তথ্য ব্যবহার করতে পারেন, নিমজ্জনশীল এবং বাস্তবসম্মত ব্যবহারকারীর অভিজ্ঞতা সক্ষম করে৷
গভীরতার তথ্য গতি থেকে গণনা করা হয় এবং একটি হার্ডওয়্যার গভীরতা সেন্সর থেকে তথ্যের সাথে মিলিত হতে পারে, যেমন একটি টাইম-অফ-ফ্লাইট (ToF) সেন্সর, যদি উপলব্ধ থাকে। Depth API সমর্থন করার জন্য একটি ডিভাইসের একটি ToF সেন্সর প্রয়োজন হয় না ।
পূর্বশর্ত
এগিয়ে যাওয়ার আগে নিশ্চিত করুন যে আপনি মৌলিক AR ধারণা এবং কীভাবে একটি ARCore সেশন কনফিগার করবেন তা বুঝতে পেরেছেন।
গভীরতা-সমর্থিত ডিভাইসগুলিতে অ্যাক্সেস সীমাবদ্ধ করুন
যদি আপনার অ্যাপের ডেপথ এপিআই সমর্থনের প্রয়োজন হয়, কারণ হয় AR অভিজ্ঞতার একটি মূল অংশ গভীরতার উপর নির্ভর করে বা গভীরতা ব্যবহার করে এমন অ্যাপের অংশগুলির জন্য কোনও আকর্ষণীয় ফলব্যাক না থাকায়, আপনি Google Play-তে আপনার অ্যাপের বিতরণ সীমাবদ্ধ করতে বেছে নিতে পারেন ARCore সক্ষম করুন গাইডে বর্ণিত AndroidManifest.xml পরিবর্তনগুলি ছাড়াও আপনার AndroidManifest.xml এ নিম্নলিখিত লাইন যোগ করে Depth API সমর্থন করে এমন ডিভাইসগুলিতে সঞ্চয় করুন:
<uses-feature android:name="com.google.ar.core.depth" />
গভীরতা সক্ষম করুন
একটি নতুন ARCore সেশনে , ব্যবহারকারীর ডিভাইস Depth সমর্থন করে কিনা তা পরীক্ষা করুন৷ প্রসেসিং পাওয়ার সীমাবদ্ধতার কারণে সমস্ত ARCore-সামঞ্জস্যপূর্ণ ডিভাইস ডেপথ API সমর্থন করে না। সম্পদ সংরক্ষণ করতে, ARCore-এ ডিফল্টরূপে গভীরতা অক্ষম করা হয়। আপনার অ্যাপ ডেপথ এপিআই ব্যবহার করতে গভীরতা মোড সক্ষম করুন।
জাভা
Config config = session.getConfig();

// Check whether the user's device supports the Depth API.
boolean isDepthSupported = session.isDepthModeSupported(Config.DepthMode.AUTOMATIC);
if (isDepthSupported) {
  config.setDepthMode(Config.DepthMode.AUTOMATIC);
}
session.configure(config);
কোটলিন
val config = session.config

// Check whether the user's device supports the Depth API.
val isDepthSupported = session.isDepthModeSupported(Config.DepthMode.AUTOMATIC)
if (isDepthSupported) {
  config.depthMode = Config.DepthMode.AUTOMATIC
}
session.configure(config)
গভীরতা ছবি অর্জন
বর্তমান ফ্রেমের জন্য গভীরতার চিত্র পেতে Frame.acquireDepthImage16Bits() এ কল করুন।
জাভা
// Retrieve the depth image for the current frame, if available.
Image depthImage = null;
try {
  depthImage = frame.acquireDepthImage16Bits();
  // Use the depth image here.
} catch (NotYetAvailableException e) {
  // This means that depth data is not available yet.
  // Depth data will not be available if there are no tracked
  // feature points. This can happen when there is no motion, or when the
  // camera loses its ability to track objects in the surrounding
  // environment.
} finally {
  if (depthImage != null) {
    depthImage.close();
  }
}
কোটলিন
// Retrieve the depth image for the current frame, if available.
try {
  frame.acquireDepthImage16Bits().use { depthImage ->
    // Use the depth image here.
  }
} catch (e: NotYetAvailableException) {
  // This means that depth data is not available yet.
  // Depth data will not be available if there are no tracked
  // feature points. This can happen when there is no motion, or when the
  // camera loses its ability to track objects in the surrounding
  // environment.
}
প্রত্যাবর্তিত চিত্রটি কাঁচা চিত্রের বাফার প্রদান করে, যা প্রতিটি রেন্ডার করা বস্তুর জন্য GPU-তে ব্যবহারের জন্য একটি ফ্র্যাগমেন্ট শেডারে প্রেরণ করা যেতে পারে। এটি OPENGL_NORMALIZED_DEVICE_COORDINATES এ ভিত্তিক এবং Frame.transformCoordinates2d() কল করে TEXTURE_NORMALIZED এ পরিবর্তন করা যেতে পারে। একবার অবজেক্ট শেডারের মধ্যে গভীরতার চিত্রটি অ্যাক্সেসযোগ্য হয়ে গেলে, এই গভীরতা পরিমাপগুলি অক্লুশন পরিচালনার জন্য সরাসরি অ্যাক্সেস করা যেতে পারে।
গভীরতার মান বুঝুন
পর্যবেক্ষিত বাস্তব-বিশ্ব জ্যামিতিতে বিন্দু A এবং একটি 2D বিন্দু a গভীরতার চিত্রে একই বিন্দুকে উপস্থাপন করে, a তে Depth API দ্বারা প্রদত্ত মানটি প্রধান অক্ষের উপর প্রক্ষিপ্ত CA এর দৈর্ঘ্যের সমান। এটিকে ক্যামেরার উৎপত্তি C এর সাথে A এর z-অর্ডিনেট হিসাবেও উল্লেখ করা যেতে পারে। Depth API এর সাথে কাজ করার সময়, এটা বোঝা গুরুত্বপূর্ণ যে গভীরতার মানগুলি রশ্মির CA এর দৈর্ঘ্য নয়, বরং এটির অভিক্ষেপ ।
শেডারে গভীরতা ব্যবহার করুন
বর্তমান ফ্রেমের জন্য গভীরতার তথ্য পার্স করুন
বর্তমান স্ক্রিনের অবস্থানের জন্য গভীরতার তথ্য অ্যাক্সেস করতে একটি ফ্র্যাগমেন্ট শেডারে সাহায্যকারী ফাংশন DepthGetMillimeters() এবং DepthGetVisibility() ব্যবহার করুন। তারপরে রেন্ডার করা অবজেক্টের কিছু অংশ বেছে নিতে এই তথ্যটি ব্যবহার করুন।
// Use DepthGetMillimeters() and DepthGetVisibility() to parse the depth image
// for a given pixel, and compare against the depth of the object to render.
float DepthGetMillimeters(in sampler2D depth_texture, in vec2 depth_uv) {
  // Depth is packed into the red and green components of its texture.
  // The texture is a normalized format, storing millimeters.
  vec3 packedDepthAndVisibility = texture2D(depth_texture, depth_uv).xyz;
  return dot(packedDepthAndVisibility.xy, vec2(255.0, 256.0 * 255.0));
}

// Return a value representing how visible or occluded a pixel is relative
// to the depth image. The range is 0.0 (not visible) to 1.0 (completely
// visible).
float DepthGetVisibility(in sampler2D depth_texture, in vec2 depth_uv,
                         in float asset_depth_mm) {
  float depth_mm = DepthGetMillimeters(depth_texture, depth_uv);

  // Instead of a hard Z-buffer test, allow the asset to fade into the
  // background along a 2 * kDepthTolerancePerMm * asset_depth_mm
  // range centered on the background depth.
  const float kDepthTolerancePerMm = 0.015f;
  float visibility_occlusion = clamp(0.5 * (depth_mm - asset_depth_mm) /
    (kDepthTolerancePerMm * asset_depth_mm) + 0.5, 0.0, 1.0);

 // Use visibility_depth_near to set the minimum depth value. If using
 // this value for occlusion, avoid setting it too close to zero. A depth value
 // of zero signifies that there is no depth data to be found.
  float visibility_depth_near = 1.0 - InverseLerp(
      depth_mm, /*min_depth_mm=*/150.0, /*max_depth_mm=*/200.0);

  // Use visibility_depth_far to set the maximum depth value. If the depth
  // value is too high (outside the range specified by visibility_depth_far),
  // the virtual object may get inaccurately occluded at further distances
  // due to too much noise.
  float visibility_depth_far = InverseLerp(
      depth_mm, /*min_depth_mm=*/7500.0, /*max_depth_mm=*/8000.0);

  const float kOcclusionAlpha = 0.0f;
  float visibility =
      max(max(visibility_occlusion, kOcclusionAlpha),
          max(visibility_depth_near, visibility_depth_far));

  return visibility;
}
ভার্চুয়াল বস্তু বন্ধ করুন
ফ্র্যাগমেন্ট শেডারের বডিতে ভার্চুয়াল অবজেক্ট আটকান। এর গভীরতার উপর ভিত্তি করে অবজেক্টের আলফা চ্যানেল আপডেট করুন। এটি একটি অবজেক্টেড অবজেক্ট রেন্ডার করবে।
// Occlude virtual objects by updating the object’s alpha channel based on its depth.
const float kMetersToMillimeters = 1000.0;

float asset_depth_mm = v_ViewPosition.z * kMetersToMillimeters * -1.;

// Compute the texture coordinates to sample from the depth image.
vec2 depth_uvs = (u_DepthUvTransform * vec3(v_ScreenSpacePosition.xy, 1)).xy;

gl_FragColor.a *= DepthGetVisibility(u_DepthTexture, depth_uvs, asset_depth_mm);
আপনি টু-পাস রেন্ডারিং বা প্রতি-অবজেক্ট, ফরওয়ার্ড-পাস রেন্ডারিং ব্যবহার করে অক্লুশন রেন্ডার করতে পারেন। প্রতিটি পদ্ধতির কার্যকারিতা দৃশ্যের জটিলতা এবং অন্যান্য অ্যাপ-নির্দিষ্ট বিবেচনার উপর নির্ভর করে।
প্রতি-অবজেক্ট, ফরোয়ার্ড-পাস রেন্ডারিং
প্রতি-অবজেক্ট, ফরওয়ার্ড-পাস রেন্ডারিং বস্তুর প্রতিটি পিক্সেল এর উপাদান শেডারে থাকা নির্ধারণ করে। যদি পিক্সেলগুলি দৃশ্যমান না হয় তবে সেগুলি ক্লিপ করা হয়, সাধারণত আলফা ব্লেন্ডিংয়ের মাধ্যমে, এইভাবে ব্যবহারকারীর ডিভাইসে বাধা অনুকরণ করে।
দুই-পাস রেন্ডারিং
টু-পাস রেন্ডারিংয়ের সাথে, প্রথম পাসটি সমস্ত ভার্চুয়াল সামগ্রীকে একটি মধ্যস্থতাকারী বাফারে রেন্ডার করে। দ্বিতীয় পাস ভার্চুয়াল দৃশ্যের গভীরতার সাথে বাস্তব জগতের গভীরতার পার্থক্যের উপর ভিত্তি করে ভার্চুয়াল দৃশ্যকে পটভূমিতে মিশ্রিত করে। এই পদ্ধতির জন্য কোনও অতিরিক্ত অবজেক্ট-নির্দিষ্ট শেডার কাজের প্রয়োজন নেই এবং সাধারণত ফরোয়ার্ড-পাস পদ্ধতির তুলনায় আরও অভিন্ন-সুদর্শন ফলাফল তৈরি করে।
গভীরতার ছবি থেকে দূরত্ব বের করুন
ভার্চুয়াল অবজেক্টগুলি আটকানো বা গভীরতার ডেটা ভিজ্যুয়ালাইজ করা ছাড়া অন্য উদ্দেশ্যে ডেপথ এপিআই ব্যবহার করতে, গভীরতার চিত্র থেকে তথ্য বের করুন।
জাভা
/** Obtain the depth in millimeters for depthImage at coordinates (x, y). */
public int getMillimetersDepth(Image depthImage, int x, int y) {
  // The depth image has a single plane, which stores depth for each
  // pixel as 16-bit unsigned integers.
  Image.Plane plane = depthImage.getPlanes()[0];
  int byteIndex = x * plane.getPixelStride() + y * plane.getRowStride();
  ByteBuffer buffer = plane.getBuffer().order(ByteOrder.nativeOrder());
  return Short.toUnsignedInt(buffer.getShort(byteIndex));
}
কোটলিন
/** Obtain the depth in millimeters for [depthImage] at coordinates ([x], [y]). */
fun getMillimetersDepth(depthImage: Image, x: Int, y: Int): UInt {
  // The depth image has a single plane, which stores depth for each
  // pixel as 16-bit unsigned integers.
  val plane = depthImage.planes[0]
  val byteIndex = x * plane.pixelStride + y * plane.rowStride
  val buffer = plane.buffer.order(ByteOrder.nativeOrder())
  val depthSample = buffer.getShort(byteIndex)
  return depthSample.toUInt()
}
ক্যামেরা ইমেজ এবং গভীরতা ইমেজ মধ্যে স্থানাঙ্ক রূপান্তর
getCameraImage() ব্যবহার করে প্রাপ্ত চিত্রগুলির গভীরতার চিত্রগুলির তুলনায় একটি ভিন্ন আকৃতির অনুপাত থাকতে পারে৷ এই ক্ষেত্রে, গভীরতা চিত্রটি ক্যামেরা চিত্রের একটি ক্রপ, এবং ক্যামেরা চিত্রের সমস্ত পিক্সেলের একটি সংশ্লিষ্ট বৈধ গভীরতার অনুমান নেই।
CPU ইমেজে স্থানাঙ্কের জন্য গভীরতার চিত্র স্থানাঙ্ক পেতে:
জাভা
float[] cpuCoordinates = new float[] {cpuCoordinateX, cpuCoordinateY};
float[] textureCoordinates = new float[2];
frame.transformCoordinates2d(
    Coordinates2d.IMAGE_PIXELS,
    cpuCoordinates,
    Coordinates2d.TEXTURE_NORMALIZED,
    textureCoordinates);
if (textureCoordinates[0] < 0 || textureCoordinates[1] < 0) {
  // There are no valid depth coordinates, because the coordinates in the CPU image are in the
  // cropped area of the depth image.
  return null;
}
return new Pair<>(
    (int) (textureCoordinates[0] * depthImage.getWidth()),
    (int) (textureCoordinates[1] * depthImage.getHeight()));
কোটলিন
val cpuCoordinates = floatArrayOf(cpuCoordinateX.toFloat(), cpuCoordinateY.toFloat())
val textureCoordinates = FloatArray(2)
frame.transformCoordinates2d(
  Coordinates2d.IMAGE_PIXELS,
  cpuCoordinates,
  Coordinates2d.TEXTURE_NORMALIZED,
  textureCoordinates,
)
if (textureCoordinates[0] < 0 || textureCoordinates[1] < 0) {
  // There are no valid depth coordinates, because the coordinates in the CPU image are in the
  // cropped area of the depth image.
  return null
}
return (textureCoordinates[0] * depthImage.width).toInt() to
  (textureCoordinates[1] * depthImage.height).toInt()
গভীরতার চিত্র স্থানাঙ্কের জন্য CPU চিত্র স্থানাঙ্ক পেতে:
জাভা
float[] textureCoordinates =
    new float[] {
      (float) depthCoordinateX / (float) depthImage.getWidth(),
      (float) depthCoordinateY / (float) depthImage.getHeight()
    };
float[] cpuCoordinates = new float[2];
frame.transformCoordinates2d(
    Coordinates2d.TEXTURE_NORMALIZED,
    textureCoordinates,
    Coordinates2d.IMAGE_PIXELS,
    cpuCoordinates);
return new Pair<>((int) cpuCoordinates[0], (int) cpuCoordinates[1]);
কোটলিন
val textureCoordinates =
  floatArrayOf(
    depthCoordinatesX.toFloat() / depthImage.width.toFloat(),
    depthCoordinatesY.toFloat() / depthImage.height.toFloat(),
  )
val cpuCoordinates = FloatArray(2)
frame.transformCoordinates2d(
  Coordinates2d.TEXTURE_NORMALIZED,
  textureCoordinates,
  Coordinates2d.IMAGE_PIXELS,
  cpuCoordinates,
)
return cpuCoordinates[0].toInt() to cpuCoordinates[1].toInt()
ডেপথ হিট-টেস্ট
হিট-টেস্ট ব্যবহারকারীদের দৃশ্যের একটি বাস্তব-বিশ্বের অবস্থানে বস্তু স্থাপন করার অনুমতি দেয়। পূর্বে, হিট-পরীক্ষাগুলি শুধুমাত্র সনাক্ত করা প্লেনে পরিচালিত হতে পারে, অবস্থানগুলিকে বড়, সমতল পৃষ্ঠগুলিতে সীমাবদ্ধ করে, যেমন সবুজ অ্যান্ড্রয়েড দ্বারা দেখানো ফলাফলগুলি। গভীরতা হিট-পরীক্ষাগুলি মসৃণ এবং কাঁচা গভীরতার উভয় তথ্যেরই সুবিধা নেয় যাতে আরও সঠিক হিট ফলাফল পাওয়া যায়, এমনকি নন-প্লানার এবং লো-টেক্সচার সারফেসগুলিতেও। এটি লাল অ্যান্ড্রয়েডের সাথে দেখানো হয়েছে।
গভীরতা-সক্ষম হিট-টেস্ট ব্যবহার করতে, hitTest() কল করুন এবং রিটার্ন তালিকায় DepthPoints চেক করুন।
জাভা
// Create a hit test using the Depth API.
List<HitResult> hitResultList = frame.hitTest(tap);
for (HitResult hit : hitResultList) {
  Trackable trackable = hit.getTrackable();
  if (trackable instanceof Plane
      || trackable instanceof Point
      || trackable instanceof DepthPoint) {
    useHitResult(hit);
    break;
  }
}
কোটলিন
// Create a hit test using the Depth API.
val hitResult =
  frame
    .hitTest(tap)
    .filter {
      val trackable = it.trackable
      trackable is Plane || trackable is Point || trackable is DepthPoint
    }
    .firstOrNull()
useHitResult(hitResult)
এরপর কি
- Raw Depth API দিয়ে আরও সঠিক সেন্সিং সক্ষম করুন৷
- ARCore Depth Lab দেখুন, যা গভীরতার ডেটা অ্যাক্সেস করার বিভিন্ন উপায় দেখায়।