
מבוא
במדריך הזה נסביר איך להוסיף למפת Google סמן בדף אינטרנט באמצעות HTML, CSS ו-JavaScript. בנוסף, מוסבר בו איך להגדיר אפשרויות של מפה ואיך להשתמש במיקום של רכיבי בקרה כדי להוסיף תוויות למפה.
בהמשך מוצגת המפה שתיצרו באמצעות המדריך הזה. הסמן ממוקם באולורו (שנקרא גם איירס רוק) בפארק הלאומי אולורו-קאטה ג'וטה.
תחילת העבודה
כדי ליצור מפה של Google עם סמן בדף אינטרנט, צריך לבצע שלושה שלבים:
צריך דפדפן אינטרנט. בוחרים דפדפן מוכר כמו Google Chrome (מומלץ), Firefox, Safari או Edge, בהתאם לפלטפורמה שלכם מרשימת הדפדפנים הנתמכים.
שלב 1: קבלת מפתח API
בקטע הזה מוסבר איך לאמת את האפליקציה שלכם ב-Maps JavaScript API באמצעות מפתח API משלכם.
כדי לקבל מפתח API:
נכנסים ל מסוף Google Cloud.
יוצרים או בוחרים פרויקט.
לוחצים על המשך כדי להפעיל את ה-API ואת כל השירותים שקשורים אליו.
בדף Credentials, מקבלים מפתח API (ומגדירים את ההגבלות על מפתח ה-API). הערה: אם יש לכם מפתח API קיים ללא הגבלות, או מפתח עם הגבלות על דפדפנים, אתם יכולים להשתמש במפתח הזה.
במאמר שימוש במפתחות API מוסבר איך למנוע גניבת מכסות ולאבטח את מפתח ה-API.
מפעילים את החיוב. מידע נוסף מופיע במאמר בנושא שימוש וחיוב.
אחרי שמקבלים מפתח API, מוסיפים אותו לקטע הקוד הבא על ידי לחיצה על YOUR_API_KEY. מעתיקים ומדביקים את תג הסקריפט של טוען האתחול כדי להשתמש בו בדף אינטרנט משלכם.
<script>
  (g=>{var h,a,k,p="The Google Maps JavaScript API",c="google",l="importLibrary",q="__ib__",m=document,b=window;b=b[c]||(b[c]={});var d=b.maps||(b.maps={}),r=new Set,e=new URLSearchParams,u=()=>h||(h=new Promise(async(f,n)=>{await (a=m.createElement("script"));e.set("libraries",[...r]+"");for(k in g)e.set(k.replace(/[A-Z]/g,t=>"_"+t[0].toLowerCase()),g[k]);e.set("callback",c+".maps."+q);a.src=`https://maps.${c}apis.com/maps/api/js?`+e;d[q]=f;a.onerror=()=>h=n(Error(p+" could not load."));a.nonce=m.querySelector("script[nonce]")?.nonce||"";m.head.append(a)}));d[l]?console.warn(p+" only loads once. Ignoring:",g):d[l]=(f,...n)=>r.add(f)&&u().then(()=>d[l](f,...n))})({
    key: "YOUR_API_KEY",
    v: "weekly",
    // Use the 'v' parameter to indicate the version to use (weekly, beta, alpha, etc.).
    // Add other bootstrap parameters as needed, using camel case.
  });
</script>
שלב 2: יוצרים דף HTML
זוהי דוגמה לקוד של דף אינטרנט בסיסי ב-HTML:
<!DOCTYPE html>
<!--
 @license
 Copyright 2025 Google LLC. All Rights Reserved.
 SPDX-License-Identifier: Apache-2.0
-->

<html>
  <head>
    <title>Add a Map</title>

    <link rel="stylesheet" type="text/css" href="./style.css" />
    <script type="module" src="./index.js"></script>
    <!-- prettier-ignore -->
    <script>(g=>{var h,a,k,p="The Google Maps JavaScript API",c="google",l="importLibrary",q="__ib__",m=document,b=window;b=b[c]||(b[c]={});var d=b.maps||(b.maps={}),r=new Set,e=new URLSearchParams,u=()=>h||(h=new Promise(async(f,n)=>{await (a=m.createElement("script"));e.set("libraries",[...r]+"");for(k in g)e.set(k.replace(/[A-Z]/g,t=>"_"+t[0].toLowerCase()),g[k]);e.set("callback",c+".maps."+q);a.src=`https://maps.${c}apis.com/maps/api/js?`+e;d[q]=f;a.onerror=()=>h=n(Error(p+" could not load."));a.nonce=m.querySelector("script[nonce]")?.nonce||"";m.head.append(a)}));d[l]?console.warn(p+" only loads once. Ignoring:",g):d[l]=(f,...n)=>r.add(f)&&u().then(()=>d[l](f,...n))})
        ({key: "YOUR_API_KEY", v: "weekly"});</script>
  </head>
  <body>

    <!-- The map, centered at Uluru, Australia. -->
    <gmp-map center="-25.344,131.031" zoom="4" map-id="DEMO_MAP_ID">
    </gmp-map>

  </body>
</html>
זהו דף HTML בסיסי מאוד שמשתמש בgmp-map element כדי להציג מפה בדף. המפה תהיה ריקה כי עדיין לא הוספנו קוד JavaScript.
הסבר על הקוד
בשלב הזה בדוגמה, יש לנו:
- הצהרתם על האפליקציה כ-HTML5 באמצעות ההצהרה
!DOCTYPE html. - הטעינה של Maps JavaScript API מתבצעת באמצעות טוען bootstrap.
- נוצר רכיב
gmp-mapלהצגת המפה.
הצהרה על האפליקציה כ-HTML5
מומלץ להצהיר על DOCTYPE אמיתי באפליקציית האינטרנט.
בדוגמאות כאן, הצהרנו על האפליקציות שלנו כ-HTML5 באמצעות התג
HTML5 DOCTYPE כמו שמוצג למטה:
<!DOCTYPE html>
רוב הדפדפנים העדכניים יעבדו תוכן שמוצהר באמצעות התג DOCTYPE ב'מצב תקנים', כלומר האפליקציה שלכם תהיה תואמת יותר לדפדפנים שונים. התג DOCTYPE גם נועד לפעול בצורה חלקה; דפדפנים שלא מבינים אותו יתעלמו ממנו וישתמשו ב'מצב מוזר' כדי להציג את התוכן שלהם.
שימו לב: חלק מכללי ה-CSS שפועלים במצב תאימות (quirks mode) לא תקינים במצב standards. בפרט, כל הגדלים שמבוססים על אחוזים צריכים להיות מושפעים מאלמנטים של בלוקים ברמה העליונה, ואם אחד מהאלמנטים האלה לא מציין גודל, הגודל שלו יהיה 0x0 פיקסלים. לכן, אנחנו כוללים את ההצהרה הבאה בנושא style:
<style>
  gmp-map {
    height: 100%;
  }
  html, body {
    height: 100%;
    margin: 0;
    padding: 0;
  }
</style>
טעינת Maps JavaScript API
טוען ה-bootstrap מכין את Maps JavaScript API לטעינה (לא נטענות ספריות עד שמפעילים את התג importLibrary()).
<script>
  (g=>{var h,a,k,p="The Google Maps JavaScript API",c="google",l="importLibrary",q="__ib__",m=document,b=window;b=b[c]||(b[c]={});var d=b.maps||(b.maps={}),r=new Set,e=new URLSearchParams,u=()=>h||(h=new Promise(async(f,n)=>{await (a=m.createElement("script"));e.set("libraries",[...r]+"");for(k in g)e.set(k.replace(/[A-Z]/g,t=>"_"+t[0].toLowerCase()),g[k]);e.set("callback",c+".maps."+q);a.src=`https://maps.${c}apis.com/maps/api/js?`+e;d[q]=f;a.onerror=()=>h=n(Error(p+" could not load."));a.nonce=m.querySelector("script[nonce]")?.nonce||"";m.head.append(a)}));d[l]?console.warn(p+" only loads once. Ignoring:",g):d[l]=(f,...n)=>r.add(f)&&u().then(()=>d[l](f,...n))})({
    key: "YOUR_API_KEY",
    v: "weekly",
    // Use the 'v' parameter to indicate the version to use (weekly, beta, alpha, etc.).
    // Add other bootstrap parameters as needed, using camel case.
  });
</script>
במאמר שלב 3: קבלת מפתח API מוסבר איך לקבל מפתח API משלכם.
בשלב הזה של המדריך מופיע חלון ריק, שמוצג בו רק הטקסט של התווית ללא עיצוב. הסיבה לכך היא שעדיין לא הוספנו קוד JavaScript.
יצירת רכיב gmp-map
כדי שהמפה תוצג בדף אינטרנט, אנחנו צריכים לשריין לה מקום. בדרך כלל, אנחנו עושים את זה על ידי יצירת רכיב gmp-map וקבלת הפניה לרכיב הזה ב-Document Object Model (DOM) של הדפדפן. אפשר גם להשתמש ברכיב div (מידע נוסף), אבל מומלץ להשתמש ברכיב gmp-map.
בדוגמה הבאה מוגדר הרכיב gmp-map, והפרמטרים center, zoom ו-map-id מוגדרים:
<gmp-map center="-25.344,131.031" zoom="4" map-id="DEMO_MAP_ID">
</gmp-map>
האפשרויות center ו-zoom הן תמיד חובה. בדוגמת הקוד שלמעלה, המאפיין center מציין לממשק ה-API איפה למרכז את המפה, והמאפיין zoom מציין את רמת הזום של המפה. רמת הזום: 0 היא רמת הזום הנמוכה ביותר, ומוצגת בה כדור הארץ כולו. כדי להתקרב לכדור הארץ ברזולוציות גבוהות יותר, מגדילים את ערך הזום.
רמות של מרחק התצוגה
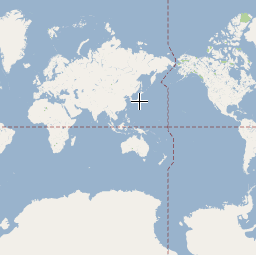
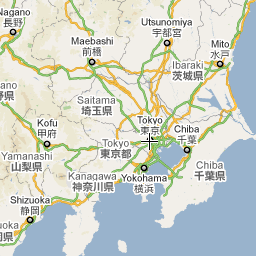
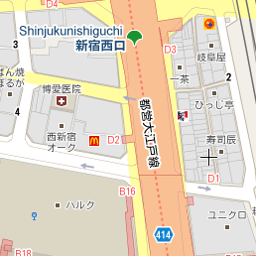
כדי להציג מפה של כדור הארץ כולו כתמונה אחת, צריך ליצור מפה ענקית או מפה קטנה עם רזולוציה נמוכה מאוד. כתוצאה מכך, תמונות המפה במפות Google ובממשק ה-API של JavaScript במפות Google מחולקות ל'משבצות' במפה ול'רמות זום'. ברמות זום נמוכות, קבוצה קטנה של משבצות מפה מכסה שטח רחב. ברמות זום גבוהות יותר, המשבצות הן ברזולוציה גבוהה יותר ומכסות שטח קטן יותר. ברשימה הבאה מפורטות רמות הפירוט המשוערות שיוצגו בכל רמת זום:
- 1: World
- 5: מסת יבשה או יבשת
- 10: עיר
- 15: רחובות
- 20: בניינים
שלוש התמונות הבאות מציגות את אותו מיקום בטוקיו ברמות זום 0, 7 ו-18.
בדוגמה הבאה מוצג קוד ה-CSS שקובע את הגודל של רכיב gmp-map.
/* Set the size of the gmp-map element that contains the map */
gmp-map {
    height: 400px; /* The height is 400 pixels */
    width: 100%; /* The width is the width of the web page */
}
בדוגמת הקוד שלמעלה, רכיב style מגדיר את הגודל של gmp-map. כדי שהמפה תהיה גלויה, צריך להגדיר את הרוחב והגובה שלה לערך שגדול מ-0px. בדוגמה הזו, הגובה של gmp-map מוגדר ל-400 פיקסלים, והרוחב מוגדר ל-100% כדי שהתמונה תוצג לרוחב דף האינטרנט. מומלץ להגדיר תמיד באופן מפורש את סגנונות הגובה והרוחב.
שליטה במיקום המודעות
אפשר להשתמש ב-control slotting כדי להוסיף למפה רכיבי בקרה של טופס HTML. משבצת היא מיקום מוגדר מראש במפה. משתמשים במאפיין slot כדי להגדיר את המיקום הנדרש של רכיב, ומקננים רכיבים בתוך הרכיב gmp-map. קטע הקוד הבא מראה איך מוסיפים תווית HTML לפינה הימנית העליונה של המפה.
<!-- The map, centered at Uluru, Australia. -->
<gmp-map center="-25.344,131.031" zoom="4" map-id="DEMO_MAP_ID">
  <div id="controls" slot="control-inline-start-block-start">
    <h3>My Google Maps Demo</h3>
  </div>
</gmp-map>
שלב 3: מוסיפים קוד JavaScript
בקטע הזה מוסבר איך לטעון את Maps JavaScript API לדף אינטרנט, ואיך לכתוב קוד JavaScript משלכם שמשתמש ב-API כדי להוסיף מפה עם סמן.
TypeScript
async function init(): Promise<void> { // Request the needed libraries. const [{ AdvancedMarkerElement }] = await Promise.all([ google.maps.importLibrary('marker'), google.maps.importLibrary('maps'), ]); // Get the gmp-map element. const mapElement = document.querySelector('gmp-map')!; // Get the inner map. const innerMap = mapElement.innerMap; // Set map options. innerMap.setOptions({ mapTypeControl: false, }); // Add a marker positioned at the map center (Uluru). new AdvancedMarkerElement({ map: innerMap, position: mapElement.center, title: 'Uluru/Ayers Rock', }); } void init();
JavaScript
async function init() { // Request the needed libraries. const [{ AdvancedMarkerElement }] = await Promise.all([ google.maps.importLibrary('marker'), google.maps.importLibrary('maps'), ]); // Get the gmp-map element. const mapElement = document.querySelector('gmp-map'); // Get the inner map. const innerMap = mapElement.innerMap; // Set map options. innerMap.setOptions({ mapTypeControl: false, }); // Add a marker positioned at the map center (Uluru). new AdvancedMarkerElement({ map: innerMap, position: mapElement.center, title: 'Uluru/Ayers Rock', }); } void init();
הקוד שלמעלה מבצע את הפעולות הבאות כשקוראים לפונקציה initMap():
- טוען את הספריות
mapsו-marker. - הפונקציה מקבלת את רכיב המפה מה-DOM.
- הגדרה של אפשרויות נוספות למפה במפה הפנימית.
- הוספת סמן למפה.
קבלת אובייקט המפה והגדרת אפשרויות
innerMap מייצג מופע של המחלקה Map.
כדי להגדיר אפשרויות מפה, מקבלים את מופע innerMap
מרכיב המפה ומפעילים את setOptions.
בקטע הקוד הבא אפשר לראות איך מקבלים את המופע innerMap מ-DOM ואז קוראים ל-setOptions:
// Get the gmp-map element.
const mapElement = document.querySelector(
  "gmp-map"
) as google.maps.MapElement;

// Get the inner map.
const innerMap = mapElement.innerMap;

// Set map options.
innerMap.setOptions({
  mapTypeControl: false,
});
מחכים שהמפה תיטען
כשמשתמשים ברכיב gmp-map, המפה נטענת באופן אסינכרוני. מצב כזה עלול לגרום למרוץ תהליכים אם מתבצעות בקשות אחרות בזמן האתחול (לדוגמה, בקשה למיקום גאוגרפי או לפרטי מקום). כדי לוודא שהקוד יפעל רק אחרי שהמפה נטענת במלואה, צריך להשתמש ב-addListenerOnceגורם מטפל באירועים idle בפונקציית האתחול, כמו שמוצג כאן:
// Do things once the map has loaded.
google.maps.event.addListenerOnce(innerMap, 'idle', () => {
    // Run this code only after the map has loaded.
    console.log("The map is now ready!");
});
כך תוכלו לוודא שהקוד יופעל רק אחרי שהמפה נטענה. ה-handler מופעל רק פעם אחת במהלך מחזור החיים של האפליקציה.
קוד לדוגמה מלא
קוד מלא לדוגמה
TypeScript
async function init(): Promise<void> { // Request the needed libraries. const [{ AdvancedMarkerElement }] = await Promise.all([ google.maps.importLibrary('marker'), google.maps.importLibrary('maps'), ]); // Get the gmp-map element. const mapElement = document.querySelector('gmp-map')!; // Get the inner map. const innerMap = mapElement.innerMap; // Set map options. innerMap.setOptions({ mapTypeControl: false, }); // Add a marker positioned at the map center (Uluru). new AdvancedMarkerElement({ map: innerMap, position: mapElement.center, title: 'Uluru/Ayers Rock', }); } void init();
JavaScript
async function init() { // Request the needed libraries. const [{ AdvancedMarkerElement }] = await Promise.all([ google.maps.importLibrary('marker'), google.maps.importLibrary('maps'), ]); // Get the gmp-map element. const mapElement = document.querySelector('gmp-map'); // Get the inner map. const innerMap = mapElement.innerMap; // Set map options. innerMap.setOptions({ mapTypeControl: false, }); // Add a marker positioned at the map center (Uluru). new AdvancedMarkerElement({ map: innerMap, position: mapElement.center, title: 'Uluru/Ayers Rock', }); } void init();
CSS
/* * Always set the map height explicitly to define the size of the div element * that contains the map. */ gmp-map { height: 100%; } /* * Optional: Makes the sample page fill the window. */ html, body { height: 100%; margin: 0; padding: 0; }
HTML
<html>
<head>
<title>Add a Map</title>
<link rel="stylesheet" type="text/css" href="./style.css" />
<script type="module" src="./index.js"></script>
<script>
// prettier-ignore
(g=>{var h,a,k,p="The Google Maps JavaScript API",c="google",l="importLibrary",q="__ib__",m=document,b=window;b=b[c]||(b[c]={});var d=b.maps||(b.maps={}),r=new Set,e=new URLSearchParams,u=()=>h||(h=new Promise(async(f,n)=>{await (a=m.createElement("script"));e.set("libraries",[...r]+"");for(k in g)e.set(k.replace(/[A-Z]/g,t=>"_"+t[0].toLowerCase()),g[k]);e.set("callback",c+".maps."+q);a.src=`https://maps.${c}apis.com/maps/api/js?`+e;d[q]=f;a.onerror=()=>h=n(Error(p+" could not load."));a.nonce=m.querySelector("script[nonce]")?.nonce||"";m.head.append(a)}));d[l]?console.warn(p+" only loads once. Ignoring:",g):d[l]=(f,...n)=>r.add(f)&&u().then(()=>d[l](f,...n))})({
key: "AIzaSyA6myHzS10YXdcazAFalmXvDkrYCp5cLc8"
});
</script>
</head>
<body>
<!-- The map, centered at Uluru, Australia. -->
<gmp-map center="-25.344,131.031" zoom="4" map-id="DEMO_MAP_ID">
<div id="controls" slot="control-inline-start-block-start">
<h3>My Google Maps Demo</h3>
</div>
</gmp-map>
</body>
</html>דוגמה לניסיון
מידע נוסף על סמנים:
טיפים ופתרון בעיות
- מידע נוסף על קבלת קואורדינטות של קו רוחב וקו אורך או על המרה של כתובת לקואורדינטות גיאוגרפיות
- אתם יכולים לשנות אפשרויות כמו סגנון ומאפיינים כדי להתאים אישית את המפה. למידע נוסף על התאמה אישית של מפות, אפשר לקרוא את המדריכים בנושא עיצוב וציור במפה.
- אתם יכולים להשתמש במסוף של כלי הפיתוח בדפדפן האינטרנט כדי לבדוק ולהריץ את הקוד, לקרוא דוחות שגיאות ולפתור בעיות בקוד.
- כדי לפתוח את המסוף ב-Chrome, משתמשים במקשי הקיצור הבאים:
Command+Option+J (ב-Mac) או Control+Shift+J (ב-Windows). כדי לקבל את קואורדינטות קו הרוחב וקו האורך של מיקום במפות Google, פועלים לפי השלבים הבאים.
- פותחים את מפות Google בדפדפן.
- לוחצים לחיצה ימנית על המיקום המדויק במפה שרוצים לקבל את הקואורדינטות שלו.
- בוחרים את קואורדינטות קו הרוחב וקו האורך מהתפריט.
אפשר להמיר כתובת לקואורדינטות של קו אורך וקו רוחב באמצעות שירות הגיאו-קידוד. במדריכים למפתחים מוסבר בפירוט איך מתחילים להשתמש בשירות הקידוד הגיאוגרפי.