The Daydream View VR headset is no longer available for purchase as of October 15, 2019. As of November 2023, previously supported devices will no longer be able to download and install Google VR Serivces (Android application ID com.google.vr.vrcore) for new users.
Stay organized with collections
Save and categorize content based on your preferences.
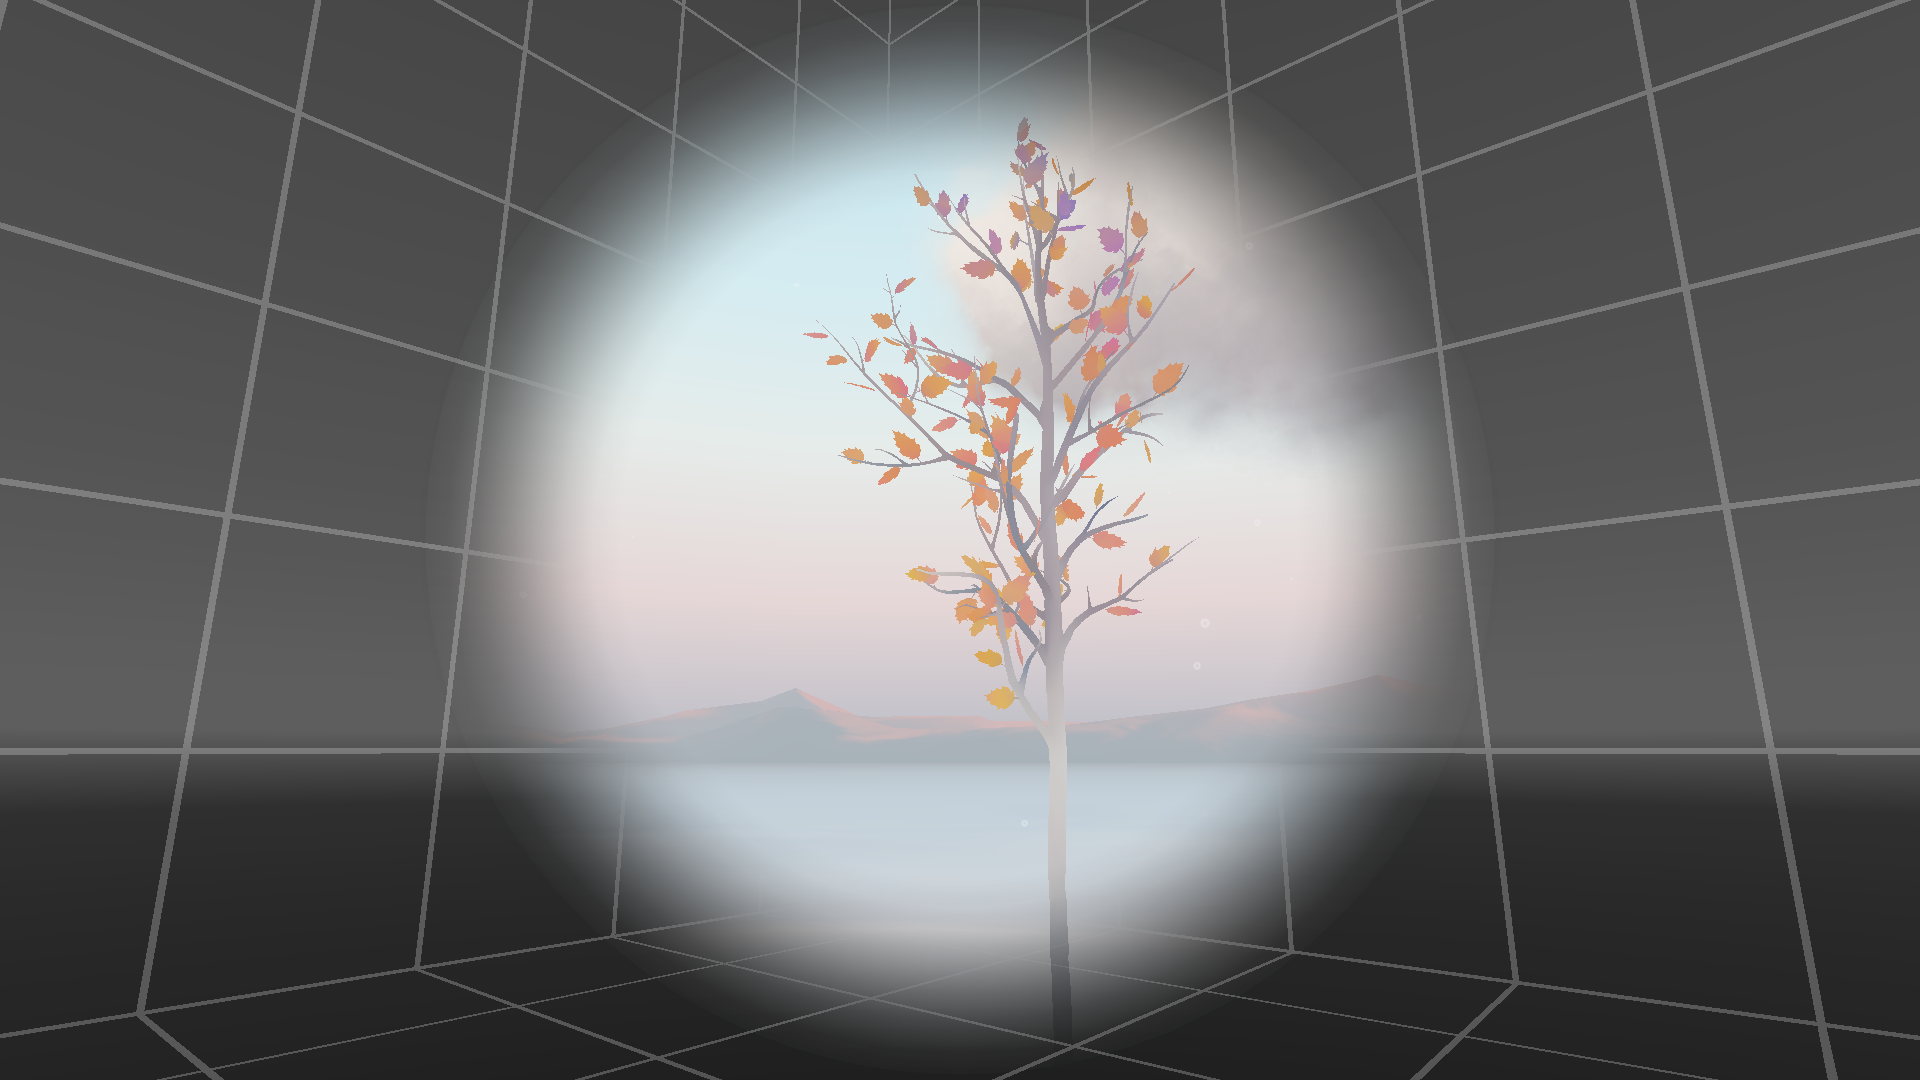
Tunneling is a technique used with first-person locomotion (such as walking)
where, during movement, the camera is cropped and a high-constrast stable
background is displayed in the user's peripheral vision. The cropping of the
scene is the "tunnel" and the use of a stable background is referring to as
"grounding the user." This is analogous to a user watching first-person
locomotion on a television set, where the television and room around it form the
stable background.
In the provided demo the stable background consists of high-constrast gridlines
which we've found through testing to be the most effective cue
for grounding, even when only processed with the user's peripheral vision.
The Tunneling Demo package consists of the following:
Prefabs and scripts that control the tunneling experience.
An environment that our testing has found to be effective at grounding the
user.
Getting started
The easiest way to use tunneling in your scene is to copy and paste the Player
object from the TunnelingLocomotionDemo scene (included as part of Elements)
into your own scene.
If you want to set tunneling up manually, do the following:
Add an instance of the TunnelingVignette prefab as a sibling of the Main
Camera.
Add an instance of the script FirstPersonTunnelingLocomotion to the parent
of the Main Camera.
In the FirstPersonTunnelingLocomotion script, drag a reference to
TunnelingVignette into the Vignette Controller property.
Optionally, add a Character Controller to the parent of the Main Camera if
you want the player to be blocked by collisions.
Terminology
Using tunneling, when the user moves, their view shifts from the standard view
of the environment to the tunneling vignette, a new view consisting of three
elements:
The primary environment with a restricted field-of-view.
The hole in which the primary environment is viewed through, called the
iris.
A static background occupying the user's peripherial view, called the
cage.
The user continues to see the tunneling vignette until they stop moving.
Script properties
The tunneling vignette is managed by the scripts
FirstPersonTunnelingLocomotion, TunnelingVignette, and
FadeVignetteController. Each of these scripts has a number of configuration
points you can use to customize the tunneling experience.
The FirstPersonTunnelingLocomotion script allows you to adjust the following
properties:
Vignette Controller: Script that controls the Vignette.
Max Speed: Maximum speed the user can move.
Max Angular Velocity: Maximum speed the user can rotate.
Smoothing Factor: Smoothing factor applied to the touch input.
Min Input Threshold: Controls how far the user must touch on the
touchpad to be moving at min speed.
Max Input Threshold: Determines how far the user must touch on the
touchpad to be moving at max speed.
Only move After Swiping: If enabled, movement won't begin until the
swipe is complete.
The 'TunnelingVignette' script allows you to adjust the following properties:
Iris: The mesh used to render the iris.
Iris Distance: Sets where the iris hole will appear in z-space.
Cage Color: Sets the color of the cage.
Iris Depth Material:
Iris Color Material:
Preview FOV (Degrees): Sets the field-of-view shown in the preview.
Preview Alpha: Sets the alpha (how much the main environment fades) in
the preview.
The FadeVignetteController script allows you to adjust the following properties:
Fade Speed: Sets the speed that the vignette fades in and out at.
Iris Speed: Sets the speed that the vignette opens and closes.
Alpha Ready Threshold: The minimum alpha that vignette must be at to be
considered ready.
Best Practices
When customizing the look and feel of the tunneling vignette, keep the
following principles in mind to ensure that your solution reduces motion
sickness, as a poor implementation can increase it.
Motion itself should occur in a restricted field of vision.
There should be a fixed background to anchor the player's motion. High
contrast details will help users perceive the background in their periheral
vision.
Motion should avoid acceleration and deceleration and use a constant velocity.
Rotation causes more motion sickness than translation, so the field of view
should be smaller when doing rotational movement versus translational
movement.
The app should maintain a stable horizon during motion.
All rights reserved. Java is a registered trademark of Oracle and/or its affiliates.
Last updated 2024-10-09 UTC.
[[["Easy to understand","easyToUnderstand","thumb-up"],["Solved my problem","solvedMyProblem","thumb-up"],["Other","otherUp","thumb-up"]],[["Missing the information I need","missingTheInformationINeed","thumb-down"],["Too complicated / too many steps","tooComplicatedTooManySteps","thumb-down"],["Out of date","outOfDate","thumb-down"],["Samples / code issue","samplesCodeIssue","thumb-down"],["Other","otherDown","thumb-down"]],["Last updated 2024-10-09 UTC."],[[["\u003cp\u003eTunneling is a technique used with first-person locomotion to reduce motion sickness in VR by restricting the field of view and providing a stable background.\u003c/p\u003e\n"],["\u003cp\u003eThe Tunneling Demo package includes prefabs, scripts, and an example environment to easily implement tunneling in your VR project.\u003c/p\u003e\n"],["\u003cp\u003eThe tunneling effect utilizes an iris, cage, and primary environment view to create the experience, and is customizable through script properties for vignette, locomotion, and fading.\u003c/p\u003e\n"],["\u003cp\u003eWhen customizing tunneling, prioritize a restricted field of view, a fixed high-contrast background, constant velocity, minimized rotation, and a stable horizon to mitigate motion sickness.\u003c/p\u003e\n"]]],["Tunneling, used during first-person movement, crops the camera view (\"tunnel\") and displays a stable, high-contrast background (\"cage\") in the periphery to ground the user. Key actions involve setting up the `TunnelingVignette` prefab and `FirstPersonTunnelingLocomotion` script, which control the transition to and properties of the \"tunneling vignette.\" This vignette consists of the environment, a restricted viewing hole (iris), and the static cage. Configurable script properties include movement speeds, cage color, iris properties, and fade speeds. Best practices involve restricted motion view, a fixed background, constant velocity, and a smaller field-of-view during rotation.\n"],null,["# Tunneling demo\n\nTunneling is a technique used with first-person locomotion (such as walking)\nwhere, during movement, the camera is cropped and a high-constrast stable\nbackground is displayed in the user's peripheral vision. The cropping of the\nscene is the \"tunnel\" and the use of a stable background is referring to as\n\"grounding the user.\" This is analogous to a user watching first-person\nlocomotion on a television set, where the television and room around it form the\nstable background.\n\nIn the provided demo the stable background consists of high-constrast gridlines\nwhich we've found through testing to be the most effective cue\nfor grounding, even when only processed with the user's peripheral vision.\n\nThe Tunneling Demo package consists of the following:\n\n- Prefabs and scripts that control the tunneling experience.\n- An environment that our testing has found to be effective at grounding the user.\n\nGetting started\n---------------\n\nThe easiest way to use tunneling in your scene is to copy and paste the `Player`\nobject from the `TunnelingLocomotionDemo` scene (included as part of Elements)\ninto your own scene.\n\nIf you want to set tunneling up manually, do the following:\n\n1. Add an instance of the `TunnelingVignette` prefab as a sibling of the Main Camera.\n2. Add an instance of the script `FirstPersonTunnelingLocomotion` to the parent of the Main Camera.\n3. In the `FirstPersonTunnelingLocomotion` script, drag a reference to `TunnelingVignette` into the Vignette Controller property.\n4. Optionally, add a Character Controller to the parent of the Main Camera if you want the player to be blocked by collisions.\n\n### Terminology\n\nUsing tunneling, when the user moves, their view shifts from the standard view\nof the environment to the **tunneling vignette**, a new view consisting of three\nelements:\n\n- The primary environment with a restricted field-of-view.\n- The hole in which the primary environment is viewed through, called the **iris**.\n- A static background occupying the user's peripherial view, called the **cage**.\n\nThe user continues to see the tunneling vignette until they stop moving.\n\n### Script properties\n\nThe tunneling vignette is managed by the scripts\n`FirstPersonTunnelingLocomotion`, `TunnelingVignette`, and\n`FadeVignetteController`. Each of these scripts has a number of configuration\npoints you can use to customize the tunneling experience.\n| **Note:** `FirstPersonTunnelingLocomotion` is a recommended implementation of how to do a first-person control scheme with tunneling locomotion. You can create your own control scheme and then control the tunneling vignette using the `FadeVignetteController`.\n\nThe `FirstPersonTunnelingLocomotion` script allows you to adjust the following\nproperties:\n\n- **Vignette Controller**: Script that controls the Vignette.\n- **Max Speed**: Maximum speed the user can move.\n- **Max Angular Velocity**: Maximum speed the user can rotate.\n- **Smoothing Factor**: Smoothing factor applied to the touch input.\n- **Min Input Threshold**: Controls how far the user must touch on the touchpad to be moving at min speed.\n- **Max Input Threshold**: Determines how far the user must touch on the touchpad to be moving at max speed.\n- **Only move After Swiping**: If enabled, movement won't begin until the swipe is complete.\n\nThe 'TunnelingVignette' script allows you to adjust the following properties:\n\n- **Iris**: The mesh used to render the iris.\n- **Iris Distance**: Sets where the iris hole will appear in z-space.\n- **Cage Color**: Sets the color of the cage.\n- **Iris Depth Material**:\n- **Iris Color Material**:\n- **Preview FOV (Degrees)**: Sets the field-of-view shown in the preview.\n- **Preview Alpha**: Sets the alpha (how much the main environment fades) in the preview.\n\nThe `FadeVignetteController` script allows you to adjust the following properties:\n\n- **Fade Speed**: Sets the speed that the vignette fades in and out at.\n- **Iris Speed**: Sets the speed that the vignette opens and closes.\n- **Alpha Ready Threshold**: The minimum alpha that vignette must be at to be considered ready.\n\nBest Practices\n--------------\n\nWhen customizing the look and feel of the tunneling vignette, keep the\nfollowing principles in mind to ensure that your solution reduces motion\nsickness, as a poor implementation can increase it.\n\n1. Motion itself should occur in a restricted field of vision.\n2. There should be a fixed background to anchor the player's motion. High contrast details will help users perceive the background in their periheral vision.\n3. Motion should avoid acceleration and deceleration and use a constant velocity.\n4. Rotation causes more motion sickness than translation, so the field of view should be smaller when doing rotational movement versus translational movement.\n5. The app should maintain a stable horizon during motion."]]