The Daydream View VR headset is no longer available for purchase as of October 15, 2019. As of November 2023, previously supported devices will no longer be able to download and install Google VR Serivces (Android application ID com.google.vr.vrcore) for new users.
Stay organized with collections
Save and categorize content based on your preferences.
The GVR SDK for Unity includes an additional GVR video plugin that supports
streaming flat and 360° videos in both mono and stereo formats by using the
ExoPlayer library to handle decoding and rendering of video, audio, and related
streams. ExoPlayer provides all the standard playback framework for both videos
embedded in your application and streaming videos, including adaptive streaming
support, such as DASH and HLS.
Configuring your video player
The GVR SDK for Unity provides a C# script, called GvrVideoPlayerTexture, that
allows you to configure your video player. The script renders the video image
into a texture created in Unity. The texture can then be placed on any mesh
renderer in the scene.
To use the script, add it to a GameObject with a Mesh Renderer component. At
runtime, the script creates another texture and uses that as the main texture of
the renderer.
Player properties
The GvrVideoPlayerTexture script allows you to adjust the following properties:
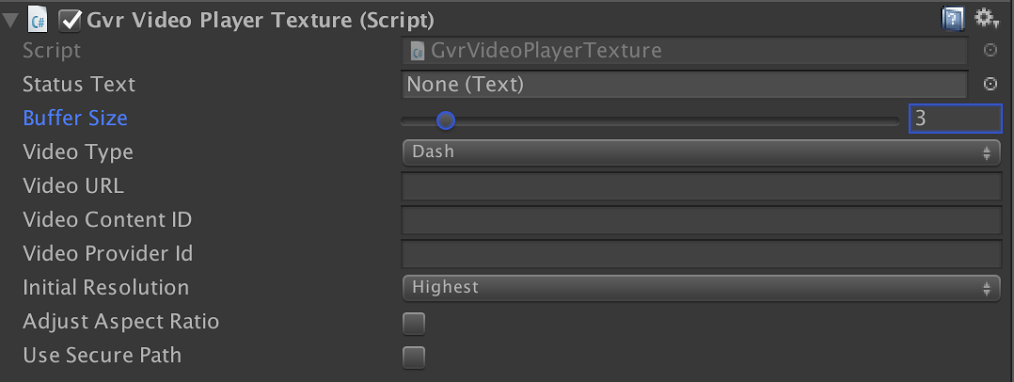
Status Text: Allows you to put in a text component that can display
textual information like framerate and resolution.
Buffer Size: Determines the buffer size, with a minimum value of 3 and a
maximum value of 15.
Video Type: Determines the video type. The options are:
Dash
HLS
Other (used for local video)
Video URL: The video file's location.
Video Content ID: The video file's Content ID.
Video Provider ID: The video file's Provider ID.
Initial Resolution: The target resolution for the video. The options
are:
Lowest (Sets the video to the lowest possible resolution.)
720
1080
2048
Highest (Sets the video to the highest possible resolution.)
Adjust Aspect Ratio: If this box is checked, the size of the video player
object will be adjusted to match the video's aspect ratio. Only applies to
flat videos.
Examples
These examples demonstrate how to build a simple video player within VR.
Create a Quad object (Game Object > 3D Object > Quad).
Set the Position to (0,1,12)
Set the Scale to (16,9,1) for a 16:9 aspect ratio.
Add the video material to the video player object. This is what's shown
until the video loads.
In the Mesh Renderer component, expand Materials and set
element 0 to be VideoMaterial, or StereoMaterial if the video is
a stereoscopic video, located under GoogleVR/Demos/Materials/VideoDemo.
Add the GvrVideoTexturePlayer script to the quad, located under
GoogleVR/Scripts/Video.
Set the properties in GvrVideoTextureplayer as follows:
Video Type: Dash
Buffer size: 4
Video URL:
https://storage.googleapis.com/wvmedia/clear/h264/tears/tears_hd.mpd
Video Content ID:
https://storage.googleapis.com/wvmedia/clear/h264/tears/tears_hd.mpd
Video Provider ID: (leave blank)
Add the VideoControls prefab, located under
GoogleVR/Demos/Prefabs/VideoDemo.
Set the Position to be (0,0,3).
Attach the Video Player to the Video Controls.
Under Video Player Reference Script, set Player to the video
player object.
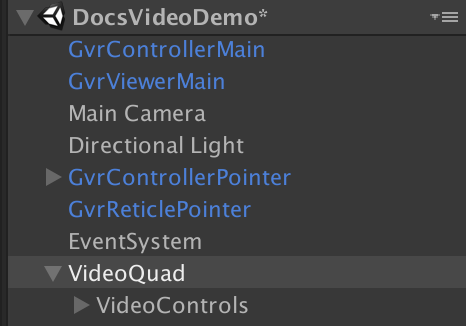
At this point, your scene should have all the components as shown in the
screenshot below.
Save the scene and open File > Build Settings.
Add the current scene to the scene list and make sure it's the first
scene enabled.
Press Build & Run to run the example.
Spherical Video
This example shows how to create a 360° video playback using DASH with a
video hosted on Google Cloud Storage. To do this, we create a large sphere with
the camera at the center and render the video on the inside of the sphere.
Create a Sphere object (Game Object > 3D Object > Sphere).
Set the Position to (0,0,0).
Set the Scale to (12,12,12).
Add the video material to the video player object. This is what's shown
until the video loads.
In the Mesh Renderer component, expand Materials and set
element 0 to be VideoStereoInside, located under
GoogleVR/Demos/Materials/VideoDemo.
Add the GvrVideoTexturePlayer script to the sphere, located under
GoogleVR/Scripts/Video
Set the properties in the GvrVideoTextureplayer script as follows:
Video Type: Dash
Buffer size: 4
Video URL:
https://storage.googleapis.com/daydream-deveng.appspot.com/japan360/dash/japan_day06_eagle2_shot0005-2880px_40000kbps.mpd
Video Content ID: (leave blank)
Video Provider ID: (leave blank)
Add the VideoControls prefab, located under GoogleVR/Demos/Prefabs/VideoDemo
Set the Position to be (0,0,3).
Attach the Video Player to the Video Controls.
Under Video Player Reference Script, set Player to the video player
object.
Save the scene and open File > Build Settings.
Add the current scene to the scene list and make sure it's the only
scene enabled.
Press Build & Run to run the example.
Dealing with large video assets
Locally storing videos using Asset Manager is a viable option when your APK
file is under 100 MB, the maximum allowed file size for apps on the Google Play
Store, but it is not uncommon to have video assets exceeding this limit. To work
around this limit, the resources can be stored in an OBB file as follows:
Place your video asset in Assets/StreamingAssets. Files in this folder will
be copied unchanged to the target machine, where it then will be available
from a specific folder. For more information, see Unity's documentation on Special
Folders.
Change the Video Texture Player properties to:
Video Type: Other
Video URL:
jar:file://${Application.dataPath}!/assets/vid_bigbuckbunny.mp4
Video Content ID: (leave blank)
Video Provider ID: (leave blank)
Open Player Settings. Under Publishing Settings check the Split
Application Binary checkbox. This will create the OBB file.
To switch the video playing without destroying and creating a new TexturePlayer
component:
Set the video properties to the new stream on the GvrVideoTexturePlayer script,
specifically, the VideoType, VideoURL, VideoContentID and VideoProviderID.
Call TexturePlayer.CleanupVideo().
Call TexturePlayer.ReinitializeVideo(). This will create a new instance of
ExoPlayer.
Callbacks
OnVideoEvent
Because initializing the player and loading the video stream are asynchronous
operations, it can be useful to have a callback when the video is ready. This is
an alternative to polling the VideoReady property in the Update method. You can
register a callback to be called when the video is ready by invoking
GvrVideoTexturePlayer.OnVideoEventCallBack().
For example:
Getcomponent<TexturePlayer>().SetOnVideoEventCallback(eventId)=>{Debug.Log("Video is ready!")UpdateStatusText(););
The available eventIds are:
VideoReady
VideoStartPlayback
VideoFormatChanged
VideoSurfaceSet
VideoSizeChanged
OnException
When something goes wrong with the video playback, the player throws an
exception. A callback can be registered to be invoked when exceptions occur by
calling GvrVideoTexturePlayer.SetOnExceptionCallback(). For example:
GetComponent<TexturePlayer>().SetOnExceptionCallback((type,message)=>{Debug.LogError("Exception of type: "+type+": "+message);});
All rights reserved. Java is a registered trademark of Oracle and/or its affiliates.
Last updated 2024-10-09 UTC.
[[["Easy to understand","easyToUnderstand","thumb-up"],["Solved my problem","solvedMyProblem","thumb-up"],["Other","otherUp","thumb-up"]],[["Missing the information I need","missingTheInformationINeed","thumb-down"],["Too complicated / too many steps","tooComplicatedTooManySteps","thumb-down"],["Out of date","outOfDate","thumb-down"],["Samples / code issue","samplesCodeIssue","thumb-down"],["Other","otherDown","thumb-down"]],["Last updated 2024-10-09 UTC."],[[["\u003cp\u003eThe GVR video plugin utilizes ExoPlayer for streaming flat and 360° videos in mono and stereo formats, supporting adaptive streaming like DASH and HLS for Daydream VR experiences.\u003c/p\u003e\n"],["\u003cp\u003eThe \u003ccode\u003eGvrVideoPlayerTexture\u003c/code\u003e script renders video onto a Unity texture, enabling placement on any mesh renderer within the scene, and offering customization of properties like buffer size, video type, resolution, and aspect ratio.\u003c/p\u003e\n"],["\u003cp\u003eExample scenes demonstrate setting up flat and spherical video playback, requiring configuration of the main camera, video player object with material, and attaching the \u003ccode\u003eGvrVideoPlayerTexture\u003c/code\u003e script with relevant video properties.\u003c/p\u003e\n"],["\u003cp\u003eLarge video assets can be managed by storing them in an OBB file and adjusting the Video Texture Player properties accordingly to bypass the 100MB APK file size limit.\u003c/p\u003e\n"],["\u003cp\u003eDynamic video switching and handling asynchronous operations are facilitated through callbacks like \u003ccode\u003eOnVideoEvent\u003c/code\u003e (for events like video readiness and format changes) and \u003ccode\u003eOnException\u003c/code\u003e (for error handling).\u003c/p\u003e\n"]]],["The GVR SDK for Unity offers a video plugin for streaming flat and 360° videos in mono and stereo, using the ExoPlayer library. The `GvrVideoPlayerTexture` script configures the video player and renders it onto a Unity texture. Key properties include video type (Dash, HLS, Other), URL, Content/Provider IDs, and resolution. The setup involves creating a scene with Daydream support, importing the GVR and VideoPlayer SDKs. Examples are provided for flat and spherical videos, and large video files can be stored in OBB files. Switching video streams is possible by adjusting properties and calling cleanup and reinitialize methods. Callbacks are available for events like video readiness and exceptions.\n"],null,["# Streaming video support\n\nThe GVR SDK for Unity includes an additional GVR video plugin that supports\nstreaming flat and 360° videos in both mono and stereo formats by using the\nExoPlayer library to handle decoding and rendering of video, audio, and related\nstreams. ExoPlayer provides all the standard playback framework for both videos\nembedded in your application and streaming videos, including adaptive streaming\nsupport, such as DASH and HLS.\n| **Note:** This plugin supports Daydream only.\n\nConfiguring your video player\n-----------------------------\n\nThe GVR SDK for Unity provides a C# script, called `GvrVideoPlayerTexture`, that\nallows you to configure your video player. The script renders the video image\ninto a texture created in Unity. The texture can then be placed on any mesh\nrenderer in the scene.\n\nTo use the script, add it to a GameObject with a Mesh Renderer component. At\nruntime, the script creates another texture and uses that as the main texture of\nthe renderer.\n\n### Player properties\n\nThe `GvrVideoPlayerTexture` script allows you to adjust the following properties:\n\n- **Status Text**: Allows you to put in a text component that can display textual information like framerate and resolution.\n- **Buffer Size**: Determines the buffer size, with a minimum value of 3 and a maximum value of 15.\n- **Video Type** : Determines the video type. The options are:\n - Dash\n - HLS\n - Other (used for local video)\n- **Video URL**: The video file's location.\n- **Video Content ID**: The video file's Content ID.\n- **Video Provider ID**: The video file's Provider ID.\n- **Initial Resolution** : The target resolution for the video. The options are:\n - Lowest (Sets the video to the lowest possible resolution.)\n - 720\n - 1080\n - 2048\n - Highest (Sets the video to the highest possible resolution.)\n- **Adjust Aspect Ratio**: If this box is checked, the size of the video player object will be adjusted to match the video's aspect ratio. Only applies to flat videos.\n\nExamples\n--------\n\nThese examples demonstrate how to build a simple video player within VR.\n\n### Prerequisites\n\n- [Google VR SDK for Unity](/vr/unity/download#google-vr-sdk-for-unity)\n- [Unity 5.6](https://unity3d.com/get-unity/download) or newer\n\n### Setting up your scene\n\nThe following steps set up the Daydream controller support, which all the video\nplayer examples require.\n\n1. Create a new 3D Unity Project.\n2. [Configure the build settings to enable Daydream\n support.](/vr/unity/get-started#configure_build_settings)\n3. Import the GVR SDK for Unity.\n 1. Under the **Assets** menu, select **Import Package** , then **Custom\n Package**, then navigate to the Unity GVR SDK and select it.\n4. Import the VideoPlayer SDK.\n 1. In the **Project** panel, find the GVRVideoPlayer package located in the GoogleVR folder. Double-click the package to import it.\n5. Enable support for the Daydream controller and UI.\n 1. Add `GvrEditorEmulator` to the scene, located under GoogleVR/Prefabs.\n 2. Add `GvrControllerMain` to the scene, located under GoogleVR/Prefabs/Controller.\n 3. Add `GvrControllerPointer`, located under GoogleVR/Prefabs/UI.\n 4. Add `GvrReticlePointer`, located under GoogleVR/Prefabs/UI.\n 5. Create an empty game object and name it EventSystem. Add an Event System component, and then attach the `GvrPointerInputModule` script.\n\n### Flat Video\n\nThis example shows how to create a flat video playback using DASH with a video\nhosted on Google Cloud Storage.\n\n1. This example assumes you've run the steps in [Setting up your\n scene](#setting_up_your_scene).\n2. Configure the main camera.\n 1. Set the **Position** to (0, 1, 0).\n 2. Set **Target Eye** to **both**.\n3. Add the video player object.\n 1. Create a **Quad** object (**Game Object \\\u003e 3D Object \\\u003e Quad**).\n 2. Set the **Position** to (0,1,12)\n 3. Set the **Scale** to (16,9,1) for a 16:9 aspect ratio.\n4. Add the video material to the video player object. This is what's shown until the video loads.\n 1. In the **Mesh Renderer** component, expand **Materials** and set **element 0** to be `VideoMaterial`, or `StereoMaterial` if the video is a stereoscopic video, located under GoogleVR/Demos/Materials/VideoDemo.\n5. Add the `GvrVideoTexturePlayer` script to the quad, located under GoogleVR/Scripts/Video.\n6. Set the properties in `GvrVideoTextureplayer` as follows:\n 1. **Video Type**: Dash\n 2. **Buffer size**: 4\n 3. **Video URL**: https://storage.googleapis.com/wvmedia/clear/h264/tears/tears_hd.mpd\n 4. **Video Content ID**: https://storage.googleapis.com/wvmedia/clear/h264/tears/tears_hd.mpd\n 5. **Video Provider ID**: (leave blank)\n7. Add the `VideoControls` prefab, located under GoogleVR/Demos/Prefabs/VideoDemo.\n 1. Set the **Position** to be (0,0,3).\n8. Attach the Video Player to the Video Controls.\n 1. Under **Video Player Reference Script** , set **Player** to the video player object.\n9. At this point, your scene should have all the components as shown in the\n screenshot below.\n\n Save the scene and open **File \\\u003e Build Settings**.\n10. Add the current scene to the scene list and make sure it's the first\n scene enabled.\n\n11. Press **Build \\& Run** to run the example.\n\n### Spherical Video\n\nThis example shows how to create a 360° video playback using DASH with a\nvideo hosted on Google Cloud Storage. To do this, we create a large sphere with\nthe camera at the center and render the video on the inside of the sphere.\n\n1. Run all the steps in [Setting up your scene](#setting_up_your_scene).\n2. Configure the main camera.\n 1. Set the **Position** to (0, 1, 0).\n 2. Set **Target Eye** to **both**.\n3. Add the video player object.\n 1. Create a **Sphere** object (**Game Object \\\u003e 3D Object \\\u003e Sphere**).\n 2. Set the **Position** to (0,0,0).\n 3. Set the **Scale** to (12,12,12).\n4. Add the video material to the video player object. This is what's shown until the video loads.\n 1. In the **Mesh Renderer** component, expand **Materials** and set **element 0** to be `VideoStereoInside`, located under GoogleVR/Demos/Materials/VideoDemo.\n5. Add the `GvrVideoTexturePlayer` script to the sphere, located under GoogleVR/Scripts/Video\n6. Set the properties in the `GvrVideoTextureplayer` script as follows:\n 1. **Video Type**: Dash\n 2. **Buffer size**: 4\n 3. **Video URL**: https://storage.googleapis.com/daydream-deveng.appspot.com/japan360/dash/japan_day06_eagle2_shot0005-2880px_40000kbps.mpd\n 4. **Video Content ID**: (leave blank)\n 5. **Video Provider ID**: (leave blank)\n7. Add the `VideoControls` prefab, located under GoogleVR/Demos/Prefabs/VideoDemo\n 1. Set the **Position** to be (0,0,3).\n8. Attach the Video Player to the Video Controls.\n 1. Under **Video Player Reference Script** , set **Player** to the video player object.\n9. Save the scene and open **File \\\u003e Build Settings** .\n 1. Add the current scene to the scene list and make sure it's the only scene enabled.\n10. Press **Build \\& Run** to run the example.\n\nDealing with large video assets\n-------------------------------\n\nLocally storing videos using Asset Manager is a viable option when your APK\nfile is under 100 MB, the maximum allowed file size for apps on the Google Play\nStore, but it is not uncommon to have video assets exceeding this limit. To work\naround this limit, the resources can be stored in an OBB file as follows:\n\n1. Place your video asset in Assets/StreamingAssets. Files in this folder will\n be copied unchanged to the target machine, where it then will be available\n from a specific folder. For more information, see [Unity's documentation on Special\n Folders.](https://docs.unity3d.com/Manual/StreamingAssets.html)\n\n2. Change the Video Texture Player properties to:\n\n 1. **Video Type** : **Other**\n 2. **Video URL**: jar:file://${Application.dataPath}!/assets/vid_bigbuckbunny.mp4\n 3. **Video Content ID**: (leave blank)\n 4. **Video Provider ID**: (leave blank)\n\n | **Note:** ${Application.dataPath} will be replaced at runtime by the actual value of Application.dataPath.\n3. Open **Player Settings** . Under **Publishing Settings** check the **Split\n Application Binary** checkbox. This will create the OBB file.\n\n4. When deploying the application locally, the OBB file is copied to the\n correct location automatically. See [this page on handling OBB files via the Play Store with\n Unity](https://docs.unity3d.com/Manual/android-OBBsupport.html).\n\nSwitching video streams\n-----------------------\n\nTo switch the video playing without destroying and creating a new TexturePlayer\ncomponent:\n\n1. Set the video properties to the new stream on the `GvrVideoTexturePlayer` script, specifically, the **VideoType** , **VideoURL** , **VideoContentID** and **VideoProviderID**.\n2. Call `TexturePlayer.CleanupVideo()`.\n3. Call `TexturePlayer.ReinitializeVideo()`. This will create a new instance of ExoPlayer.\n\nCallbacks\n---------\n\n### OnVideoEvent\n\nBecause initializing the player and loading the video stream are asynchronous\noperations, it can be useful to have a callback when the video is ready. This is\nan alternative to polling the VideoReady property in the Update method. You can\nregister a callback to be called when the video is ready by invoking\n`GvrVideoTexturePlayer.OnVideoEventCallBack()`.\n\nFor example: \n\n Getcomponent\u003cTexturePlayer\u003e().SetOnVideoEventCallback(eventId) =\u003e {\n Debug.Log(\"Video is ready!\")\n UpdateStatusText();\n );\n\nThe available eventIds are:\n\n- VideoReady\n- VideoStartPlayback\n- VideoFormatChanged\n- VideoSurfaceSet\n- VideoSizeChanged\n\n### OnException\n\nWhen something goes wrong with the video playback, the player throws an\nexception. A callback can be registered to be invoked when exceptions occur by\ncalling `GvrVideoTexturePlayer.SetOnExceptionCallback()`. For example: \n\n GetComponent\u003cTexturePlayer\u003e().SetOnExceptionCallback(\n (type, message) =\u003e {\n Debug.LogError(\"Exception of type: \" + type + \": \" + message);\n }\n );"]]