
Overview
Google Maps Platform is available for web (JS, TS), Android, and iOS, and also offers web services APIs for getting information about places, directions, and distances. The samples in this guide are written for one platform, but documentation links are provided for implementation on other platforms.
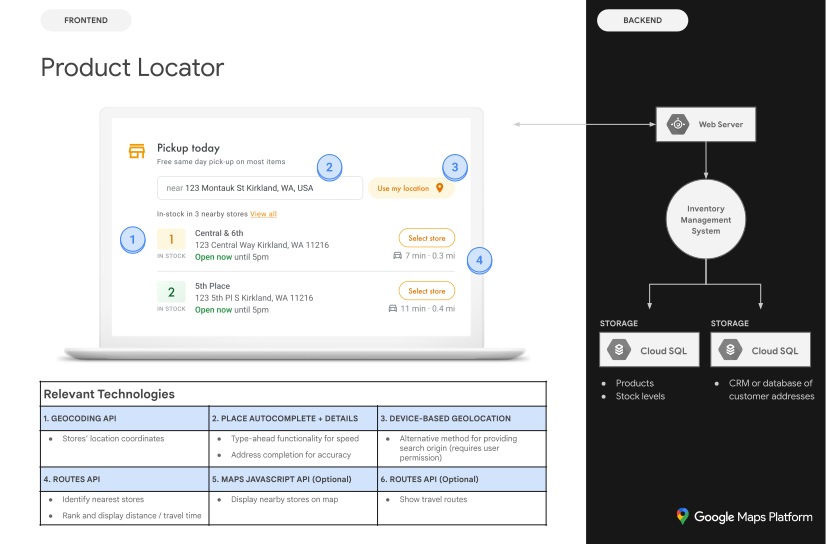
When your users see your products online, they want to find the best and most convenient way to get their order. The Product Locator implementation guide and customization tips are what Google recommends as the optimal combination of Google Maps Platform APIs to build great product locator user experiences.
Following this implementation guide, you can help customers see the detailed information they need to find your products, and give them directions to the store that has their item, whether they're driving, cycling, walking, or taking public transit.
Enable APIs
To implement Product Locator, you must enable the following APIs in the Google Cloud console. The following hyperlinks send you to the Google Cloud console to enable each API for your selected project:
For more information about setup, see Getting started with Google Maps Platform.
Implementation guide sections
The following implementations and customizations are covered here:
- The check mark icon is a core implementation step.
- The star icon is an optional but recommended customization to enhance the solution.
| Associate store locations with Google Maps Platform places | Match a store location with a place in Google Maps Platform. | |
| Identify the user's location | Add type-as-you-go functionality to improve the user experience on all platforms and improve address accuracy with minimum keystrokes. | |
| Identify the closest stores | Calculate the travel distance and travel time for multiple origins and destinations, optionally specifying various forms of transport such as walking, driving, public transit, or cycling. | |
| Display store information | Show data-rich information on your stores, so users can navigate to them more easily. | |
| Provide navigation directions | Get directions data from origin to destination using various forms of transport such as walking, driving, cycling, and public transit. | |
| Send directions to mobile | In addition to showing directions on your webpage, you can also send directions to a user's phone for navigation using Google Maps on the go. | |
| Show your locations on an interactive map | Create custom map markers to help your locations stand out, and style the map to match your brand colors. Display (or hide) specific points of interest (POI) on your map to help users better orient themselves, and control POI density to prevent map clutter. | |
| Combine custom location data with Place Details | Combine your own custom location details with Place Details to give users a rich set of data for making decisions. |
Associate store locations with Google Maps Platform places
Get place IDs
| This example uses: Places API (New) | Also available: JavaScript |
You may have a database of your stores with basic information like the name
of that location, its address, and its phone number, and you want to associate
it with a place in Google Maps Platform as a set of final destinations your
users can pick up products. To fetch the information
that Google Maps Platform has about that place, including geographic
coordinates and user-contributed information, find the
place ID
that corresponds to each of the stores in your database.
You can make a call to the
Text Search (New) endpoint in Places API (New) and
request only the places.id field in the field mask (which triggers
the Text
Search Essentials IDs Only SKU).
The following shows an example of requesting the place ID for the Google London office:
curl -X POST -d '{
  "textQuery" : "Google London"
}' \
-H 'Content-Type: application/json' \
-H 'X-Goog-Api-Key: YOUR_API_KEY' \
-H 'X-Goog-FieldMask: places.id' \
'https://places.googleapis.com/v1/places:searchText'
You can store this place ID in your database with the rest of your store data and use it as an efficient way to request information about the store. Following are instructions for using the place ID to geocode, retrieve Place Details, and request directions to the place.
Geocode your locations
| This example uses: Geocoding API | Also available: JavaScript |
If your database of stores has street addresses but not geographic coordinates, use the Geocoding API to obtain the latitude and longitude of that address for the purposes of calculating which stores are nearest to your customer. You can geocode the store on the server side, store the latitudes and longitudes in your database, and refresh at least every 30 days.
Here is an example of using the Geocoding API to obtain the latitude and longitude of the place ID that was returned for the Google London office:
```html
https://maps.googleapis.com/maps/api/geocode/json?place_id=ChIJVSZzVR8FdkgRTyQkxxLQmVU&key=YOUR_API_KEY&solution_channel=GMP_guides_productlocator_v1_a
```
Identify the user's location
| This example uses: Place Autocomplete in the Maps JavaScript API | Also available: Android | iOS |
A key component in Product Locator is identifying your user's starting location. You can offer two options for the user to specify their starting location: typing in the origin of their search, or granting permissions to web browser geolocation or mobile location services.
Handle typed entries using autocomplete
Today's users are accustomed to the autocomplete type-ahead functionality on the consumer version of Google Maps. This functionality can be integrated into any application using the Google Maps Platform Places libraries on mobile devices and the web. When a user types an address, autocomplete fills in the rest through the use of widgets. You can also provide your own autocomplete functionality using the Place Autocomplete Data API directly.
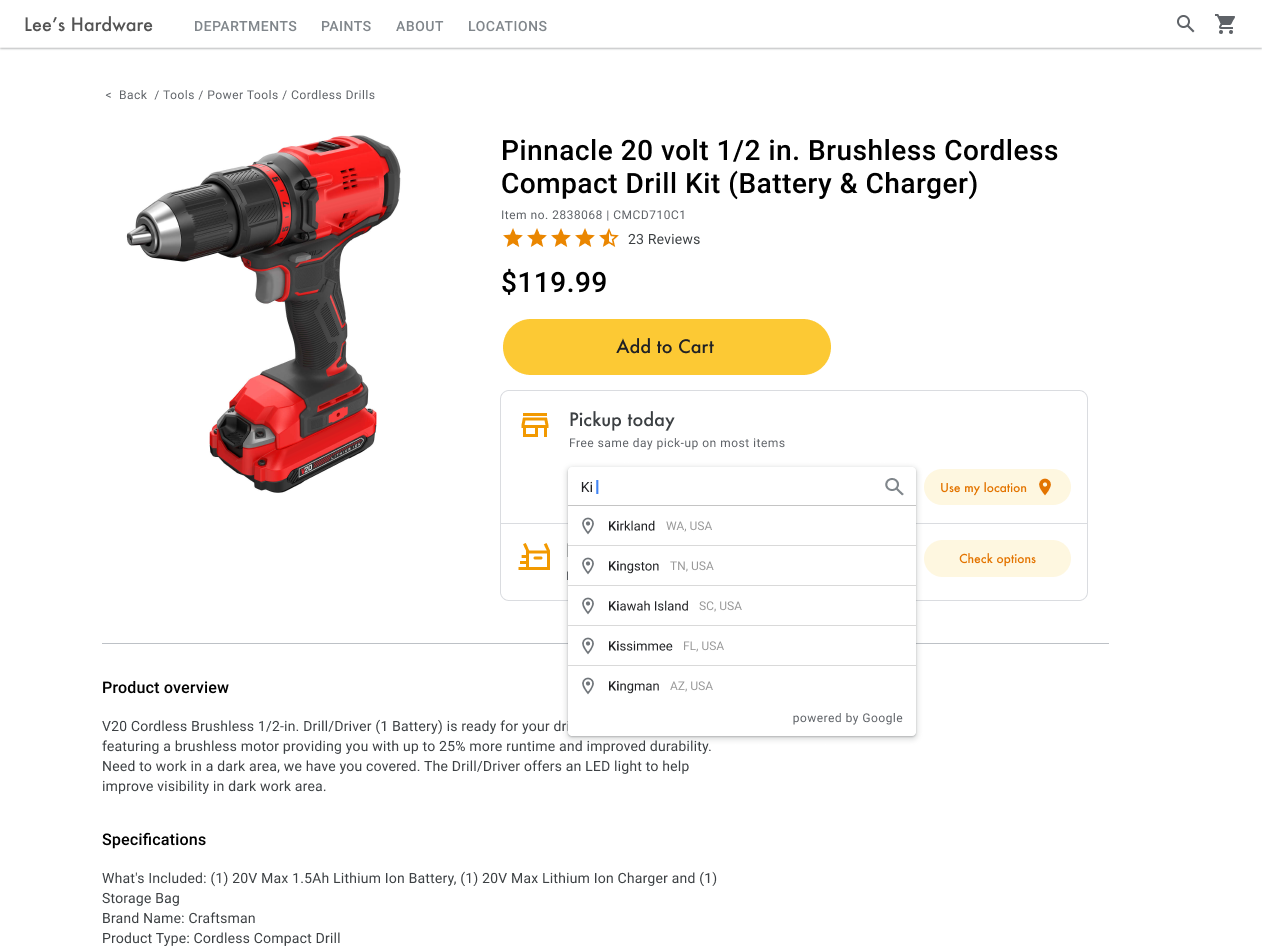
In the following example, add the Places and Marker libraries to your site by
adding the libraries=places,marker parameter to the
Maps JavaScript API script URL.
<script src="https://maps.googleapis.com/maps/api/js?key=YOUR_API_KEY&libraries=places,marker&callback=initMap&solution_channel=GMP_guides_productlocator_v1_a" defer></script>Next, add a container element to your page where the
PlaceAutocompleteElement
widget will be appended:
<div id="autocomplete-container"></div>Finally, initialize the PlaceAutocompleteElement widget and append
it to the container. Constraining the
Place
Autocomplete predictions
with includedPrimaryTypes: ["geocode"] configures the widget to
accept street addresses, neighborhoods, cities, and zip codes so users can input
any level of specificity to describe their origin. When a user selects a
prediction, the gmp-select event fires and you can call
place.fetchFields() to request the location field
containing the latitude and longitude of the user's origin. You'll use these map
coordinates to indicate the relationship of your locations to the origin.
// Create the PlaceAutocompleteElement, restricting predictions to
// geographical location types in the United Kingdom.
const placeAutocomplete = new google.maps.places.PlaceAutocompleteElement({
  includedPrimaryTypes: ["geocode"],
  includedRegionCodes: ["gb"],
});
placeAutocomplete.placeholder = "Enter starting address, city, or zip code";
document.getElementById("autocomplete-container").appendChild(placeAutocomplete);

// When the user selects an address from the drop-down,
// fetch the place details and search for the nearest stores.
placeAutocomplete.addEventListener("gmp-select", async ({ placePrediction }) => {
  const place = placePrediction.toPlace();
  await place.fetchFields({
    fields: ["id", "location", "formattedAddress"],
  });
  searchFromOrigin(place);
});
}
In this example, once the user selects the address, the
searchFromOrigin() function starts. This takes the location of
the matched result that is the user location, then searches for nearest
locations based on those coordinates as the origin, discussed in the
Identify the closest stores section.
Expand this to see video walkthroughs of adding Place Autocomplete to your app:
Website
Android apps
iOS apps
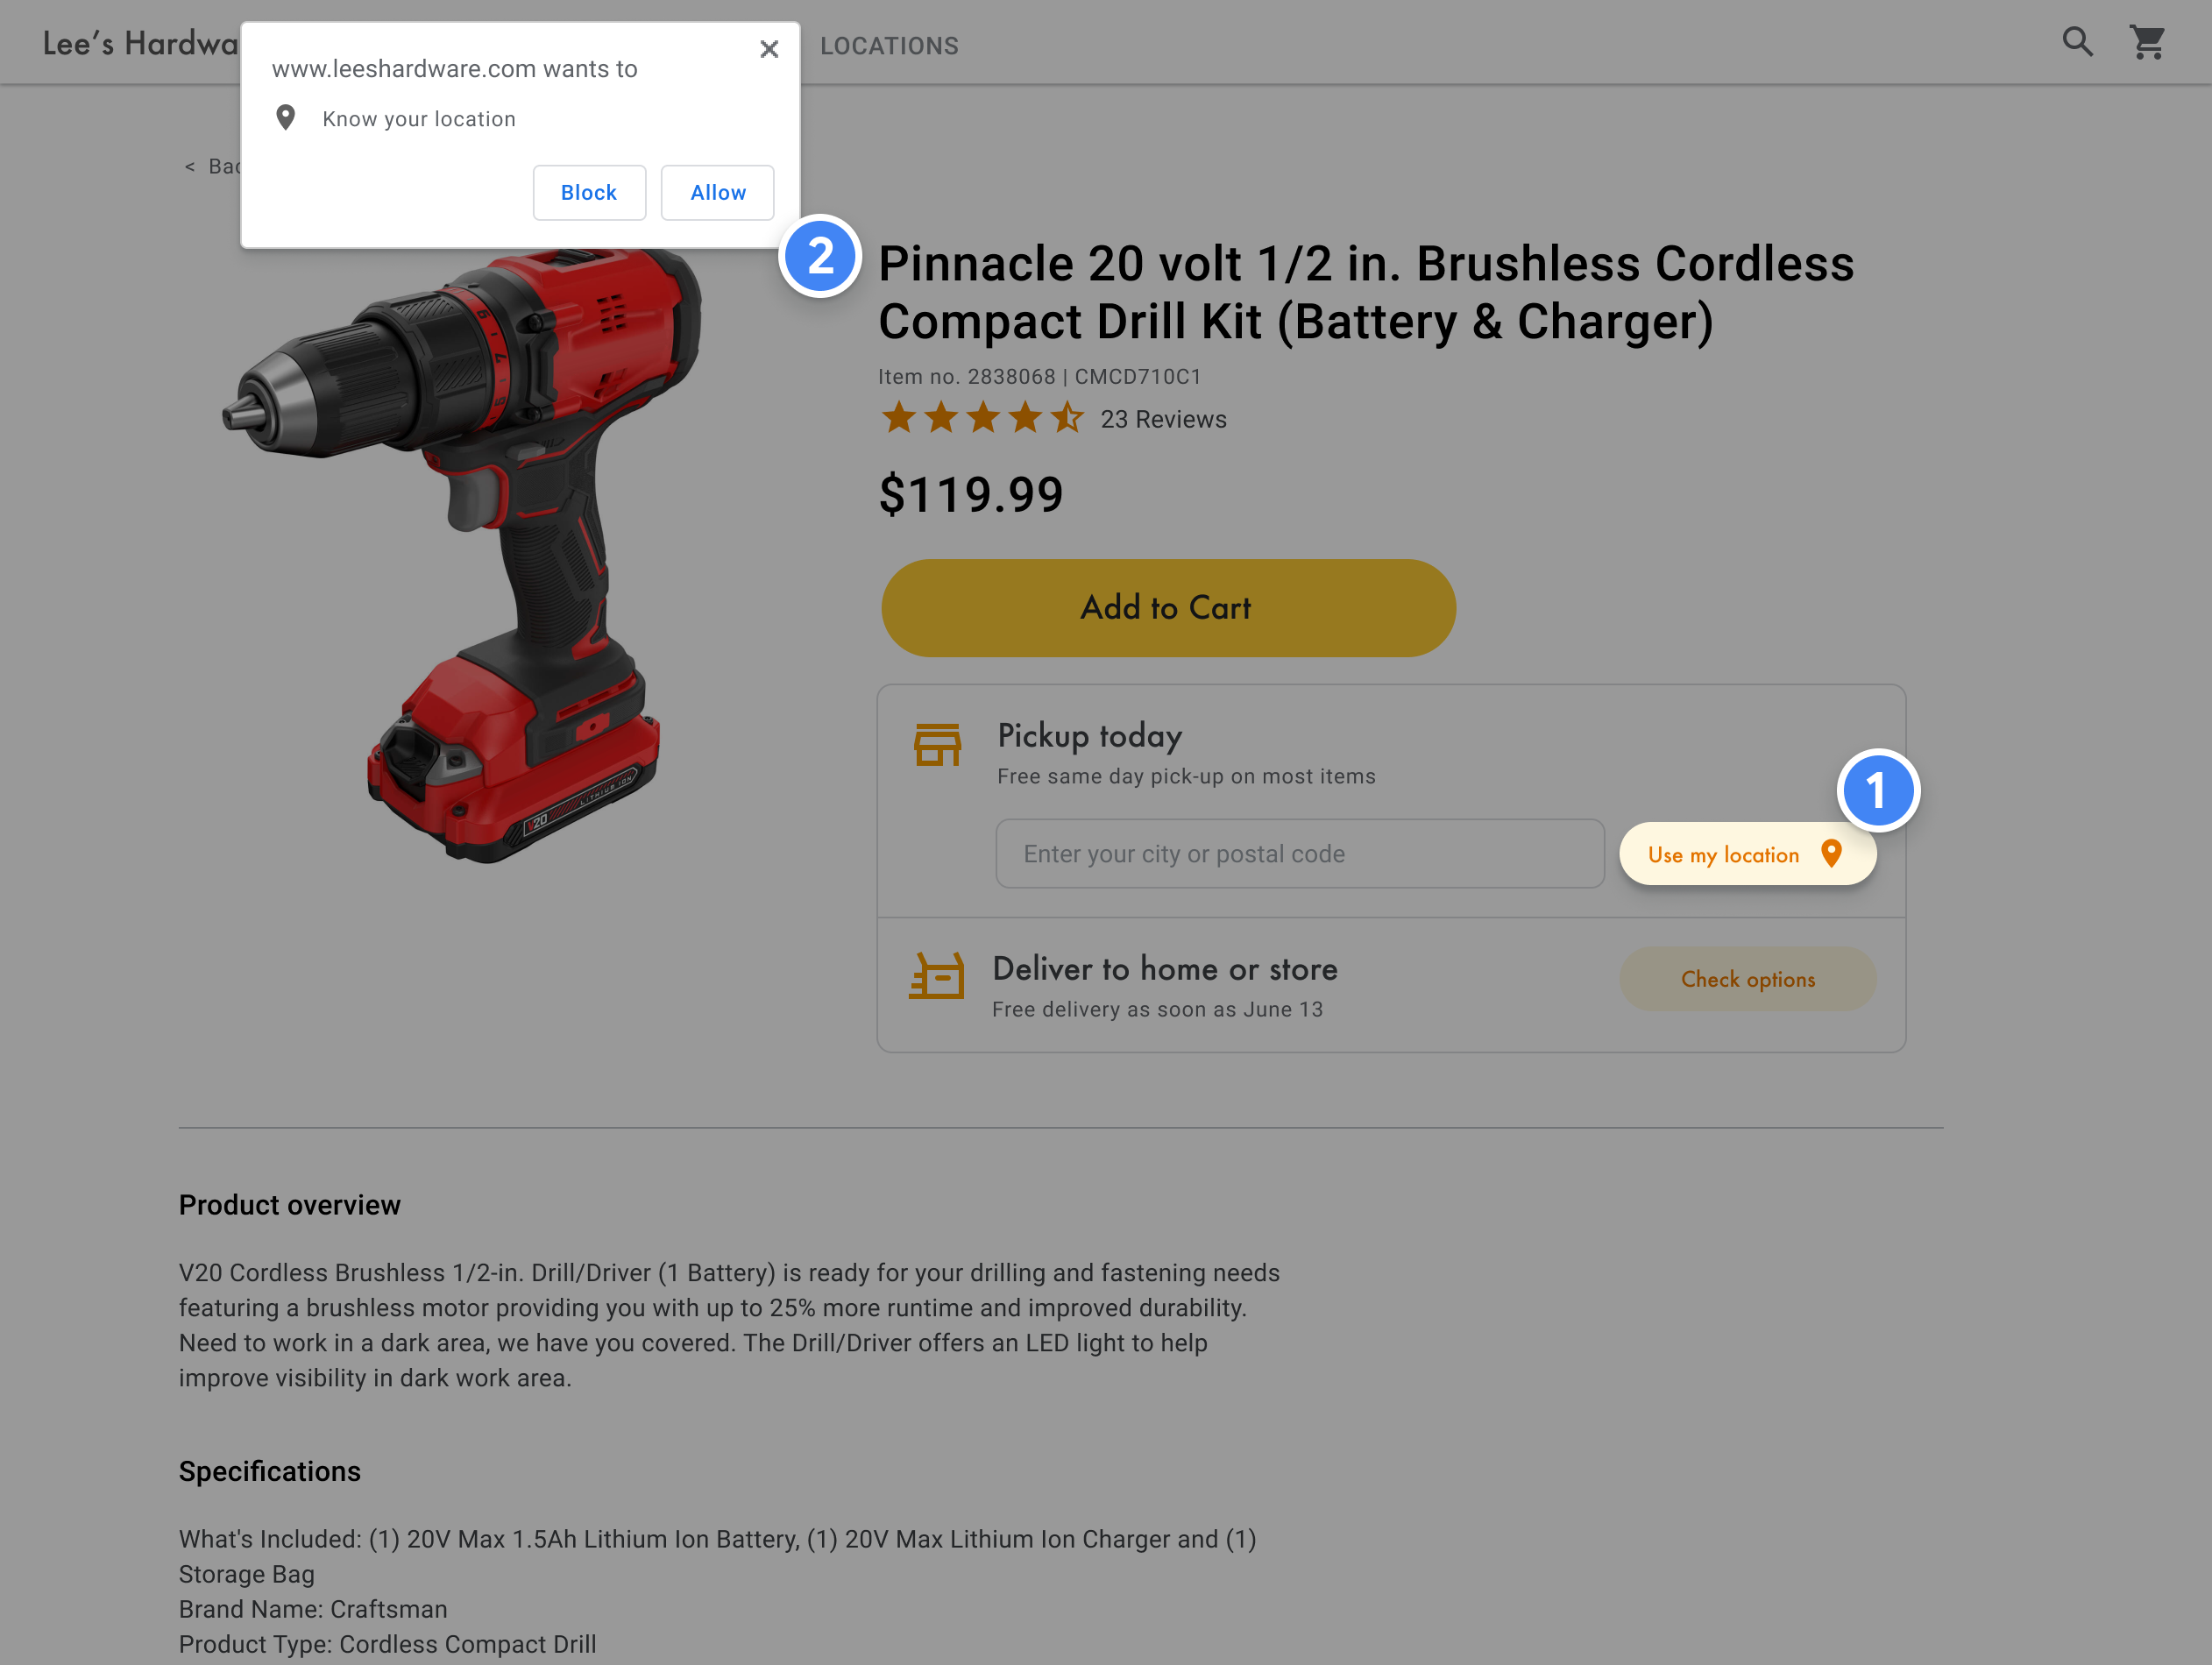
Use browser geolocation
To request and handle HTML5 browser geolocation, see how to enable a Use my location window:
Identify the closest stores
| This example uses: Routes Library, Maps JavaScript API | Also available: Routes API |
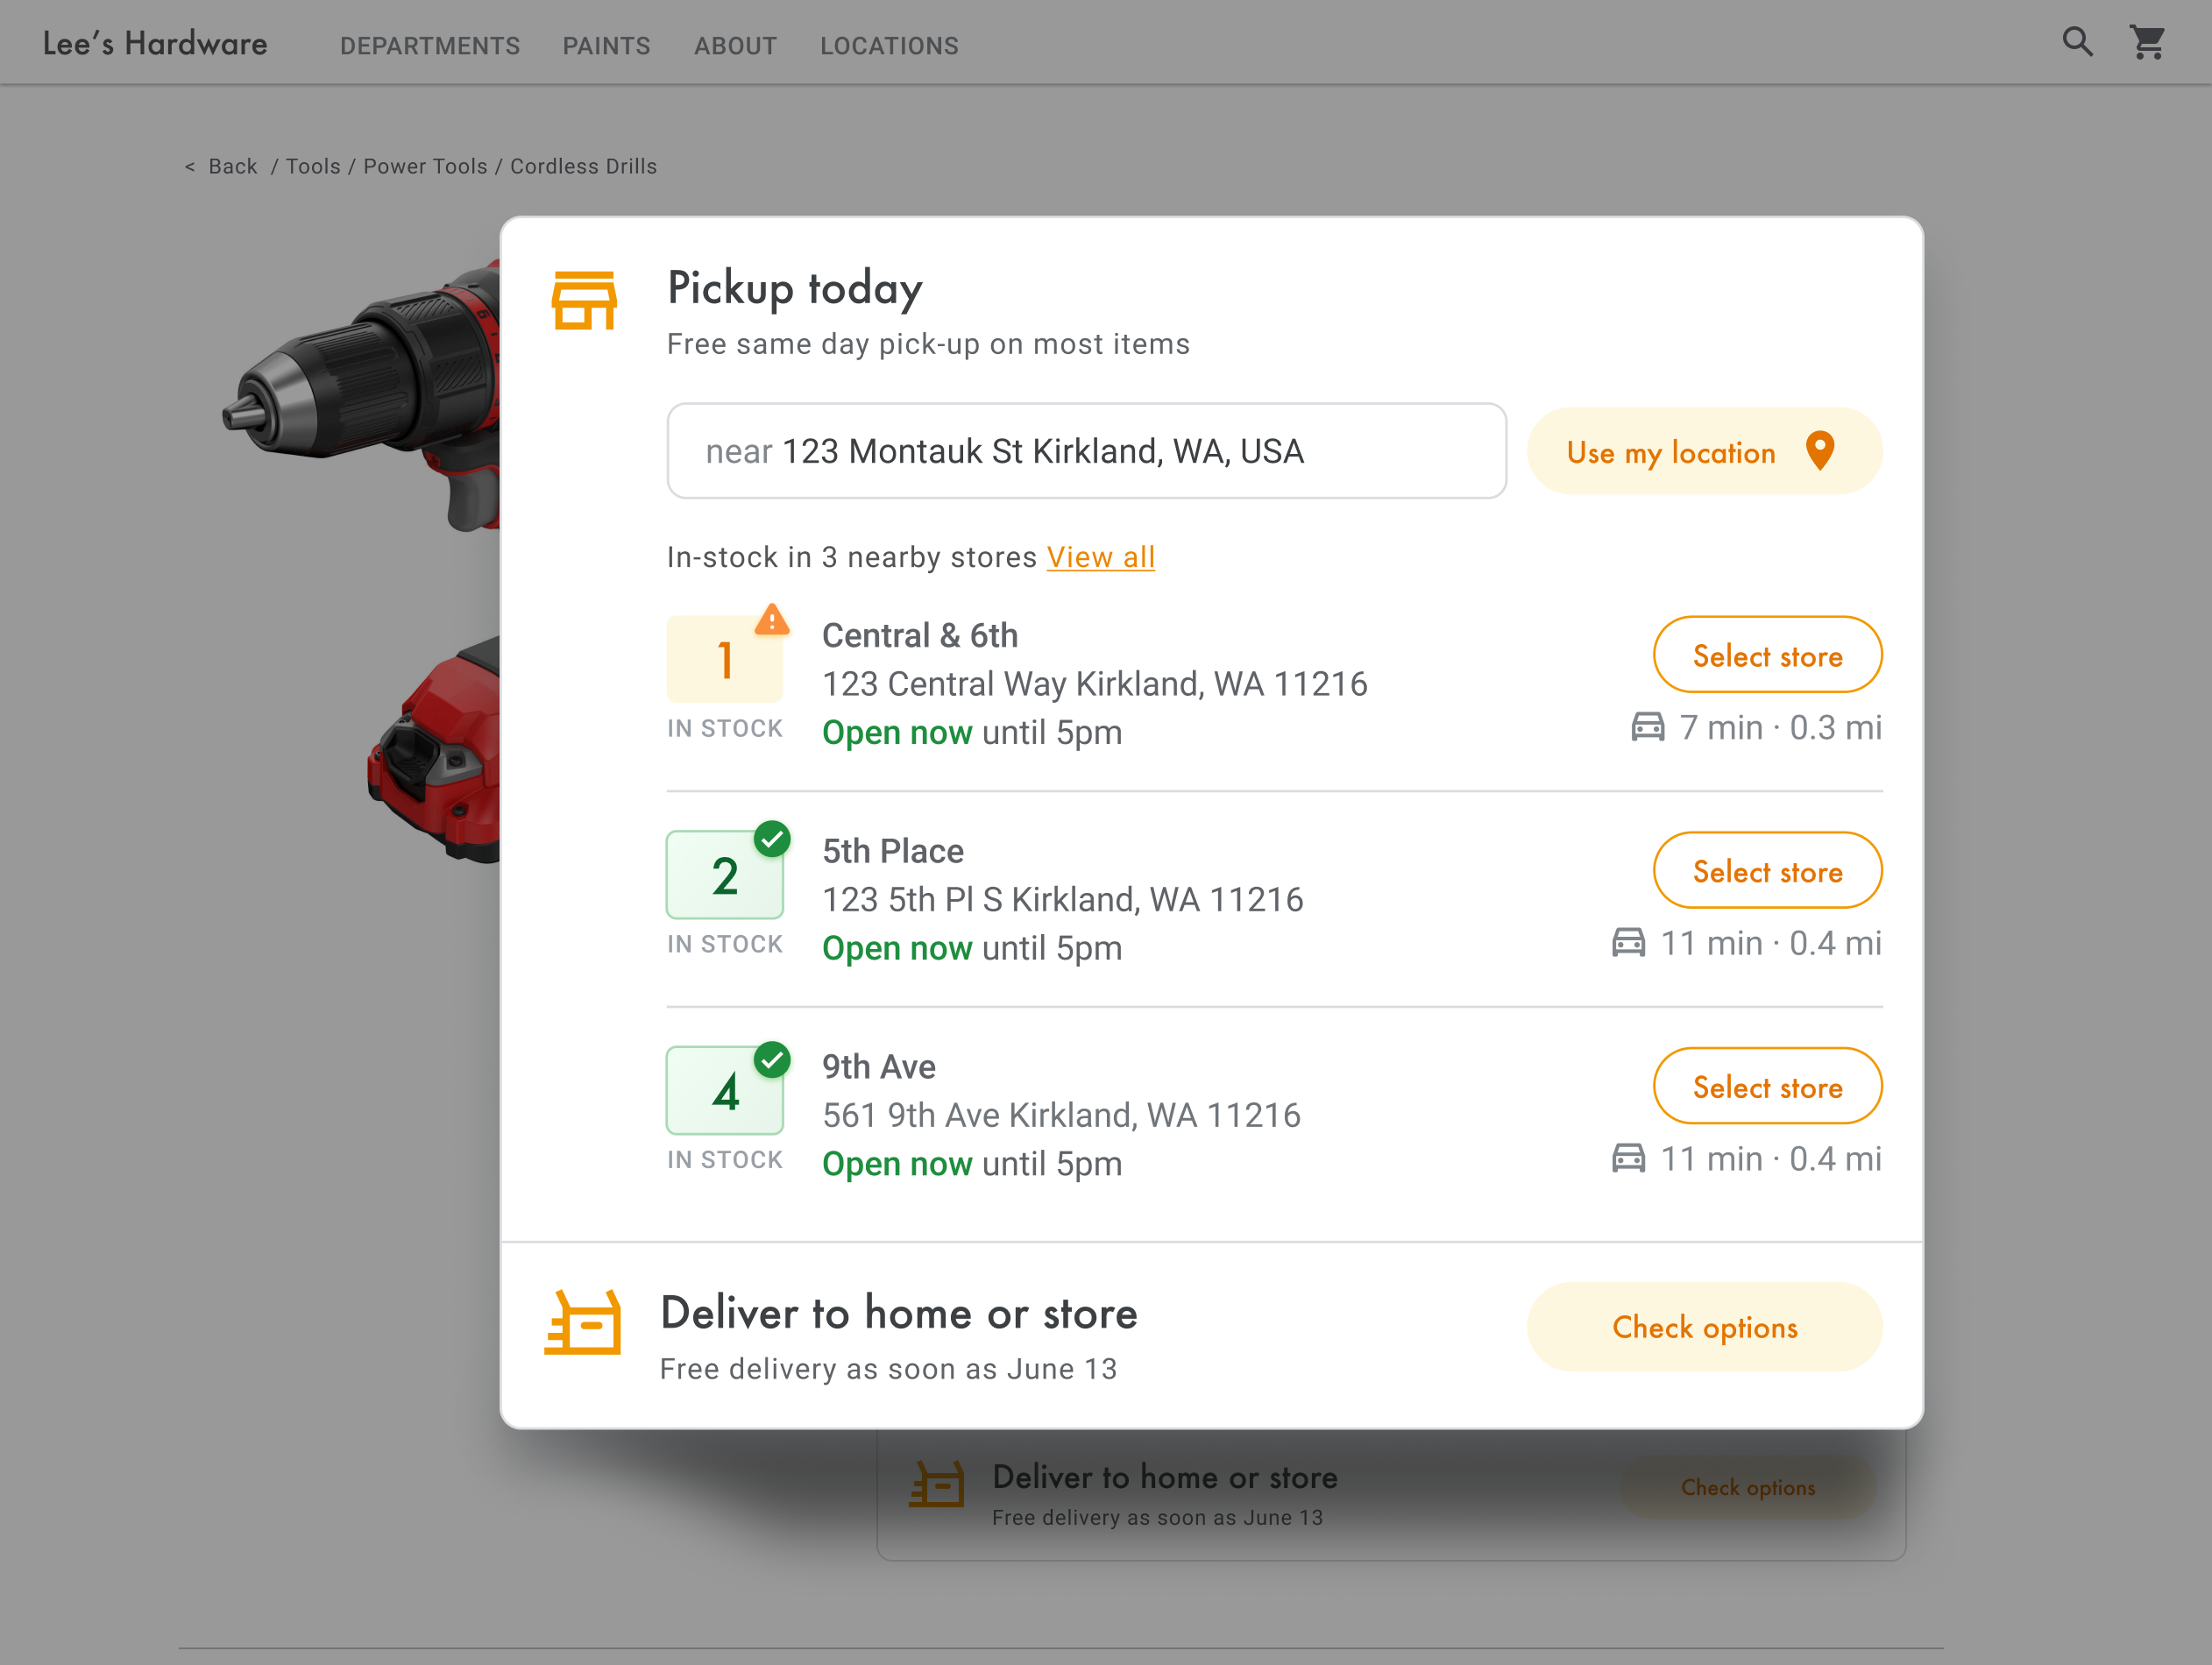
Once you have the location of the user, you can compare this to where your store
locations are. Doing this with the
RouteMatrix
class in the Routes Library, Maps JavaScript API (or the
Compute Route
Matrix feature in the Routes API) helps your users select the
location that's most convenient for them by driving time or road distance.
The standard way of organizing a list of locations is by sorting them by distance. Often this distance is calculated simply by using the straight line from a user to the location, but this can be misleading. The straight line might be over an impassable river or through busy roads at a time when another location might be more convenient. This is important when you have multiple locations within a few kilometers of each other.
The RouteMatrix.computeRouteMatrix method works by taking a list of
origin and destination locations and returning not only the travel distance but
also the travel time between them. In a user's case, the origin would be where
they currently are, or their desired starting point, and the destinations would
be that of the locations. Origins and destinations can be specified as
coordinate pairs, place IDs, or addresses. You can use
RouteMatrix.computeRouteMatrix with routing preferences such as
TRAFFIC_AWARE to show results based on current or future driving
times.
The following example calls RouteMatrix.computeRouteMatrix in the
Routes Library, Maps JavaScript API, specifying the user's origin and up to 25 store
locations at a time.
async function getDistances(originLocation) {
  const { RouteMatrix } = await google.maps.importLibrary("routes");
  const request = {
    origins: [originLocation],
    destinations: stores.slice(0, 25).map((store) => store.location),
    travelMode: google.maps.TravelMode.DRIVING,
    routingPreference: "TRAFFIC_AWARE",
    fields: ["distanceMeters", "durationMillis", "condition"],
  };
  return RouteMatrix.computeRouteMatrix(request);
}

function update(location) {
  if (!location) {
    return;
  }

  // ...

  // sort by spherical distance
  stores.sort((a, b) => {
    return (
      google.maps.geometry.spherical.computeDistanceBetween(
        new google.maps.LatLng(a.location),
        location
      ) -
      google.maps.geometry.spherical.computeDistanceBetween(
        new google.maps.LatLng(b.location),
        location
      )
    );
  });

  // display travel distance and time
  getDistances(location)
    .then(({ matrix }) => {
      const items = matrix.rows[0].items;
      for (let i = 0; i < items.length; i++) {
        if (items[i].condition === "ROUTE_EXISTS") {
          stores[i].travelDistance = items[i].distanceMeters;
          stores[i].travelDuration = items[i].durationMillis;
        }
      }
    })
    .finally(() => {
      renderCards(stores);
      autocompleteInput.disabled = false;
      isUpdateInProgress = false;
    });
}
For each nearby location you can display stock status of the product based on your inventory database.
Display store information
| This example uses: Places Library, Maps JavaScript API | Also available: Places SDK for Android | Places SDK for iOS | Places API (New) |
You can share rich Place Details like contact information, hours of operation, and current open status to help customers pick their preferred location or finalize their order.
After making a call to the Maps JavaScript API to get Place Details, you can filter and render the response.
To request Place Details, you'll need the place ID of each of your locations. See Get place IDs to retrieve the place ID of your location.
The following Place Details request uses the Place class to return the name, coordinates, website, phone number, rating, and hours for the Google London place ID:
const place = new google.maps.places.Place({ id: 'ChIJVSZzVR8FdkgRTyQkxxLQmVU', });await place.fetchFields({ fields: [ 'displayName', 'nationalPhoneNumber', 'location', 'regularOpeningHours', 'rating', 'utcOffsetMinutes', 'websiteURI', ], });
createMarker(place);
Enhance Product Locator
Depending on your business or users' needs, you can further enhance the user's experience.
Provide navigation directions
| This example uses: Routes Library, Maps JavaScript API | Also available: Routes API web service for use on Android and iOS, either directly from the application or remotely through a server proxy |
When you show users directions from within your site or applications, your users don't need to navigate away from your site and get distracted with other pages or see competitors on the map. With the Routes API, you can also request eco-friendly routes to estimate fuel or energy usage and show the environmental impact of a journey.
The Route
class in the Routes Library, Maps JavaScript API also has methods such as
createPolylines() and
createWaypointAdvancedMarkers() that let you process the results
and display them on a map.
Following is an example of requesting and displaying a route on a map. For more information on the sample, see Get a route.
Send directions to mobile
To make it even easier for users to reach a location, you can text or email them a directions link. When they click it, the Google Maps app will launch on their phone if it is installed, or maps.google.com will load in their device's web browser. Both of these experiences provide the user with the option to use turn-by-turn navigation, including voice guidance, to reach the destination.
Use
Maps URLs to compose a directions URL like the following, with
the URL-encoded place name as the destination parameter and place
ID as the destination_place_id parameter. There is no cost to
compose or use Maps URLs, so you don't need to include an API key
in the URL.
https://www.google.com/maps/dir/?api=1&destination=Google%20London&destination_place_id=ChIJVSZzVR8FdkgRTyQkxxLQmVU
You can optionally provide an origin query parameter using the same
address format as the destination. But by omitting it, the directions start from
the user's current location, which may be different from where they were using
your Product Locator app.
Maps URLs
provide additional query parameter options, such as travelmode and
dir_action=navigate to launch the directions with navigation turned
on.
This clickable link, which extends the preceding example URL, sets the
origin as a London football stadium and uses
travelmode=transit to provide public transit directions to the
destination.
To send a text or email containing this URL, we currently recommend using a third-party application such as twilio. If you're using App Engine, you can use third-party companies to send SMS messages or email. For more information, see Sending Messages with Third-Party Services.
Show your locations on an interactive map
Use dynamic maps
| This example uses: Maps JavaScript API | Also available: Android | iOS |
A locator is an important part of the user experience. Some sites, however, may lack even a simple map, requiring users to leave the site or the app to find a nearby location. This means a suboptimal experience for users who must navigate between pages in order to get the information they require. Instead, you can enhance this experience by embedding and customizing maps into your applications.
Adding a dynamic map to your page—that is, a map that users can move around, zoom in and out on, and get details about different locations and points of interest—can be done with a few lines of code.
First, you need to include the Maps JavaScript API in the page.
This is done through linking the following script in your HTML page, including
libraries=marker so you can add
advanced
markers to the map.
<script defer src="https://maps.googleapis.com/maps/api/js?key=YOUR_API_KEY&libraries=marker&callback=initMap&solution_channel=GMP_guides_productlocator_v1_a"></script>The URL references the JavaScript initMap function that runs when
the page loads. In the URL, you can also define the
language or region of your map to make sure it's formatted in the correct way
for the specific country you're targeting. Setting a region also ensures that
the behavior of apps used outside of the United States is biased towards the
region you set. View the Google Maps Platform Coverage Details
for a full list of supported languages and regions, and learn more about
region
parameter usage.
Next, you need an HTML div to place your map on the page.
This is the place where the map will be displayed.
<div id="map"></div>The next step is to set the basic functionality of your map. This is done in the
initMap script function specified in the script URL. In this script,
shown in the following example, you can set the initial location, a
map ID (required
for advanced markers and cloud-based map styling),
the type of map, and
which controls are available on the map for your users. Notice that
getElementById() references the preceding "map" div
ID.
function initMap() {
const map = new google.maps.Map(document.getElementById("map"), {
zoom: 12,
center: { lat: 51.485925, lng: -0.129500 },
mapId: "DEMO_MAP_ID",
zoomControl: false
});
}
For a locator, you're usually interested in setting the initial location, the center point or bounds, and the zoom level (how much the map is zoomed into that location). Most other elements, such as tuning of controls, are optional as you determine the level of interaction with the map.
Customize your map
You can change your map's appearance and details in a number of ways. For example, you can:
- Create your own custom markers to replace the default map pins.
- Change the colors of map features to reflect your brand.
- Control which points of interest you display (attractions, food, lodging, and so on) and at what density, letting you focus user attention on your locations while highlighting the landmarks that help users get to the nearest location.
Create custom map markers
You can customize your advanced markers by changing the default pin background, border, or glyph color (for example, to indicate whether a location is currently open), replacing the marker with a custom graphic image such as the logo of your brand, or building custom HTML and CSS markers. Info windows, or pop-up windows, can provide additional information to users, such as opening hours, phone number, or photos.
Following is a sample map that uses custom graphic markers. (See the source code in the Maps JavaScript API custom graphic markers topic.)
For detailed information, see the advanced markers documentation for JavaScript (web), Android, and iOS.
Style your map
Google Maps Platform lets you style your map in ways that help users find the closest location, get there as quickly as possible, and help you reinforce your brand. For example, you can change map colors to match your branding, and you can reduce distractions on the map by controlling the points of interest that are visible to users. Google Maps Platform also provides a number of map starter templates, some of which are optimized for different industries, such as travel, logistics, real estate, and retail.
You can create or modify map styles in the Google Cloud console Map Styles page in your project.
Expand to see animations of map style creation and styling in the Cloud console:
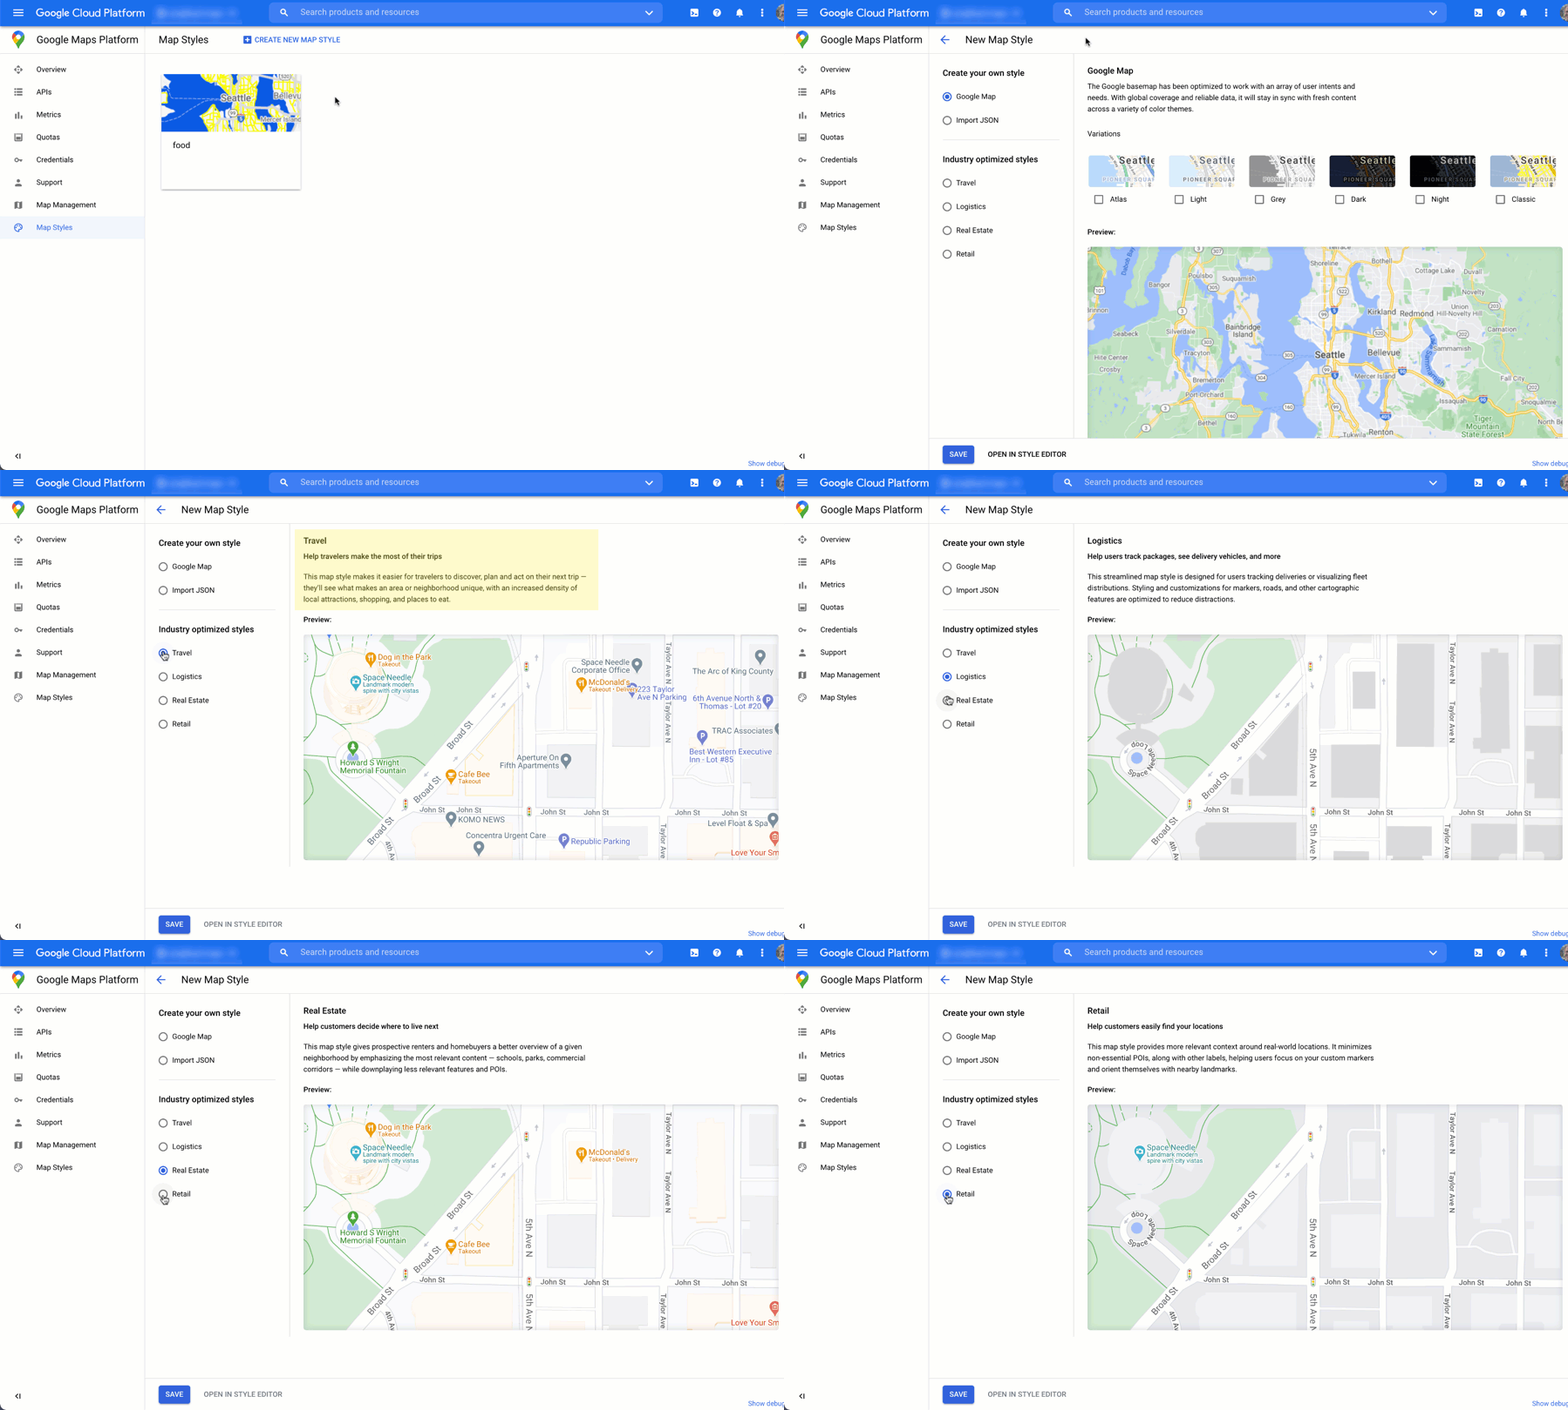
Industry map styles
This animation shows predefined industry-specific map styles you can use. These styles provide an optimal starting point for each type of industry. For example, the Retail map style reduces points of interest on the map, letting users focus on your locations, as well as the landmarks to help them get to the closest location as quickly and confidently as possible.
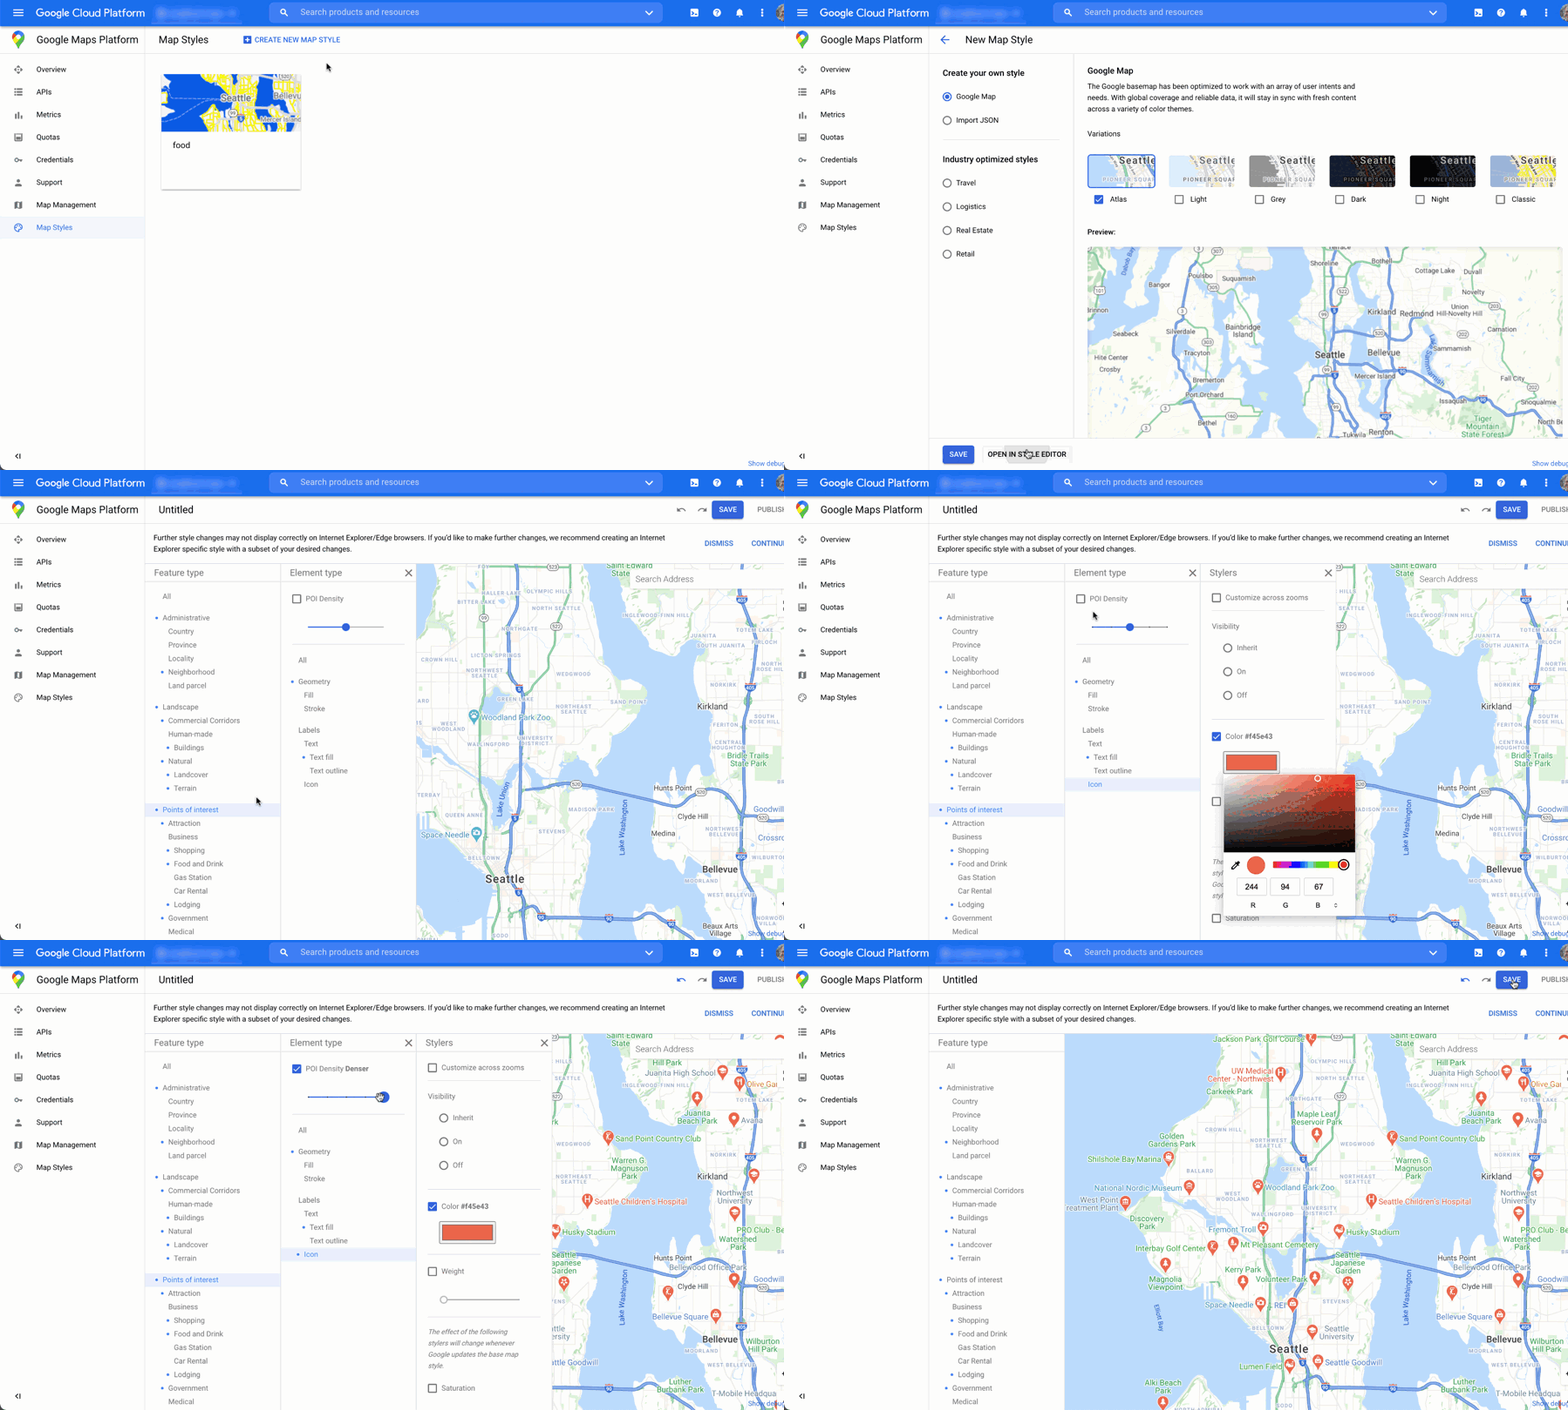
Points of interest control
This animation sets the marker color for points of interest and increases the POI density on the map style. The higher the density, the more POI markers appear on the map.
Each map style has its own ID. After you publish a style in the Cloud console, you reference that map ID in your code—which means you can update a map style in real time without refactoring your app. The new look will automatically appear in the existing application and be used across platforms. The following examples show how to add a map ID to a web page using the Maps JavaScript API.
By including one or more map_ids in the script URL, the
Maps JavaScript API automatically makes those styles available
for faster map rendering when you call those styles in your code.
<script
src="https://maps.googleapis.com/maps/api/js?key=YOUR_API_KEY&map_ids=MAP_IDs&callback=initMap&solution_channel=GMP_guides_productlocator_v1_a">
</script>
The following code displays a styled map on the web page. (Not shown is an HTML
<div id="map"></div> element where the map will appear
on the page.)
map = new google.maps.Map(document.getElementById('map'), {
center: {lat: 51.485925, lng: -0.129500},
zoom: 12,
mapId: '1234abcd5678efgh'
});
Learn more about incorporating cloud-based maps styling in JavaScript (web), Android, and iOS.
Combine custom location data with Place Details
The previous Show your locations on an interactive map section describes using Place Details to give users a rich level of information about your locations, such as opening hours, photos, and reviews.
It's helpful to understand the pricing and SKU tiers of different data fields in Places API (New). To manage your costs, one strategy is to combine the information you already have about your locations with the fresh information from Google Maps such as temporary closure, holiday hours, and user ratings, photos, and reviews. If you already have the contact information for your stores, you won't need to request those fields from Place Details and can constrain your field mask to fetch only the fields you want to display.
You may have your own place data to supplement or use instead of Place Details. The codelab for the full-stack locator provides an example of using GeoJSON with a database to store and retrieve your own location details.