
Introduction
For millions of users globally, Google Maps is the go-to source for accurate and up-to-date places information. Google's rich database of over 250 million places worldwide, including user reviews, photos and ratings provides an unparalleled level of detail and trust. To provide fresh and factual data, we make 100 million updates to the map every day.
Places UI Kit is a ready-to-use, cost-effective component library, and is powered by Google Maps' extensive information on places. It enables you to integrate Google's trusted and familiar Places experience to your front-end use cases on a map of your choice.
Components
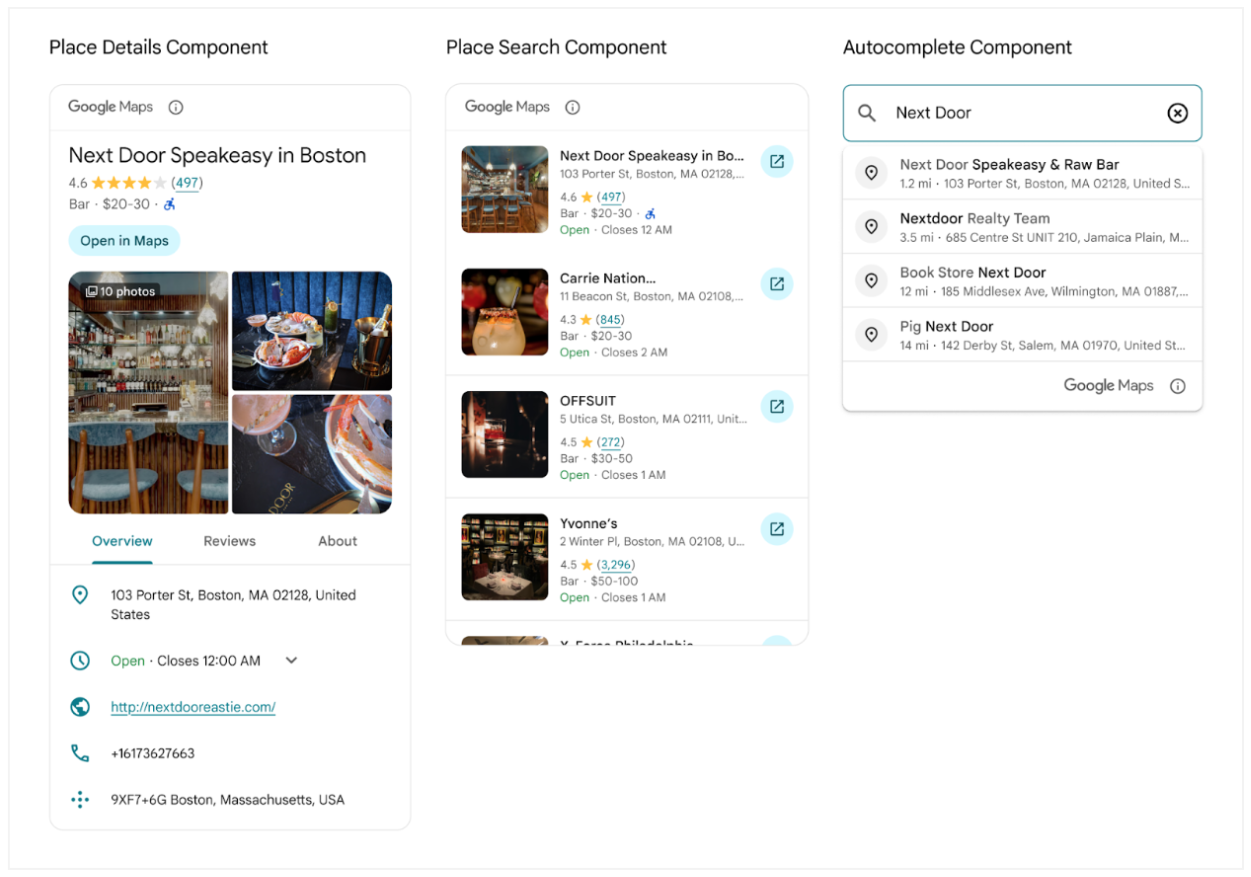
The Places UI Kit offers a set of individual UI components that can be used independently or together to create a seamless Places experience.
Place Details: This component renders detailed information about a place, such as its name, address, phone number, website, opening hours, and user reviews.
Place Search: This component displays a list of nearby places categorically or through free text search.
Basic Place Autocomplete: This component creates a text input field, presenting a dropdown list of predicted places that matches input.
Key Benefits of Places UI Kit
Ease of Use: Incorporate Google's trusted user experience for Places into your apps with minimal code.
Use on Any Map: For the first time, you can use Places content on a non-Google map.
Familiar UI: The components provide a user interface that is consistent with the Google Maps experience, making it intuitive for users.
Customization: The Places UI Kit offers extensive visual customization options at no extra charge. You can use a variety of settings and custom CSS properties to configure the display elements.
Cost-Effective: The Places UI Kit can be a more cost-effective solution compared to using the Places API directly.
Real-world Use Cases
The Places UI Kit can be used in a variety of applications to enhance the user experience.
Local Discovery Applications: A "things to do" application can use the Place Search component to show a list of nearby restaurants, cafes, or attractions. When a user selects a place from the list, the Place Details component can be used to display more information about that location.
Travel Planning Applications: A travel application can use the Place Search to allow users to search for hotels or points of interest in a specific city. The Place Details component can then show photos, ratings, and reviews for each location to help with planning.
Real Estate and Property Search Portals: A real estate application can use a Place Search component to show different categories of nearby places to help a potential home buyer or renter to understand the neighborhood lifestyle fit before they schedule a viewing.
Messaging and Social Media Applications: A messaging and social media application can use Place Search to search and suggest nearby places to help users easily find a meet-up place. The Place Details component can be used to show the rich places information when users share places. Using the pre-built Google Maps button, users can easily and accurately explore further locations and traveling information on Google Maps.
Customization
The content richness and the styles of the Places UI Kit components can be customized to fit your needs.
Using custom CSS properties, for example the CSS properties for Place Details
Component, allows you to tailor the
look and feel of the components to match your application's design. You can
customize colors, fonts, and other visual aspects. It is important to adhere to
the attribution requirements when making visual modifications. For example, you
can change the primary color used for links and review counts with the --gmp-mat-color-primary CSS property.
You can control the specific place content displayed using a nested gmp-place-content-config element to select and configure the content, or simply using gmp-place-all-content to show all available content.
A customization tool is available in the documentation to help you visualize different style configurations.
Implementation Guidance
Places UI Kit is available through Maps JavaScript and Places SDK for Android and iOS.
Getting Started
To begin using the Places UI Kit, you need to follow these steps:
Set up your Google Cloud project: You need a Cloud project with a billing account to use the Places UI Kit.
Enable the Places UI Kit: You must enable the Places UI Kit for your project.
Get an API key: An API key is required to authenticate your requests.
For more platform specific details, check out the Places UI Kit getting started guidance for JavaScript, Android, and iOS.
Implementation Example
Here's an example of implementing a Place Search and Place Details with dynamic JavaScript maps. A user can search nearby places based on free text. When clicking on a place in the search result list, the Place Details component will show on the dynamic maps.
Below are the code snippets. You can find the demo and the complete code on this GitHub repo.
Before you start, make sure you have completed the above Getting Started steps relevant to JavaScript.
Load the required libraries in HTML.
<script>
  (g=>{var h,a,k,p="The Google Maps JavaScript API",c="google",l="importLibrary",q="__ib__",m=document,b=window;b=b[c]||(b[c]={});var d=b.maps||(b.maps={}),r=new Set,e=new URLSearchParams,u=()=>h||(h=new Promise(async(f,n)=>{await (a=m.createElement("script"));e.set("libraries",[...r]+"");for(k in g)e.set(k.replace(/[A-Z]/g,t=>"_"+t[0].toLowerCase()),g[k]);e.set("callback",c+".maps."+q);a.src=`https://maps.${c}apis.com/maps/api/js?`+e;d[q]=f;a.onerror=()=>h=n(Error(p+" could not load."));a.nonce=m.querySelector("script[nonce]")?.nonce||"";m.head.append(a)}));d[l]?console.warn(p+" only loads once. Ignoring:",g):d[l]=(f,...n)=>r.add(f)&&u().then(()=>d[l](f,...n))})({
    key: "YOUR_API_KEY",
    v: "weekly",
    // Use the 'v' parameter to indicate the version to use (weekly, beta, alpha, etc.).
    // Add other bootstrap parameters as needed, using camel case.
  });
</script>
In HTML, add a map container, text input field and a search button. This map container will hold the dynamic maps which will be created in JavaScript. The input box allows users to type in search queries.
<div id="map-container"></div>
<div class="controls">
    <input type="text" class="query-input" />
    <button class="search-button">Search</button>
</div>
Add the Place Search component. Place Search component provides horizontal and vertical layouts. In this example, we use the horizontal layout. The “selectable” attribute enables the search result list item to be clickable (gmp-select event will be triggered when clicked).
Within the gmp-place-search element, we add two child elements:
gmp-place-all-contentis used to show all available contentgmp-place-text-search-requestis used to configure thePlaceSearchElement.
We will set the configuration in JavaScript in this example
<div class="list-container">
    <gmp-place-search orientation="horizontal" selectable>
         <gmp-place-all-content></gmp-place-all-content>
         <gmp-place-text-search-request></gmp-place-text-search-request>
    </gmp-place-search>
</div>
Next, add the Place Details component, which is available in compact and full layouts, each supporting vertical and horizontal orientations. This example uses the compact horizontal layout. Like the Place Search component, we add two child elements:
gmp-place-all-contentindicates showing all available contentgmp-place-details-place-requestis used to select a place.
We will set the place in JavaScript in this example
<div id="details-container">
     <gmp-place-details-compact orientation="horizontal">
        <gmp-place-details-place-request></gmp-place-details-place-request>
        <gmp-place-all-content></gmp-place-all-content>
    </gmp-place-details-compact>
</div>
In JavaScript, import the libraries that we need for this example. The Places library imports the Places UI Kit library for JavaScript.
const {Map} = await google.maps.importLibrary("maps");
await google.maps.importLibrary("places");
({AdvancedMarkerElement} = await google.maps.importLibrary("marker"));
({LatLngBounds, LatLng} = await google.maps.importLibrary("core"));
Create dynamic maps.
const mapContainer = document.getElementById("map-container");
const mapOptions = {
    center: {lat: 37.422, lng: -122.085},
    zoom: 12
};
const gMap = new Map(mapContainer, mapOptions);
Add a click listener to the search button to initiate a place search. When the search results load, create markers for each place and add click listener to it. Clicking a marker will then request and display the corresponding Place Details.
When places are found and the PlaceSearchElement loads, the places property
of the PlaceSearchElement is populated with an array of results. Each result
is a place object containing its Place ID, coordinates, and viewport. To fetch
details, pass either the Place ID or the entire place object to the Place
Details element.
const queryInput = document.querySelector(".query-input");
const searchButton = document.querySelector(".search-button");
const placeSearch = document.querySelector("gmp-place-search");
const placeSearchQuery = document.querySelector("gmp-place-text-search-request");
const placeDetails = document.querySelector("gmp-place-details-compact");
const placeRequest = document.querySelector("gmp-place-details-place-request");

placeDetailsPopup = new AdvancedMarkerElement({
    map: null,
    content: placeDetails,
    zIndex: 1
});

searchButton.addEventListener("click", searchPlaces);

function searchPlaces(){
    if (queryInput.value.trim()) {
        placeSearchQuery.textQuery = queryInput.value.trim();
        placeSearchQuery.locationBias = gMap.getBounds();
        placeSearch.addEventListener('gmp-load', addMarkers, { once: true });
    }
}

async function addMarkers(){
    const bounds = new LatLngBounds();
    placeSearch.places.forEach((place) => {
        let marker = new AdvancedMarkerElement({
            map: gMap,
            position: place.location
        });
        bounds.extend(place.location);
        marker.addListener('click',(event) => {
            placeRequest.place = place;
            placeDetails.style.display = 'block';
            placeDetailsPopup.position = place.location;
            placeDetailsPopup.map = gMap;
            gMap.fitBounds(place.viewport, {top: 200, left: 100});
        });
        gMap.setCenter(bounds.getCenter());
        gMap.fitBounds(bounds);
    });
}
Make sure to check out the demo and the complete code on this GitHub repo.
Sources to help you build
- Get Started with Google Maps Platform
- Places UI Kit for JavaScript
- Places UI Kit for Android
- Places UI Kit for iOS
- Places UI Kit Customization
Contributors
Principal authors:
Teresa Qin | Google Maps Platform Solutions Engineer