
Objective
Learn how to integrate the PlaceSearchElement with Google Maps to help users
to find places using nearby search or text search, enhancing their ability to
explore points of interest. Use the Place Details Compact Element to provide
more details about the places surfaced in your application.
What is the PlaceSearchElement?
The PlaceSearchElement is part of the Places UI Kit in the Maps JavaScript
API. It's an HTML element that renders the results of a place search directly in
a list format within your application. This element simplifies the process of
displaying places found using a Nearby Search or a Text Search, providing a
seamless user experience for place discovery. When a user selects a place from
the list, you can display its details on the map, often using an Info Window and
the Place Details Element.
Visualize place discovery
The following image shows an example of the PlaceSearchElement in action. On
the left, a list of restaurants is displayed (the PlaceSearchElement). When a
restaurant is selected, its details appear in an Info Window on the map, and the
map centers on its location.

Use Cases for Place Discovery
Integrating the PlaceSearchElement can enhance various applications across
different industries:
- Travel and Tourism: Allow tourists to search for attractions, hotels, or specific types of cuisine in an area.
- Real Estate: Enable potential buyers or renters to find nearby schools, supermarkets, or public transport options.
- Logistics and Services: Assist drivers in finding EV charging stations, gas stations, or specific service centers.
Solution Workflow: Implementing Place Discovery
This section walks you through integrating the PlaceSearchElement to
discover places on a map, and includes code snippets for interacting with the
Places UI Kit. Learn how to initialize the map and implement both Nearby
Search and Text Search. Finally, use the Place Details element to show more
details about a place when a user clicks its pin on the map.
Prerequisites
Familiarity with the following documentation is recommended:
PlaceSearchElement- Used to expose places using either Nearby Search or Text Search- Place Details Element - Used to display details of an individual place
- Maps JavaScript API - Used to show a map on your page, and to import Places UI Kit
Enable Maps JavaScript API and Places UI Kit on your project.
Verify you have loaded the Maps JavaScript API and imported the required libraries before getting started. This document also assumes a working knowledge of web development, including HTML, CSS, and JavaScript.
Add a map to the page
The first step is to add a map to your page. This map will be used to display PlaceSearchElement results as selectable pins.
There are two ways to add a map to a page:
- Using a
gmp-mapHTML web component. - Using JavaScript.
The code snippets on this page were generated using a JavaScript map.
The map can either be centered on a location you would like the user to search around, such as a hotel, or initialized to ask for the user's current location to center the map. For the purposes of this document, we will be using a fixed location to anchor the search.
If you are visualizing places nearby a fixed location, such as a hotel, place a marker on the map to represent this place. For example:
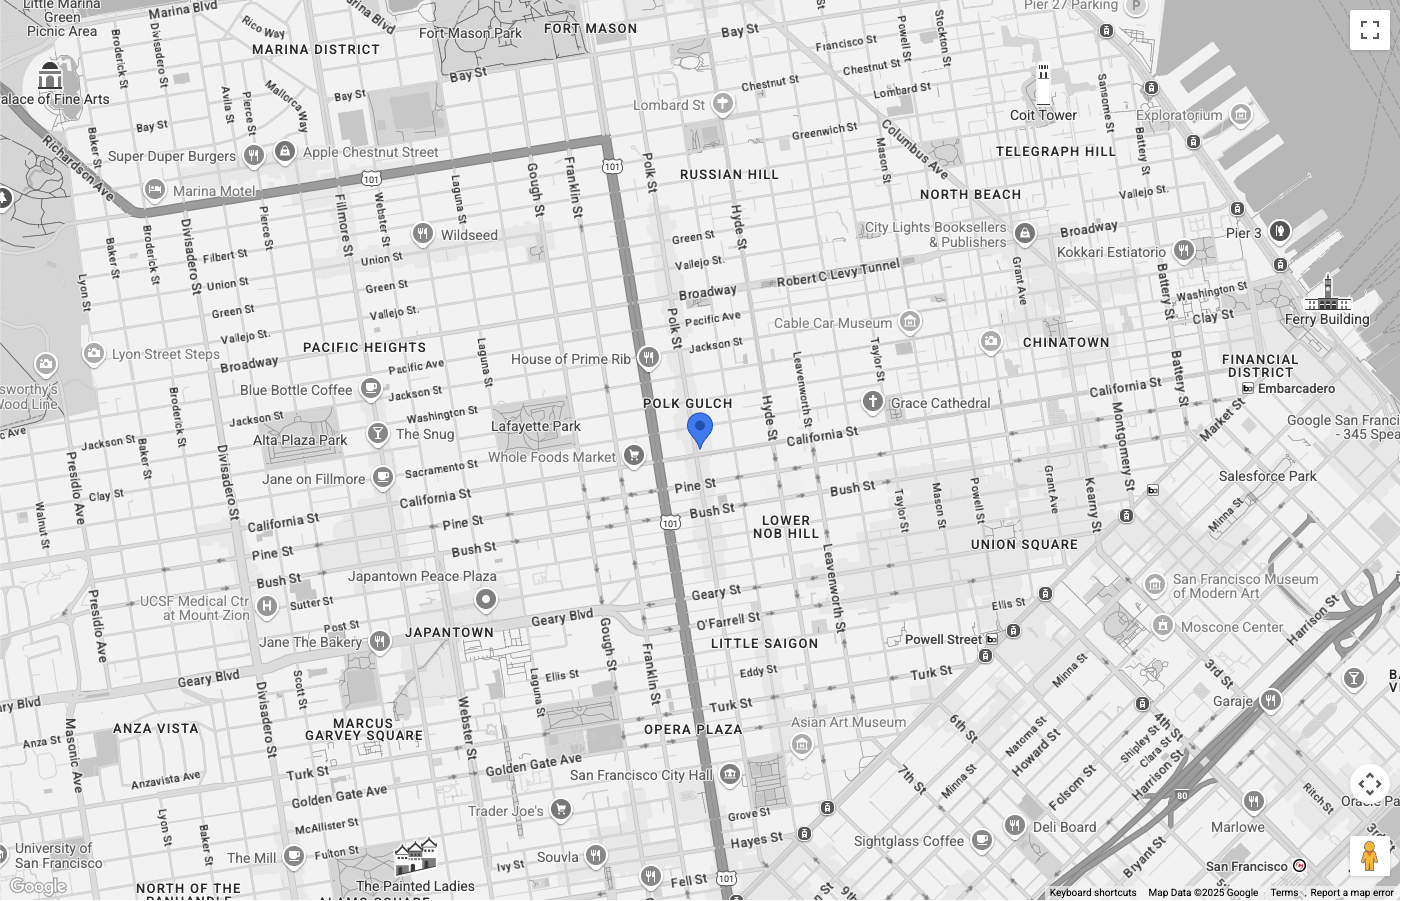
The map is centered on San Francisco, with a blue pin to represent the place we
are searching nearby. The pin color has been customized using
PinElement.
The Map Type control has been hidden
from the UI.
Set up PlaceSearchElement
Now, set up the HTML and CSS to display the PlaceSearchElement. This
example floats the element over the left side of the map, but you can try
different layouts to suit your application.
The PlaceSearchElement uses a declarative approach. Instead of configuring it
entirely in JavaScript, you define the search type directly in your HTML by
nesting a request element, such as <gmp-place-nearby-search-request>, inside
the main <gmp-place-search> component.
Within your HTML code, initialize a <gmp-place-search> element. Use the
selectable attribute to enable click events on the results. Inside it, add a
<gmp-place-nearby-search-request> to specify that this element will be used
for nearby search.
<gmp-place-search selectable>
  <gmp-place-nearby-search-request>
  </gmp-place-nearby-search-request>
</gmp-place-search>
To perform an initial search and display results, we'll use JavaScript to get a
reference to the nested request element and set its properties. Initialize a
Circle to use as the locationRestriction, using the marker position from the
previous step as the center point. Then, set the locationRestriction and
includedPrimaryTypes properties on the request element to trigger the search.
The code snippet for this is as follows:
// Get references to the Place Search and its nested request element
const placeSearchElement = document.querySelector("gmp-place-search");
const placeSearchRequestElement = document.querySelector("gmp-place-nearby-search-request");

// Define the location restriction for the search
const circleRestriction = new Circle({
    center: marker.position,
    radius: 500
});

// Set the properties on the request element to perform an initial search for restaurants.
placeSearchRequestElement.locationRestriction = circleRestriction;
placeSearchRequestElement.includedPrimaryTypes = ['restaurant'];
An example of how the application could look at this stage is as follows:
Allow user to search
The PlaceSearchElement allows two search options:
<gmp-place-nearby-search-request>- render search results from a Places Nearby Search, using Place Types.<gmp-place-text-search-request>- render search results from a Places Text Search, using a free text input such as "Sushi in San Francisco".
These are nested elements inside <gmp-place-search>. You then trigger searches
by setting properties on that nested request element using JavaScript.
This section describes implementing both methods.
Nearby search
To allow users to perform a nearby search, you first need a UI element for them to select a Place Type. Choose the selection method that works best for your application, for example, a drop-down list populated with a selection of place types.
It's recommended to choose a subset of types that are relevant to your use case.
For example, if you're developing an application to show tourists what's nearby
a hotel, you might choose: bakery, coffee_shop, museum, restaurant, and
tourist_attraction.
Your HTML should contain the <gmp-place-search> element with a
<gmp-place-nearby-search-request> nested inside.
<gmp-place-search selectable>
  <gmp-place-nearby-search-request>
  </gmp-place-nearby-search-request>
</gmp-place-search>
Next, create a JavaScript listener for the change event on your place type
selector. This listener will call a function that updates the properties of the
<gmp-place-nearby-search-request> element, which automatically triggers a new
search and updates the list.
// Get a reference to the nested request element
const placeSearchRequestElement = document.querySelector('gmp-place-nearby-search-request');

// Function to update the place search based on the selected type
function updatePlaceList() {
    const selectedType = placeTypeSelect.value;
    if (!selectedType) {
        // If no type is selected, don't perform a search.
        // You could optionally hide the list or clear previous results here.
        placeSearchElement.style.display = 'none';
        return;
    }
    placeSearchElement.style.display = 'block';

    // Set properties on the request element to trigger a new search
    placeSearchRequestElement.locationRestriction = searchCircle;
    placeSearchRequestElement.maxResultCount = 8;
    placeSearchRequestElement.includedPrimaryTypes = [selectedType];
}
The same searchCircle from the setup step is used for the
locationRestriction. The includedPrimaryTypes property is set to the value
from the user's selection. An optional maxResultCount is also set to limit the
number of results.
Text Search

To enable text search, your HTML configuration must change. Instead of the
nearby search request, you nest a <gmp-place-text-search-request> element.
<gmp-place-search selectable>
  <gmp-place-text-search-request>
  </gmp-place-text-search-request>
</gmp-place-search>
Add a text input and a search button to your UI. Create a JavaScript listener
for the button's click event. The event handler will take the user's input and
update the properties of the <gmp-place-text-search-request> element to
perform the search.
// Get a reference to the text search request element
const placeTextSearchRequestElement = document.querySelector('gmp-place-text-search-request');
const textSearchInput = document.getElementById('textSearchInput');
const textSearchButton = document.getElementById('textSearchButton');

textSearchButton.addEventListener('click', performTextSearch);

function performTextSearch() {
    const query = textSearchInput.value.trim();
    if (!query) {
        console.log("Search query is empty.");
        return;
    }
    // Set properties on the request element to trigger a new search
    placeTextSearchRequestElement.textQuery = query;
    placeTextSearchRequestElement.locationBias = map.getBounds();
    placeTextSearchRequestElement.maxResultCount = 8;
}
Here, we set the textQuery property with the user's input. We also provide a
locationBias using the current map bounds, which tells the API to prefer
results within that area without strictly confining them. An optional
maxResultCount limits the number of results returned.
Display Place Pins and Details
Now the application can perform a place search and populate the element. In the next step we will enhance its functionality by:
- Displaying pins on the map for each place populated in the
PlaceSearchElement. - Allowing a user to either click a pin or the place within the
PlaceSearchElement, to show more details about that particular place.
The principle of this step is the same whether the application is using a nearby search or a text search.
First, add a global variable to your JavaScript code to store the place markers. This will allow you to remove them when the search changes and to handle click events.
let markers = {};
Create a function to add markers to the map. This function will be called whenever new search results are loaded. It will:
- Remove any existing place markers from the map.
- Loop through the results from the
PlaceSearchElementand add a marker for each one. - Adjust the map's bounds so all new markers are visible.
To listen for when search results are available, add a gmp-load event listener
to the <gmp-place-search> element. This event fires after a search is complete
and the results are rendered.
We'll add the listener inside our search function (e.g., updatePlaceList), and
use the { once: true } option to make sure it only fires for the results of
the current search.
// In your search function, after setting the request properties:
placeSearchElement.addEventListener('gmp-load', addMarkers, { once: true });
The addMarkers function looks like this:
async function addMarkers() {
    const { LatLngBounds } = await google.maps.importLibrary("core");
    const bounds = new LatLngBounds();

    if (placeSearchElement.places.length > 0) {
        // Remove existing markers
        for (const m in markers) {
            markers[m].map = null;
        }
        markers = {};

        // Loop through each place from the search results
        // and add a marker for each one.
        for (const place of placeSearchElement.places) {
            const marker = new google.maps.marker.AdvancedMarkerElement({
                map: map,
                position: place.location,
            });

            markers[place.id] = marker;
            bounds.extend(place.location);
            marker.collisionBehavior = google.maps.CollisionBehavior.REQUIRED_AND_HIDES_OPTIONAL;

            // Add a click listener for each marker.
            marker.addListener('gmp-click', (event) => {
                // The main logic for showing details will go here.
            });
        }
        // Position the map to display all markers.
        map.setCenter(bounds.getCenter());
        map.fitBounds(bounds);
    }
}
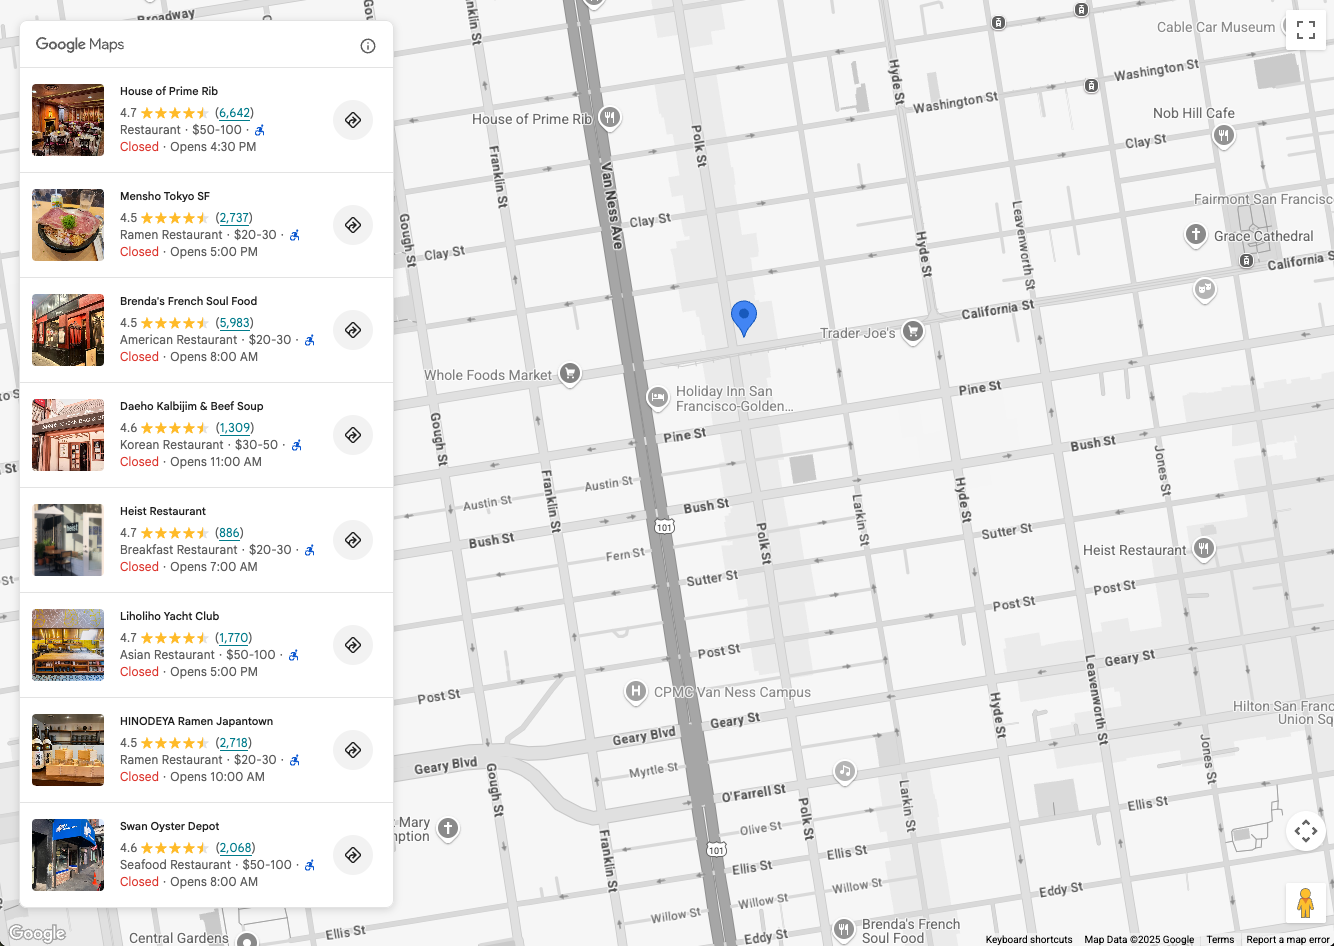
Once this step is completed, the application will look like the following, with
the ability to show markers for each place returned by the PlaceSearchElement:
Now that we have markers on the map, the last step is to handle marker and element click events to show an info window with place details, provided by the Place Details Element. For this example, we will use the Place Details Compact Element.
Add the Place Details Compact Element HTML to your code, for example:
<gmp-place-details-compact orientation="vertical" style="display: none;">
    <gmp-place-all-content></gmp-place-all-content>
    <gmp-place-attribution light-scheme-color="gray" dark-scheme-color="white"></gmp-place-attribution>
</gmp-place-details-compact>
The style is set to display: none; it won't be visible until it's required.
gmp-place-all-content is passed to render all element content. To choose which
content to render, see the Place Details Compact
Element
documentation.
Create a global variable in JavaScript to hold a reference to the Place Details Compact Element, and populate this in your initialization code, for example:
let placeDetailsElement;
...
placeDetailsElement = document.querySelector('gmp-place-details-compact');
Within the addMarkers function, add a gmp-click event listener to each
marker, and configure the Place Details Compact Element to show the place
details by passing the Place ID of the current marker.
Once this is done, an Info Window is opened to display the Place Details Compact Element, anchored on the marker.
Finally, the map is positioned to the viewport of the selected place, making it visible.
async function addMarkers() {
          ...
            marker.addListener('gmp-click', (event) => {
                //Set up Place Details Compact Widget
                placeDetailsElement.style.display = "block";
                // Remove any existing place request element
                const existingPlaceRequest = placeDetailsElement.querySelector('gmp-place-details-place-request');
                if (existingPlaceRequest) {
                    existingPlaceRequest.remove();
                }
                // Create and configure the new place request element
                const placeRequestElement = new google.maps.places.PlaceDetailsPlaceRequestElement({ place: place.id });
                // Prepend the new place request element to the main widget
                placeDetailsElement.prepend(placeRequestElement);
                if (infoWindow.isOpen) {
                    infoWindow.close();
                }
                infoWindow.setOptions({
                    content: placeDetailsElement
                });
                infoWindow.open({
                    anchor: marker,
                    map: map
                });
                // Position the map to show the selected place
                placeDetailsElement.addEventListener('gmp-load', () => {
                    map.fitBounds(place.viewport, { top: 500, left: 400 });
                });
            });
          ...
        });
    }
}
To enable the user to click a place in the Place List Element to show the Place
Details Compact Element, add the following to the JavaScript code after the call
to configureFromSearchNearbyRequest.
placeSearchElement.addEventListener("gmp-select", ({ place }) => {
    if (markers[place.id]) {
        markers[place.id].click();
    }
});
After this step is completed, the application will be able to use either a Nearby Search or Text Search to populate the Place List Element. The results of this will show pins on the map, and clicking a pin or a place in the Place List Element will show an Info Window with place details, provided by the Place Details Compact Element.
The application will look like the following:

Conclusion
The PlaceSearchElement combined with the Place Details Compact Element
provides a streamlined way to add rich place discovery features to your Google
Maps Platform applications.
Try Places UI Kit today to empower your users to find and explore places using both nearby & text searches, and display rich place details, enhancing their interaction with your place discovery use cases.
Contributors
Henrik Valve | DevX Engineer