アプリケーションが Business Profile API に送信するリクエストにはすべて、認証トークンが含まれている必要があります。認証トークンを使ってユーザーやアプリケーションを識別し、Business Profile API へのアクセスを許可します。アプリケーションは、リクエストの承認に OAuth 2.0 プロトコルを使用する必要があります。
このガイドでは、プラットフォームに OAuth 2.0 を実装するさまざまな方法について説明します。Google Identity Platform は、このガイドで使用されている Google ログインと OAuth 機能を提供します。
ウェブサーバー アプリケーションで OAuth 2.0 を使用する方法について詳しくは、こちらのガイドをご覧ください。
OAuth 2.0 を実装すると、次のような利点があります。
- ビジネス オーナーのデータへのアクセスを保護できます。
- ビジネス オーナーが Google アカウントにログインしたときに本人を確認します。
- パートナーのプラットフォームまたはアプリケーションが、ビジネス オーナーからの明示的な同意を得てビジネス情報データにアクセスして変更できるようにします。オーナーは後でこのアクセス権を取り消すことができます。
- パートナー プラットフォームの ID を確立します。
- パートナー プラットフォームがビジネス オーナーに代わってオンラインやオフラインのアクションを行えるようにします。これには、クチコミに対する返信、投稿の作成、メニュー項目の更新が含まれます。
OAuth 2.0 による API アクセス
まず、Google Cloud プロジェクトを設定し、Business Profile API を有効にする必要があります。詳しくは、基本設定のドキュメントをご覧ください。
OAuth と同意画面を設定する
認証情報と同意画面を作成する方法は次のとおりです。
- API Consoleの [認証情報] ページで、[認証情報を作成] をクリックし、プルダウン リストから [OAuth クライアント ID] を選択します。
- アプリケーションの種類を選択し、該当する情報を入力して [作成] をクリックします。
- [保存] をクリックします。
- OAuth 同意画面の設定を更新します。 ここで、アプリケーション名とロゴを更新し、利用規約とプライバシー ポリシーへのリンクを追加できます。
次の画像は、OAuth 同意画面のアプリケーション名とロゴのフィールドを示しています。
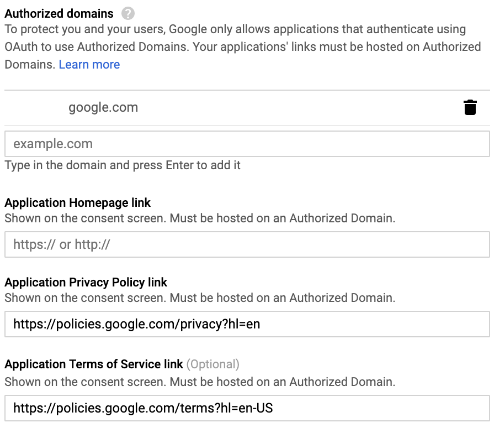
次の画像は、OAuth 同意画面に表示される追加のフィールドを示しています。
次の画像は、ユーザーが同意する前に表示される内容の例です。

OAuth 2.0 を組み込む方法
OAuth 2.0 を実装するには、以下の方法を使用します。
以下のコンテンツでは、OAuth 2.0 をアプリケーションに組み込む方法について説明します。
認証スコープ
以下のいずれかの OAuth スコープが必要です。
- https://www.googleapis.com/auth/business.manage
- https://www.googleapis.com/auth/plus.business.manage
plus.business.manage スコープのサポートは終了しましたが、既存の実装での下位互換性を維持するため、現在も使用することができます。
クライアント ライブラリ
このページの言語固有のサンプルでは、Google API クライアント ライブラリを使用して OAuth 2.0 認証を実装しています。サンプルコードを実行するには、ご利用の言語のクライアント ライブラリをインストールしてください。
クライアント ライブラリは、次の言語で利用可能です。
Google ログイン
Google ログインは、OAuth をプラットフォームに統合する最も簡単な方法です。Android、iOS、ウェブなどでご利用いただけます。

Google ログインは、他の Google サービスへのログインに使用するアカウント情報とアカウント情報でログインできる安全な認証システムです。ユーザーはログインすると、アプリケーションによる Business Profile API の呼び出しと、更新トークンやアクセス トークンの取得に使用する認証コードの交換に同意することができます。
オフライン アクセス
ユーザーがオフラインの場合でも、ユーザーに代わって Business Profile API を呼び出すことができます。ユーザーがログインして同意した後はいつでもリスティングを編集、表示、および管理できるため、プラットフォームにこの機能を組み込むことをおすすめします。
ユーザーがすでに Google アカウントにログインしており、アプリでの Business Profile API の呼び出しに同意し、更新トークンやアクセス トークンの取得に使用される認証コードを交換すると、更新トークンは安全に保存され、後からいつでも新しいアクセス トークンを取得するために使用できるようになります。詳しくは、サーバー側アプリケーション向け Google ログインに関する記事をご覧ください。
次のコード スニペットは、アプリケーションにオフライン アクセスを実装する方法を示しています。このコードを実行するには、サンプルを実行するをご覧ください。
<!-- The top of file index.html -->
<html itemscope itemtype="http://schema.org/Article">
<head>
  <!-- BEGIN Pre-requisites -->
  <script src="https://ajax.googleapis.com/ajax/libs/jquery/1.8.2/jquery.min.js">
  </script>
  <script src="https://apis.google.com/js/client:platform.js?onload=start" async defer>
  </script>
  <!-- END Pre-requisites -->
<!-- Continuing the <head> section -->
  <script>
    function start() {
      gapi.load('auth2', function() {
        auth2 = gapi.auth2.init({
          client_id: 'YOUR_CLIENT_ID.apps.googleusercontent.com',
          // Scopes to request in addition to 'profile' and 'email'
          scope: 'https://www.googleapis.com/auth/business.manage',
          immediate: true
        });
      });
    }
  </script>
</head>
<body>
  <!-- Add where you want your sign-in button to render -->
<!-- Use an image that follows the branding guidelines in a real app, more info here:
 https://developers.google.com/identity/branding-guidelines
-->
<h1>Business Profile Offline Access Demo</h1>

<p> This demo demonstrates the use of Google Identity Services and OAuth to gain authorization to call the Business Profile APIs on behalf of the user, even when the user is offline.

When a refresh token is acquired, store this token securely on your database. You will then be able to use this token to refresh the OAuth credentials and make offline API calls on behalf of the user.

The user may revoke access at any time from the <a href='https://myaccount.google.com/permissions'>Account Settings</a> page.
</p>

<button id="signinButton">Sign in with Google</button><br>
<input id="authorizationCode" type="text" placeholder="Authorization Code" style="width: 60%"><button id="accessTokenButton" disabled>Retrieve Access/Refresh Token</button><br>
 <input id="refreshToken" type="text" placeholder="Refresh Token, never expires unless revoked" style="width: 60%"><button id="refreshSubmit">Refresh Access Token</button><br>
 <input id="accessToken" type="text" placeholder="Access Token" style="width: 60%"><button id="gmbAccounts">Get Business Profile Accounts</button><br>
 <p>API Responses:</p>
<script>
    //Will be populated after sign in.
    var authCode;
  $('#signinButton').click(function() {
    // signInCallback
    auth2.grantOfflineAccess().then(signInCallback);
  });

  $('#accessTokenButton').click(function() {
    // signInCallback defined in step 6.
    retrieveAccessTokenAndRefreshToken(authCode);
  });

  $('#refreshSubmit').click(function() {
    // signInCallback defined in step 6.
    retrieveAccessTokenFromRefreshToken($('#refreshToken').val());
  });

   $('#gmbAccounts').click(function() {
    // signInCallback defined in step 6.
    retrieveGoogleMyBusinessAccounts($('#accessToken').val());
  });


function signInCallback(authResult) {
    //the 'code' field from the response, used to retrieve access token and bearer token
  if (authResult['code']) {
    // Hide the sign-in button now that the user is authorized, for example:
    $('#signinButton').attr('style', 'display: none');
    authCode = authResult['code'];

    $("#accessTokenButton").attr( "disabled", false );

    //Pretty print response
    var e = document.createElement("pre")
    e.innerHTML = JSON.stringify(authResult, undefined, 2);
    document.body.appendChild(e);

    //autofill authorization code input
    $('#authorizationCode').val(authResult['code'])


  } else {
    // There was an error.
  }
}

//WARNING: THIS FUNCTION IS DISPLAYED FOR DEMONSTRATION PURPOSES ONLY. YOUR CLIENT_SECRET SHOULD NEVER BE EXPOSED ON THE CLIENT SIDE!!!!
function retrieveAccessTokenAndRefreshToken(code) {
      $.post('https://www.googleapis.com/oauth2/v4/token',
      { //the headers passed in the request
        'code' : code,
        'client_id' : 'YOUR_CLIENT_ID.apps.googleusercontent.com',
        'client_secret' : 'YOUR_CLIENT_SECRET',
        'redirect_uri' : 'http://localhost:8000',
        'grant_type' : 'authorization_code'
      },
      function(returnedData) {
        console.log(returnedData);
        //pretty print JSON response
        var e = document.createElement("pre")
        e.innerHTML = JSON.stringify(returnedData, undefined, 2);
        document.body.appendChild(e);
        $('#refreshToken').val(returnedData['refresh_token'])
      });
}

//WARNING: THIS FUNCTION IS DISPLAYED FOR DEMONSTRATION PURPOSES ONLY. YOUR CLIENT_SECRET SHOULD NEVER BE EXPOSED ON THE CLIENT SIDE!!!!
function retrieveAccessTokenFromRefreshToken(refreshToken) {
    $.post('https://www.googleapis.com/oauth2/v4/token',
        { // the headers passed in the request
        'refresh_token' : refreshToken,
        'client_id' : 'YOUR_CLIENT_ID.apps.googleusercontent.com',
        'client_secret' : 'YOUR_CLIENT_SECRET',
        'redirect_uri' : 'http://localhost:8000',
        'grant_type' : 'refresh_token'
      },
      function(returnedData) {
        var e = document.createElement("pre")
        e.innerHTML = JSON.stringify(returnedData, undefined, 2);
        document.body.appendChild(e);
        $('#accessToken').val(returnedData['access_token'])
      });
}

function retrieveGoogleMyBusinessAccounts(accessToken) {
    $.ajax({
        type: 'GET',
        url: 'https://mybusinessaccountmanagement.googleapis.com/v1/accounts',
        headers: {
            'Authorization' : 'Bearer ' + accessToken
        },
        success: function(returnedData) {
            var e = document.createElement("pre")
            e.innerHTML = JSON.stringify(returnedData, undefined, 2);
            document.body.appendChild(e);
        }
    });
}
</script>
</body>
</html>
オンライン アクセスのみ
実装を簡単にするため、ユーザーの更新トークンをキャッシュせずに Business Profile API 呼び出しを行うこともできます。ただし、API 呼び出しを実行するには、ユーザーがプラットフォームにログインする必要があります。
次のコード スニペットは、Google ログインフローの実装とユーザー固有の API 呼び出しの方法を示しています。ユーザーが Google アカウント情報を使ってログインし、アプリケーションへの同意を承認すると、アクセス トークンが付与されます。このアクセス トークンを Business Profile API リクエストでヘッダーとして渡す必要があります。このアクセス トークンによりユーザーが識別されます。
このコードを実行するには、サンプルを実行するをご覧ください。
<!-- The top of file index.html -->
<html lang="en">
  <head>
    <meta name="google-signin-scope" content="profile email https://www.googleapis.com/auth/business.manage">
    <meta name="google-signin-client_id" content="YOUR_CLIENT_ID.apps.googleusercontent.com">
    <script src="https://apis.google.com/js/platform.js" async defer></script>
  </head>
  <body>
    <div class="g-signin2" data-onsuccess="onSignIn" data-theme="dark"></div>
    <script>
      var gmb_api_version = 'https://mybusinessaccountmanagement.googleapis.com/v1';
      function onSignIn(googleUser) {
        // Useful data for your client-side scripts:
        var profile = googleUser.getBasicProfile();
        console.log('Full Name: ' + profile.getName());
        console.log("Email: " + profile.getEmail());
        var access_token = googleUser.getAuthResponse().access_token;

        //Using the sign in data to make a Business Profile APIs call
        var req = gmb_api_version + '/accounts';
        var xhr = new XMLHttpRequest();
        xhr.open('GET', req);
        xhr.setRequestHeader('Authorization', 'Bearer ' + access_token);

        //Displaying the API response
        xhr.onload = function () {
          document.body.appendChild(document.createTextNode(xhr.responseText));
        }
        xhr.send();
      }
    </script>
  </body>
</html>
サンプルを実行する
サンプルコードを実行する方法は、次のとおりです。
- コード スニペットを
index.htmlという名前のファイルに保存し、クライアント ID がファイルに設定されていることを確認します。 次のコマンドを使用して、作業ディレクトリからウェブサーバーを起動します。
Python 2.X
python -m SimpleHTTPServer 8000
Python 3.X
python -m http.server 8000
API Console の [認証情報] ページから、使用するクライアント ID を選択します。
[承認済みの JavaScript 生成元] に、ウェブサイトの URL を入力します。このガイドのサンプルコードを実行するには、
http://localhost:8000も追加する必要があります。ブラウザで次の URL を読み込みます。
http://localhost:8000/index.html