

ভূমিকা
মার্কার ম্যাপে কোনও লোকেশন শনাক্ত করে। ডিফল্ট হিসেবে, মার্কার একটি
স্ট্যান্ডার্ড ছবি ব্যবহার করে। মার্কার কাস্টম ছবি দেখাতে পারে, যেক্ষেত্রে এগুলিকে
সাধারণত "আইকন" বলা হয়। মার্কার ও আইকন হল
Marker ধরনের অবজেক্ট। আপনি মার্কারের কনস্ট্রাক্টরের মধ্যে বা মার্কারের উপর setIcon() কল করে
কাস্টম আইকন সেট করতে পারেন। মার্কার ইমেজ কাস্টমাইজ করা
সম্পর্কে আরও জানুন।
সাধারণভাবে বলতে গেলে, মার্কার হল এক ধরনের ওভারলে। অন্যান্য ধরনের ওভারলে সম্পর্কে জানতে, ম্যাপে আঁকা দেখুন।
মার্কার ইন্টার্যাক্টিভ হওয়ার জন্য ডিজাইন করা হয়েছে। যেমন, ডিফল্ট হিসেবে তারা
'click' ইভেন্ট পায়, তাই আপনি কাস্টম তথ্য দেখানোর জন্য
তথ্য উইন্ডো
খুলে আনতে
ইভেন্ট লিসনার যোগ করতে পারেন। আপনি মার্কারের draggable প্রপার্টি true-এ সেট করে
ব্যবহারকারীদের ম্যাপে মার্কার সরানোর অনুমতি দিতে
পারেন। ড্র্যাগ করা যায় এমন মার্কার সম্পর্কে আরও তথ্যের জন্য, নিচে দেখুন।
একটি চিহ্নকারী যুক্ত করুন
google.maps.Marker
কনস্ট্রাক্টর একটি একক Marker options অবজেক্ট
লিটারাল নেয়, যা মার্কারের প্রাথমিক প্রপার্টি নির্দিষ্ট করে।
মার্কার তৈরি করার সময় নিম্নলিখিত ফিল্ডগুলি বিশেষভাবে গুরুত্বপূর্ণ এবং সাধারণত সেট করা হয়:
-
position(প্রয়োজনীয়) মার্কারের প্রাথমিক লোকেশন শনাক্ত করার জন্যLatLngনির্দিষ্ট করে।LatLngপাওয়ার একটি উপায় হল জিওকোডিং পরিষেবা ব্যবহার করা। -
map(ঐচ্ছিক)Mapনির্দিষ্ট করে যেখানে মার্কার রাখতে হবে। মার্কার তৈরি করার সময় আপনি যদি ম্যাপ নির্দিষ্ট না করেন, তাহলে মার্কার তৈরি হলেও ম্যাপের সাথে অ্যাটাচ করা (বা ম্যাপে দেখানো) হয় না। আপনি পরে মার্কারেরsetMap()মেথড কল করে মার্কার যোগ করতে পারেন।
নিচে দেওয়া উদাহরণে, অস্ট্রেলিয়ার কেন্দ্রে অবস্থিত উলুরুতে একটি ম্যাপে একটি সাধারণ মার্কার যোগ করা হয়েছে:
TypeScript
function initMap(): void { const myLatLng = { lat: -25.363, lng: 131.044 }; const map = new google.maps.Map( document.getElementById("map") as HTMLElement, { zoom: 4, center: myLatLng, } ); new google.maps.Marker({ position: myLatLng, map, title: "Hello World!", }); } declare global { interface Window { initMap: () => void; } } window.initMap = initMap;
জাভাস্ক্রিপ্ট
function initMap() { const myLatLng = { lat: -25.363, lng: 131.044 }; const map = new google.maps.Map(document.getElementById("map"), { zoom: 4, center: myLatLng, }); new google.maps.Marker({ position: myLatLng, map, title: "Hello World!", }); } window.initMap = initMap;
উপরের উদাহরণে, মার্কার বিকল্পে map প্রপার্টি ব্যবহার করে মার্কার তৈরি করার সময়
ম্যাপে মার্কারটি প্লেস করা হয়।
বিকল্প হিসেবে, আপনি মার্কারের setMap() পদ্ধতি ব্যবহার করে সরাসরি ম্যাপে মার্কার যোগ করতে পারেন, যেমনটি নিচের উদাহরণে দেখানো হয়েছে:
var myLatlng = new google.maps.LatLng(-25.363882,131.044922);
var mapOptions = {
  zoom: 4,
  center: myLatlng
}
var map = new google.maps.Map(document.getElementById("map"), mapOptions);

var marker = new google.maps.Marker({
    position: myLatlng,
    title:"Hello World!"
});

// To add the marker to the map, call setMap();
marker.setMap(map);
মার্কারের title টুলটিপ হিসেবে দেখা যাবে।
আপনি যদি Marker options পাস করতে না চান, তাহলে
মার্কারের কনস্ট্রাক্টরে, পরিবর্তে কনস্ট্রাক্টরের
শেষ আর্গুমেন্টে একটি খালি অবজেক্ট {} পাস করুন।
মার্কার সরানো
ম্যাপ থেকে মার্কার সরাতে, আর্গুমেন্ট হিসেবে null পাস করে
setMap() মেথড কল করুন।
marker.setMap(null);
মনে রাখবেন, উপরের পদ্ধতিতে মার্কার মুছে ফেলা হয় না। এটি ম্যাপ থেকে
মার্কার সরিয়ে দেয়। পরিবর্তে আপনি যদি মার্কারটি মুছে ফেলতে চান, তাহলে আপনাকে
এটি ম্যাপ থেকে সরাতে হবে এবং তারপরে মার্কারটি
null-এ সেট করতে হবে।
আপনি যদি মার্কারের একটি সেট ম্যানেজ করতে চান, তাহলে মার্কারগুলি
রাখার জন্য আপনাকে একটি অ্যারে তৈরি করতে হবে। এই অ্যারে ব্যবহার করে, মার্কার সরানোর প্রয়োজন হলে, আপনি অ্যারের প্রতিটি মার্কারের উপর
setMap() কল করতে পারবেন। আপনি
ম্যাপ থেকে মার্কার সরিয়ে দিয়ে এবং তারপরে অ্যারের
length থেকে 0 সেট করে মার্কার মুছে দিতে পারবেন, এর ফলে মার্কারের
সমস্ত রেফারেন্স মুছে যাবে।
মার্কার ছবি কাস্টমাইজ করা
ডিফল্ট Google Maps পুশপিন আইকনের পরিবর্তে দেখানোর জন্য ছবির ফাইল বা ভেক্টর-ভিত্তিক আইকন নির্দিষ্ট করে আপনি মার্কারের ভিজ্যুয়াল উপস্থিতি কাস্টমাইজ করতে পারবেন। আপনি মার্কার লেবেল-এর সাহায্যে টেক্সট যোগ করতে পারেন এবং ক্লিক করা যায় এমন অঞ্চল সংজ্ঞায়িত করতে জটিল আইকন ব্যবহার করতে পারেন এবং মার্কারের স্ট্যাক অর্ডার সেট করতে পারেন।
ছবি আইকন সহ মার্কার
সবচেয়ে প্রাথমিক ক্ষেত্রে, কোনও আইকন ডিফল্ট Google Maps পুশপিন আইকনের পরিবর্তে
ব্যবহার করার জন্য একটি ছবি নির্দিষ্ট করতে পারে। এই ধরনের আইকন নির্দিষ্ট করতে, মার্কারের icon প্রপার্টি কোনও ছবির URL-এ সেট করুন। Maps JavaScript API অটোমেটিক আইকনের সাইজ নির্ধারণ করবে।
TypeScript
// This example adds a marker to indicate the position of Bondi Beach in Sydney, // Australia. function initMap(): void { const map = new google.maps.Map( document.getElementById("map") as HTMLElement, { zoom: 4, center: { lat: -33, lng: 151 }, } ); const image = "https://developers.google.com/maps/documentation/javascript/examples/full/images/beachflag.png"; const beachMarker = new google.maps.Marker({ position: { lat: -33.89, lng: 151.274 }, map, icon: image, }); } declare global { interface Window { initMap: () => void; } } window.initMap = initMap;
জাভাস্ক্রিপ্ট
// This example adds a marker to indicate the position of Bondi Beach in Sydney, // Australia. function initMap() { const map = new google.maps.Map(document.getElementById("map"), { zoom: 4, center: { lat: -33, lng: 151 }, }); const image = "https://developers.google.com/maps/documentation/javascript/examples/full/images/beachflag.png"; const beachMarker = new google.maps.Marker({ position: { lat: -33.89, lng: 151.274 }, map, icon: image, }); } window.initMap = initMap;
ভেক্টর-ভিত্তিক আইকন সহ মার্কার
মার্কারের ভিজ্যুয়াল অ্যাপিয়ারেন্স নির্ধারণ করতে আপনি কাস্টম SVG ভেক্টর পাথ ব্যবহার করতে
পারেন। এটি করতে, মার্কারের icon প্রপার্টির
পছন্দসই পাথ সহ একটি Symbol অবজেক্ট লিটেরাল পাস করুন। আপনি
SVG পাথ নোটেশন ব্যবহার করে কাস্টম পাথ
সংজ্ঞায়িত করতে পারেন অথবা
google.maps.SymbolPath-এ আগে থেকে সংজ্ঞায়িত পাথগুলির মধ্যে একটি ব্যবহার করতে পারেন। জুম লেভেল পরিবর্তন হলে মার্কার যাতে সঠিকভাবে রেন্ডার হয় তার জন্য anchor প্রপার্টি
প্রয়োজন। মার্কার (ও পলিলাইন)-এর জন্য
ভেক্টর-ভিত্তিক আইকন তৈরি করতে প্রতীক ব্যবহার করা
সম্পর্কে আরও জানুন।
TypeScript
// This example uses SVG path notation to add a vector-based symbol // as the icon for a marker. The resulting icon is a marker-shaped // symbol with a blue fill and no border. function initMap(): void { const center = new google.maps.LatLng(-33.712451, 150.311823); const map = new google.maps.Map( document.getElementById("map") as HTMLElement, { zoom: 9, center: center, } ); const svgMarker = { path: "M-1.547 12l6.563-6.609-1.406-1.406-5.156 5.203-2.063-2.109-1.406 1.406zM0 0q2.906 0 4.945 2.039t2.039 4.945q0 1.453-0.727 3.328t-1.758 3.516-2.039 3.070-1.711 2.273l-0.75 0.797q-0.281-0.328-0.75-0.867t-1.688-2.156-2.133-3.141-1.664-3.445-0.75-3.375q0-2.906 2.039-4.945t4.945-2.039z", fillColor: "blue", fillOpacity: 0.6, strokeWeight: 0, rotation: 0, scale: 2, anchor: new google.maps.Point(0, 20), }; new google.maps.Marker({ position: map.getCenter(), icon: svgMarker, map: map, }); } declare global { interface Window { initMap: () => void; } } window.initMap = initMap;
জাভাস্ক্রিপ্ট
// This example uses SVG path notation to add a vector-based symbol // as the icon for a marker. The resulting icon is a marker-shaped // symbol with a blue fill and no border. function initMap() { const center = new google.maps.LatLng(-33.712451, 150.311823); const map = new google.maps.Map(document.getElementById("map"), { zoom: 9, center: center, }); const svgMarker = { path: "M-1.547 12l6.563-6.609-1.406-1.406-5.156 5.203-2.063-2.109-1.406 1.406zM0 0q2.906 0 4.945 2.039t2.039 4.945q0 1.453-0.727 3.328t-1.758 3.516-2.039 3.070-1.711 2.273l-0.75 0.797q-0.281-0.328-0.75-0.867t-1.688-2.156-2.133-3.141-1.664-3.445-0.75-3.375q0-2.906 2.039-4.945t4.945-2.039z", fillColor: "blue", fillOpacity: 0.6, strokeWeight: 0, rotation: 0, scale: 2, anchor: new google.maps.Point(0, 20), }; new google.maps.Marker({ position: map.getCenter(), icon: svgMarker, map: map, }); } window.initMap = initMap;
মার্কার লেবেল
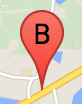
মার্কার লেবেল হল একটি অক্ষর বা সংখ্যা যা মার্কারের ভিতরে দেখানো হয়। এই বিভাগে
মার্কার ছবিতে 'B' অক্ষর সহ মার্কার লেবেল দেখানো হয়েছে।
আপনি মার্কার লেবেলকে স্ট্রিং বা
MarkerLabel
অবজেক্ট হিসেবে নির্দিষ্ট করতে পারেন যার মধ্যে স্ট্রিং ও অন্যান্য লেবেল প্রপার্টি থাকে।
মার্কার তৈরি করার সময়, আপনি
MarkerOptions
অবজেক্টে
label প্রপার্টি নির্দিষ্ট করতে পারবেন। অন্যথায়, আগে থেকে থাকা কোনও মার্কারের উপর লেবেল সেট করতে, আপনি
মার্কার
অবজেক্টে setLabel() কল করতে পারেন।
ব্যবহারকারী ম্যাপে ক্লিক করলে নিম্নলিখিত উদাহরণে লেবেল করা মার্কার দেখানো হয়:
TypeScript
// In the following example, markers appear when the user clicks on the map. // Each marker is labeled with a single alphabetical character. const labels = "ABCDEFGHIJKLMNOPQRSTUVWXYZ"; let labelIndex = 0; function initMap(): void { const bangalore = { lat: 12.97, lng: 77.59 }; const map = new google.maps.Map( document.getElementById("map") as HTMLElement, { zoom: 12, center: bangalore, } ); // This event listener calls addMarker() when the map is clicked. google.maps.event.addListener(map, "click", (event) => { addMarker(event.latLng, map); }); // Add a marker at the center of the map. addMarker(bangalore, map); } // Adds a marker to the map. function addMarker(location: google.maps.LatLngLiteral, map: google.maps.Map) { // Add the marker at the clicked location, and add the next-available label // from the array of alphabetical characters. new google.maps.Marker({ position: location, label: labels[labelIndex++ % labels.length], map: map, }); } declare global { interface Window { initMap: () => void; } } window.initMap = initMap;
জাভাস্ক্রিপ্ট
// In the following example, markers appear when the user clicks on the map. // Each marker is labeled with a single alphabetical character. const labels = "ABCDEFGHIJKLMNOPQRSTUVWXYZ"; let labelIndex = 0; function initMap() { const bangalore = { lat: 12.97, lng: 77.59 }; const map = new google.maps.Map(document.getElementById("map"), { zoom: 12, center: bangalore, }); // This event listener calls addMarker() when the map is clicked. google.maps.event.addListener(map, "click", (event) => { addMarker(event.latLng, map); }); // Add a marker at the center of the map. addMarker(bangalore, map); } // Adds a marker to the map. function addMarker(location, map) { // Add the marker at the clicked location, and add the next-available label // from the array of alphabetical characters. new google.maps.Marker({ position: location, label: labels[labelIndex++ % labels.length], map: map, }); } window.initMap = initMap;
জটিল আইকন
ক্লিক করা যায় এমন অঞ্চল বোঝাতে আপনি জটিল আকার নির্দিষ্ট করতে পারেন এবং
অন্যান্য ওভারলে (তাদের
"স্ট্যাক অর্ডার") সাপেক্ষে আইকন কীভাবে দেখানো হবে তা নির্দিষ্ট করতে পারেন। এইভাবে নির্দিষ্ট করা আইকনগুলিকে তাদের
icon
প্রপার্টিকে
Icon ধরনের অবজেক্টে সেট করতে হবে।
Icon
অবজেক্ট একটি ছবিকে সংজ্ঞায়িত করে। এছাড়াও, এগুলি আইকনের size, আইকনের origin (যেমন, আপনি যে ছবি চান সেটি যদি স্প্রাইটে কোনও বড় ছবির অংশ হয়) এবং আইকনের হটস্পট কোথায় থাকবে (যা অরিজিনের উপর নির্ভর করে) সেই anchor নির্ধারণ করে।
আপনি কাস্টম
মার্কার সহ লেবেল ব্যবহার করলে, আপনি
Icon
অবজেক্টে labelOrigin প্রপার্টির
মাধ্যমে লেবেলটি পজিশন করতে পারবেন।
TypeScript
// The following example creates complex markers to indicate beaches near // Sydney, NSW, Australia. Note that the anchor is set to (0,32) to correspond // to the base of the flagpole. function initMap(): void { const map = new google.maps.Map( document.getElementById("map") as HTMLElement, { zoom: 10, center: { lat: -33.9, lng: 151.2 }, } ); setMarkers(map); } // Data for the markers consisting of a name, a LatLng and a zIndex for the // order in which these markers should display on top of each other. const beaches: [string, number, number, number][] = [ ["Bondi Beach", -33.890542, 151.274856, 4], ["Coogee Beach", -33.923036, 151.259052, 5], ["Cronulla Beach", -34.028249, 151.157507, 3], ["Manly Beach", -33.80010128657071, 151.28747820854187, 2], ["Maroubra Beach", -33.950198, 151.259302, 1], ]; function setMarkers(map: google.maps.Map) { // Adds markers to the map. // Marker sizes are expressed as a Size of X,Y where the origin of the image // (0,0) is located in the top left of the image. // Origins, anchor positions and coordinates of the marker increase in the X // direction to the right and in the Y direction down. const image = { url: "https://developers.google.com/maps/documentation/javascript/examples/full/images/beachflag.png", // This marker is 20 pixels wide by 32 pixels high. size: new google.maps.Size(20, 32), // The origin for this image is (0, 0). origin: new google.maps.Point(0, 0), // The anchor for this image is the base of the flagpole at (0, 32). anchor: new google.maps.Point(0, 32), }; // Shapes define the clickable region of the icon. The type defines an HTML // <area> element 'poly' which traces out a polygon as a series of X,Y points. // The final coordinate closes the poly by connecting to the first coordinate. const shape = { coords: [1, 1, 1, 20, 18, 20, 18, 1], type: "poly", }; for (let i = 0; i < beaches.length; i++) { const beach = beaches[i]; new google.maps.Marker({ position: { lat: beach[1], lng: beach[2] }, map, icon: image, shape: shape, title: beach[0], zIndex: beach[3], }); } } declare global { interface Window { initMap: () => void; } } window.initMap = initMap;
জাভাস্ক্রিপ্ট
// The following example creates complex markers to indicate beaches near // Sydney, NSW, Australia. Note that the anchor is set to (0,32) to correspond // to the base of the flagpole. function initMap() { const map = new google.maps.Map(document.getElementById("map"), { zoom: 10, center: { lat: -33.9, lng: 151.2 }, }); setMarkers(map); } // Data for the markers consisting of a name, a LatLng and a zIndex for the // order in which these markers should display on top of each other. const beaches = [ ["Bondi Beach", -33.890542, 151.274856, 4], ["Coogee Beach", -33.923036, 151.259052, 5], ["Cronulla Beach", -34.028249, 151.157507, 3], ["Manly Beach", -33.80010128657071, 151.28747820854187, 2], ["Maroubra Beach", -33.950198, 151.259302, 1], ]; function setMarkers(map) { // Adds markers to the map. // Marker sizes are expressed as a Size of X,Y where the origin of the image // (0,0) is located in the top left of the image. // Origins, anchor positions and coordinates of the marker increase in the X // direction to the right and in the Y direction down. const image = { url: "https://developers.google.com/maps/documentation/javascript/examples/full/images/beachflag.png", // This marker is 20 pixels wide by 32 pixels high. size: new google.maps.Size(20, 32), // The origin for this image is (0, 0). origin: new google.maps.Point(0, 0), // The anchor for this image is the base of the flagpole at (0, 32). anchor: new google.maps.Point(0, 32), }; // Shapes define the clickable region of the icon. The type defines an HTML // <area> element 'poly' which traces out a polygon as a series of X,Y points. // The final coordinate closes the poly by connecting to the first coordinate. const shape = { coords: [1, 1, 1, 20, 18, 20, 18, 1], type: "poly", }; for (let i = 0; i < beaches.length; i++) { const beach = beaches[i]; new google.maps.Marker({ position: { lat: beach[1], lng: beach[2] }, map, icon: image, shape: shape, title: beach[0], zIndex: beach[3], }); } } window.initMap = initMap;
MarkerImage অবজেক্টকে Icon টাইপে কনভার্ট করা
Maps JavaScript API-এর 3.10 ভার্সন পর্যন্ত, জটিল আইকন
MarkerImage অবজেক্ট হিসেবে সংজ্ঞায়িত করা হত। Icon অবজেক্ট লিটারাল ভার্সন ৩.১০-এ যোগ করা হয়েছে এবং ভার্সন ৩.১১ থেকে
MarkerImage-এর পরিবর্তে ব্যবহার করা হয়।
Icon অবজেক্ট লিটেরাল
MarkerImage-এর মতো একই প্যারামিটার ব্যবহার করে, যার ফলে আপনি সহজেই
MarkerImage-কে Icon-এ কনভার্ট করতে পারেন। এর জন্য আপনাকে
কনস্ট্রাক্টর সরিয়ে দিতে হবে, আগের প্যারামিটারগুলিকে {}-এর মধ্যে রাখতে হবে এবং
প্রতিটি প্যারামিটারের নাম যোগ করতে হবে। যেমন:
var image = new google.maps.MarkerImage(
    place.icon,
    new google.maps.Size(71, 71),
    new google.maps.Point(0, 0),
    new google.maps.Point(17, 34),
    new google.maps.Size(25, 25));
হয়ে যায়
var image = {
  url: place.icon,
  size: new google.maps.Size(71, 71),
  origin: new google.maps.Point(0, 0),
  anchor: new google.maps.Point(17, 34),
  scaledSize: new google.maps.Size(25, 25)
};
মার্কার অপ্টিমাইজ করা
অপ্টিমাইজেশন অনেক মার্কারকে একটি স্ট্যাটিক এলিমেন্ট হিসেবে রেন্ডার করে পারফর্ম্যান্স উন্নত করে। অনেক বেশি মার্কারের প্রয়োজন হলে এটি কাজে লাগে। ডিফল্ট হিসেবে, Maps JavaScript API সিদ্ধান্ত নেবে যে কোনও মার্কার অপ্টিমাইজ করা হবে কিনা। অনেক বেশি সংখ্যক মার্কার থাকলে, Maps JavaScript API অপ্টিমাইজেশনের মাধ্যমে মার্কার রেন্ডার করার চেষ্টা করবে। সব মার্কার অপ্টিমাইজ করা যায় না; কিছু পরিস্থিতিতে, Maps JavaScript API-কে অপ্টিমাইজেশন ছাড়াই মার্কার রেন্ডার করতে হতে পারে। অ্যানিমেটেড GIF বা PNG-এর জন্য অপ্টিমাইজ করা রেন্ডারিং বন্ধ করুন অথবা প্রতিটি মার্কারকে আলাদা DOM এলিমেন্ট হিসেবে রেন্ডার করতে হবে। নিম্নলিখিত উদাহরণে অপ্টিমাইজ করা মার্কার তৈরি করার পদ্ধতি দেখানো হয়েছে:
var marker = new google.maps.Marker({
    position: myLatlng,
    title:"Hello World!",
    optimized: true
});
মার্কার অ্যাক্সেসযোগ্য করুন
আপনি ক্লিক লিসনার ইভেন্ট যোগ করে এবং optimized-কে false-এ সেট করে
মার্কার অ্যাক্সেসযোগ্য করতে পারেন। ক্লিক লিসনার
মার্কারকে বোতামের মতো আচরণ করতে বাধ্য করে, যা
কীবোর্ড নেভিগেশন, স্ক্রিন রিডার ইত্যাদির মাধ্যমে অ্যাক্সেস করা যেতে পারে। কোনও মার্কারের জন্য অ্যাক্সেসযোগ্য টেক্সট দেখাতে
title বিকল্প ব্যবহার করুন।
নিচের উদাহরণে, Tab টিপলে প্রথম মার্কারটি ফোকাস পায় ; তারপরে আপনি তীরচিহ্ন কী ব্যবহার করে মার্কারগুলির মধ্যে নেভিগেট করতে পারবেন। ম্যাপের বাকি কন্ট্রোলগুলি দেখতে ট্যাব আবার প্রেস করুন। কোনও মার্কারের তথ্য উইন্ডো থাকলে, আপনি মার্কারটিতে ক্লিক করে অথবা মার্কারটি বেছে নেওয়ার পরে Enter কী বা স্পেস বার প্রেস করে এটি খুলতে পারবেন। তথ্য উইন্ডো বন্ধ হয়ে গেলে, ফোকাস আবার সংশ্লিষ্ট মার্কারের উপর ফিরে আসবে।
TypeScript
// The following example creates five accessible and // focusable markers. function initMap(): void { const map = new google.maps.Map( document.getElementById("map") as HTMLElement, { zoom: 12, center: { lat: 34.84555, lng: -111.8035 }, } ); // Set LatLng and title text for the markers. The first marker (Boynton Pass) // receives the initial focus when tab is pressed. Use arrow keys to // move between markers; press tab again to cycle through the map controls. const tourStops: [google.maps.LatLngLiteral, string][] = [ [{ lat: 34.8791806, lng: -111.8265049 }, "Boynton Pass"], [{ lat: 34.8559195, lng: -111.7988186 }, "Airport Mesa"], [{ lat: 34.832149, lng: -111.7695277 }, "Chapel of the Holy Cross"], [{ lat: 34.823736, lng: -111.8001857 }, "Red Rock Crossing"], [{ lat: 34.800326, lng: -111.7665047 }, "Bell Rock"], ]; // Create an info window to share between markers. const infoWindow = new google.maps.InfoWindow(); // Create the markers. tourStops.forEach(([position, title], i) => { const marker = new google.maps.Marker({ position, map, title: `${i + 1}. ${title}`, label: `${i + 1}`, optimized: false, }); // Add a click listener for each marker, and set up the info window. marker.addListener("click", () => { infoWindow.close(); infoWindow.setContent(marker.getTitle()); infoWindow.open(marker.getMap(), marker); }); }); } declare global { interface Window { initMap: () => void; } } window.initMap = initMap;
জাভাস্ক্রিপ্ট
// The following example creates five accessible and // focusable markers. function initMap() { const map = new google.maps.Map(document.getElementById("map"), { zoom: 12, center: { lat: 34.84555, lng: -111.8035 }, }); // Set LatLng and title text for the markers. The first marker (Boynton Pass) // receives the initial focus when tab is pressed. Use arrow keys to // move between markers; press tab again to cycle through the map controls. const tourStops = [ [{ lat: 34.8791806, lng: -111.8265049 }, "Boynton Pass"], [{ lat: 34.8559195, lng: -111.7988186 }, "Airport Mesa"], [{ lat: 34.832149, lng: -111.7695277 }, "Chapel of the Holy Cross"], [{ lat: 34.823736, lng: -111.8001857 }, "Red Rock Crossing"], [{ lat: 34.800326, lng: -111.7665047 }, "Bell Rock"], ]; // Create an info window to share between markers. const infoWindow = new google.maps.InfoWindow(); // Create the markers. tourStops.forEach(([position, title], i) => { const marker = new google.maps.Marker({ position, map, title: `${i + 1}. ${title}`, label: `${i + 1}`, optimized: false, }); // Add a click listener for each marker, and set up the info window. marker.addListener("click", () => { infoWindow.close(); infoWindow.setContent(marker.getTitle()); infoWindow.open(marker.getMap(), marker); }); }); } window.initMap = initMap;
মার্কার অ্যানিমেট করা
আপনি মার্কার অ্যানিমেট করতে পারেন যাতে সেগুলি বিভিন্ন পরিস্থিতিতে ডাইনামিক মুভমেন্ট
প্রদর্শন করে। মার্কার কীভাবে অ্যানিমেট করা হবে তা নির্দিষ্ট করতে, মার্কারের animation প্রপার্টি ব্যবহার করুন, যার ধরন হল
google.maps.Animation। নিম্নলিখিত
Animation ভ্যালু কাজ করে:
-
DROPনির্দেশ করে যে ম্যাপে প্রথমবার প্লেস করার সময় মার্কারটি ম্যাপের উপর থেকে তার চূড়ান্ত লোকেশনে ড্রপ করা উচিত। মার্কার স্থির হয়ে গেলে অ্যানিমেশন বন্ধ হয়ে যাবে এবংanimationপরিবর্তিত হয়েnullহয়ে যাবে। এই ধরনের অ্যানিমেশন সাধারণতMarkerতৈরি করার সময় নির্দিষ্ট করা হয়। -
BOUNCEথেকে বোঝা যায় যে মার্কারটি একই জায়গায় বাউন্স করবে। A বাউন্স করা মার্কারটি ততক্ষণ পর্যন্ত বাউন্স করতে থাকবে যতক্ষণ না এরanimationপ্রপার্টি স্পষ্টভাবেnullহিসেবে সেট করা হয়।
আপনি Marker অবজেক্টে
setAnimation() কল করে আগে থেকে থাকা কোনও মার্কারের উপর অ্যানিমেশন শুরু করতে পারেন।
TypeScript
// The following example creates a marker in Stockholm, Sweden using a DROP // animation. Clicking on the marker will toggle the animation between a BOUNCE // animation and no animation. let marker: google.maps.Marker; function initMap(): void { const map = new google.maps.Map( document.getElementById("map") as HTMLElement, { zoom: 13, center: { lat: 59.325, lng: 18.07 }, } ); marker = new google.maps.Marker({ map, draggable: true, animation: google.maps.Animation.DROP, position: { lat: 59.327, lng: 18.067 }, }); marker.addListener("click", toggleBounce); } function toggleBounce() { if (marker.getAnimation() !== null) { marker.setAnimation(null); } else { marker.setAnimation(google.maps.Animation.BOUNCE); } } declare global { interface Window { initMap: () => void; } } window.initMap = initMap;
জাভাস্ক্রিপ্ট
// The following example creates a marker in Stockholm, Sweden using a DROP // animation. Clicking on the marker will toggle the animation between a BOUNCE // animation and no animation. let marker; function initMap() { const map = new google.maps.Map(document.getElementById("map"), { zoom: 13, center: { lat: 59.325, lng: 18.07 }, }); marker = new google.maps.Marker({ map, draggable: true, animation: google.maps.Animation.DROP, position: { lat: 59.327, lng: 18.067 }, }); marker.addListener("click", toggleBounce); } function toggleBounce() { if (marker.getAnimation() !== null) { marker.setAnimation(null); } else { marker.setAnimation(google.maps.Animation.BOUNCE); } } window.initMap = initMap;
আপনার কাছে অনেক মার্কার থাকলে, আপনি হয়ত সেগুলি ম্যাপে একসাথে
ড্রপ করতে চাইবেন না। নিচে দেখানো প্যাটার্নের মতো করে আপনার
মার্কারের অ্যানিমেশনের মধ্যে স্পেস দিতে setTimeout() ব্যবহার করতে পারেন:
function drop() {
  for (var i =0; i < markerArray.length; i++) {
    setTimeout(function() {
      addMarkerMethod();
    }, i * 200);
  }
}
মার্কারকে ড্র্যাগ করার উপযুক্ত করা
ব্যবহারকারীদের ম্যাপে মার্কার টেনে অন্য লোকেশনে নিয়ে যাওয়ার অনুমতি দিতে, মার্কার বিকল্পে
draggable-কে true হিসেবে সেট করুন।
var myLatlng = new google.maps.LatLng(-25.363882,131.044922);
var mapOptions = {
  zoom: 4,
  center: myLatlng
}
var map = new google.maps.Map(document.getElementById("map"), mapOptions);

// Place a draggable marker on the map
var marker = new google.maps.Marker({
    position: myLatlng,
    map: map,
    draggable:true,
    title:"Drag me!"
});
আরও মার্কার কাস্টমাইজেশন
Marker ক্লাসের আরও এক্সটেনশন, মার্কার ক্লাস্টারিং ও ম্যানেজমেন্ট এবং ওভারলে কাস্টমাইজেশন সম্পর্কে জানতে, ওপেন সোর্স লাইব্রেরি দেখুন।