JavaScript를 사용하여 마커가 포함된 Google 지도 추가

소개

이 튜토리얼에서는 HTML, CSS, JavaScript를 사용하여 마커가 포함된 Google 지도를 웹페이지에 추가하는 방법을 보여줍니다. 또한 지도 옵션을 설정하는 방법과 컨트롤 슬롯을 사용하여 지도에 라벨을 추가하는 방법도 보여줍니다.

이 튜토리얼을 사용하여 아래와 같은 지도를 만듭니다. 마커가 울루루 카타츄타 국립공원의 울루루(에어스 록이라고도 함)에 배치되어 있습니다.

시작하기

웹페이지에 마커가 포함된 Google 지도를 만들려면 다음 세 단계를 따르세요.

  1. API 키 가져오기
  2. HTML 페이지 만들기
  3. 마커가 포함된 지도 추가

웹브라우저가 필요합니다. 지원되는 브라우저 목록에서 플랫폼에 따라 Chrome(권장), Firefox, Safari, Edge와 같이 잘 알려진 브라우저를 선택하세요.

1단계: API 키 가져오기

이 섹션에서는 자체 API 키를 사용하여 Maps JavaScript API에 앱을 인증하는 방법을 설명합니다.

다음 단계에 따라 API 키를 가져옵니다.

  1. Google Cloud 콘솔로 이동합니다.

  2. 프로젝트를 만들거나 선택합니다.

  3. 계속을 클릭하여 API와 모든 관련 서비스를 사용 설정합니다.

  4. 사용자 인증 정보 페이지에서 API 키를 가져오고 API 키 제한사항을 설정합니다. 기존에 무제한 API 키가 있거나 브라우저 제한이 있는 키가 있으면 그 키를 사용할 수도 있습니다.

  5. 할당량 도난을 방지하고 API 키를 보호하려면 API 키 사용을 참고하세요.

  6. 결제를 사용 설정합니다. 자세한 내용은 사용량 및 결제를 참고하세요.

  7. API 키를 받으면 'YOUR_API_KEY'를 클릭하여 다음 스니펫에 추가합니다. 자체 웹페이지에서 사용할 부트 로더 스크립트 태그를 복사하여 붙여넣습니다.

    <script>
      (g=>{var h,a,k,p="The Google Maps JavaScript API",c="google",l="importLibrary",q="__ib__",m=document,b=window;b=b[c]||(b[c]={});var d=b.maps||(b.maps={}),r=new Set,e=new URLSearchParams,u=()=>h||(h=new Promise(async(f,n)=>{await (a=m.createElement("script"));e.set("libraries",[...r]+"");for(k in g)e.set(k.replace(/[A-Z]/g,t=>"_"+t[0].toLowerCase()),g[k]);e.set("callback",c+".maps."+q);a.src=`https://maps.${c}apis.com/maps/api/js?`+e;d[q]=f;a.onerror=()=>h=n(Error(p+" could not load."));a.nonce=m.querySelector("script[nonce]")?.nonce||"";m.head.append(a)}));d[l]?console.warn(p+" only loads once. Ignoring:",g):d[l]=(f,...n)=>r.add(f)&&u().then(()=>d[l](f,...n))})({
        key: "YOUR_API_KEY",
        v: "weekly",
        // Use the 'v' parameter to indicate the version to use (weekly, beta, alpha, etc.).
        // Add other bootstrap parameters as needed, using camel case.
      });
    </script>

2단계: HTML 페이지 만들기

다음은 기본 HTML 웹페이지를 만들기 위한 코드입니다.

<!DOCTYPE html>
<!--
 @license
 Copyright 2025 Google LLC. All Rights Reserved.
 SPDX-License-Identifier: Apache-2.0
-->

<html>
  <head>
    <title>Add a Map</title>

    <link rel="stylesheet" type="text/css" href="./style.css" />
    <script type="module" src="./index.js"></script>
    <!-- prettier-ignore -->
    <script>(g=>{var h,a,k,p="The Google Maps JavaScript API",c="google",l="importLibrary",q="__ib__",m=document,b=window;b=b[c]||(b[c]={});var d=b.maps||(b.maps={}),r=new Set,e=new URLSearchParams,u=()=>h||(h=new Promise(async(f,n)=>{await (a=m.createElement("script"));e.set("libraries",[...r]+"");for(k in g)e.set(k.replace(/[A-Z]/g,t=>"_"+t[0].toLowerCase()),g[k]);e.set("callback",c+".maps."+q);a.src=`https://maps.${c}apis.com/maps/api/js?`+e;d[q]=f;a.onerror=()=>h=n(Error(p+" could not load."));a.nonce=m.querySelector("script[nonce]")?.nonce||"";m.head.append(a)}));d[l]?console.warn(p+" only loads once. Ignoring:",g):d[l]=(f,...n)=>r.add(f)&&u().then(()=>d[l](f,...n))})
        ({key: "YOUR_API_KEY", v: "weekly"});</script>
  </head>
  <body>

    <!-- The map, centered at Uluru, Australia. -->
    <gmp-map center="-25.344,131.031" zoom="4" map-id="DEMO_MAP_ID">
    </gmp-map>

  </body>
</html>

이것은 gmp-map 요소를 사용하여 페이지에 지도를 표시하는 매우 기본적인 HTML 페이지입니다. 아직 JavaScript 코드를 추가하지 않았으므로 지도가 비어 있습니다.

코드 이해하기

이 단계의 예시에는 다음이 있습니다.

  • !DOCTYPE html 선언을 사용하여 애플리케이션을 HTML5로 선언했습니다.
  • 부트스트랩 로더를 사용하여 Maps JavaScript API를 로드했습니다.
  • 지도를 보관할 gmp-map 요소를 만들었습니다.

애플리케이션을 HTML5로 선언

웹 애플리케이션 내에서 실제 DOCTYPE을 선언하는 것이 좋습니다. 이 예에서는 아래에 표시된 것처럼 HTML5 DOCTYPE을 사용하여 애플리케이션을 HTML5로 선언했습니다.

<!DOCTYPE html>

대부분의 최신 브라우저에서는 '표준 모드'에서 이 DOCTYPE을 사용하여 선언된 콘텐츠를 렌더링합니다. 즉 애플리케이션의 브라우저 간 호환성이 더 높아집니다. 또한 DOCTYPE은 성능 저하를 매끄럽게 처리하도록 설계되어, DOCTYPE을 인식하지 못하는 브라우저는 이를 무시하고 '쿼크 모드'를 사용하여 콘텐츠를 표시합니다.

쿼크 모드에서 작동하는 일부 CSS는 표준 모드에서 유효하지 않습니다. 특히 모든 백분율 기반 크기는 상위 블록 요소에서 상속해야 하며 상위 요소에서 크기를 지정하지 못하면 0x0픽셀로 간주됩니다. 이러한 이유로 다음과 같은 style 선언이 포함됩니다.

<style>
  gmp-map {
    height: 100%;
  }
  html, body {
    height: 100%;
    margin: 0;
    padding: 0;
  }
</style>

Maps JavaScript API 로드하기

부트스트랩 로더는 로딩을 위해 Maps JavaScript API를 준비합니다(importLibrary()가 호출될 때까지 라이브러리가 로드되지 않습니다).

<script>
  (g=>{var h,a,k,p="The Google Maps JavaScript API",c="google",l="importLibrary",q="__ib__",m=document,b=window;b=b[c]||(b[c]={});var d=b.maps||(b.maps={}),r=new Set,e=new URLSearchParams,u=()=>h||(h=new Promise(async(f,n)=>{await (a=m.createElement("script"));e.set("libraries",[...r]+"");for(k in g)e.set(k.replace(/[A-Z]/g,t=>"_"+t[0].toLowerCase()),g[k]);e.set("callback",c+".maps."+q);a.src=`https://maps.${c}apis.com/maps/api/js?`+e;d[q]=f;a.onerror=()=>h=n(Error(p+" could not load."));a.nonce=m.querySelector("script[nonce]")?.nonce||"";m.head.append(a)}));d[l]?console.warn(p+" only loads once. Ignoring:",g):d[l]=(f,...n)=>r.add(f)&&u().then(()=>d[l](f,...n))})({
    key: "YOUR_API_KEY",
    v: "weekly",
    // Use the 'v' parameter to indicate the version to use (weekly, beta, alpha, etc.).
    // Add other bootstrap parameters as needed, using camel case.
  });
</script>

자체 API 키를 가져오는 방법은 3단계: API 키 가져오기를 참고하세요.

이 단계에서는 서식이 지정되지 않은 라벨 텍스트만 표시된 빈 창이 표시됩니다. 아직 JavaScript 코드를 추가하지 않았기 때문입니다.

gmp-map 요소 만들기

웹페이지에 지도를 표시하려면 표시할 자리를 예약해야 합니다. 일반적으로 gmp-map 요소를 만들고 브라우저의 문서 객체 모델 (DOM)에서 이 요소에 대한 참조를 얻는 방식으로 자리를 예약합니다. div 요소를 사용하여 이 작업을 수행할 수도 있지만 (자세히 알아보기) gmp-map 요소를 사용하는 것이 좋습니다.

아래 코드는 gmp-map 요소를 정의하고 center, zoom, map-id 매개변수를 설정합니다.

<gmp-map center="-25.344,131.031" zoom="4" map-id="DEMO_MAP_ID">
</gmp-map>

centerzoom 옵션은 항상 필수입니다. 위 코드에서 center 속성은 지도의 중심을 표시할 위치를 API에 알려주고 zoom 속성은 지도의 확대/축소 수준을 지정합니다. 확대/축소: 0은 가장 낮은 확대/축소 수준으로 지구 전체를 표시합니다. 확대/축소 값을 더 높게 설정하여 지구를 더 높은 해상도로 확대합니다.

확대/축소 수준

지구 전체의 지도를 단일 이미지로 제공하려면 거대한 지도 또는 해상도가 매우 낮은 작은 지도가 필요합니다. 따라서 Google 지도 및 Maps JavaScript API 내 지도 이미지는 지도 '타일'과 '확대/축소 수준'으로 나누어져 있습니다. 확대/축소 수준이 낮을 때는 적은 수의 지도 타일로 넓은 영역을 커버하고, 확대/축소 수준이 높을수록 고해상도 타일로 더 좁은 영역을 커버합니다. 다음 목록은 각 확대/축소 수준에서 기대할 수 있는 세부정보의 대략적인 수준을 보여줍니다.

  • 1: 세계
  • 5: 대륙
  • 10: 도시
  • 15: 거리
  • 20: 건물

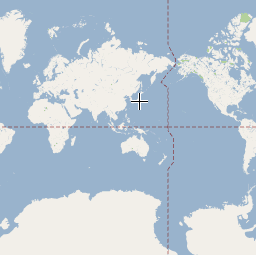
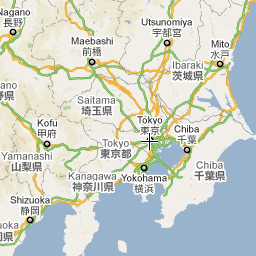
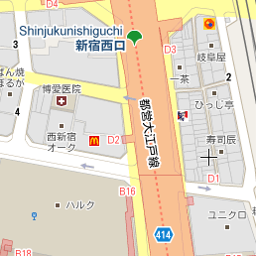
다음 세 이미지는 도쿄의 동일한 장소를 확대/축소 수준 0, 7, 18로 나타낸 것입니다.

아래 코드는 gmp-map 요소의 크기를 설정하는 CSS를 설명합니다.

/* Set the size of the gmp-map element that contains the map */
gmp-map {
    height: 400px; /* The height is 400 pixels */
    width: 100%; /* The width is the width of the web page */
}

위 코드에서 style 요소는 gmp-map의 크기를 설정합니다. 지도를 표시하려면 너비와 높이를 0픽셀보다 크게 설정하세요. 이 경우 gmp-map를 높이 400픽셀, 너비 100% 로 설정하여 웹페이지의 너비에 맞게 표시합니다. 항상 높이와 너비 스타일을 명시적으로 설정하는 것이 좋습니다.

제어 슬롯팅

제어 슬롯팅을 사용하여 지도에 HTML 양식 컨트롤을 추가할 수 있습니다. 슬롯은 지도에 미리 정의된 위치입니다. slot 속성을 사용하여 요소에 필요한 위치를 설정하고 gmp-map 요소 내에 요소를 중첩합니다. 다음 스니펫은 지도의 왼쪽 상단에 HTML 라벨을 추가하는 방법을 보여줍니다.

<!-- The map, centered at Uluru, Australia. -->
<gmp-map center="-25.344,131.031" zoom="4" map-id="DEMO_MAP_ID">
  <div id="controls" slot="control-inline-start-block-start">
    <h3>My Google Maps Demo</h3>
  </div>
</gmp-map>

3단계: JavaScript 코드 추가

이 섹션에서는 Maps JavaScript API를 웹페이지에 로드하는 방법과 API를 사용하는 자체 JavaScript를 작성하여 마커가 포함된 지도를 추가하는 방법을 설명합니다.

TypeScript

async function initMap(): Promise<void> {
  //  Request the needed libraries.
  const [{ Map }, { AdvancedMarkerElement }] = await Promise.all([
    google.maps.importLibrary("maps") as Promise<google.maps.MapsLibrary>,
    google.maps.importLibrary("marker") as Promise<google.maps.MarkerLibrary>,
  ]);
  // Get the gmp-map element.
  const mapElement = document.querySelector(
    "gmp-map"
  ) as google.maps.MapElement;

  // Get the inner map.
  const innerMap = mapElement.innerMap;

  // Set map options.
  innerMap.setOptions({
    mapTypeControl: false,
  });

  // Add a marker positioned at the map center (Uluru).
  const marker = new AdvancedMarkerElement({
    map: innerMap,
    position: mapElement.center,
    title: "Uluru/Ayers Rock",
  });
}
initMap();

자바스크립트

async function initMap() {
    //  Request the needed libraries.
    const [{ Map }, { AdvancedMarkerElement }] = await Promise.all([
        google.maps.importLibrary("maps"),
        google.maps.importLibrary("marker"),
    ]);
    // Get the gmp-map element.
    const mapElement = document.querySelector("gmp-map");
    // Get the inner map.
    const innerMap = mapElement.innerMap;
    // Set map options.
    innerMap.setOptions({
        mapTypeControl: false,
    });
    // Add a marker positioned at the map center (Uluru).
    const marker = new AdvancedMarkerElement({
        map: innerMap,
        position: mapElement.center,
        title: "Uluru/Ayers Rock",
    });
}
initMap();

위 코드는 initMap()가 호출될 때 다음 작업을 실행합니다.

  • mapsmarker 라이브러리를 로드합니다.
  • DOM에서 지도 요소를 가져옵니다.
  • 내부 지도에 추가 지도 옵션을 설정합니다.
  • 지도에 마커를 추가합니다.

지도 객체 가져오기 및 옵션 설정

innerMapMap 클래스의 인스턴스를 나타냅니다. 지도 옵션을 설정하려면 지도 요소에서 innerMap 인스턴스를 가져와 setOptions를 호출합니다. 다음 스니펫은 DOM에서 innerMap 인스턴스를 가져온 다음 setOptions를 호출하는 방법을 보여줍니다.

// Get the gmp-map element.
const mapElement = document.querySelector(
  "gmp-map"
) as google.maps.MapElement;

// Get the inner map.
const innerMap = mapElement.innerMap;

// Set map options.
innerMap.setOptions({
  mapTypeControl: false,
});

지도가 로드될 때까지 기다립니다.

gmp-map 요소를 사용하면 지도가 비동기적으로 로드됩니다. 이로 인해 초기화 시간에 다른 요청 (예: 위치정보 또는 장소 세부정보 요청)이 이루어지면 경합 상태가 발생할 수 있습니다. 지도가 완전히 로드된 후에만 코드가 실행되도록 하려면 다음과 같이 초기화 함수에서 addListenerOnce 유휴 이벤트 핸들러를 사용하세요.

// Do things once the map has loaded.
google.maps.event.addListenerOnce(innerMap, 'idle', () => {
    // Run this code only after the map has loaded.
    console.log("The map is now ready!");
});

이렇게 하면 지도가 로드된 후에만 코드가 실행됩니다. 핸들러는 앱의 수명 주기 동안 한 번만 트리거됩니다.

예시 코드 작성

전체 예시 코드는 여기를 참고하세요.

TypeScript

async function initMap(): Promise<void> {
  //  Request the needed libraries.
  const [{ Map }, { AdvancedMarkerElement }] = await Promise.all([
    google.maps.importLibrary("maps") as Promise<google.maps.MapsLibrary>,
    google.maps.importLibrary("marker") as Promise<google.maps.MarkerLibrary>,
  ]);
  // Get the gmp-map element.
  const mapElement = document.querySelector(
    "gmp-map"
  ) as google.maps.MapElement;

  // Get the inner map.
  const innerMap = mapElement.innerMap;

  // Set map options.
  innerMap.setOptions({
    mapTypeControl: false,
  });

  // Add a marker positioned at the map center (Uluru).
  const marker = new AdvancedMarkerElement({
    map: innerMap,
    position: mapElement.center,
    title: "Uluru/Ayers Rock",
  });
}
initMap();

JavaScript

async function initMap() {
    //  Request the needed libraries.
    const [{ Map }, { AdvancedMarkerElement }] = await Promise.all([
        google.maps.importLibrary("maps"),
        google.maps.importLibrary("marker"),
    ]);
    // Get the gmp-map element.
    const mapElement = document.querySelector("gmp-map");
    // Get the inner map.
    const innerMap = mapElement.innerMap;
    // Set map options.
    innerMap.setOptions({
        mapTypeControl: false,
    });
    // Add a marker positioned at the map center (Uluru).
    const marker = new AdvancedMarkerElement({
        map: innerMap,
        position: mapElement.center,
        title: "Uluru/Ayers Rock",
    });
}
initMap();

CSS

/*
 * Always set the map height explicitly to define the size of the div element
 * that contains the map.
 */
gmp-map {
  height: 100%;
}

/*
   * Optional: Makes the sample page fill the window.
   */
html,
body {
  height: 100%;
  margin: 0;
  padding: 0;
}

HTML

<html>
  <head>
    <title>Add a Map</title>

    <link rel="stylesheet" type="text/css" href="./style.css" />
    <script type="module" src="./index.js"></script>
    <!-- prettier-ignore -->
    <script>(g=>{var h,a,k,p="The Google Maps JavaScript API",c="google",l="importLibrary",q="__ib__",m=document,b=window;b=b[c]||(b[c]={});var d=b.maps||(b.maps={}),r=new Set,e=new URLSearchParams,u=()=>h||(h=new Promise(async(f,n)=>{await (a=m.createElement("script"));e.set("libraries",[...r]+"");for(k in g)e.set(k.replace(/[A-Z]/g,t=>"_"+t[0].toLowerCase()),g[k]);e.set("callback",c+".maps."+q);a.src=`https://maps.${c}apis.com/maps/api/js?`+e;d[q]=f;a.onerror=()=>h=n(Error(p+" could not load."));a.nonce=m.querySelector("script[nonce]")?.nonce||"";m.head.append(a)}));d[l]?console.warn(p+" only loads once. Ignoring:",g):d[l]=(f,...n)=>r.add(f)&&u().then(()=>d[l](f,...n))})
        ({key: "AIzaSyA6myHzS10YXdcazAFalmXvDkrYCp5cLc8", v: "weekly"});</script>
  </head>
  <body>
    <!-- The map, centered at Uluru, Australia. -->
    <gmp-map center="-25.344,131.031" zoom="4" map-id="DEMO_MAP_ID">
      <div id="controls" slot="control-inline-start-block-start">
        <h3>My Google Maps Demo</h3>
      </div>
    </gmp-map>
  </body>
</html>

샘플 사용해 보기

마커에 대해 자세히 알아보기:

도움말 및 문제 해결

  • 위도/경도 좌표를 가져오거나 주소를 지리적 좌표로 변환하는 방법을 자세히 알아보세요.
  • 스타일, 속성 등의 옵션을 조정하여 지도를 맞춤설정할 수 있습니다. 지도 맞춤설정에 관한 자세한 내용은 스타일 지정지도에 그리기 가이드를 참고하세요.
  • 웹브라우저에서 개발자 도구 콘솔을 사용하여 코드를 테스트 및 실행하고 오류 보고서를 읽고 코드 관련 문제를 해결합니다.
  • 다음 단축키를 사용하여 Chrome에서 콘솔을 엽니다.
    Command+Option+J(Mac) 또는 Control+Shift+J(Windows)
  • 아래 단계에 따라 Google 지도에서 위치의 위도 및 경도 좌표를 가져옵니다.

    1. 브라우저에서 Google 지도를 엽니다.
    2. 지도에서 좌표가 필요한 정확한 위치를 마우스 오른쪽 버튼으로 클릭합니다.
    3. 표시되는 컨텍스트 메뉴에서 이곳이 궁금한가요?를 선택합니다. 지도의 하단에 카드가 표시됩니다. 카드의 마지막 행에서 위도 및 경도 좌표를 찾습니다.
  • 지오코딩 서비스를 사용하여 주소를 위도 및 경도 좌표로 변환할 수 있습니다. 개발자 가이드에서는 지오코딩 서비스 시작하기에 관한 자세한 정보를 제공합니다.