
Page Summary
-
Blockly Developer Tools is a web-based tool for building and including custom blocks in your application.
-
You can define a block by adding inputs and fields, and setting properties like tooltip text and color.
-
The tool supports different output configurations for defining blocks and generating code based on your application's setup.
-
The code output section provides the necessary code for loading the core library, defining the block, and generating code for it.
-
Blocks are automatically saved to your browser's local storage and can be imported from the legacy Block Factory tool.
Blockly Developer Tools is a web-based developer tool that can help you build custom blocks and include them in your application.
Define a block
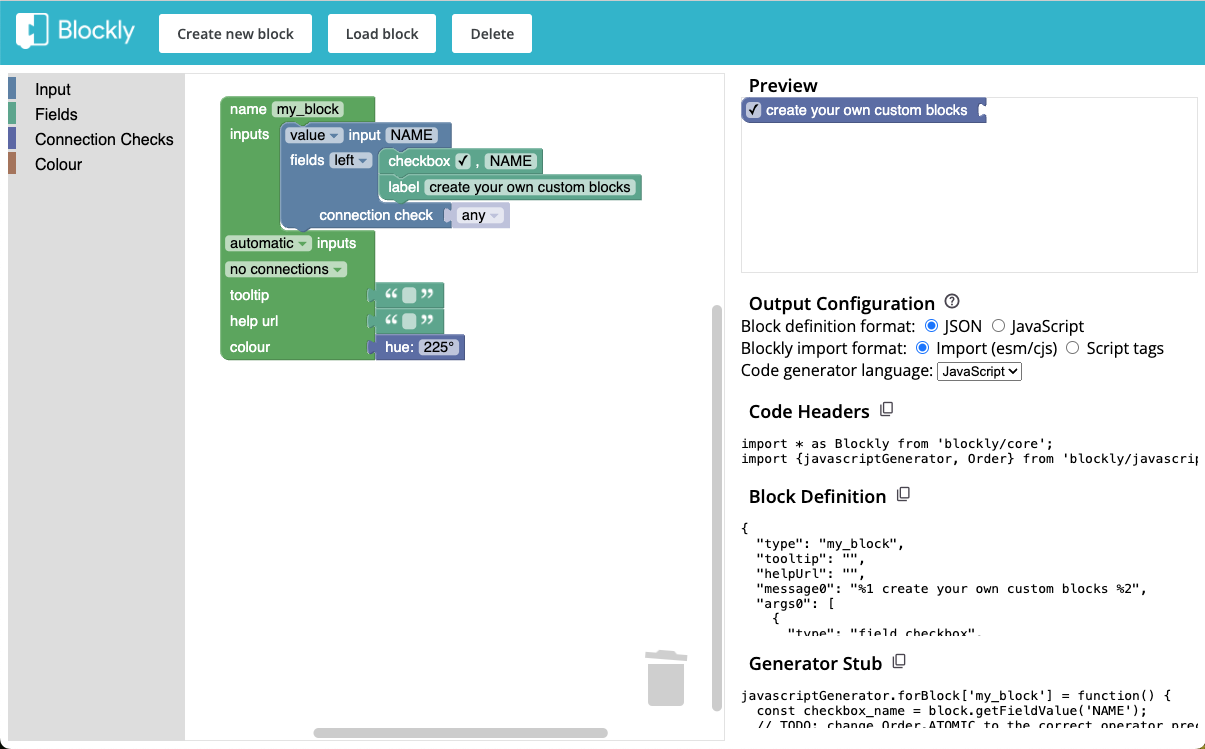
The Block Factory workspace will start with an empty configuration block. You can add inputs and fields to the block by dragging blocks from the respective categories in the toolbox. You can also set the tooltip text, help URL, colour, and connection check(s) for the block by modifying the configuration block.
The Block Factory can only create one type of block at a time. If you want to design several blocks that are connected together, you'll have to design the blocks separately and connect them in the toolbox definition. Additionally, blocks can have advanced features like mutators, but these advanced features can't be created in the Factory. You'll have to modify the block definition according to the documentation after you've built the basic form of the block.
As you modify the configuration block in the workspace, the preview for the block will update automatically. The code you will need to add to your application will also update automatically.
Output configuration
Blockly supports different methods of defining blocks and of loading Blockly itself, as well as having multiple built-in code generator languages. The way you define your blocks and block-code generators depends on these factors, so you can set them in the Block Factory to change the code output.

Blockly import format
You can load Blockly through <script> tags in HTML, or using import
statements if you use a build tool with your application. This choice impacts
how you reference certain parts of the Blockly API. For more information on
which to choose, see the documentation about loading Blockly.
Whichever method you use, be sure to select the corresponding choice in the
Block Factory so that the code you'll add to your application is accurate for
your application.
Block definition format
Blockly supports defining blocks in JSON or JavaScript. The JSON format is preferred, but if you will be adding advanced features like mutators, you can use the JavaScript format.
Code generator language
Blockly ships with multiple code generator languages. Choose
the language(s) your application needs in order to show the corresponding
block-code generator stub. If you use a custom language generator, you can
modify the name of your custom CodeGenerator class after you copy the code
into your application.
Code output
The next sections of the Block Factory show you the code you will need to copy into your application in order to load the block you've created. Where you copy the code will depend on how you've structured your application, but generally you'll need to run the code headers before the definition and block-code generator, the block definitions before you try to use them in a toolbox, and the block-code generators before you try to generate code for a workspace. For each of the sections, you can use the copy button to copy the entire code block for that section.
If you are still unsure of how to use the code output, you may be interested in the sample app which has examples of custom blocks and block-code generators.
Code headers
The Code Headers section shows the code you need to load the core Blockly library and the language generator you've chosen. There may be other configuration here too; for example, some fields you might include in a block are from Blockly plugins. These plugins will have their own import statements and possibly other code you'll have to run to initialize the field. This code should be included before any of the following code sections.
Block definition
The block definition is how you tell Blockly the shape of
your block, such as what fields and inputs it has, the colour, and more. After
you run this code, Blockly will know how to create a block just based on its
type.
If you are using the sample app, you can include this code in a
file under the blocks/ directory. If you have your own application structure,
make sure to include this code before you try to reference a block by name, such
as in a toolbox definition. Either way, make sure the code headers are present
in the file where you include this code.
Generator stub
The block-code generator is how you describe the code that should be generated for a block. The generator stub created by the Block Factory gives you the basic code for getting the values of inputs and fields that are on your block. It's up to you to combine these values into the final code that will be generated!
If you are using the sample app, you can include this code in a
file under the generators/ directory. If you have your own application
structure, make sure to include this code before you try to generate code for a
workspace that includes your custom blocks. Either way, make sure the code
headers are present in the file where you include this code.
Video walkthrough
This video walks through the steps of defining a block in detail. The UI is out date, but the block features it highlights are still more or less accurate.
Block library
Blocks are saved in the browser's local storage automatically any time you make a change to the block. You can create a new block or load an existing block from your local storage by clicking the corresponding buttons in the top toolbar.
Import from legacy Block Factory
If you've used the legacy Block Factory and want to migrate your existing block definitions into the new tool, you can do so by following these steps:
In the legacy Block Factory, click the
Export Block Librarybutton in the toolbar. This will download a file with all of your block definitions.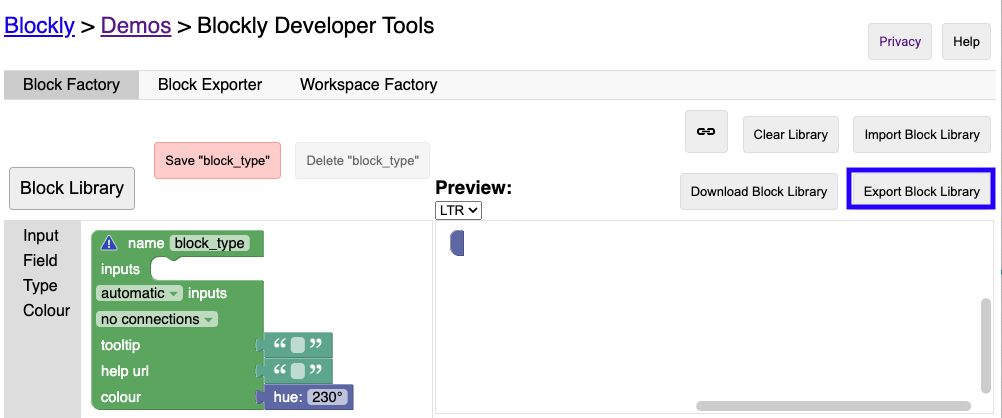
In the new Block Factory, click the "Load block" button in the toolbar.
Select the "Import from Block Factory" option in the menu.
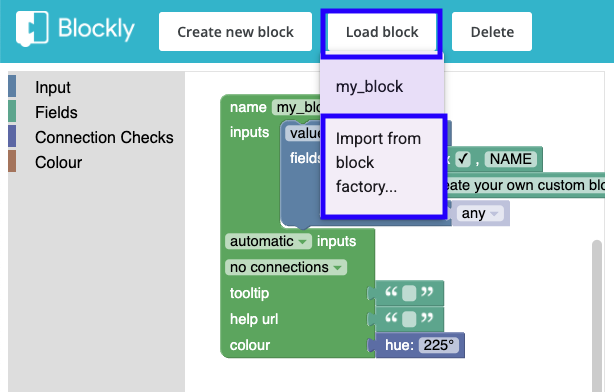
Upload the file you downloaded in Step 1.
Your block definitions should be automatically converted to the new format and will now be available from the
Load blockmenu. Blocks may have been renamed if there were conflicts with existing blocks.If there were errors parsing any of your blocks, we won't be able to load them. You can help us by filing a bug against blockly-samples and including the file that wouldn't parse.