Page Summary
-
The new Merchant API beta allows third-party apps to integrate Merchant Center diagnostic capabilities, enabling merchants to troubleshoot issues directly within the app.
-
Developers can utilize the
MerchantSupportservice to retrieve diagnostic information and trigger actions for merchants. -
Built-in actions with user input enable complex diagnostic flows, requiring developers to handle user input and error responses.
-
Pre-rendered HTML content provided by the API should be sanitized and styled for optimal presentation within the app.
-
Apps should avoid caching API responses to ensure merchants always see the most up-to-date diagnostic information.
This guide explains how third-party app developers can use the
MerchantSupport
service to create an in-app diagnostics page for their merchants.
You can use this service to create UIs similar to the Merchant Center account diagnostics and product issues pages.
The MerchantSupport service is for third-party UIs only. Requests should be
triggered when a merchant interacts with your application's UI. To automate
diagnostics for your own merchant account, see the account
status, product
status, and product
filtering guides.
We recommend that you provide the following pages in your app to help your merchants troubleshoot:
- Account diagnostics
- Product diagnostics
Different options for implementing a diagnostics page
You can implement the diagnostic page in different ways. Based on your need,
choose the option that determines how complex diagnostic actions are handled. In
the request you can set user_input_action_option to one of the following
options:
REDIRECT_TO_MERCHANT_CENTER: This is the default option. Actions that require displaying additional content or receive additional input from the merchant aren't fully implemented in your app. For them, API provides a link to redirect to the corresponding page in the Merchant Center where the merchant can perform the action.BUILT_IN_USER_INPUT_ACTIONS: You can implement complex actions that require user input as an in-app solution in your application.
Implement a diagnostics page
This section covers how to implement the diagnostics page. It uses the default (simple) option to handle complex actions as redirects to the Merchant Center.
For a more advanced implementation with in-app actions, review the following sections and see Implement built-in action with user input.
Implementation
Here's how we suggest the flow of your diagnostics page should look like:
- A merchant opens a diagnostics page in your app.
Your app requests diagnostics by calling the
MerchantSupportservice.Here's a sample request:
POST https://shoppingcontent.googleapis.com/content/v2.1/{merchantId}/merchantsupport/renderaccountissues?timeZone=America/Los_Angeles&languageCode=en-GB {}Replace {merchantId} with the unique identifier of the account you want to trigger the processing of the action for.
Your app displays the diagnostics and recommended actions from the response to the merchant. Here's a sample response:
{
  "issues": [
    {
      "title": "Misrepresentation",
      "impact": {
        "message": "Prevents all products from showing in all countries",
        "severity": "ERROR",
        "breakdowns": [
          {
            "regions": [
              {
                "code": "001",
                "name": "All countries"
              }
            ],
            "details": [
              "Products not showing organically"
            ]
          }
        ]
      },
      "prerenderedContent": "\u003cdiv class=\"issue-detail\"\u003e\u003cdiv class=\"issue-content\"\u003e\u003cp class=\"content-element\"\u003e\u003cspan class=\"segment\"\u003eBased on the information available about your business, there is reason to believe that customers are being misled on Google. Review the Misrepresentation policy and make changes to your Merchant Center and/or online store.u003c/span\u003e\u003c/p\u003e\u003cp class=\"content-element root-causes-intro\"\u003e\u003cspan class=\"segment\"\u003eMake sure your Merchant Center and online store follow the following best practices / guidelines\u003c/span\u003e\u003c/p\u003e\u003cul class=\"content-element root-causes\"\u003e\u003cli\u003e\u003cp\u003e\u003cspan class=\"segment\"\u003eProvide transparency about your business identity, business model, policies and how your customers can interact with you\u003c/span\u003e\u003c/p\u003e\u003c/li\u003e\u003cli\u003e\u003cp\u003e\u003cspan class=\"segment\"\u003ePromote your online reputation by showing reviews or highlighting any badges or seals of approval\u003c/span\u003e\u003c/p\u003e\u003c/li\u003e\u003cli\u003e\u003cp class=\"tooltip tooltip-style-info\"\u003e\u003cspan class=\"segment\"\u003eUse a professional design for your online store that includes an SSL certificate\u003c/span\u003e\u003cspan class=\"tooltip-icon\"\u003e\u003cbr\u003e\u003c/span\u003e\u003cspan class=\"tooltip-text\"\u003e\u003cspan class=\"segment\"\u003eMake sure it's accessible for all users without any redirects and doesn't have any placeholders for text and images.u003c/span\u003e\u003c/span\u003e\u003c/p\u003e\u003c/li\u003e\u003cli\u003e\u003cp class=\"tooltip tooltip-style-info\"\u003e\u003cspan class=\"segment\"\u003eProvide information in the business information settings in your Merchant Center\u003c/span\u003e\u003cspan class=\"tooltip-icon\"\u003e\u003cbr\u003e\u003c/span\u003e\u003cspan class=\"tooltip-text\"\u003e\u003cspan class=\"segment\"\u003eLink any relevant third-party platforms to your Merchant Center and create a Google Business Profile.u003c/span\u003e\u003c/span\u003e\u003c/p\u003e\u003c/li\u003e\u003cli\u003e\u003cp\u003e\u003cspan class=\"segment\"\u003eFollow SEO guidelines, improve your eligibility for seller ratings and match your product data in your Merchant Center with your online store\u003c/span\u003e\u003c/p\u003e\u003c/li\u003e\u003c/ul\u003e\u003ca href=\"https://support.google.com/merchants/answer/6150127?hl=en-US\" class=\"content-element\"\u003eLearn more about the Misrepresentation policy\u003c/a\u003e\u003c/div\u003e\u003c/div\u003e",
      "actions": [
        {
          "externalAction": {
            "type": "REVIEW_ACCOUNT_ISSUE_IN_MERCHANT_CENTER",
            "uri": "https://merchants.google.com/mc/products/diagnostics/accountissues?a=672911686&hl=en-US"
          },
          "buttonLabel": "Request review",
          "isAvailable": true
        }
      ],
      "prerenderedOutOfCourtDisputeSettlement": "\u003cdetails class=\"ods-section\"\u003e\u003csummary\u003eShow additional options available to you\u003c/summary\u003e\u003cp class=\"ods-description\"\u003e\u003cspan class=\"segment\"\u003eYou may have the option to request an external appeal. You'll also be asked to provide your routing and reference IDs.\u003c/span\u003e \u003ca href=\"https://support.google.com/european-union-digital-services-act-redress-options?hl=en-GB\" target=\"_blank\" class=\"segment\"\u003eLearn more about external appeals\u003c/a\u003e\u003c/p\u003e\u003cp class=\"ods-param ods-routing-id\"\u003e\u003cspan class=\"segment ods-param-header\"\u003eRouting ID:\u003c/span\u003e \u003cspan class=\"segment ods-param-value\"\u003eRDAX\u003c/span\u003e\u003c/p\u003e\u003cp class=\"ods-param ods-reference-id\"\u003e\u003cspan class=\"segment ods-param-header\"\u003eReference ID:\u003c/span\u003e \u003cspan class=\"segment ods-param-value\"\u003e672911686\u003c/span\u003e\u003c/p\u003e\u003c/details\u003e"
    },
    {
      "title": "Adult-oriented content",
      "impact": {
        "message": "Prevents all products from showing in all countries",
        "severity": "ERROR",
        "breakdowns": [
          {
            "regions": [
              {
                "code": "001",
                "name": "All countries"
              }
            ],
            "details": [
              "Products not showing organically"
            ]
          }
        ]
      },
      "prerenderedContent": "\u003cdiv class=\"issue-detail\"\u003e\u003cdiv class=\"callout-banners\"\u003e\u003cdiv class=\"callout-banner callout-banner-info\"\u003e\u003cp\u003e\u003cspan class=\"segment\"\u003eReview requested on Aug 9, 2023. It can take a few days to complete.u003c/span\u003e\u003c/p\u003e\u003c/div\u003e\u003c/div\u003e\u003cdiv class=\"issue-content\"\u003e\u003cp class=\"content-element\"\u003e\u003cspan class=\"segment\"\u003eThere was a problem identified with the sale of prohibited adult products on your online store. In the case that you are intentionally selling adult items, enable Adult content in Settings in your Merchant Center. In your product file, use the \u003c/span\u003e\u003cspan class=\"segment segment-attribute\"\u003eadult\u003c/span\u003e\u003cspan class=\"segment\"\u003e attribute for specific products.u003c/span\u003e\u003c/p\u003e\u003cp class=\"content-element root-causes-intro\"\u003e\u003cspan class=\"segment\"\u003eMake sure the products meet the policy requirements\u003c/span\u003e\u003c/p\u003e\u003cul class=\"content-element root-causes\"\u003e\u003cli\u003e\u003cp class=\"tooltip tooltip-style-info\"\u003e\u003cspan class=\"segment\"\u003eAdult oriented content may be prohibited or restricted depending on the product sold and the country it is sold\u003c/span\u003e\u003cspan class=\"tooltip-icon\"\u003e\u003cbr\u003e\u003c/span\u003e\u003cspan class=\"tooltip-text\"\u003e\u003cspan class=\"segment\"\u003eSee a full list of countries in the HelpCenter\u003c/span\u003e\u003c/span\u003e\u003c/p\u003e\u003c/li\u003e\u003cli\u003e\u003cp class=\"tooltip tooltip-style-info\"\u003e\u003cspan class=\"segment\"\u003eDon't list sexually explicit content that is intended to arouse or includes content such as text, image, audio, or video of graphic sexual acts intended to arouse\u003c/span\u003e\u003cspan class=\"tooltip-icon\"\u003e\u003cbr\u003e\u003c/span\u003e\u003cspan class=\"tooltip-text\"\u003e\u003cspan class=\"segment\"\u003eExamples: Graphic depictions of sexual acts in progress, including hardcore pornography, any type of genital, anal, or oral sexual activity; graphic depictions of masturbation or genital arousal and language explicitly referencing arousal, masturbation, cartoon porn, or hentai\u003c/span\u003e\u003c/span\u003e\u003c/p\u003e\u003c/li\u003e\u003c/ul\u003e\u003ca href=\"https://support.google.com/merchants/answer/6150138?hl=en-US#wycd-restricted-adult-content\" class=\"content-element\"\u003eLearn more about the Adult-oriented content policy\u003c/a\u003e\u003c/div\u003e\u003c/div\u003e"
    },
    {
      "title": "Missing return and refund policy",
      "impact": {
        "message": "Limits visibility of all products in all countries",
        "severity": "ERROR",
        "breakdowns": [
          {
            "regions": [
              {
                "code": "001",
                "name": "All countries"
              }
            ],
            "details": [
              "Limited visibility for products showing organically"
            ]
          }
        ]
      },
      "prerenderedContent": "\u003cdiv class=\"issue-detail\"\u003e\u003cdiv class=\"issue-content\"\u003e\u003cp class=\"content-element\"\u003e\u003cspan class=\"segment\"\u003eThere was a problem identified with the return and/or refund policy of your online store. Update your return or refund policy to provide customers a transparent shopping experience.u003c/span\u003e\u003c/p\u003e\u003cp class=\"content-element root-causes-intro\"\u003e\u003cspan class=\"segment\"\u003eMake sure your products meet the Shopping policy requirements\u003c/span\u003e\u003c/p\u003e\u003cul class=\"content-element root-causes\"\u003e\u003cli\u003e\u003cp class=\"tooltip tooltip-style-info\"\u003e\u003cspan class=\"segment\"\u003eIt's available on your online store\u003c/span\u003e\u003cspan class=\"tooltip-icon\"\u003e\u003cbr\u003e\u003c/span\u003e\u003cspan class=\"tooltip-text\"\u003e\u003cspan class=\"segment\"\u003eWe recommend that you have a separate landing page for your policy and link to it from the other pages on your online store, so that it's easy to find.u003c/span\u003e\u003c/span\u003e\u003c/p\u003e\u003c/li\u003e\u003cli\u003e\u003cp class=\"tooltip tooltip-style-info\"\u003e\u003cspan class=\"segment\"\u003eIt's available in the language of the country you're selling in or in English\u003c/span\u003e\u003cspan class=\"tooltip-icon\"\u003e\u003cbr\u003e\u003c/span\u003e\u003cspan class=\"tooltip-text\"\u003e\u003cspan class=\"segment\"\u003eMake sure that the return and/or refund policy is available in the target language or in English. Ideally, users should be given the option to select the return and/or refund policy in their own language.u003c/span\u003e\u003c/span\u003e\u003c/p\u003e\u003c/li\u003e\u003cli\u003e\u003cp\u003e\u003cspan class=\"segment\"\u003eIt's accessible to everyone visiting your online store, without having to log in, sign up or enter any personal information\u003c/span\u003e\u003c/p\u003e\u003c/li\u003e\u003c/ul\u003e\u003ca href=\"https://support.google.com/merchants/answer/9158778?hl=en-US\" class=\"content-element\"\u003eLearn more about Missing return and refund policy\u003c/a\u003e\u003c/div\u003e\u003c/div\u003e",
      "actions": [
        {
          "externalAction": {
            "type": "REVIEW_ACCOUNT_ISSUE_IN_MERCHANT_CENTER",
            "uri": "https://merchants.google.com/mc/products/diagnostics/accountissues?a=672911686&hl=en-US"
          },
         "buttonLabel": "Request review",
         "isAvailable": true
        }
      ]
    }
  ]
}
We recommend that you display the issues in the order they're returned, with the
titleandimpact.message. We also recommend that you display theimpact.breakdownsof the issue when the merchant holds pointer over the issue title or description.The merchant clicks an issue from the list.
Your app displays the detailed
impactof each issue percountry,destination,prerendered_content,prerendered_out_of_court_dispute_settlementand buttons for theactionsthe merchant can take to resolve the issue. There are different types of actions:- External actions: Point to the external page, for example, in Merchant Center, where the merchant can resolve the issue.
- Built-in simple actions: Point to the page in your application where the merchant can resolve the issue.
- Built-in user-input actions: Open a dialog where the merchant can
provide the required information and request the action. This type of
action is only available if the
BUILT_IN_USER_INPUT_ACTIONSwas requested.
The merchant follows instructions to resolve the issue.
The merchant reloads the diagnostics page in your app.
Your app submits another request to the
MerchantSupportservice, and displays an updated list of issues.
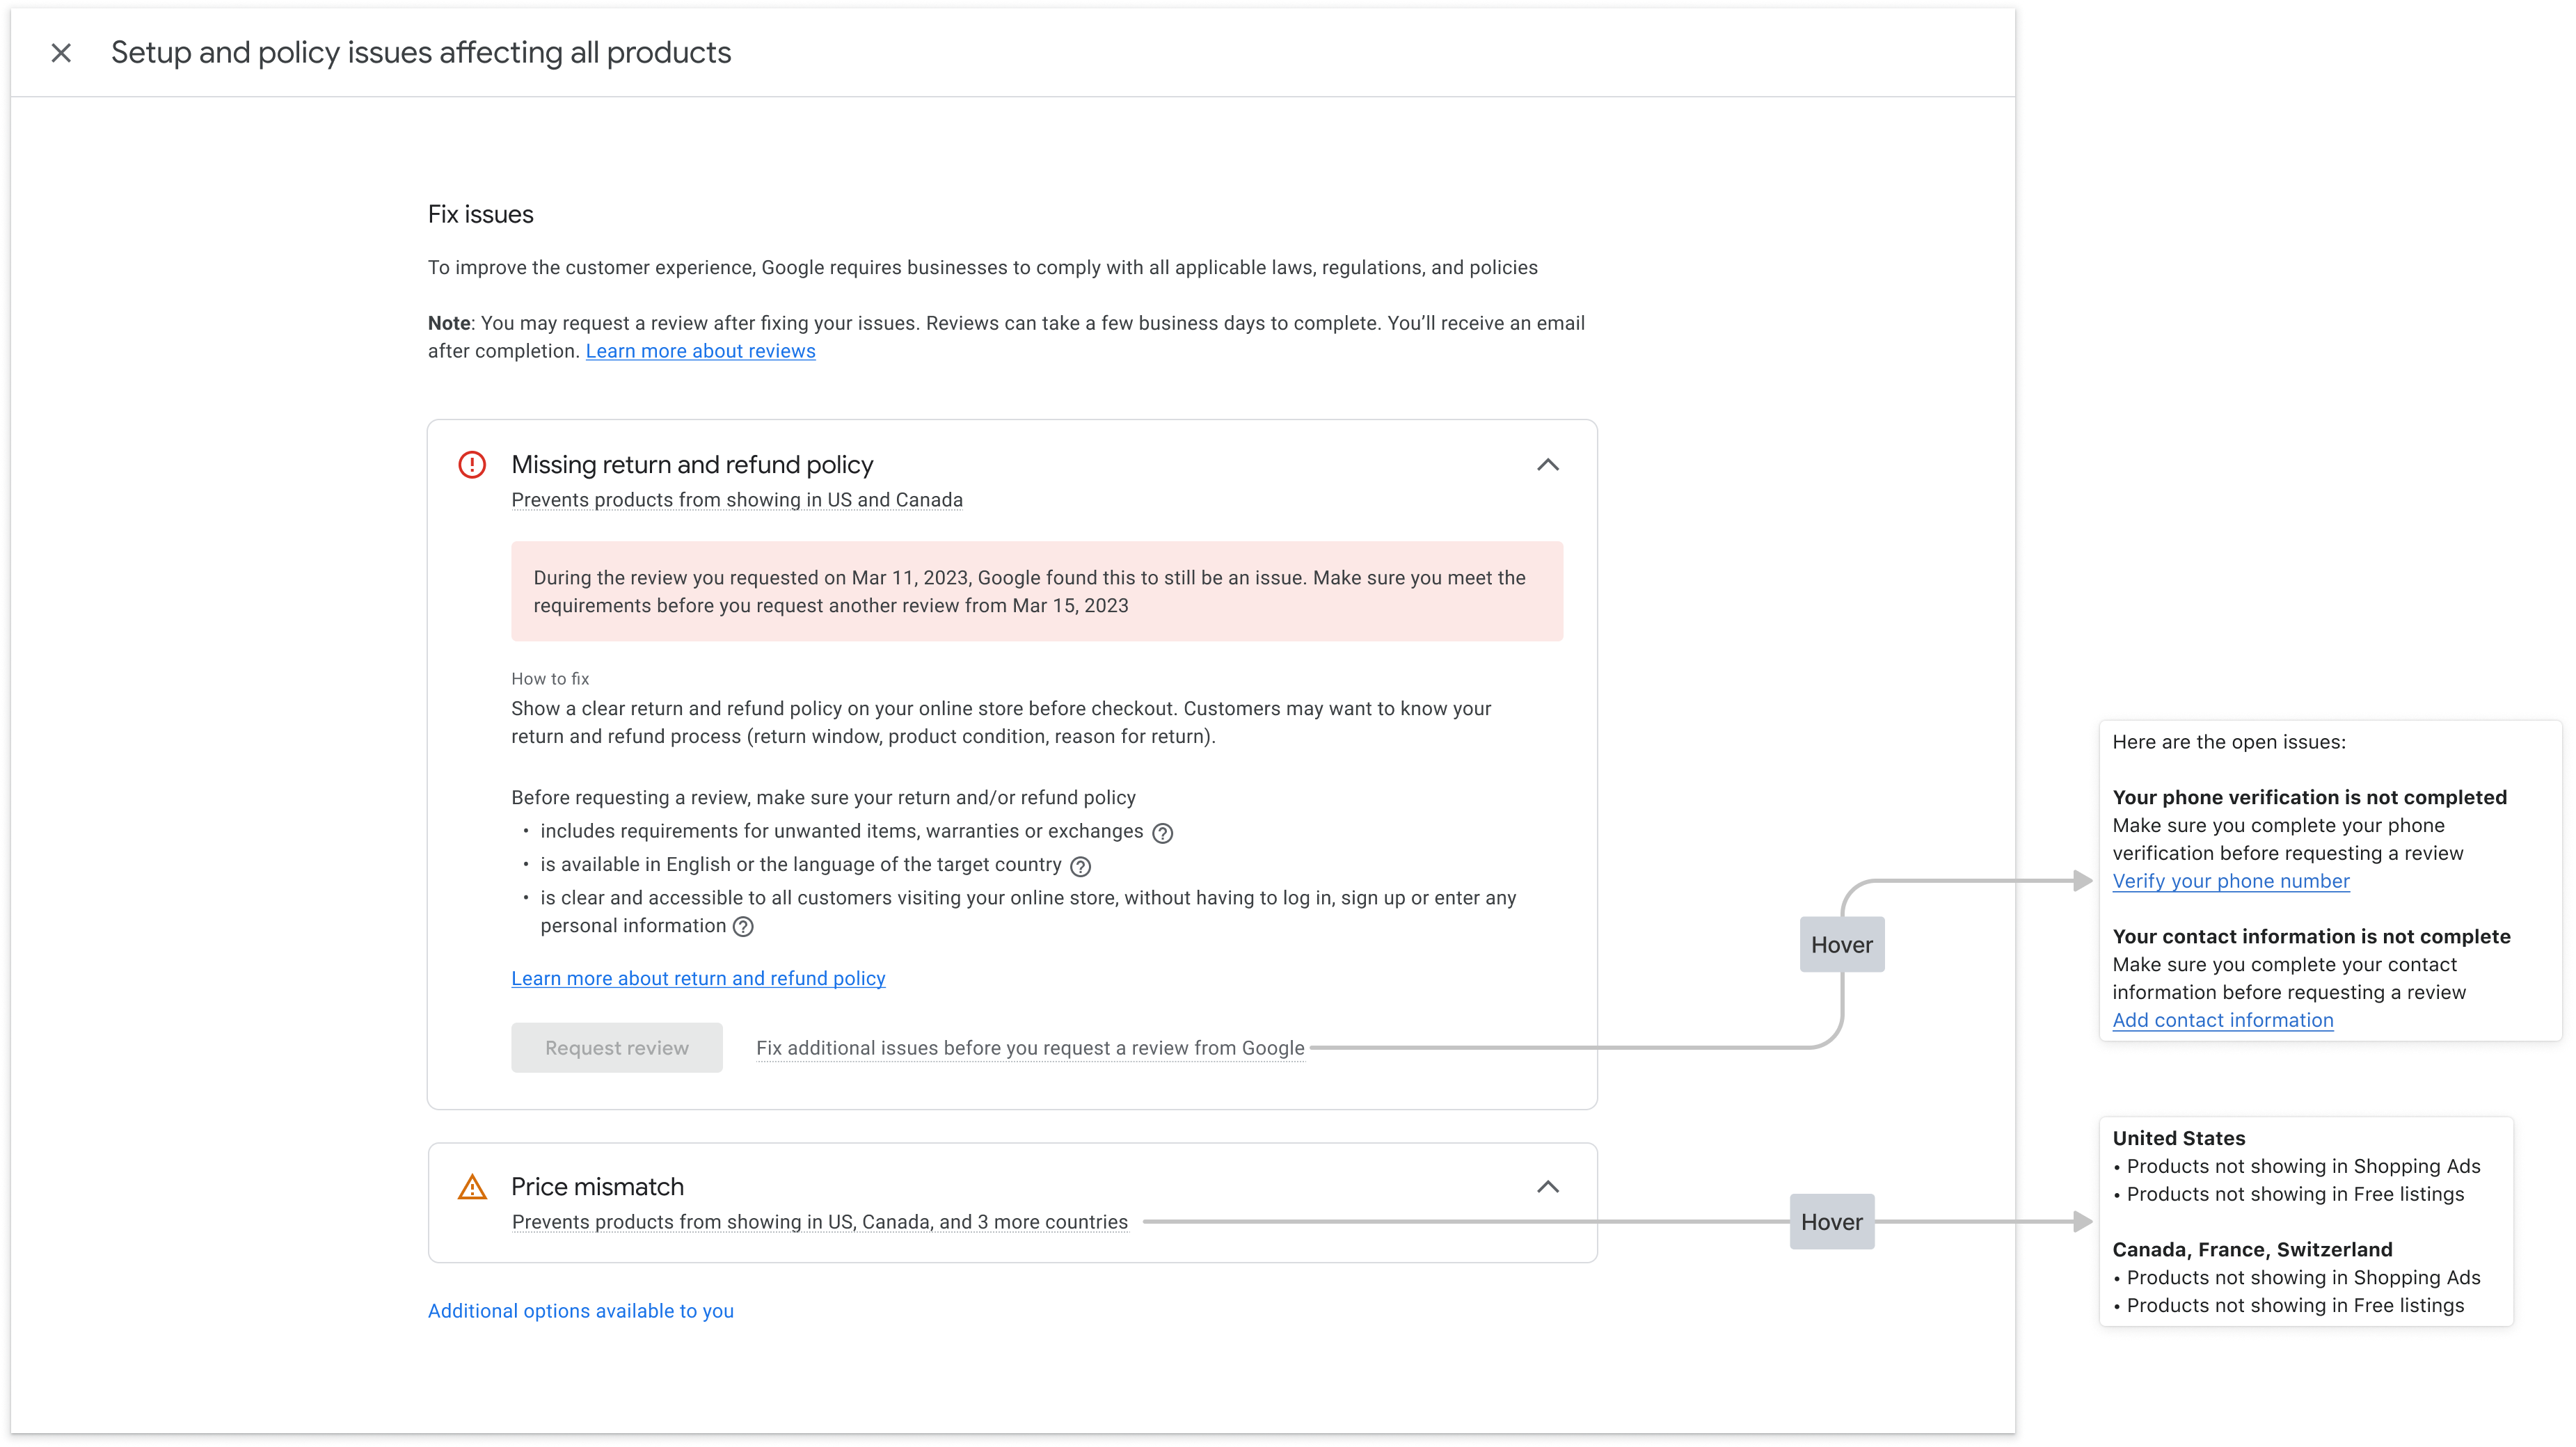
You can compare the information displayed by your finished app to the diagnostics pages in Merchant Center to verify your implementation.
UI mocks
Here's an example of how you can display the information from the
renderaccountissues response in your account diagnostics page. Objects in the
UI are mapped to corresponding API fields in the mock. You can create a similar
page for product issues.
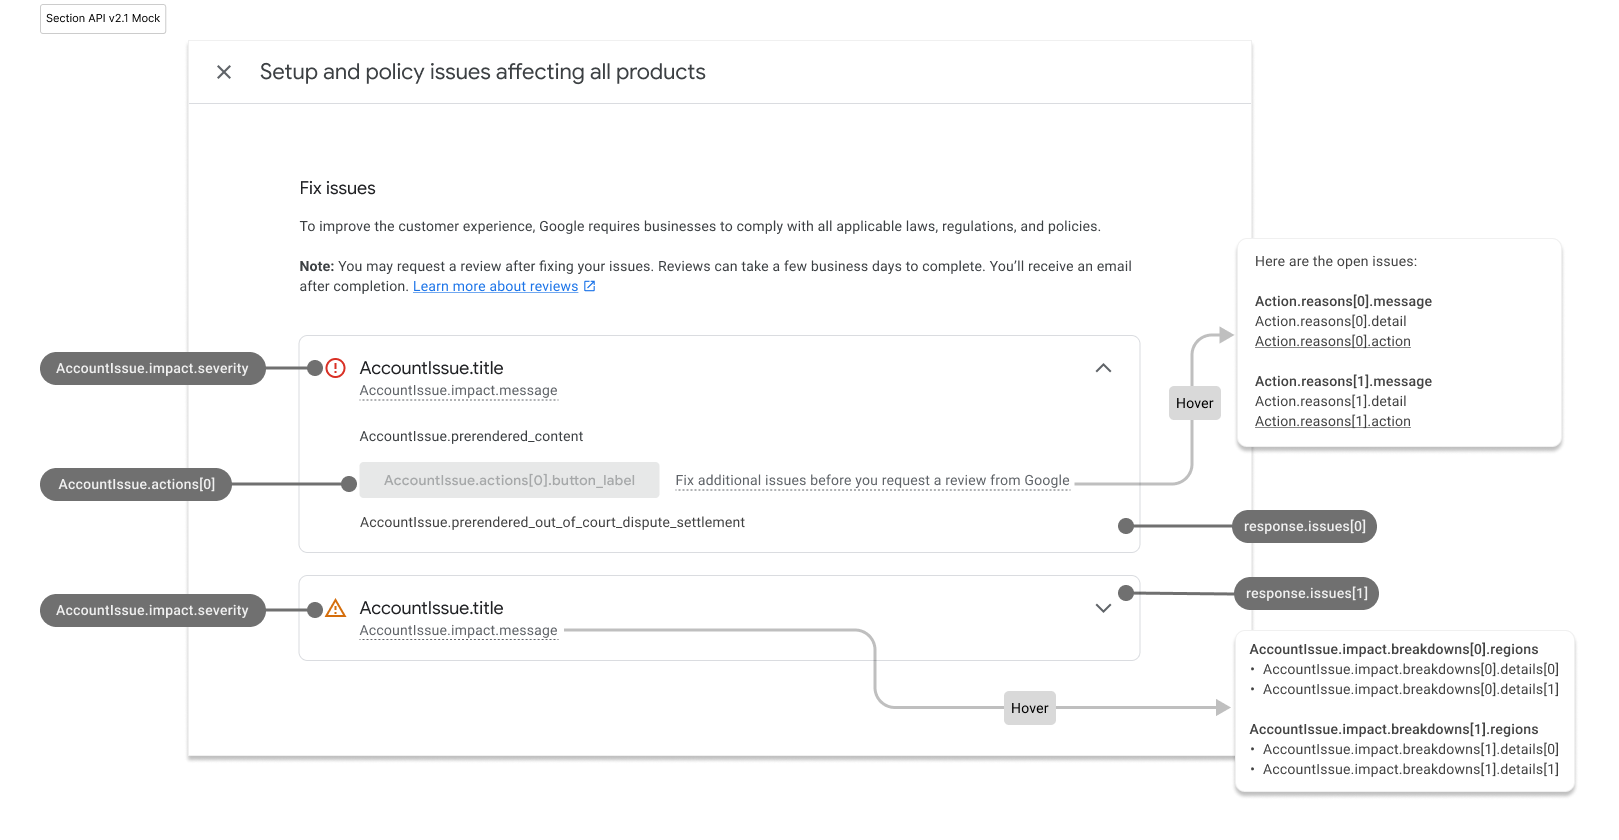
Here's how the populated account diagnostic page looks:
Style pre-rendered HTML
The response from calling the MerchantSupport service includes the
prerendered_content field, the details of each issue in HTML. The response can
also include the prerendered_out_of_court_dispute_settlement field,
an HTML with instructions for the out of court dispute settlement. You can embed
this HTML content directly into your UI to display the issue in a readable
format.
Style pre-rendered content HTML
You might see HTML elements with the class new-element. The new-element
class is applied to elements that are added to the HTML after you've integrated
with the MerchantSupport service. We recommend hiding elements with the class
new-element, so that you can style these elements before they're displayed to
users in your app.
Here's an example of the prerendered_content field value:
<div class="issue-detail">
  <div class="callout-banners">
    <div class="callout-banner callout-banner-info"><p><span class="segment">Review requested on Aug 9, 2023. It can take a few days to complete.</span>
    </p></div>
  </div>
  <div class="issue-content"><p class="content-element"><span class="segment">There was a problem identified with the sale of prohibited adult products on your online store. In the case that you are intentionally selling adult items, enable Adult content in Settings in your Merchant Center. In your product file, use the </span><span
      class="segment segment-attribute">adult</span><span class="segment"> attribute for specific products.</span>
  </p>
    <p class="content-element root-causes-intro"><span class="segment">Make sure the products meet the policy requirements</span>
    </p>
    <ul class="content-element root-causes">
      <li><p class="tooltip tooltip-style-info"><span class="segment">Adult oriented content may be prohibited or restricted depending on the product sold and the country it is sold</span><span
          class="tooltip-icon"><br></span><span class="tooltip-text"><span class="segment">See a full list of countries in the HelpCenter</span></span>
      </p></li>
      <li><p class="tooltip tooltip-style-info"><span class="segment">Don't list sexually explicit content that is intended to arouse or includes content such as text, image, audio, or video of graphic sexual acts intended to arouse</span><span
          class="tooltip-icon"><br></span><span class="tooltip-text"><span class="segment">Examples: Graphic depictions of sexual acts in progress, including hardcore pornography, any type of genital, anal, or oral sexual activity; graphic depictions of masturbation or genital arousal and language explicitly referencing arousal, masturbation, cartoon porn, or hentai</span></span>
      </p></li>
    </ul>
    <a href="https://support.google.com/merchants/answer/6150138?hl=en-US#wycd-restricted-adult-content"
       class="content-element">Learn more about the Adult-oriented content policy</a></div>
</div>
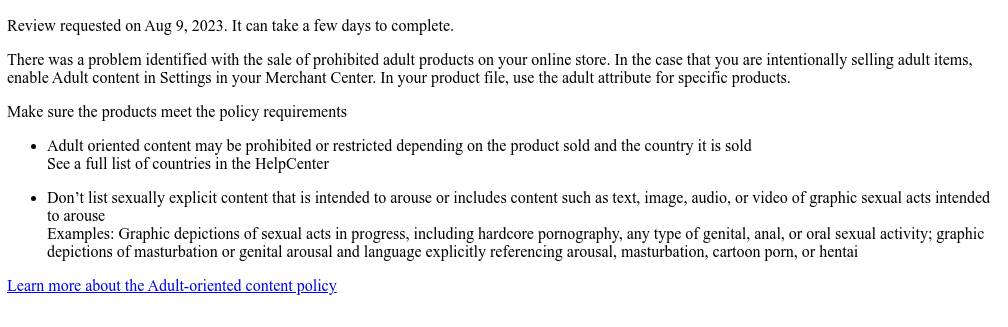
Here's what it looks like if you embedded the preceding HTML
prerendered_content in your app without any styling:
You can use multiple CSS classes to adjust how the content renders in your UI. Here's a CSS sample you can use:
issue-detail {
  text-align: left;
  width: 700px;
  border-radius: 8px;
  background: white;
  margin: 16px;
  padding: 16px;
}

.content-element {
  margin: 8px 0 8px 0;
  display: block;
}

/* callout banners */
.callout-banners {
  margin: 0 0 16px 0;
}

.callout-banner {
  display: block;
  padding: 16px 16px 6px 16px;
  margin: 0 0 8px 0;
  border-radius: 8px;
}

.callout-banner-info {
  background: #e8f0fe;
}

.callout-banner-warning {
  background: #fef7e0;
}

.callout-banner-error {
  background: #fce8e6;
}

/* add an icon to the callout banner */
.callout-banner p {
  background-repeat: no-repeat;
  padding-left: 32px;
}

.callout-banner-error p {
  background-image: url("https://fonts.gstatic.com/s/i/short-term/release/googlesymbols/error/default/20px.svg");
}

.callout-banner-warning p {
  background-image: url("https://fonts.gstatic.com/s/i/short-term/release/googlesymbols/warning/default/20px.svg");
}

.callout-banner-info p {
  background-image: url("https://fonts.gstatic.com/s/i/short-term/release/googlesymbols/search/default/20px.svg");
}

/* segments with style */
.segment-attribute {
  color: #198639;
  font-family: monospace, monospace;
}

.segment-bold {
  font-weight: bold;
}

.segment-italic {
  font-style: italic;
}

/* tooltip */
.tooltip {
  position: relative;
}

.tooltip-style-info .tooltip-icon:before {
  content: '(i)';
  font-style: normal;
  font-weight: normal;
  text-decoration: inherit;
  margin-left: 5px;
}

.tooltip-style-question .tooltip-icon:before {
  content: '(?)';
  font-style: normal;
  font-weight: normal;
  text-decoration: inherit;
  margin-left: 5px;
}

.tooltip .tooltip-text {
  visibility: hidden;
  text-align: left;
  background: white;
  border-radius: 8px;
  padding: 5px 0;
  border: 1px solid;
  padding: 10px;
  box-shadow: 3px 7px 12px #c1c1c1;
  position: absolute;
  z-index: 1;
}

.tooltip:hover .tooltip-text {
  visibility: visible;
}

/* table */
table.content-element {
  margin: 16px 0 16px 0;
  border: 1px solid #ccc;
  border-collapse: collapse;
  margin: 1em 0;
}

table.content-element th {
  background-color: #eee;
}

table.content-element th, table td {
  border: 1px solid #ddd;
  font-size: 0.9em;
  padding: 0.3em 1em;
}

/* hidde elements added in future, until they are supported in your application */
.new-element {
  visibility: hidden;
}
Here's how the rendered content looks if you use the preceding CSS:
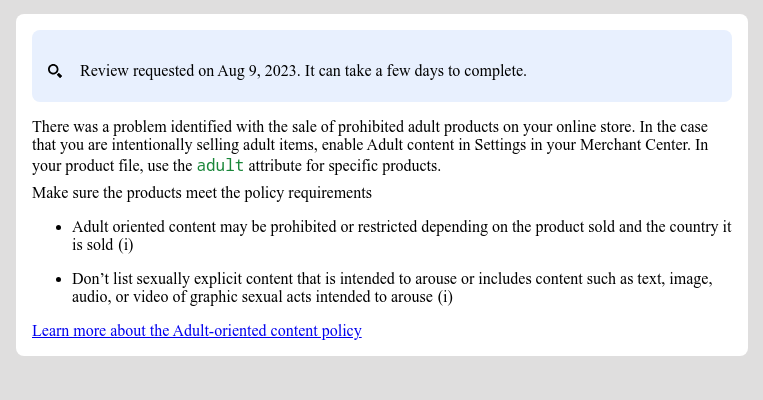
You can also configure and show tooltips with CSS:

Style pre-rendered HTML for out of court dispute settlement
Here's an example of the prerendered_out_of_court_dispute_settlement field
value:
<details class="ods-section" open="">
  <summary>Show additional options available to you</summary>
  <p class="ods-description">
    <span class="segment">You may have the option to request an external appeal. You'll also be asked to provide your routing and reference IDs.</span>
    <a href="https://support.google.com/european-union-digital-services-act-redress-options?hl=en-US"
       target="_blank" class="segment">Learn more about external appeals</a>
  </p>
  <p class="ods-param ods-routing-id">
    <span class="segment ods-param-header">Routing ID:</span>
    <span class="segment ods-param-value">RDAX</span>
  </p>
  <p class="ods-param ods-reference-id">
    <span class="segment ods-param-header">Reference ID:</span>
    <span class="segment ods-param-value">672911686</span>
  </p>
</details>
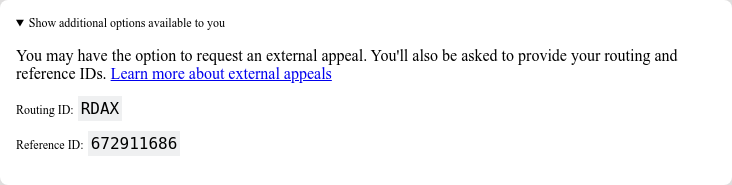
Here's what it looks like if you embedded the preceding HTML
prerendered_out_of_court_dispute_settlement in your app without any styling:

You can use multiple CSS classes to adjust how this section renders in your UI. Here's a CSS sample you can use:
.ods-param-value {
  background: #dee1e37d;
  font-family: monospace, monospace;
  padding: 3px;
}

.ods-param-header {
  font-size: .75rem;
}

.ods-section summary {
  font-size: .75rem;
}
Here's how the rendered content looks if you use the preceding CSS:
Implement built-in action with user input
A built-in action with user input lets you provide a complex diagnostic capability as an in-app solution in your application. We recommend implementing it as a dialog where the merchant can provide their input, read additional information, and confirm the request.
Each action contains one or more action flows. For some actions, there can be more than one flow. For example, there could be a different flow when the merchant asks for an additional review because they disagree with the decision and a different flow when they already fixed the problem.
To request data to implement complex actions with user input, you must set
the user_input_action_option field to BUILT_IN_USER_INPUT_ACTIONS value.
POST https://shoppingcontent.googleapis.com/content/v2.1/{merchantId}/merchantsupport/renderaccountissues

{
  "user_input_action_option": "BUILT_IN_USER_INPUT_ACTIONS"
}
Replace {merchantId} with the unique identifier of the account you want to trigger the processing of the action for.
Implementation
Here is how we suggest the flow of your diagnostics page that requests user input should look like:
The merchant clicks the action button.
- If there are multiple flows available, your app offers all of them so the merchant can select one, based on their intent.
- The merchant selects the flow.
Your app displays the title, message, callout, and user input form for the selected action flow. We recommend that you display these details in a dialog.
- The callout, if present, contains important information that aims to help the merchant to better understand how the action works and what to do to be successful. We recommend highlighting this message and styling it according to the severity of the callout.
- If there are any input fields in the flow, they need to be displayed so the merchant can provide values. If the input field is marked as required, then your app shouldn't let the merchant send the request before they provide the value.
The merchant reads the information and provides requested values.
The merchant confirms their request by clicking the button.
Your app triggers the processing of the action by calling the
MerchantSupportservice. Here's a sample request:POST https://shoppingcontent.googleapis.com/content/v2.1/{merchantId}/merchantsupport/triggeraction { actionContext: "ActionContextValue=", actionInput: { actionFlowId: "flow1", inputValues: [ { input_field_id: "input1", checkbox_input_value: { value: true } } ] }Replace {merchantId} with the unique identifier of the account you want to trigger the processing of the action for.
Your app shows the confirmation message returned from the
MerchantSupportservice.- If the service returns a validation error with the
INVALID_ARGUMENTstatus, it contains detailed information and localized error message that should be shown to the merchant. We recommend showing such an error close to the affected input field. Here's an example of a sample response:
{ "error": { "code": 400, "message": "[actionInput.inputValues] Invalid user input", "status": "INVALID_ARGUMENT", "details": [ { "@type": "type.googleapis.com/google.rpc.ErrorInfo", "reason": "invalid", "domain": "global" }, { "@type": "type.googleapis.com/google.rpc.BadRequest", "fieldViolations": [ { "field": "actionInput.inputValues.input", "description": "The field is required" } ] } ] } }- If the service returns invalid state or internal error, denoted by the
FAILED_PRECONDITIONandINTERNALstatuses, the app should instruct the merchant to reload the page or to try later.
- If the service returns a validation error with the