ทุกคำขอที่แอปพลิเคชันส่งไปยัง Business Profile API จะต้องมีโทเค็นการให้สิทธิ์ โทเค็นการให้สิทธิ์จะระบุผู้ใช้หรือแอปพลิเคชันให้กับ Google ซึ่งจะอนุญาตให้เข้าถึง Business Profile API แอปพลิเคชันต้องใช้โปรโตคอล OAuth 2.0 เพื่อให้สิทธิ์คำขอ
คู่มือนี้จะอธิบายวิธีการต่างๆ ที่คุณสามารถใช้เพื่อติดตั้งใช้งาน OAuth 2.0 ในแพลตฟอร์ม Google Identity Platform มีฟังก์ชันการทำงานของ Google Sign-In และ OAuth ที่ใช้ตลอดทั้งคู่มือนี้
หากต้องการทําความเข้าใจเพิ่มเติมเกี่ยวกับวิธีใช้ OAuth 2.0 สําหรับแอปพลิเคชันเว็บเซิร์ฟเวอร์ โปรดดูคู่มือที่นี่
การใช้ OAuth 2.0 มีประโยชน์ดังต่อไปนี้
- ปกป้องการเข้าถึงข้อมูลของเจ้าของธุรกิจ
- สร้างตัวตนของเจ้าของธุรกิจเมื่อลงชื่อเข้าใช้บัญชี Google
- ระบุว่าแพลตฟอร์มหรือแอปพลิเคชันของพาร์ทเนอร์สามารถเข้าถึงและแก้ไขข้อมูลตำแหน่งได้เมื่อได้รับความยินยอมอย่างชัดแจ้งจากเจ้าของธุรกิจ เจ้าของจะเพิกถอนสิทธิ์เข้าถึงนี้ในภายหลังได้
- สร้างตัวตนของแพลตฟอร์มพาร์ทเนอร์
- ช่วยให้แพลตฟอร์มของพาร์ทเนอร์ดําเนินการออนไลน์หรือออฟไลน์ในนามของเจ้าของธุรกิจได้ ซึ่งรวมถึงการตอบรีวิว การสร้างโพสต์ และการอัปเดตรายการเมนู
การเข้าถึง API ด้วย OAuth 2.0
ก่อนเริ่มต้น คุณต้องกำหนดค่าโปรเจ็กต์ Google Cloud และเปิดใช้ Business Profile API ดูข้อมูลเพิ่มเติมได้ที่เอกสารประกอบสําหรับการตั้งค่าพื้นฐาน
กำหนดค่า OAuth และหน้าจอขอความยินยอม
ทําตามขั้นตอนต่อไปนี้เพื่อสร้างข้อมูลเข้าสู่ระบบและหน้าจอแสดงความยินยอม
- จากหน้าข้อมูลเข้าสู่ระบบใน API Console ให้คลิกสร้างข้อมูลเข้าสู่ระบบ แล้วเลือก "รหัสไคลเอ็นต์ OAuth" จากรายการแบบเลื่อนลง
- เลือกประเภทแอปพลิเคชัน กรอกข้อมูลที่เกี่ยวข้อง แล้วคลิกสร้าง
- คลิกบันทึก
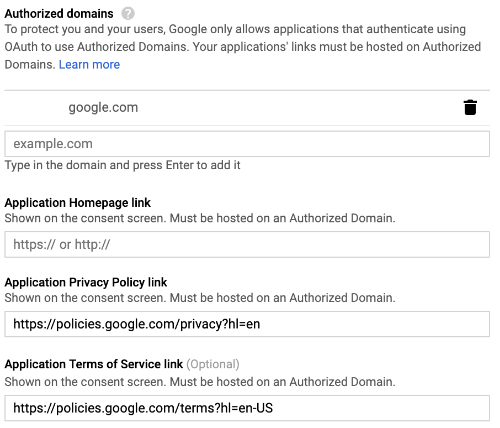
- อัปเดตการตั้งค่าหน้าจอขอความยินยอม OAuth จากตรงนั้น คุณสามารถอัปเดตชื่อแอปพลิเคชันและโลโก้ รวมถึงใส่ลิงก์ไปยังข้อกำหนดในการให้บริการและนโยบายความเป็นส่วนตัว
รูปภาพต่อไปนี้แสดงช่องชื่อแอปพลิเคชันและโลโก้ในหน้าจอความยินยอม OAuth
รูปภาพต่อไปนี้แสดงช่องเพิ่มเติมที่ปรากฏในหน้าจอความยินยอม OAuth
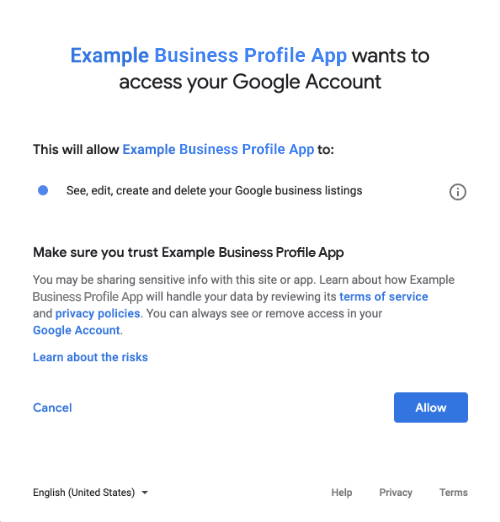
รูปภาพต่อไปนี้เป็นตัวอย่างสิ่งที่ผู้ใช้อาจเห็นก่อนที่จะให้ความยินยอม
วิธีผสานรวม OAuth 2.0
คุณใช้วิธีการต่อไปนี้เพื่อติดตั้งใช้งาน OAuth 2.0 ได้
เนื้อหาต่อไปนี้ให้ข้อมูลเกี่ยวกับวิธีเหล่านี้ในการผสานรวม OAuth 2.0 เข้ากับแอปพลิเคชัน
ขอบเขตการให้สิทธิ์
ต้องใช้ขอบเขต OAuth ต่อไปนี้
- https://www.googleapis.com/auth/business.manage
- https://www.googleapis.com/auth/plus.business.manage
เราเลิกใช้งานขอบเขต plus.business.manage แล้ว แต่ยังคงมีไว้เพื่อรักษาความเข้ากันได้แบบย้อนหลังสำหรับการใช้งานที่มีอยู่
ไลบรารีของไคลเอ็นต์
ตัวอย่างเฉพาะภาษาในหน้านี้ใช้ไลบรารีของไคลเอ็นต์ Google API เพื่อใช้การให้สิทธิ์ OAuth 2.0 หากต้องการเรียกใช้ตัวอย่างโค้ด คุณต้องติดตั้งไลบรารีไคลเอ็นต์สำหรับภาษาของคุณก่อน
ไลบรารีของไคลเอ็นต์มีให้บริการในภาษาต่อไปนี้
Google Sign-In
Google Sign-In เป็นวิธีที่เร็วที่สุดในการผสานรวม OAuth เข้ากับแพลตฟอร์ม ซึ่งพร้อมใช้งานสำหรับ Android, iOS, เว็บ และอื่นๆ

Google Sign-In เป็นระบบการตรวจสอบสิทธิ์ที่ปลอดภัยซึ่งช่วยให้ผู้ใช้ลงชื่อเข้าใช้ด้วยบัญชี Google ซึ่งเป็นบัญชีเดียวกับที่ใช้ลงชื่อเข้าใช้บริการอื่นๆ ของ Google เมื่อลงชื่อเข้าใช้แล้ว ผู้ใช้สามารถให้ความยินยอมให้แอปพลิเคชันเรียกใช้ Business Profile API และแลกเปลี่ยนรหัสการให้สิทธิ์ที่ใช้รับโทเค็นการรีเฟรชและโทเค็นการเข้าถึง
การเข้าถึงแบบออฟไลน์
คุณอาจต้องการเรียก Business Profile API ในนามของผู้ใช้แม้ในขณะที่ผู้ใช้ออฟไลน์อยู่ เราขอแนะนำให้แพลตฟอร์มต่างๆ นำมาใช้เนื่องจากคุณจะแก้ไข ดู และจัดการข้อมูลได้ทุกเมื่อหลังจากที่ผู้ใช้ลงชื่อเข้าใช้และให้ความยินยอม
Google จะถือว่าผู้ใช้ลงชื่อเข้าใช้ด้วยบัญชี Google ของตนแล้ว ให้ความยินยอมให้แอปพลิเคชันของคุณเรียกใช้ Business Profile API และแลกเปลี่ยนรหัสการให้สิทธิ์ซึ่งจะใช้เพื่อรับโทเค็นรีเฟรช และโทเค็นการเข้าถึงในภายหลัง ผู้ใช้สามารถจัดเก็บโทเค็นรีเฟรชอย่างปลอดภัยและใช้โทเค็นดังกล่าวในภายหลังเพื่อรับโทเค็นการเข้าถึงใหม่ได้ทุกเมื่อ อ่านข้อมูลเพิ่มเติมได้ที่Google Sign-In สําหรับแอปฝั่งเซิร์ฟเวอร์
ข้อมูลโค้ดต่อไปนี้แสดงวิธีใช้การเข้าถึงแบบออฟไลน์ในแอปพลิเคชัน หากต้องการเรียกใช้โค้ดนี้ โปรดดูเรียกใช้ตัวอย่าง
<!-- The top of file index.html -->
<html itemscope itemtype="http://schema.org/Article">
<head>
  <!-- BEGIN Pre-requisites -->
  <script src="https://ajax.googleapis.com/ajax/libs/jquery/1.8.2/jquery.min.js">
  </script>
  <script src="https://apis.google.com/js/client:platform.js?onload=start" async defer>
  </script>
  <!-- END Pre-requisites -->
<!-- Continuing the <head> section -->
  <script>
    function start() {
      gapi.load('auth2', function() {
        auth2 = gapi.auth2.init({
          client_id: 'YOUR_CLIENT_ID.apps.googleusercontent.com',
          // Scopes to request in addition to 'profile' and 'email'
          scope: 'https://www.googleapis.com/auth/business.manage',
          immediate: true
        });
      });
    }
  </script>
</head>
<body>
  <!-- Add where you want your sign-in button to render -->
<!-- Use an image that follows the branding guidelines in a real app, more info here:
 https://developers.google.com/identity/branding-guidelines
-->
<h1>Business Profile Offline Access Demo</h1>

<p> This demo demonstrates the use of Google Identity Services and OAuth to gain authorization to call the Business Profile APIs on behalf of the user, even when the user is offline.

When a refresh token is acquired, store this token securely on your database. You will then be able to use this token to refresh the OAuth credentials and make offline API calls on behalf of the user.

The user may revoke access at any time from the <a href='https://myaccount.google.com/permissions'>Account Settings</a> page.
</p>

<button id="signinButton">Sign in with Google</button><br>
<input id="authorizationCode" type="text" placeholder="Authorization Code" style="width: 60%"><button id="accessTokenButton" disabled>Retrieve Access/Refresh Token</button><br>
 <input id="refreshToken" type="text" placeholder="Refresh Token, never expires unless revoked" style="width: 60%"><button id="refreshSubmit">Refresh Access Token</button><br>
 <input id="accessToken" type="text" placeholder="Access Token" style="width: 60%"><button id="gmbAccounts">Get Business Profile Accounts</button><br>
 <p>API Responses:</p>
<script>
    //Will be populated after sign in.
    var authCode;
  $('#signinButton').click(function() {
    // signInCallback
    auth2.grantOfflineAccess().then(signInCallback);
  });

  $('#accessTokenButton').click(function() {
    // signInCallback defined in step 6.
    retrieveAccessTokenAndRefreshToken(authCode);
  });

  $('#refreshSubmit').click(function() {
    // signInCallback defined in step 6.
    retrieveAccessTokenFromRefreshToken($('#refreshToken').val());
  });

   $('#gmbAccounts').click(function() {
    // signInCallback defined in step 6.
    retrieveGoogleMyBusinessAccounts($('#accessToken').val());
  });


function signInCallback(authResult) {
    //the 'code' field from the response, used to retrieve access token and bearer token
  if (authResult['code']) {
    // Hide the sign-in button now that the user is authorized, for example:
    $('#signinButton').attr('style', 'display: none');
    authCode = authResult['code'];

    $("#accessTokenButton").attr( "disabled", false );

    //Pretty print response
    var e = document.createElement("pre")
    e.innerHTML = JSON.stringify(authResult, undefined, 2);
    document.body.appendChild(e);

    //autofill authorization code input
    $('#authorizationCode').val(authResult['code'])


  } else {
    // There was an error.
  }
}

//WARNING: THIS FUNCTION IS DISPLAYED FOR DEMONSTRATION PURPOSES ONLY. YOUR CLIENT_SECRET SHOULD NEVER BE EXPOSED ON THE CLIENT SIDE!!!!
function retrieveAccessTokenAndRefreshToken(code) {
      $.post('https://www.googleapis.com/oauth2/v4/token',
      { //the headers passed in the request
        'code' : code,
        'client_id' : 'YOUR_CLIENT_ID.apps.googleusercontent.com',
        'client_secret' : 'YOUR_CLIENT_SECRET',
        'redirect_uri' : 'http://localhost:8000',
        'grant_type' : 'authorization_code'
      },
      function(returnedData) {
        console.log(returnedData);
        //pretty print JSON response
        var e = document.createElement("pre")
        e.innerHTML = JSON.stringify(returnedData, undefined, 2);
        document.body.appendChild(e);
        $('#refreshToken').val(returnedData['refresh_token'])
      });
}

//WARNING: THIS FUNCTION IS DISPLAYED FOR DEMONSTRATION PURPOSES ONLY. YOUR CLIENT_SECRET SHOULD NEVER BE EXPOSED ON THE CLIENT SIDE!!!!
function retrieveAccessTokenFromRefreshToken(refreshToken) {
    $.post('https://www.googleapis.com/oauth2/v4/token',
        { // the headers passed in the request
        'refresh_token' : refreshToken,
        'client_id' : 'YOUR_CLIENT_ID.apps.googleusercontent.com',
        'client_secret' : 'YOUR_CLIENT_SECRET',
        'redirect_uri' : 'http://localhost:8000',
        'grant_type' : 'refresh_token'
      },
      function(returnedData) {
        var e = document.createElement("pre")
        e.innerHTML = JSON.stringify(returnedData, undefined, 2);
        document.body.appendChild(e);
        $('#accessToken').val(returnedData['access_token'])
      });
}

function retrieveGoogleMyBusinessAccounts(accessToken) {
    $.ajax({
        type: 'GET',
        url: 'https://mybusinessaccountmanagement.googleapis.com/v1/accounts',
        headers: {
            'Authorization' : 'Bearer ' + accessToken
        },
        success: function(returnedData) {
            var e = document.createElement("pre")
            e.innerHTML = JSON.stringify(returnedData, undefined, 2);
            document.body.appendChild(e);
        }
    });
}
</script>
</body>
</html>
เข้าถึงได้ทางออนไลน์เท่านั้น
การเรียกจาก Business Profile API อาจดำเนินการโดยไม่มีการแคชโทเค็นรีเฟรชของผู้ใช้เพื่อให้ติดตั้งใช้งานได้ง่าย อย่างไรก็ตาม ผู้ใช้ต้องลงชื่อเข้าใช้เพื่อให้แพลตฟอร์มเรียก API ในฐานะผู้ใช้ได้
ข้อมูลโค้ดต่อไปนี้แสดงการใช้งานขั้นตอนการลงชื่อเข้าใช้ด้วย Google และวิธีเรียก API สำหรับผู้ใช้ที่เฉพาะเจาะจง หลังจากผู้ใช้ลงชื่อเข้าใช้ด้วยบัญชี Google และให้ความยินยอมแก่แอปพลิเคชันของคุณแล้ว ระบบจะมอบโทเค็นการเข้าถึง โทเค็นการเข้าถึงนี้จะระบุผู้ใช้และต้องส่งเป็นส่วนหัวในคำขอ Business Profile API
หากต้องการเรียกใช้โค้ดนี้ โปรดดูเรียกใช้ตัวอย่าง
<!-- The top of file index.html -->
<html lang="en">
  <head>
    <meta name="google-signin-scope" content="profile email https://www.googleapis.com/auth/business.manage">
    <meta name="google-signin-client_id" content="YOUR_CLIENT_ID.apps.googleusercontent.com">
    <script src="https://apis.google.com/js/platform.js" async defer></script>
  </head>
  <body>
    <div class="g-signin2" data-onsuccess="onSignIn" data-theme="dark"></div>
    <script>
      var gmb_api_version = 'https://mybusinessaccountmanagement.googleapis.com/v1';
      function onSignIn(googleUser) {
        // Useful data for your client-side scripts:
        var profile = googleUser.getBasicProfile();
        console.log('Full Name: ' + profile.getName());
        console.log("Email: " + profile.getEmail());
        var access_token = googleUser.getAuthResponse().access_token;

        //Using the sign in data to make a Business Profile APIs call
        var req = gmb_api_version + '/accounts';
        var xhr = new XMLHttpRequest();
        xhr.open('GET', req);
        xhr.setRequestHeader('Authorization', 'Bearer ' + access_token);

        //Displaying the API response
        xhr.onload = function () {
          document.body.appendChild(document.createTextNode(xhr.responseText));
        }
        xhr.send();
      }
    </script>
  </body>
</html>
เรียกใช้ตัวอย่าง
ทําตามขั้นตอนต่อไปนี้เพื่อเรียกใช้โค้ดตัวอย่างที่ระบุ
- บันทึกข้อมูลโค้ดลงในไฟล์ชื่อ
index.htmlตรวจสอบว่าคุณได้ตั้งค่ารหัสลูกค้าในไฟล์แล้ว เริ่มเว็บเซิร์ฟเวอร์ด้วยคำสั่งต่อไปนี้จากไดเรกทอรีที่ทำงานอยู่
Python 2.X
python -m SimpleHTTPServer 8000
Python 3.X
python -m http.server 8000
จากหน้าข้อมูลเข้าสู่ระบบในคอนโซล API ให้เลือกรหัสไคลเอ็นต์ที่ใช้
ป้อน URL ของเว็บไซต์ในช่องต้นทาง JavaScript ที่ได้รับอนุญาต หากต้องการเรียกใช้โค้ดตัวอย่างในคู่มือนี้ คุณต้องเพิ่ม
http://localhost:8000ด้วยโหลด URL ต่อไปนี้ในเบราว์เซอร์
http://localhost:8000/index.html