Page Summary
-
A webhook is a URL endpoint where the RBM platform sends messages and events via HTTPS POST requests.
-
Webhooks can be configured at either the partner level, applying to all agents, or at the agent level for individual agents with distinct behavior.
-
To configure an agent webhook, use the Business Communications Developer Console to set the URL and note the
clientTokenfor verifying incoming messages. -
You must verify incoming messages by comparing the
X-Goog-Signatureheader with a hash generated using the message body and yourclientToken. -
It is crucial to design your webhook to process RBM events asynchronously to handle high rates of notifications and avoid delivery failures, which trigger a backoff and retry mechanism that lasts up to 7 days.
A webhook is a partner-specified URL where the RBM platform posts messages and events. This URL acts as an endpoint that receives HTTPS POST requests containing data about the events. This means that data is sent to your application securely over HTTPS.
A webhook URL might look something like this:
https://[your company name].com/api/rbm-events.
Once you configure your webhook, you can start receiving messages and events.
Partner webhooks and agent webhooks
You can configure your webhook either at the partner level or at the agent level.
- Your partner webhook applies to every agent you maintain. If your agents have similar behavior, or if you only have one agent, use the partner webhook.
- Agent webhooks apply to individual agents. If you operate multiple agents with distinct behavior, you can set a different webhook for each agent.
If you've configured both a partner webhook and an agent webhook, the agent webhook takes precedence on its specific agent, while the partner webhook applies to any agents that don't have their own webhook.
Configure an agent webhook
You receive messages sent to your agent at your partner webhook. If you want messages for a specific agent to arrive at a different webhook instead, set an agent webhook.
- Open the Business Communications Developer Console and sign in with your RBM partner Google Account.
- Click your agent.
- Click Integrations.
- For Webhook, click Configure.
- For Webhook endpoint URL, enter your webhook URL beginning with "https://".
- Note your
clientTokenvalue. You need it to verify that messages you receive are coming from Google. Configure your webhook to accept a
POSTrequest with the specifiedclientTokenparameter and send a200 OKresponse with the plain text value of thesecretparameter as the response body.For example, if your webhook receives a
POSTrequest with the following body content{ "clientToken":"SJENCPGJESMGUFPY", "secret":"1234567890" }then your webhook should confirm the
clientTokenvalue and, ifclientTokenis correct, return a200 OKresponse with1234567890as the response body:// clientToken from Configure const myClientToken = "SJENCPGJESMGUFPY"; // Example endpoint app.post("/rbm-webhook", (req, res) => { const msg = req.body; if (msg.clientToken === myClientToken) { res.status(200).send(msg.secret); return; } res.send(400); });In the Developer Console, click Verify. When RBM verifies your webhook, the dialog closes.
Verify incoming messages
Because webhooks can receive messages from any senders, you should verify that Google sent incoming messages before processing message content.
To verify that Google sent a message you received, follow these steps:
- Extract the message's
X-Goog-Signatureheader. This is a hashed, base64-encoded copy of the message body payload. - Base-64-decode the RBM payload in the
message.bodyelement of the request. - Using your webhook's client token (which you specified when you set up your webhook) as a key, create a SHA512 HMAC of the bytes of the base-64 decoded message payload and base64-encode the result.
- Compare the
X-Goog-Signaturehash with the hash you created.- If the hashes match, you've confirmed that Google sent the message.
If the hashes don't match, check your hashing process on a known-good message.
If your hashing process is working correctly and you receive a message that you believe was fraudulently sent to you, contact us.
Node.js
  if ((requestBody.hasOwnProperty('message')) && (requestBody.message.hasOwnProperty('data'))) {
    // Validate the received hash to ensure the message came from Google RBM
    let userEventString = Buffer.from(requestBody.message.data, 'base64');
    let hmac = crypto.createHmac('sha512', CLIENT_TOKEN);
    let data = hmac.update(userEventString);
    let genHash = data.digest('base64');
    let headerHash = req.header('X-Goog-Signature');

    if (headerHash === genHash) {
      let userEvent = JSON.parse(userEventString);

      console.log('userEventString: ' + userEventString);
      handleMessage(userEvent);
    } else {
      console.log('hash mismatch - ignoring message');
    }
  }

  res.sendStatus(200);
Message handling
Returning anything other than 200 OK from a webhook is considered a delivery
failure.
Developers must be mindful that sending messages at high rates will
generate webhook notifications at high rates and must design their code to
handle notifications at the expected rate. It is important for developers to
consider situations that may cause failure responses - including 500 responses
from their web container, timeouts, or upstream failures. Things to consider
include:
- Verify that your DDoS protections are configured to handle the expected rate of webhook notifications.
- Confirm that resources such as database connection pools don't run out and
produce timeouts or
500responses.
Developers should design their systems so the processing of RBM events occurs
asynchronously and doesn't prevent the webhook from returning 200 OK.
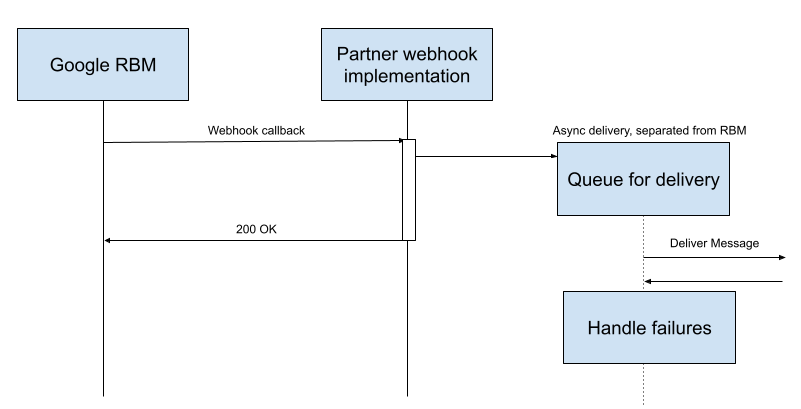
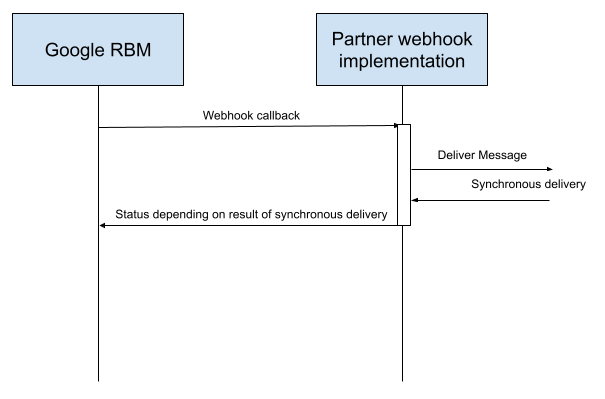
It is important to not process the RBM event within the webhook itself. Any error or delay during processing may impact the webhook return code:
Behavior on delivery failure
RBM uses a backoff and retry mechanism when it receives a response other than
200 OK from a webhook call. RBM will increase the time it waits between
retries up to a maximum of 600 seconds. Retries will continue for 7 days,
after which the message will be dropped.
Implications of agent-level webhooks
RBM queues messages for a partner on one queue. Where a partner is using agent-level webhooks, it is important to bear in mind that the failure of one webhook will impact delivery to other webhooks. Webhooks belonging to other agents will be called during the backoff period of a failed message. However, as failed messages queue up for retry, overall delivery rates will fall and other agents will be impacted.
It is important that developers understand this model and code accordingly - as far as possible, accepting messages and queueing them for processing to minimize the opportunity of returning a failure.
Next steps
Once you configure your webhook, your agent can receive messages from your test devices. Send a message to validate your setup.