
확장 프로그램은 블록이 생성될 때 지정된 유형의 각 블록에서 실행되는 함수입니다. 이는 보통 블록에 맞춤 구성 또는 동작을 추가합니다.
뮤테이터는 커스텀 직렬화와 때로는 UI를 블록에 추가하는 특별한 종류의 확장 프로그램입니다.
확장 프로그램
확장 프로그램은 블록이 생성될 때 지정된 유형의 각 블록에서 실행되는 함수입니다. 맞춤 구성 (예: 블록의 도움말 설정) 또는 맞춤 동작 (예: 블록에 이벤트 리스너 추가)을 추가할 수 있습니다.
// This extension sets the block's tooltip to be a function which displays
// the parent block's tooltip (if it exists).
Blockly.Extensions.register(
    'parent_tooltip_extension',
    function() { // this refers to the block that the extension is being run on
      var thisBlock = this;
      this.setTooltip(function() {
        var parent = thisBlock.getParent();
        return (parent && parent.getInputsInline() && parent.tooltip) ||
            Blockly.Msg.MATH_NUMBER_TOOLTIP;
      });
    });
확장 프로그램을 문자열 키와 연결할 수 있도록 확장 프로그램을 '등록'해야 합니다. 그런 다음 이 문자열 키를 블록 유형 JSON 정의의 extensions 속성에 할당하여 확장 프로그램을 블록에 적용할 수 있습니다.
{
 //...,
 "extensions": ["parent_tooltip_extension",]
}
한 번에 여러 개의 광고 확장을 추가할 수도 있습니다. 확장 프로그램을 하나만 적용하는 경우에도 extensions 속성은 배열이어야 합니다.
{
  //...,
  "extensions": ["parent_tooltip_extension", "break_warning_extension"],
}
믹스
Blockly는 일부 속성/도우미 함수를 블록에 추가하되 즉시 실행하지는 않으려는 경우에 편의 메서드도 제공합니다. 이렇게 하려면 모든 추가 속성/메서드가 포함된 mixin 객체를 등록할 수 있습니다. 그러면 믹스인 객체가 특정 블록 유형의 인스턴스가 생성될 때마다 믹스인을 적용하는 함수로 래핑됩니다.
Blockly.Extensions.registerMixin('my_mixin', {
  someProperty: 'a cool value',

  someMethod: function() {
    // Do something cool!
  }
))`
믹스인과 연결된 문자열 키는 다른 확장 프로그램과 마찬가지로 JSON에서 참조할 수 있습니다.
{
 //...,
 "extensions": ["my_mixin"],
}
변형자
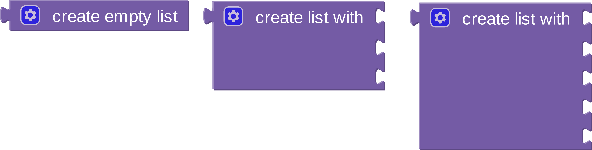
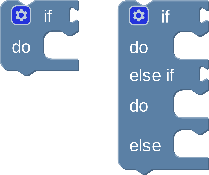
뮤테이터는 블록에 추가 직렬화 (저장 및 로드되는 추가 상태)를 추가하는 특수한 유형의 확장 프로그램입니다. 예를 들어 내장된 controls_if 및 list_create_with 블록은 입력 수를 저장할 수 있도록 추가 직렬화가 필요합니다.
블록의 모양을 변경한다고 해서 추가 직렬화가 필요한 것은 아닙니다. 예를 들어 math_number_property 블록은 형태를 변경하지만 값이 이미 직렬화된 드롭다운 필드를 기반으로 합니다. 따라서 필드 검사기만 사용할 수 있으며 뮤테이터는 필요하지 않습니다.


뮤테이터가 필요한 경우와 그렇지 않은 경우에 대한 자세한 내용은 직렬화 페이지를 참조하세요.
또한 변형자는 선택적 메서드를 제공하는 경우 사용자가 블록의 모양을 변경할 수 있는 내장 UI를 제공합니다.
직렬화 후크
변형에는 함께 작동하는 직렬화 후크 두 쌍이 있습니다. 한 쌍의 후크는 새로운 JSON 직렬화 시스템에서 작동하며, 다른 쌍은 이전 XML 직렬화 시스템에서 작동합니다. 이 쌍을 하나 이상 제공해야 합니다.
saveExtraState 및 loadExtraState
saveExtraState 및 loadExtraState는 새로운 JSON 직렬화 시스템에서 작동하는 직렬화 후크입니다. saveExtraState은 블록의 추가 상태를 나타내는 JSON 직렬화 가능 값을 반환하고 loadExtraState는 동일한 JSON 직렬화 가능 값을 받아 블록에 적용합니다.
// These are the serialization hooks for the lists_create_with block.
saveExtraState: function() {
  return {
    'itemCount': this.itemCount_,
  };
},

loadExtraState: function(state) {
  this.itemCount_ = state['itemCount'];
  // This is a helper function which adds or removes inputs from the block.
  this.updateShape_();
},
결과 JSON은 다음과 같습니다.
{
  "type": "lists_create_with",
  "extraState": {
    "itemCount": 3 // or whatever the count is
  }
}
상태 없음
블록이 직렬화될 때 기본 상태이면 saveExtraState 메서드가 null를 반환하여 이를 나타낼 수 있습니다. saveExtraState 메서드가 null를 반환하면 extraState 속성이 JSON에 추가되지 않습니다. 이렇게 하면 저장 파일 크기가 작게 유지됩니다.
전체 직렬화 및 지원 데이터
saveExtraState는 선택적 doFullSerialization 매개변수도 수신합니다. 이는 다른 직렬 변환기로 직렬화된 상태를 참조하는 블록 (예: 지원 데이터 모델)에 사용됩니다. 매개변수는 블록이 역직렬화될 때 참조된 상태를 사용할 수 없다는 신호를 보내므로 블록은 모든 지원 상태 자체를 직렬화해야 합니다. 예를 들어 개별 블록이 직렬화되거나 블록을 복사하여 붙여넣기할 때 true입니다.
이러한 연결의 일반적인 두 가지 사용 사례는 다음과 같습니다.
- 개별 블록이 지원 데이터 모델이 없는 작업공간에 로드되면 새 데이터 모델을 만들기에 충분한 자체 상태의 정보를 갖게 됩니다.
- 블록을 복사하여 붙여넣기하면 블록은 항상 기존 지원 데이터 모델을 참조하는 대신 새로운 지원 데이터 모델을 만듭니다.
이를 사용하는 일부 블록이 @blockly/block-shareable-procedures 블록입니다. 일반적으로 상태를 저장하는 지원 데이터 모델에 대한 참조를 직렬화합니다.
그러나 doFullSerialization 매개변수가 true이면 모든 상태를 직렬화합니다. 공유 가능한 절차 블록은 이를 사용하여 복사하여 붙여넣을 때 기존 모델을 참조하는 대신 새 지원 데이터 모델을 만들도록 합니다.
mutToDom 및 domToMutation
mutationToDom 및 domToMutation는 이전 XML 직렬화 시스템에서 작동하는 직렬화 후크입니다. 이러한 후크는 필요한 경우에만 사용하고 (예: 아직 이전하지 않은 이전 코드베이스를 작업 중인 경우), 그 외의 경우에는 saveExtraState 및 loadExtraState를 사용하세요.
mutationToDom는 블록의 추가 상태를 나타내는 XML 노드를 반환하고 domToMutation는 동일한 XML 노드를 받아 블록에 상태를 적용합니다.
// These are the old XML serialization hooks for the lists_create_with block.
mutationToDom: function() {
  // You *must* create a <mutation></mutation> element.
  // This element can have children.
  var container = Blockly.utils.xml.createElement('mutation');
  container.setAttribute('items', this.itemCount_);
  return container;
},

domToMutation: function(xmlElement) {
  this.itemCount_ = parseInt(xmlElement.getAttribute('items'), 10);
  // This is a helper function which adds or removes inputs from the block.
  this.updateShape_();
},
결과 XML은 다음과 같습니다.
<block type="lists_create_with">
  <mutation items="3"></mutation>
</block>
mutationToDom 함수가 null을 반환하면 XML에 어떠한 추가 요소도 추가되지 않습니다.
UI 후크
뮤테이터의 일부로 특정 함수를 제공하면 Blockly가 기본 '뮤테이터' UI를 블록에 추가합니다.

추가 직렬화를 추가하려는 경우 이 UI를 사용할 필요가 없습니다. blocks-plus-minus 플러그인에서 제공하는 것과 같은 맞춤 UI를 사용할 수도 있고 UI를 전혀 사용하지 않을 수도 있습니다.
구성 및 분해
기본 UI는 compose 및 decompose 함수를 사용합니다.
decompose는 블록을 이리저리 이동, 추가, 삭제할 수 있는 더 작은 하위 블록으로 '분해'합니다. 이 함수는 하위 블록이 연결되는 뮤테이터 작업공간의 기본 블록인 '상단 블록'을 반환해야 합니다.
그러면 compose가 하위 블록의 구성을 해석하고 이를 사용하여 기본 블록을 수정합니다. 이 함수는 decompose에서 매개변수로 반환한 '상단 블록'을 허용해야 합니다.
이러한 함수는 '변경'되는 블록에 '혼합'되므로 this를 사용하여 해당 블록을 참조할 수 있습니다.
// These are the decompose and compose functions for the lists_create_with block.
decompose: function(workspace) {
  // This is a special sub-block that only gets created in the mutator UI.
  // It acts as our "top block"
  var topBlock = workspace.newBlock('lists_create_with_container');
  topBlock.initSvg();

  // Then we add one sub-block for each item in the list.
  var connection = topBlock.getInput('STACK').connection;
  for (var i = 0; i < this.itemCount_; i++) {
    var itemBlock = workspace.newBlock('lists_create_with_item');
    itemBlock.initSvg();
    connection.connect(itemBlock.previousConnection);
    connection = itemBlock.nextConnection;
  }

  // And finally we have to return the top-block.
  return topBlock;
},

// The container block is the top-block returned by decompose.
compose: function(topBlock) {
  // First we get the first sub-block (which represents an input on our main block).
  var itemBlock = topBlock.getInputTargetBlock('STACK');

  // Then we collect up all of the connections of on our main block that are
  // referenced by our sub-blocks.
  // This relates to the saveConnections hook (explained below).
  var connections = [];
  while (itemBlock && !itemBlock.isInsertionMarker()) {  // Ignore insertion markers!
    connections.push(itemBlock.valueConnection_);
    itemBlock = itemBlock.nextConnection &&
        itemBlock.nextConnection.targetBlock();
  }

  // Then we disconnect any children where the sub-block associated with that
  // child has been deleted/removed from the stack.
  for (var i = 0; i < this.itemCount_; i++) {
    var connection = this.getInput('ADD' + i).connection.targetConnection;
    if (connection && connections.indexOf(connection) == -1) {
      connection.disconnect();
    }
  }

  // Then we update the shape of our block (removing or adding iputs as necessary).
  // `this` refers to the main block.
  this.itemCount_ = connections.length;
  this.updateShape_();

  // And finally we reconnect any child blocks.
  for (var i = 0; i < this.itemCount_; i++) {
    connections[i].reconnect(this, 'ADD' + i);
  }
},
saveConnections
선택적으로 기본 UI에서 작동하는 saveConnections 함수를 정의할 수도 있습니다. 이 함수를 통해 기본 블록의 하위 요소 (기본 작업공간에 있음)를 뮤테이터 작업공간에 있는 하위 블록과 연결할 수 있습니다. 그런 다음 이 데이터를 사용하여 하위 블록이 재구성될 때 compose 함수가 기본 블록의 하위 요소를 올바르게 다시 연결하는지 확인할 수 있습니다.
saveConnections는 decompose 함수에서 반환된 '상단 블록'을 매개변수로 허용해야 합니다. saveConnections 함수가 정의된 경우 Blockly는 compose를 호출하기 전에 이 함수를 호출합니다.
saveConnections: function(topBlock) {
  // First we get the first sub-block (which represents an input on our main block).
  var itemBlock = topBlock.getInputTargetBlock('STACK');

  // Then we go through and assign references to connections on our main block
  // (input.connection.targetConnection) to properties on our sub blocks
  // (itemBlock.valueConnection_).
  var i = 0;
  while (itemBlock) {
    // `this` refers to the main block (which is being "mutated").
    var input = this.getInput('ADD' + i);
    // This is the important line of this function!
    itemBlock.valueConnection_ = input && input.connection.targetConnection;
    i++;
    itemBlock = itemBlock.nextConnection &&
        itemBlock.nextConnection.targetBlock();
  }
},
등록 중
변형은 특별한 종류의 확장 프로그램이므로 블록 유형의 JSON 정의에서 사용하려면 먼저 등록해야 합니다.
// Function signature.
Blockly.Extensions.registerMutator(name, mixinObj, opt_helperFn, opt_blockList);

// Example call.
Blockly.Extensions.registerMutator(
    'controls_if_mutator',
    { /* mutator methods */ },
    undefined,
    ['controls_if_elseif', 'controls_if_else']);
name: JSON에서 사용할 수 있도록 뮤테이터와 연결할 문자열입니다.mixinObj: 다양한 변형 메서드가 포함된 객체입니다. 예:saveExtraState및loadExtraStateopt_helperFn: 믹스인이 혼합된 후 블록에서 실행되는 도우미 함수입니다(선택사항).opt_blockList: UI 메서드도 정의된 경우 기본 뮤테이터 UI의 플라이아웃에 추가될 블록 유형의 배열 (선택사항)입니다.
확장 프로그램과 달리 각 블록 유형에는 하나의 뮤테이터만 있을 수 있습니다.
{
  //...
  "mutator": "controls_if_mutator"
}
도우미 함수
믹스인과 함께 뮤테이터는 도우미 함수를 등록할 수 있습니다. 이 함수는 함수가 생성되고 mixinObj가 추가된 후 지정된 유형의 각 블록에서 실행됩니다. 변형에 트리거나 효과를 추가하는 데 사용할 수 있습니다.
예를 들어 항목의 초기 수를 설정하는 목록 형태의 블록에 도우미를 추가할 수 있습니다.
var helper = function() {
  this.itemCount_ = 5;
  this.updateShape();
}