
คู่มือนี้อธิบายวิธีที่ฝ่ายที่เชื่อถือโดยตรง (RP) ซึ่งได้แก่ ผู้ขายแต่ละราย ธุรกิจ และนักพัฒนาแอป ผสานรวม Digital Credentials API เพื่อขอและตรวจสอบข้อมูลเข้าสู่ระบบข้อมูลประจำตัวดิจิทัลในแอป Android และเว็บ
เลือกเส้นทาง RP, ผู้รับจดทะเบียนผู้ตรวจสอบ หรือแบบเข้าร่วมด้วยตนเอง
วิธีการทำงานของการผสานรวมกับฝ่ายที่เกี่ยวข้อง
การผสานรวมของฝ่ายที่เกี่ยวข้องแต่ละรายการจะทำตาม 4 ขั้นตอน ขั้นตอน A และ C จะทำงานบนเซิร์ฟเวอร์ของคุณ ส่วนขั้นตอน B จะทำงานในแอป Android หรือเบราว์เซอร์ เลือกขั้นตอนใดก็ได้เพื่อข้ามไปยังรายละเอียดการติดตั้งใช้งาน
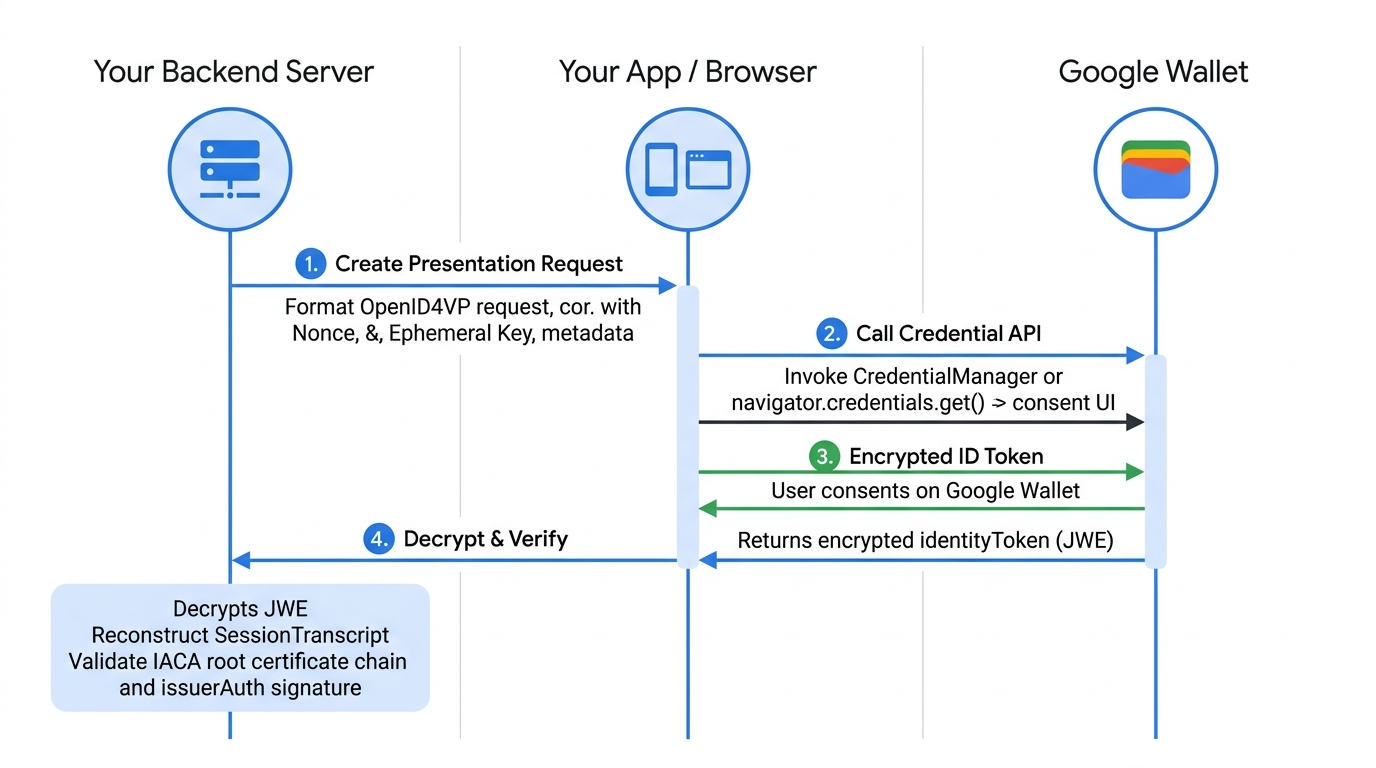
รูปแบบ ข้อมูลเข้าสู่ระบบ และความสามารถที่รองรับ
Google Wallet รองรับบัตรประจำตัวดิจิทัลที่ใช้ ISO mdoc ผ่าน OpenID4VP (เวอร์ชัน 1.0) ใน Android 9 (ระดับ API 28) ขึ้นไปและในเบราว์เซอร์ที่รองรับ
ข้อมูลเข้าสู่ระบบและแอตทริบิวต์ที่รองรับ
ค้นหาตัวระบุ doctype_value (ใบขับขี่ดิจิทัล, ID พาส, บัตรประจำตัวที่มีรูปถ่าย) และเส้นทางการอ้างสิทธิ์แอตทริบิวต์ที่คุณขอจาก Google Wallet ได้
ผู้ออกบัตรและใบรับรอง IACA ที่รองรับ
ดาวน์โหลดใบรับรองรูท IACA อย่างเป็นทางการสำหรับรัฐต่างๆ ของสหรัฐอเมริกา ผู้ออกใบรับรองระหว่างประเทศ และผู้ออกใบรับรอง Sandbox Utopia เพื่อตรวจสอบ issuerAuth
ขั้นตอน ก: จัดรูปแบบและลงชื่อในคำขอ (ฝั่งเซิร์ฟเวอร์)
หากต้องการขอข้อมูลเข้าสู่ระบบจาก Wallet ใดก็ตาม คุณต้องจัดรูปแบบคำขอโดยใช้ OpenID4VP บนเซิร์ฟเวอร์ คุณสามารถขอข้อมูลเข้าสู่ระบบที่เฉพาะเจาะจงหรือข้อมูลเข้าสู่ระบบหลายรายการในออบเจ็กต์ dcql_query รายการเดียวได้
ตัวอย่างคำขอ JSON
ต่อไปนี้คือตัวอย่างคำขอ mdoc requestJson เพื่อรับข้อมูลเข้าสู่ระบบข้อมูลประจำตัวจากกระเป๋าเงินในอุปกรณ์ Android หรือเว็บ
{
      "requests" : [
        {
          "protocol": "openid4vp-v1-signed",
          "data": {<signed_credential_request>} // This is an object, shouldn't be a string.
        }
      ]
}
ขอการเข้ารหัส
client_metadata มีคีย์สาธารณะสำหรับการเข้ารหัสสำหรับคำขอแต่ละรายการ
คุณจะต้องจัดเก็บคีย์ส่วนตัวสำหรับคำขอแต่ละรายการและใช้คีย์เหล่านั้นเพื่อตรวจสอบสิทธิ์และให้สิทธิ์โทเค็นที่คุณได้รับจากแอป Wallet
ข้อมูลเมตา OpenID4VP แบบผสานรวม
เมื่อจัดรูปแบบคำขอข้อมูลเข้าสู่ระบบ คุณต้องใส่ช่อง gw_rp_metadata_bytes ไว้ในออบเจ็กต์ client_metadata (ดังที่แสดงในโค้ดคำขอตัวอย่างด้านล่าง) ช่องนี้มีข้อมูลเมตาของฝ่ายที่เชื่อถือซึ่งเข้ารหัส Base64URL ที่ Google Wallet ต้องใช้เพื่อยืนยันตัวตนของคุณและแสดงการสร้างแบรนด์ต่อผู้ใช้
เพย์โหลดคำขอข้อมูลเข้าสู่ระบบ
พารามิเตอร์ credential_request ใน requestJson มีช่องต่อไปนี้
ข้อมูลเข้าสู่ระบบที่เฉพาะเจาะจง
{
  "response_type": "vp_token",
  "response_mode": "dc_api.jwt", // change this to dc_api if you want to demo with a non encrypted response.
  "nonce": "1234",
  "dcql_query": {
    "credentials": [
      {
        "id": "cred1",
        "format": "mso_mdoc",
        "meta": {
          // Use org.iso.18013.5.1.mDL for mDL,
          // com.google.wallet.idcard.1 for ID pass, or
          // org.iso.23220.photoid.1 for ID pass (using photo ID document type)
          "doctype_value": "org.iso.18013.5.1.mDL"
        },
        "claims": [
          {
            "path": [
              "org.iso.18013.5.1",
              "family_name"
            ],
            "intent_to_retain": false // set this to true if you are saving the value of the field
          },
          {
            "path": [
              "org.iso.18013.5.1",
              "given_name"
            ],
            "intent_to_retain": false
          },
          {
            "path": [
              "org.iso.18013.5.1",
              "age_over_18"
            ],
            "intent_to_retain": false
          }
        ]
      }
    ]
  },
  "client_metadata": {
    "jwks": {
      "keys": [ // sample request encryption key
        {
          "kty": "EC",
          "crv": "P-256",
          "x": "pDe667JupOe9pXc8xQyf_H03jsQu24r5qXI25x_n1Zs",
          "y": "w-g0OrRBN7WFLX3zsngfCWD3zfor5-NLHxJPmzsSvqQ",
          "use": "enc",
          "kid" : "1",  // This is required
          "alg" : "ECDH-ES",  // This is required
        }
      ]
    },
    "vp_formats_supported": {
      "mso_mdoc": {
        "deviceauth_alg_values": [
          -7
        ],
        "issuerauth_alg_values": [
          -7
        ]
      }
    },
    "gw_rp_metadata_bytes": "<base64url encoded metadata string>"
  }
}
ข้อมูลเข้าสู่ระบบที่มีสิทธิ์ทั้งหมด
ต่อไปนี้คือตัวอย่างคำขอสำหรับใบขับขี่ดิจิทัล ID พาส และ ID พาส (โดยใช้ประเภทเอกสารบัตรประจำตัวที่มีรูปถ่าย) ผู้ใช้จะดำเนินการต่อด้วยวิธีใดก็ได้
{
  "response_type": "vp_token",
  "response_mode": "dc_api.jwt", // change this to dc_api if you want to demo with a non encrypted response.
  "nonce": "1234",
  "dcql_query": {
    "credentials": [
      {
        "id": "mdl-request",
        "format": "mso_mdoc",
        "meta": {
          "doctype_value": "org.iso.18013.5.1.mDL"
        },
        "claims": [
          {
            "path": [
              "org.iso.18013.5.1",
              "family_name"
            ],
            "intent_to_retain": false // set this to true if you are saving the value of the field
          },
          {
            "path": [
              "org.iso.18013.5.1",
              "given_name"
            ],
            "intent_to_retain": false
          },
          {
            "path": [
              "org.iso.18013.5.1",
              "age_over_18"
            ],
            "intent_to_retain": false
          }
        ]
      },
      {  // Credential type 2: ID pass
        "id": "id_pass-request",
        "format": "mso_mdoc",
        "meta": {
          "doctype_value": "com.google.wallet.idcard.1"
        },
        "claims": [
          {
            "path": [
              "org.iso.18013.5.1",
              "family_name"
            ],
            "intent_to_retain": false // set this to true if you are saving the value of the field
          },
          {
            "path": [
              "org.iso.18013.5.1",
              "given_name"
            ],
            "intent_to_retain": false
          },
          {
            "path": [
              "org.iso.18013.5.1",
              "age_over_18"
            ],
            "intent_to_retain": false
          }
        ]
      },
      {  // Credential type 3: ID pass (using photo ID document type)
        "id": "photo_id-request",
        "format": "mso_mdoc",
        "meta": {
          "doctype_value": "org.iso.23220.photoid.1"
        },
        "claims": [
          {
            "path": [
              "org.iso.23220.1",
              "family_name"
            ],
            "intent_to_retain": false // set this to true if you are saving the value of the field
          },
          {
            "path": [
              "org.iso.23220.1",
              "given_name"
            ],
            "intent_to_retain": false
          },
          {
            "path": [
              "org.iso.23220.1",
              "age_over_18"
            ],
            "intent_to_retain": false
          }
        ]
      }
    ]
    credential_sets : [
      {
        "options": [
          [ "mdl-request" ],
          [ "id_pass-request" ],
          [ "photo_id-request" ]
        ]
      }
    ]
  },
  "client_metadata": {
    "jwks": {
      "keys": [ // sample request encryption key
        {
          "kty": "EC",
          "crv": "P-256",
          "x": "pDe667JupOe9pXc8xQyf_H03jsQu24r5qXI25x_n1Zs",
          "y": "w-g0OrRBN7WFLX3zsngfCWD3zfor5-NLHxJPmzsSvqQ",
          "use": "enc",
          "kid" : "1",  // This is required
          "alg" : "ECDH-ES",  // This is required
        }
      ]
    },
    "vp_formats_supported": {
      "mso_mdoc": {
        "deviceauth_alg_values": [
          -7
        ],
        "issuerauth_alg_values": [
          -7
        ]
      }
    },
    "gw_rp_metadata_bytes": "<base64url encoded metadata string>"
  }
}
คุณสามารถขอแอตทริบิวต์ที่รองรับจำนวนเท่าใดก็ได้จากเอกสารรับรองตัวตนที่จัดเก็บไว้ใน Google Wallet
คำขอที่ลงนามแล้ว
คำขอที่ลงนาม (คำขอการให้สิทธิ์ที่ปลอดภัยด้วย JWT) จะรวมคำขอการนำเสนอที่ตรวจสอบได้ไว้ใน JSON Web Token (JWT) ที่ลงนามด้วยการเข้ารหัสโดยใช้โครงสร้างพื้นฐาน PKI เพื่อให้มั่นใจถึงความสมบูรณ์ของคำขอและพิสูจน์ตัวตนของคุณต่อ Google Wallet
ข้อกำหนดเบื้องต้น
ก่อนใช้การเปลี่ยนแปลงโค้ดสำหรับคำขอที่ลงชื่อแล้ว โปรดตรวจสอบว่าคุณได้ดำเนินการต่อไปนี้แล้ว
- คีย์ส่วนตัว: คุณต้องมีคีย์ส่วนตัว (เช่น Elliptic Curve
ES256) เพื่อลงนามในคำขอ ซึ่งจัดการบนเซิร์ฟเวอร์ของคุณ สำหรับการทดสอบแซนด์บ็อกซ์ในฐานะฝ่ายที่เชื่อถือ ให้ใช้คีย์ส่วนตัวสำหรับการทดสอบแซนด์บ็อกซ์ - ใบรับรอง: คุณต้องมีใบรับรอง X.509 มาตรฐานที่ได้มาจากคู่คีย์
- การลงทะเบียน: ตรวจสอบว่า Google Wallet เชื่อถือใบรับรองสาธารณะ (หรือ CA รูทสำหรับผู้รับจดทะเบียนผู้ตรวจสอบ) ของคุณ
ตรรกะการสร้างคำขอ
เมื่อสร้างและลงนามคำขอ OpenID4VP โปรดให้ความสำคัญกับรูปแบบการเข้ารหัสที่แน่นอนซึ่งคาดไว้สำหรับแต่ละช่อง การผสม base64 และ base64url หรือการเติม (=) จะทำให้การตรวจสอบลายเซ็นหรือต้นทางไม่สำเร็จ
| ช่อง | การเข้ารหัส / รูปแบบที่จำเป็น | อักขระและระยะห่างจากขอบ |
|---|---|---|
client_id (x509_hash:<hash>) |
base64url ที่ไม่มีระยะห่างจากขอบ | ใช้อักขระที่ปลอดภัยสำหรับ URL (-, _) และตัด = ต่อท้ายออก |
expected_origins (android:apk-key-hash:<hash>) |
Base64 มาตรฐานที่ไม่มีการเติม | ใช้อักขระมาตรฐาน (+, /) และตัด = ต่อท้ายออก |
expected_origins (https://...) |
URL ตัวพิมพ์เล็กที่ไม่มีเครื่องหมายทับปิดท้าย | ตัวอย่าง: https://example.com (ไม่มี / ต่อท้าย) |
ส่วนหัว JWS x5c รายการ |
Base64 มาตรฐานที่มีระยะห่างจากขอบ | ใช้อักขระมาตรฐาน (+, /) และคงการเติม = ต่อท้ายไว้ |
หากต้องการสร้างคำขอ ให้ใช้คีย์ส่วนตัวและรวมเพย์โหลดไว้ใน JWS ดังนี้
def construct_openid4vp_request(
    doctypes: list[str],
    requested_fields: list[dict],
    nonce_base64: str,
    jwe_encryption_public_jwk: jwk.JWK,
    is_zkp_request: bool,
    is_signed_request: bool,
    state: dict,
    origin: str
) -> dict:

    # ... [Existing logic to build 'presentation_definition' and basic 'request_payload'] ...

    # ------------------------------------------------------------------
    # SIGNED REQUEST IMPLEMENTATION (JAR)
    # ------------------------------------------------------------------
    if is_signed_request:
        try:
            # 1. Load the Verifier's Certificate
            # We must load the PEM string into a cryptography x509 object
            verifier_cert_obj = x509.load_pem_x509_certificate(
                CERTIFICATE.encode('utf-8'),
                backend=default_backend()
            )

            # 2. Calculate Client ID (x509_hash)
            # We calculate the SHA-256 hash of the DER-encoded certificate.
            cert_der = verifier_cert_obj.public_bytes(serialization.Encoding.DER)
            verifier_fingerprint_bytes = hashlib.sha256(cert_der).digest()

            # Important: Use URL-safe Base64 (base64url: '-', '_') without padding ('=') for client_id
            verifier_fingerprint_b64 = base64.urlsafe_b64encode(verifier_fingerprint_bytes).decode('utf-8').rstrip("=")

            # Format the client_id as required by the spec
            client_id = f'x509_hash:{verifier_fingerprint_b64}'

            # 3. Update Request Payload with JAR specific fields
            request_payload["client_id"] = client_id

            # Explicitly set expected origins to prevent relay attacks
            # Important: Use standard Base64 (not URL-safe) without padding for android:apk-key-hash:
            # origin = f"android:apk-key-hash:{base64.b64encode(apk_cert_hash).decode('utf-8').rstrip('=')}"
            # Format for web origin (lowercase URL without trailing slash): origin = "https://example.com"
            if origin:
                request_payload["expected_origins"] = [origin]

            # 4. Create Signed JWT (JWS)
            # Load the signing private key
            signing_key = jwk.JWK.from_pem(PRIVATE_KEY.encode('utf-8'))

            # Initialize JWS with the JSON payload
            jws_token = jws.JWS(json.dumps(request_payload).encode('utf-8'))

            # Construct the JOSE Header
            # 'x5c' (X.509 Certificate Chain) is critical: it allows the wallet
            # to validate your key against the one registered in the console.
            # Important: Use standard Base64 ('+', '/') WITH padding ('=') for x5c
            x5c_value = base64.b64encode(cert_der).decode('utf-8')

            protected_header = {
                "alg": "ES256",                 # Algorithm (e.g., ES256 or RS256)
                "typ": "oauth-authz-req+jwt",   # Standard type for JAR
                "kid": "1",                     # Key ID
                "x5c": [x5c_value]              # Embed the certificate
            }

            # Sign the token
            jws_token.add_signature(
                key=signing_key,
                alg=None,
                protected=json_encode(protected_header)
            )

            # 5. Return the Request Object
            # Instead of returning the raw JSON, we return the signed JWT string
            # under the 'request' key.
            return {"request": jws_token.serialize(compact=True)}

        except Exception as e:
            print(f"Error signing OpenID4VP request: {e}")
            return None

    # ... [Fallback for unsigned requests] ...
    return request_payload
ขั้นตอน ข: ทริกเกอร์ API (ฝั่งไคลเอ็นต์)
ควรสร้างคำขอ API ทั้งหมดฝั่งเซิร์ฟเวอร์ ส่ง JSON ที่สร้างขึ้นไปยัง API ของแพลตฟอร์ม โดยขึ้นอยู่กับแพลตฟอร์ม
ในแอป (Android)
หากต้องการขอข้อมูลเข้าสู่ระบบเพื่อยืนยันตัวตนจากแอป Android ให้ทำตามขั้นตอนต่อไปนี้
อัปเดตทรัพยากร Dependency
ใน build.gradle ของโปรเจ็กต์ ให้อัปเดตทรัพยากร Dependency เพื่อใช้ Credential Manager (เบต้า) ดังนี้
dependencies {
    implementation("androidx.credentials:credentials:1.5.0-beta01")
    implementation("androidx.credentials:credentials-play-services-auth:1.5.0-beta01")
}
กำหนดค่า Credential Manager
หากต้องการกำหนดค่าและเริ่มต้นออบเจ็กต์ CredentialManager ให้เพิ่มตรรกะที่คล้ายกับต่อไปนี้
// Use your app or activity context to instantiate a client instance of CredentialManager.
val credentialManager = CredentialManager.create(context)
แอตทริบิวต์ข้อมูลประจำตัวของคำขอ
แทนที่จะระบุพารามิเตอร์แต่ละรายการสำหรับคำขอข้อมูลประจำตัว แอปจะระบุพารามิเตอร์ทั้งหมดรวมกันเป็นสตริง JSON ภายใน CredentialOption
Credential Manager จะส่งสตริง JSON นี้ไปยังกระเป๋าเงินดิจิทัลที่พร้อมใช้งานโดยไม่ตรวจสอบเนื้อหา จากนั้น Wallet แต่ละรายการจะมีหน้าที่รับผิดชอบดังนี้
- แยกวิเคราะห์สตริง JSON เพื่อทำความเข้าใจคำขอข้อมูลประจำตัว
- พิจารณาว่าข้อมูลเข้าสู่ระบบที่จัดเก็บไว้ (หากมี) ตรงกับคำขอหรือไม่
เราขอแนะนำให้พาร์ทเนอร์สร้างคำขอในเซิร์ฟเวอร์แม้จะเป็นการผสานรวมแอป Android ก็ตาม
คุณจะใช้ requestJson จากจัดรูปแบบและลงชื่อในคำขอเป็น request ในการเรียกใช้ฟังก์ชัน GetDigitalCredentialOption()
// The request in the JSON format to conform with
// the JSON-ified Digital Credentials API request definition.
val requestJson = generateRequestFromServer()
val digitalCredentialOption =
    GetDigitalCredentialOption(requestJson = requestJson)

// Use the option from the previous step to build the `GetCredentialRequest`.
val getCredRequest = GetCredentialRequest(
    listOf(digitalCredentialOption)
)

coroutineScope.launch {
    try {
        val result = credentialManager.getCredential(
            context = activityContext,
            request = getCredRequest
        )
        verifyResult(result)
    } catch (e : GetCredentialException) {
        handleFailure(e)
    }
}
จัดการการตอบกลับข้อมูลเข้าสู่ระบบ
เมื่อได้รับการตอบกลับจาก Wallet แล้ว ให้ตรวจสอบว่าการตอบกลับสำเร็จและมีการตอบกลับ credentialJson หรือไม่ ดังนี้
// Handle the successfully returned credential.
fun verifyResult(result: GetCredentialResponse) {
    val credential = result.credential
    when (credential) {
        is DigitalCredential -> {
            val responseJson = credential.credentialJson
            validateResponseOnServer(responseJson) // make a server call to validate the response
        }
        else -> {
            // Catch any unrecognized credential type here.
            Log.e(TAG, "Unexpected type of credential ${credential.type}")
        }
    }
}

// Handle failure.
fun handleFailure(e: GetCredentialException) {
  when (e) {
        is GetCredentialCancellationException -> {
            // The user intentionally canceled the operation and chose not
            // to share the credential.
        }
        is GetCredentialInterruptedException -> {
            // Retry-able error. Consider retrying the call.
        }
        is NoCredentialException -> {
            // No credential was available.
        }
        else -> Log.w(TAG, "Unexpected exception type ${e::class.java}")
    }
}
การตอบกลับ credentialJson มี identityToken (JWT) ที่เข้ารหัส ซึ่งกำหนดโดย W3C แอป Wallet มีหน้าที่รับผิดชอบในการสร้างคำตอบนี้
ตัวอย่าง
{
  "protocol" : "openid4vp-v1-signed",
  "data" : {
    <encrypted_response>
  }
}
ส่งการตอบกลับนี้กลับไปยังเซิร์ฟเวอร์เพื่อตรวจสอบความถูกต้อง ดูถอดรหัสและตรวจสอบการตอบกลับ
เว็บ
หากต้องการขอข้อมูลเข้าสู่ระบบข้อมูลประจำตัวโดยใช้ Digital Credentials API ใน Chrome หรือเบราว์เซอร์อื่นๆ ที่รองรับ ให้ส่งคำขอต่อไปนี้
const credentialResponse = await navigator.credentials.get({
          digital : {
          requests : [
            {
              protocol: "openid4vp-v1-signed",
              data: {<credential_request>} // This is an object, shouldn't be a string.
            }
          ]
        }
      })
ส่งการตอบกลับจาก API นี้กลับไปยังเซิร์ฟเวอร์เพื่อตรวจสอบการตอบกลับข้อมูลเข้าสู่ระบบ
ขั้นตอนที่ 3: ถอดรหัสและตรวจสอบการตอบกลับ (ฝั่งเซิร์ฟเวอร์)
เมื่อ Wallet แสดงผล identityToken (JWT) ที่เข้ารหัสแล้ว คุณต้องทำการตรวจสอบฝั่งเซิร์ฟเวอร์อย่างเข้มงวดก่อนที่จะเชื่อถือข้อมูล
ถอดรหัสการตอบกลับ
ใช้คีย์ส่วนตัวที่สอดคล้องกับคีย์สาธารณะที่ส่งใน client_metadata ของคำขอเพื่อถอดรหัส JWE ซึ่งจะทำให้ได้ vp_token
ตัวอย่าง Python:
from jwcrypto import jwe, jwk

# Retrieve the Private Key from Datastore
reader_private_jwk = jwk.JWK.from_json(jwe_private_key_json_str)
# Save public key thumbprint for session transcript
encryption_public_jwk_thumbprint = reader_private_jwk.thumbprint()


# Decrypt the JWE encrypted response from Google Wallet
jwe_object = jwe.JWE()
jwe_object.deserialize(encrypted_jwe_response_from_wallet)
jwe_object.decrypt(reader_private_jwk)
decrypted_payload_bytes = jwe_object.payload
decrypted_data = json.loads(decrypted_payload_bytes)
decrypted_data จะส่งผลให้เกิด vp_token JSON ที่มีข้อมูลเข้าสู่ระบบต่อไปนี้
{
  "vp_token":
  {
    "cred1": ["<base64UrlNoPadding_encoded_credential>"] // This applies to OpenID4VP 1.0 spec.
  }
}
สร้าง SessionTranscript ใหม่และตรวจสอบ DeviceResponse
- สร้าง SessionTranscript จาก ISO/IEC 18013-5:2021 ด้วยโครงสร้าง Handover เฉพาะของ Android หรือเว็บ
SessionTranscript = [
  null,                // DeviceEngagementBytes not available
  null,                // EReaderKeyBytes not available
  [
    "OpenID4VPDCAPIHandover",
    AndroidHandoverDataBytes   // BrowserHandoverDataBytes for Web
  ]
]
สำหรับการส่งต่อทั้ง Android และเว็บ ให้ใช้ nonce เดียวกันกับที่คุณใช้สร้าง credential_request
การส่งต่อ Android
AndroidHandoverData = [
  origin,             // "android:apk-key-hash:<base64SHA256_ofAppSigningCert>",
  nonce,           // nonce that was used to generate credential request,
  encryption_public_jwk_thumbprint,  // Encryption public key (JWK) Thumbprint
]

AndroidHandoverDataBytes = hashlib.sha256(cbor2.dumps(AndroidHandoverData)).digest()
การส่งต่อเบราว์เซอร์
BrowserHandoverData =[
  origin,               // Origin URL
  nonce,               //  nonce that was used to generate credential request
  encryption_public_jwk_thumbprint,  // Encryption public key (JWK) Thumbprint
]

BrowserHandoverDataBytes = hashlib.sha256(cbor2.dumps(BrowserHandoverData)).digest()
เมื่อใช้ SessionTranscript การตอบกลับของอุปกรณ์ต้องได้รับการตรวจสอบตาม ISO/IEC 18013-5:2021 ข้อ 9
การตรวจสอบนี้ประกอบด้วยการตรวจสอบ 4 รายการ ได้แก่
- ตรวจสอบใบรับรองของผู้ออก: ดึงข้อมูลเชนใบรับรองการลงนามของผู้ออกจาก
issuerAuthและตรวจสอบกับใบรับรองรูท IACA ที่เชื่อถือได้ โปรดดูผู้ออกใบรับรองและใบรับรอง IACA ที่รองรับ (และเพิ่มใบรับรอง Sandbox ของ Utopia เมื่อทดสอบด้วยรหัสทดสอบ Sandbox) - ยืนยันลายเซ็น MSO (ISO/IEC 18013-5 ส่วนที่ 9.1.2)
- คำนวณและตรวจสอบ
ValueDigestsสำหรับองค์ประกอบข้อมูล (ISO/IEC 18013-5 ส่วนที่ 9.1.2) - ยืนยันลายเซ็น
deviceSignature(ISO/IEC 18013-5 ส่วนที่ 9.1.3)
{
  "version": "1.0",
  "documents": [
    {
      "docType": "org.iso.18013.5.1.mDL",
      "issuerSigned": {
        "nameSpaces": {...}, // contains data elements
        "issuerAuth": [...]  // COSE_Sign1 w/ issuer PK, mso + sig
      },
      "deviceSigned": {
        "nameSpaces": 24(<< {} >>), // empty
        "deviceAuth": {
          "deviceSignature": [...] // COSE_Sign1 w/ device signature
        }
      }
    }
  ],
  "status": 0
}
ขั้นตอนที่ ง (ไม่บังคับ): การยืนยันอายุที่รักษาความเป็นส่วนตัว (ZKP)
หากต้องการรองรับการพิสูจน์ความรู้เป็นศูนย์ (เช่น การยืนยันว่าผู้ใช้มีอายุมากกว่า 18 ปีโดยไม่เห็นวันเกิดที่แน่นอน) ให้เปลี่ยนรูปแบบคำขอเป็น mso_mdoc_zk และระบุการกำหนดค่า zk_system_type ที่จำเป็น
โปรดดูภาพรวมระดับสูงเกี่ยวกับ ZKP และความสามารถของ ZKP ได้ที่คำถามที่พบบ่อย
  ...
  "dcql_query": {
    "credentials": [{
      "id": "cred1",
      "format": "mso_mdoc_zk",
      "meta": {
        "doctype_value": "org.iso.18013.5.1.mDL"
        "zk_system_type": [
        {
          "system": "longfellow-libzk-v1",
          "circuit_hash": "f88a39e561ec0be02bb3dfe38fb609ad154e98decbbe632887d850fc612fea6f", // This will differ if you need more than 1 attribute.
          "num_attributes": 1, // number of attributes (in claims) this has can support
          "version": 5,
          "block_enc_hash": 4096,
          "block_enc_sig": 2945,
        }
        {
          "system": "longfellow-libzk-v1",
          "circuit_hash": "137e5a75ce72735a37c8a72da1a8a0a5df8d13365c2ae3d2c2bd6a0e7197c7c6", // This will differ if you need more than 1 attribute.
          "num_attributes": 1, // number of attributes (in claims) this has can support
          "version": 6,
          "block_enc_hash": 4096,
          "block_enc_sig": 2945,
        }
       ],
       "verifier_message": "challenge"
      },
     "claims": [{
         ...
      "client_metadata": {
        "jwks": {
          "keys": [ // sample request encryption key
            {
              ...
คุณจะได้รับหลักฐานแบบ Zero-Knowledge ที่เข้ารหัสกลับมาจาก Wallet คุณสามารถตรวจสอบหลักฐานนี้กับใบรับรอง IACA ของผู้ออกได้โดยใช้ไลบรารี longfellow-zk ของ Google
verifier-service มีเซิร์ฟเวอร์ที่ใช้ Docker ซึ่งพร้อมสำหรับการติดตั้งใช้งาน ซึ่งช่วยให้คุณตรวจสอบการตอบกลับเทียบกับใบรับรอง IACA ของผู้ออกได้
คุณสามารถแก้ไข certs.pem เพื่อจัดการใบรับรองผู้ออก IACA ที่คุณต้องการเชื่อถือได้
SDK, การติดตั้งใช้งานอ้างอิง และการสนับสนุน
ใช้ไลบรารีโอเพนซอร์ส เซิร์ฟเวอร์อ้างอิง และเครื่องมือตรวจสอบเว็บของเราเพื่อเร่งการติดตั้งใช้งาน ดังนี้
| แหล่งข้อมูล / คลัง | สิ่งที่รายงานแสดง | ลิงก์ |
|---|---|---|
| การติดตั้งใช้งานอ้างอิงของผู้ยืนยันตัวตน | เซิร์ฟเวอร์และไคลเอ็นต์ตัวอย่างที่สาธิตการสร้างคำขอ OpenID4VP, การลงนาม JWS, การถอดรหัส JWE และการตรวจสอบความถูกต้องของการตอบกลับ mdoc | ที่เก็บ GitHub |
| Multipaz SDK | ไลบรารีโอเพนซอร์ส (OpenWallet Foundation) ซึ่งรวมถึง DeviceResponseParser สำหรับการถอดรหัส CBOR, การสร้าง SessionTranscript ขึ้นใหม่ และการตรวจสอบลายเซ็น ISO/IEC 18013-5/7 |
openwallet-foundation/multipaz |
| Longfellow ZKP Library & Verifier Service | ไลบรารีโอเพนซอร์สและเซิร์ฟเวอร์ที่ใช้ Docker สำหรับยืนยันการยืนยันอายุและแอตทริบิวต์ Zero-Knowledge Proof (mso_mdoc_zk) |
google/longfellow-zk |
| เครื่องมือตรวจสอบเว็บแบบอินเทอร์แอกทีฟ | เครื่องมือตรวจสอบเว็บที่โฮสต์เพื่อทดสอบคำขอ Digital Credentials API ของ W3C / OpenID4VP กับ Google Wallet | verifier.multipaz.org |
| ข้อกำหนดเฉพาะของ OpenID4VP 1.0 | ข้อกำหนดโปรโตคอล OpenID for Verifiable Presentations 1.0 อย่างเป็นทางการ | ข้อกำหนด OpenID4VP |
| คำถามที่พบบ่อยและการสนับสนุนนักพัฒนาแอป | คำตอบสำหรับคำถามที่พบบ่อยเกี่ยวกับการผสานรวมทางเทคนิค หรือส่งอีเมลถึง wallet-identity-rp-support@google.com เพื่อขอความช่วยเหลือในการแก้ไขข้อบกพร่อง |
คำถามที่พบบ่อยเกี่ยวกับการผสานรวมทางเทคนิค |