Verify with Google Wallet supports three integration paths—two online paths (for Android apps and websites) and one in-person path (for proximity readers and point-of-sale terminals). Select your path to get started.
The three integration paths
Relying Party (RP)
For individual merchants, businesses, or app developers verifying users directly for their own website or Android app.
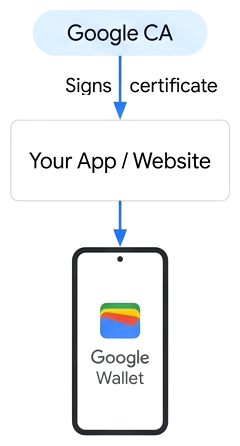
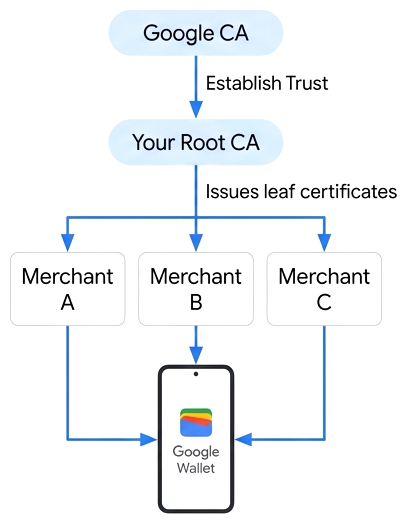
Verifier Registrar (VR)
For IDV providers, aggregators, or platforms verifying users on behalf of multiple downstream businesses (End RPs).
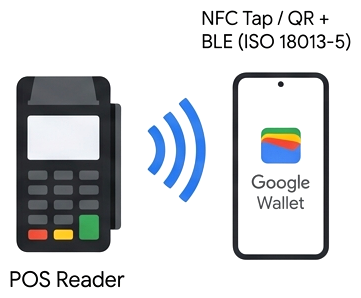
In-person verification
For point-of-sale terminals, venue readers, or mobile verifier apps verifying mDLs offline—works without Google allowlisting if your terminal supports ISO/IEC 18013-5 mdoc retrieval (ID passes are not currently supported in person).
Compare online paths: Relying Party vs. Verifier Registrar
| Aspect | Relying Party (RP) | Verifier Registrar (VR) |
|---|---|---|
| Who signs requests | Google signs your certificate (you submit a CSR) | You run your own CA (Sandbox + Production Root CAs) and sign leaf certificates for End RPs |
| Sandbox credentials | Google's shared sandbox test keys & metadata (start testing immediately) | Certificates signed by your own Sandbox Root CA, after Google trusts it |
| When to contact Google | At the end (Step 5), after completing sandbox testing | At the start (Step 1), to register your Sandbox & Production Root CAs |
Online integration guide
Select your online integration path to follow Steps 1 through 5 in order. You can complete Steps 1 and 2 (sandbox and test ID setup) in parallel while your engineering team builds Step 3.
Relying Parties (Direct)
Set up the sandbox
No intake form or approval is needed to start testing. Request sandbox allowlisting for your test Google Account, switch a test Android device to sandbox mode, and download Google's shared sandbox test keys and the Utopia Sandbox cert.
Create a test ID in the sandbox
Use a second Android device running the Utopia ePassport Simulator to provision a simulated ID pass into Google Wallet on your sandbox device.
Integrate as a Relying Party
Follow the four implementation steps in the Relying Party integration guide:
- Step 3.A — Format & sign the request: Build the OpenID4VP JSON query and sign the JWS on your server.
- Step 3.B — Trigger the API: Call Android
CredentialManageror Webnavigator.credentials.get(). - Step 3.C — Decrypt & validate the response: Decrypt the JWE and verify the IACA certificate chain and MSO on your server.
- Step 3.D (Optional) — Add Zero-Knowledge Proofs: Verify age predicates without receiving the user's birthdate.
Test your integration end to end
Present your Utopia test ID pass against your service, verify every item in the end-to-end checklist (including issuerAuth validation against the Utopia Sandbox cert), and record a demonstration video.
Go live as a Relying Party
Submit the Relying Party Onboarding Form with your production CSR, branding assets, and sandbox E2E video (formally accepting the Relying Party ToS). Once approved (typically 3–5 business days), Google returns your signed production certificate and unique gw_rp_metadata_bytes.
Verifier Registrars (Aggregators)
Submit Root CAs & set up the sandbox
First, submit the Verifier Registrar Onboarding Intake Form with your Sandbox and Production Root CA Certificates (accepting the Verifier Registrar ToS) so Google can trust your Sandbox Root CA. In parallel, allowlist your test Google Account and switch a test Android device to sandbox mode.
Create a test ID in the sandbox
Use a second Android device running the Utopia ePassport Simulator to provision a simulated ID pass into Google Wallet on your sandbox device.
Integrate as a Verifier Registrar
Follow the five implementation steps in the Verifier Registrar integration guide:
- Step 3.A — Configure CA & CBOR metadata: Set up your X.509 certificate profile (OID
1.3.6.1.4.1.11129.10.1) and CBOR metadata schema. - Step 3.B — Format & sign the request: Build the OpenID4VP JSON query and sign the JWS with your End-RP leaf certificate.
- Step 3.C — Trigger the API: Call Android
CredentialManageror Webnavigator.credentials.get(). - Step 3.D — Decrypt & validate the response: Decrypt the JWE and verify the IACA certificate chain and MSO on your server.
- Step 3.E (Optional) — Add Zero-Knowledge Proofs: Verify age predicates without receiving the user's birthdate.
Test your integration end to end
Once Google notifies you that your Sandbox Root CA is trusted, sign a test End-RP certificate, trust the Utopia Sandbox cert on your server, test with your Utopia test ID pass, and record demonstration videos for both verifier-hosted and merchant-hosted flows.
Go live as a Verifier Registrar & onboard End RPs
Submit your E2E videos for review. Google approves your videos and trusts your Production Root CA in parallel. Then, register each downstream client using the Verifier Registrar Client Onboarding Form and issue leaf certificates with a globally unique Distinguished Name.
What you'll need before you start
- A server that creates requests and validates responses. Generate the full request on your server, even for Android apps.
- Two Android devices for testing: one runs the ePassport simulator, and the other holds the test ID in Google Wallet. Use dedicated test devices, because switching to sandbox deletes the device's production Wallet data.
- A @gmail.com Google Account to use in Google Wallet while you test.
- Your display assets for the consent screen: display name, logo (see the Brand Guidelines), privacy policy URL, and Terms of Service URL.