
總覽
Google 街景服務可讓您在指定道路的涵蓋區域進行 360 度全景檢視。街景服務的 API 涵蓋範圍與 Google 地圖應用程式 (https://maps.google.com/) 相同。如需街景服務目前支援的城市清單,請參閱 Google 地圖網站。
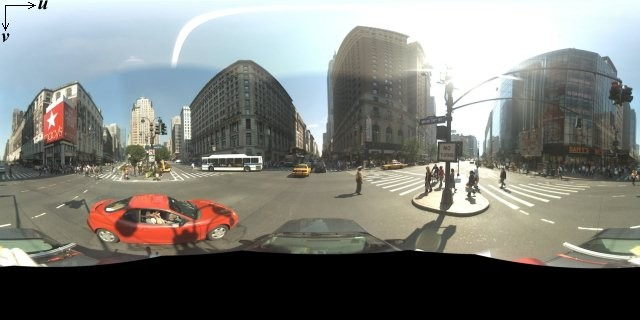
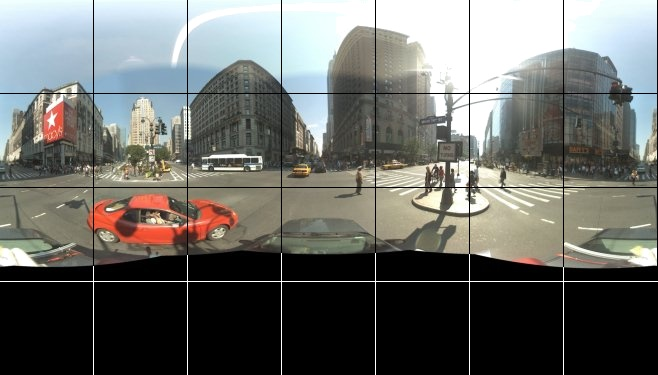
以下是街景服務圖片的範例。
Maps JavaScript API 提供街景服務,以便取得及處理在 Google 地圖街景服務中使用的圖像。瀏覽器原生支援這項街景服務。
街景服務地圖的用法
雖然街景服務可以在獨立的 DOM 元素內使用,但最大的用處是指出地圖上的地點。根據預設,地圖會啟用街景服務,並將街景服務的「衣夾人控制項」整合在導覽 (縮放及平移) 控制項中。您可以在地圖的 MapOptions 內將 streetViewControl 設為 false,以隱藏這個控制項。此外,您也可以將 Map 的 streetViewControlOptions.position 屬性設為新的 ControlPosition,以變更街景服務控制項的預設位置。
您可以使用「街景服務衣夾人」控制項直接在地圖內查看街景服務全景。使用者點選並按住衣夾人後,地圖會進行更新,在啟用街景服務的街道周圍顯示藍色外框,提供與 Google 地圖應用程式相似的使用者體驗。
使用者將「衣夾人」標記拖放到街道上時,地圖會進行更新,顯示指定地點的街景服務全景。
街景服務全景
StreetViewPanorama 物件會為街景服務「檢視器」提供 API 介面,可用來支援街景服務圖片。每張地圖都包含預設的街景服務全景,您可以呼叫地圖的 getStreetView() 方法來擷取全景。如果您為了在地圖中加入「街景服務」控制項,而將 streetViewControl 選項設為 true,系統就會自動將「衣夾人」控制項連結到這個預設的街景服務全景。
此外,如要自行建立 StreetViewPanorama 物件,並將地圖設為使用這個物件而非預設值,您也可以將地圖的 streetView 屬性明確設為該建構物件。如要修改預設行為 (例如在地圖與全景之間自動共用疊加層),建議您覆寫預設全景 (請參閱下方的「街景服務內的疊加層」一節)。
街景服務容器
您可能會想改為在獨立的 DOM 元素 (通常是 <div> 元素) 內顯示 StreetViewPanorama。方法很簡單,只要在 StreetViewPanorama 的建構函式中傳遞 DOM 元素即可。為求最佳顯示效果,建議圖片尺寸至少為 200 x 200 像素。
注意:街景服務功能是設計用來搭配地圖,但這並非硬性規定。即使沒有地圖,您也可以單獨使用街景服務物件。
街景服務位置和視角
StreetViewPanorama 建構函式也可讓您使用 StreetViewOptions 參數來設定街景服務位置和視角。建構完成後,您可以針對物件呼叫
setPosition() 和 setPov() 來變更位置和視角。
街景服務位置會定義圖片中相機焦點的位置,但不會定義圖片中相機的方向。為了解決這個問題,StreetViewPov 物件會定義兩個屬性:
heading(預設為0) 以正北為基準,定義相機擺放位置的旋轉角度 (以度為單位)。方向依順時針測量 (90 度為正東方)。pitch(預設為0) 定義相機初始預設傾斜角度的「向上」或「向下」變異量,預設傾斜角度通常 (但不一定) 是水平 (例如,在山上拍攝的圖片中,預設傾斜角度可能就不是水平)。傾斜角度的測量方式為正值朝上 (垂直向上 +90 度,並與預設傾斜角度成直角),負值朝下 (垂直向下 -90 度,並與預設傾斜角度成直角)。
StreetViewPov 物件最常用於判斷街景服務相機的視角。不過,您也可以使用 StreetViewPanorama.getPhotographerPov() 方法,來判斷街景服務圖片拍攝人員的視角 (通常是街景車或街景三輪車的正面方向)。
下方程式碼顯示波士頓的地圖,初始檢視畫面為芬威球場。選取地圖上的「衣夾人」並拖曳到支援的位置時,街景服務全景便會產生變化:
TypeScript
function initialize() { const fenway = { lat: 42.345573, lng: -71.098326 }; const map = new google.maps.Map( document.getElementById("map") as HTMLElement, { center: fenway, zoom: 14, } ); const panorama = new google.maps.StreetViewPanorama( document.getElementById("pano") as HTMLElement, { position: fenway, pov: { heading: 34, pitch: 10, }, } ); map.setStreetView(panorama); } declare global { interface Window { initialize: () => void; } } window.initialize = initialize;
JavaScript
function initialize() { const fenway = { lat: 42.345573, lng: -71.098326 }; const map = new google.maps.Map(document.getElementById("map"), { center: fenway, zoom: 14, }); const panorama = new google.maps.StreetViewPanorama( document.getElementById("pano"), { position: fenway, pov: { heading: 34, pitch: 10, }, }, ); map.setStreetView(panorama); } window.initialize = initialize;
CSS
html, body { height: 100%; margin: 0; padding: 0; } #map, #pano { float: left; height: 100%; width: 50%; }
HTML
<html>
<head>
<title>Street View split-map-panes</title>
<link rel="stylesheet" type="text/css" href="./style.css" />
<script type="module" src="./index.js"></script>
</head>
<body>
<div id="map"></div>
<div id="pano"></div>
<!--
The `defer` attribute causes the script to execute after the full HTML
document has been parsed. For non-blocking uses, avoiding race conditions,
and consistent behavior across browsers, consider loading using Promises. See
https://developers.google.com/maps/documentation/javascript/load-maps-js-api
for more information.
-->
<script
src="https://maps.googleapis.com/maps/api/js?key=AIzaSyB41DRUbKWJHPxaFjMAwdrzWzbVKartNGg&callback=initialize&v=weekly"
defer
></script>
</body>
</html>測試範例程式碼
行動裝置上的動作追蹤
如果裝置支援定向事件,API 可讓使用者隨著裝置移動變更街景服務視角。使用者可以移動裝置來環顧四周,也就是所謂的動作追蹤或裝置旋轉追蹤。
應用程式開發人員可以按照下列方式變更預設行為:
- 啟用或停用動作追蹤功能。根據預設,凡是支援動作追蹤的裝置都會啟用這項功能。下例停用動作追蹤功能,但仍顯示動作追蹤控制項 (請注意,使用者可以輕觸控制項來開啟動作追蹤功能)。
var panorama = new google.maps.StreetViewPanorama(
    document.getElementById('pano'), {
      position: {lat: 37.869260, lng: -122.254811},
      pov: {heading: 165, pitch: 0},
      motionTracking: false
    });
-
隱藏或顯示動作追蹤控制項。根據預設,控制項會顯示在支援動作追蹤的裝置上。使用者可以輕觸控制項來開啟或關閉動作追蹤功能。請注意,如果裝置不支援動作追蹤,不論
motionTrackingControl的值為何,這個控制項都不會顯示。下例同時停用動作追蹤和動作追蹤控制項。在這種情況下,使用者無法開啟動作追蹤功能:
var panorama = new google.maps.StreetViewPanorama(
    document.getElementById('pano'), {
      position: {lat: 37.869260, lng: -122.254811},
      pov: {heading: 165, pitch: 0},
      motionTracking: false,
      motionTrackingControl: false
    });
- 變更動作追蹤控制項的預設位置。根據預設,控制項會顯示在全景的右下方 (
RIGHT_BOTTOM的位置)。下例說明如何將控制項的位置設在左下方:var panorama = new google.maps.StreetViewPanorama( document.getElementById('pano'), { position: {lat: 37.869260, lng: -122.254811}, pov: {heading: 165, pitch: 0}, motionTrackingControlOptions: { position: google.maps.ControlPosition.LEFT_BOTTOM } });
如要瞭解動作追蹤功能的實際運作方式,請在行動裝置 (或支援裝置定向事件的任何裝置) 上查看下例:
街景服務內的疊加層
預設 StreetViewPanorama 物件支援以原生方式顯示地圖疊加層。一般而言,疊加層會在「街道層級」顯示,固定於 LatLng 位置 (舉例來說,在街景服務全景內顯示標記時,標記的尾端通常會固定在相關位置的水平面上)。
街景服務全景支援的疊加層類型,目前僅限於 Marker、InfoWindow 和自訂 OverlayView。如要在街景服務全景內顯示地圖的疊加層,您可以使用全景取代 Map 物件,呼叫 setMap(),並以引數形式傳遞 StreetViewPanorama (而不是地圖)。同樣地,如果您要在街景服務全景內開啟資訊視窗,請呼叫 open() 並傳遞 StreetViewPanorama() (而不是地圖)。
此外,建立包含預設 StreetViewPanorama 的地圖時,只要顯示與地圖關聯的街景服務全景,地圖上建立的任何標記都會自動與全景共用。如要擷取預設的街景服務全景,可以針對 Map 物件呼叫 getStreetView()。請注意,如果您將地圖的 streetView 屬性明確設為自行建構的 StreetViewPanorama,就等於覆寫預設全景。
下例是紐約市阿斯托廣場周邊代表不同地點的標記。將畫面切換到街景服務,即可查看 StreetViewPanorama 內顯示的共用標記。
TypeScript
let panorama: google.maps.StreetViewPanorama; let innerMap: google.maps.Map; async function init() { // Request needed libraries. const [{ Marker }] = await Promise.all([ google.maps.importLibrary('marker'), google.maps.importLibrary('maps'), ]); // Set the location of Astor Place. const astorPlace = { lat: 40.729884, lng: -73.990988 }; const mapElement = document.querySelector('gmp-map')!; innerMap = mapElement.innerMap; document .getElementById('streetview-toggle-button')! .addEventListener('click', toggleStreetView); const cafeIcon = document.createElement('img'); cafeIcon.src = new URL('./public/cafe_icon.svg', import.meta.url).href; const dollarIcon = document.createElement('img'); dollarIcon.src = new URL('./public/bank_icon.svg', import.meta.url).href; const busIcon = document.createElement('img'); busIcon.src = new URL('./public/bus_icon.svg', import.meta.url).href; // Set up the markers on the map new Marker({ position: { lat: 40.730031, lng: -73.991428 }, map: innerMap, title: 'Cafe', icon: cafeIcon.src, }); new Marker({ position: { lat: 40.729681, lng: -73.991138 }, map: innerMap, title: 'Bank', icon: dollarIcon.src, }); new Marker({ position: { lat: 40.729559, lng: -73.990741 }, map: innerMap, title: 'Bus Stop', icon: busIcon.src, }); // We get the map's default panorama and set up some defaults. // Note that we don't yet set it visible. panorama = innerMap.getStreetView()!; // TODO fix type panorama.setPosition(astorPlace); panorama.setPov({ heading: 265, pitch: 0, }); } function toggleStreetView(): void { const toggle = panorama.getVisible(); if (!toggle) { panorama.setVisible(true); } else { panorama.setVisible(false); } } void init();
JavaScript
let panorama; let innerMap; async function init() { // Request needed libraries. const [{ Marker }] = await Promise.all([ google.maps.importLibrary('marker'), google.maps.importLibrary('maps'), ]); // Set the location of Astor Place. const astorPlace = { lat: 40.729884, lng: -73.990988 }; const mapElement = document.querySelector('gmp-map'); innerMap = mapElement.innerMap; document .getElementById('streetview-toggle-button') .addEventListener('click', toggleStreetView); const cafeIcon = document.createElement('img'); cafeIcon.src = new URL('./public/cafe_icon.svg', import.meta.url).href; const dollarIcon = document.createElement('img'); dollarIcon.src = new URL('./public/bank_icon.svg', import.meta.url).href; const busIcon = document.createElement('img'); busIcon.src = new URL('./public/bus_icon.svg', import.meta.url).href; // Set up the markers on the map new Marker({ position: { lat: 40.730031, lng: -73.991428 }, map: innerMap, title: 'Cafe', icon: cafeIcon.src, }); new Marker({ position: { lat: 40.729681, lng: -73.991138 }, map: innerMap, title: 'Bank', icon: dollarIcon.src, }); new Marker({ position: { lat: 40.729559, lng: -73.990741 }, map: innerMap, title: 'Bus Stop', icon: busIcon.src, }); // We get the map's default panorama and set up some defaults. // Note that we don't yet set it visible. panorama = innerMap.getStreetView(); // TODO fix type panorama.setPosition(astorPlace); panorama.setPov({ heading: 265, pitch: 0, }); } function toggleStreetView() { const toggle = panorama.getVisible(); if (!toggle) { panorama.setVisible(true); } else { panorama.setVisible(false); } } void init(); export {};
CSS
/* * Always set the map height explicitly to define the size of the div element * that contains the map. */ #map { height: 100%; } /* * Optional: Makes the sample page fill the window. */ html, body { height: 100%; margin: 0; padding: 0; } #floating-panel { position: absolute; top: 10px; left: 25%; z-index: 5; background-color: #fff; padding: 5px; border: 1px solid #999; text-align: center; font-family: 'Roboto', sans-serif; line-height: 30px; padding-left: 10px; } #streetview-toggle-button { height: 40px; display: flex; align-items: center; justify-content: center; padding: 0 17px; border: none; background: white; cursor: pointer; border-radius: 2px; box-shadow: 0 1px 4px -1px rgba(0, 0, 0, 0.3); margin: 10px 0px 10px -2px; font-family: Roboto, Arial, sans-serif; font-size: 18px; font-weight: 400; color: rgb(86, 86, 86); } #streetview-toggle-button:hover { background: #f4f4f4; color: #000; }
HTML
<html>
<head>
<title>Overlays Within Street View</title>
<link rel="stylesheet" type="text/css" href="./style.css" />
<script type="module" src="./index.js"></script>
<script>
// prettier-ignore
(g=>{var h,a,k,p="The Google Maps JavaScript API",c="google",l="importLibrary",q="__ib__",m=document,b=window;b=b[c]||(b[c]={});var d=b.maps||(b.maps={}),r=new Set,e=new URLSearchParams,u=()=>h||(h=new Promise(async(f,n)=>{await (a=m.createElement("script"));e.set("libraries",[...r]+"");for(k in g)e.set(k.replace(/[A-Z]/g,t=>"_"+t[0].toLowerCase()),g[k]);e.set("callback",c+".maps."+q);a.src=`https://maps.${c}apis.com/maps/api/js?`+e;d[q]=f;a.onerror=()=>h=n(Error(p+" could not load."));a.nonce=m.querySelector("script[nonce]")?.nonce||"";m.head.append(a)}));d[l]?console.warn(p+" only loads once. Ignoring:",g):d[l]=(f,...n)=>r.add(f)&&u().then(()=>d[l](f,...n))})({
key: "AIzaSyA6myHzS10YXdcazAFalmXvDkrYCp5cLc8"
});
</script>
</head>
<body>
<gmp-map map-id="DEMO_MAP_ID" center="40.729884, -73.990988" zoom="18">
<input
type="button"
value="Toggle Street View"
id="streetview-toggle-button"
slot="control-block-start-inline-start" />
</gmp-map>
</body>
</html>試用範例
街景服務事件
瀏覽街景服務或控制方向時,請留意幾個代表 StreetViewPanorama 狀態出現變化的事件:
pano_changed,每當個別全景 ID 變更時就會觸發。這個事件並不表示在事件觸發時,全景內的任何相關聯資料 (例如連結) 也隨之變更,只是代表全景 ID 有所變更。請注意,全景 ID (可做為這個全景的參照) 僅在目前瀏覽器工作階段內保持不變。position_changed,每當全景的基礎 (LatLng) 位置變更時就會觸發。旋轉全景不會觸發這個事件。請注意,您可以在不變更相關聯全景 ID 的情況下,調整全景的基礎位置,因為 API 會自動將最靠近的全景 ID 與全景位置建立關聯。pov_changed,每當街景服務的StreetViewPov變更時就會觸發。請注意,位置和全景 ID 保持不變時,仍可能會觸發這個事件。links_changed,每當街景服務連結變更時就會觸發。請注意,透過pano_changed指定的全景 ID 變更後,這個事件可能會以非同步方式觸發。visible_changed,每當街景服務的顯示設定變更時就會觸發。請注意,透過pano_changed指定的全景 ID 變更後,這個事件可能會以非同步方式觸發。
下方程式碼顯示系統如何處理這些事件以收集基礎 StreetViewPanorama 的相關資料:
TypeScript
function initPano() { const panorama = new google.maps.StreetViewPanorama( document.getElementById("pano") as HTMLElement, { position: { lat: 37.869, lng: -122.255 }, pov: { heading: 270, pitch: 0, }, visible: true, } ); panorama.addListener("pano_changed", () => { const panoCell = document.getElementById("pano-cell") as HTMLElement; panoCell.innerHTML = panorama.getPano(); }); panorama.addListener("links_changed", () => { const linksTable = document.getElementById("links_table") as HTMLElement; while (linksTable.hasChildNodes()) { linksTable.removeChild(linksTable.lastChild as ChildNode); } const links = panorama.getLinks(); for (const i in links) { const row = document.createElement("tr"); linksTable.appendChild(row); const labelCell = document.createElement("td"); labelCell.innerHTML = "<b>Link: " + i + "</b>"; const valueCell = document.createElement("td"); valueCell.innerHTML = links[i].description as string; linksTable.appendChild(labelCell); linksTable.appendChild(valueCell); } }); panorama.addListener("position_changed", () => { const positionCell = document.getElementById( "position-cell" ) as HTMLElement; (positionCell.firstChild as HTMLElement).nodeValue = panorama.getPosition() + ""; }); panorama.addListener("pov_changed", () => { const headingCell = document.getElementById("heading-cell") as HTMLElement; const pitchCell = document.getElementById("pitch-cell") as HTMLElement; (headingCell.firstChild as HTMLElement).nodeValue = panorama.getPov().heading + ""; (pitchCell.firstChild as HTMLElement).nodeValue = panorama.getPov().pitch + ""; }); } declare global { interface Window { initPano: () => void; } } window.initPano = initPano;
JavaScript
function initPano() { const panorama = new google.maps.StreetViewPanorama( document.getElementById("pano"), { position: { lat: 37.869, lng: -122.255 }, pov: { heading: 270, pitch: 0, }, visible: true, }, ); panorama.addListener("pano_changed", () => { const panoCell = document.getElementById("pano-cell"); panoCell.innerHTML = panorama.getPano(); }); panorama.addListener("links_changed", () => { const linksTable = document.getElementById("links_table"); while (linksTable.hasChildNodes()) { linksTable.removeChild(linksTable.lastChild); } const links = panorama.getLinks(); for (const i in links) { const row = document.createElement("tr"); linksTable.appendChild(row); const labelCell = document.createElement("td"); labelCell.innerHTML = "<b>Link: " + i + "</b>"; const valueCell = document.createElement("td"); valueCell.innerHTML = links[i].description; linksTable.appendChild(labelCell); linksTable.appendChild(valueCell); } }); panorama.addListener("position_changed", () => { const positionCell = document.getElementById("position-cell"); positionCell.firstChild.nodeValue = panorama.getPosition() + ""; }); panorama.addListener("pov_changed", () => { const headingCell = document.getElementById("heading-cell"); const pitchCell = document.getElementById("pitch-cell"); headingCell.firstChild.nodeValue = panorama.getPov().heading + ""; pitchCell.firstChild.nodeValue = panorama.getPov().pitch + ""; }); } window.initPano = initPano;
CSS
/* * Always set the map height explicitly to define the size of the div element * that contains the map. */ #map { height: 100%; } /* * Optional: Makes the sample page fill the window. */ html, body { height: 100%; margin: 0; padding: 0; } #floating-panel { position: absolute; top: 10px; left: 25%; z-index: 5; background-color: #fff; padding: 5px; border: 1px solid #999; text-align: center; font-family: "Roboto", "sans-serif"; line-height: 30px; padding-left: 10px; } #pano { width: 50%; height: 100%; float: left; } #floating-panel { width: 45%; height: 100%; float: right; text-align: left; overflow: auto; position: static; border: 0px solid #999; }
HTML
<html>
<head>
<title>Street View Events</title>
<link rel="stylesheet" type="text/css" href="./style.css" />
<script type="module" src="./index.js"></script>
</head>
<body>
<div id="pano"></div>
<div id="floating-panel">
<table>
<tr>
<td><b>Position</b></td>
<td id="position-cell"> </td>
</tr>
<tr>
<td><b>POV Heading</b></td>
<td id="heading-cell">270</td>
</tr>
<tr>
<td><b>POV Pitch</b></td>
<td id="pitch-cell">0.0</td>
</tr>
<tr>
<td><b>Pano ID</b></td>
<td id="pano-cell"> </td>
</tr>
<table id="links_table"></table>
</table>
</div>
<!--
The `defer` attribute causes the script to execute after the full HTML
document has been parsed. For non-blocking uses, avoiding race conditions,
and consistent behavior across browsers, consider loading using Promises. See
https://developers.google.com/maps/documentation/javascript/load-maps-js-api
for more information.
-->
<script
src="https://maps.googleapis.com/maps/api/js?key=AIzaSyB41DRUbKWJHPxaFjMAwdrzWzbVKartNGg&callback=initPano&v=weekly"
defer
></script>
</body>
</html>測試範例程式碼
街景服務控制項
根據預設,顯示 StreetViewPanorama 時,全景上會顯示多種控制項。如要啟用或停用這些控制項,您可以在 StreetViewPanoramaOptions 內將對應的欄位設為 true 或 false:
panControl可用於旋轉全景。根據預設,這個控制項會顯示為整合指南針與平移功能的標準控制項。如要改變控制項的位置,您可以在panControlOptions欄位內提供PanControlOptions。zoomControl可用於縮放圖片。根據預設,這個控制項會顯示在全景右下方附近。如要修改控制項的外觀,您可以在zoomControlOptions欄位內提供ZoomControlOptions。addressControl提供文字疊加層來指出相關聯地點的地址,並提供可讓您在 Google 地圖中開啟地點的連結。如要修改控制項的外觀,您可以在addressControlOptions欄位內提供StreetViewAddressControlOptions。fullscreenControl可讓您選擇以全螢幕模式開啟街景服務。如要修改控制項的外觀,您可以在fullscreenControlOptions欄位內提供FullscreenControlOptions。motionTrackingControl可讓您選擇在行動裝置上啟用或停用動作追蹤功能。這個控制項只會顯示在支援裝置定向事件的裝置上,且預設會顯示在全景右下方。您可以提供MotionTrackingControlOptions來修改控制項的位置。詳情請參閱「動作追蹤」一節。linksControl在圖片上提供引導箭頭,方便使用者切換到相鄰的全景圖片。- 「關閉」控制項可讓使用者關閉街景服務檢視器。如要啟用或停用「關閉」控制項,您可以將
enableCloseButton設為true或false。
下例會修改相關聯街景服務內顯示的控制項,並移除檢視畫面的連結:
TypeScript
function initPano() { // Note: constructed panorama objects have visible: true // set by default. const panorama = new google.maps.StreetViewPanorama( document.getElementById("map") as HTMLElement, { position: { lat: 42.345573, lng: -71.098326 }, addressControlOptions: { position: google.maps.ControlPosition.BOTTOM_CENTER, }, linksControl: false, panControl: false, enableCloseButton: false, } ); } declare global { interface Window { initPano: () => void; } } window.initPano = initPano;
JavaScript
function initPano() { // Note: constructed panorama objects have visible: true // set by default. const panorama = new google.maps.StreetViewPanorama( document.getElementById("map"), { position: { lat: 42.345573, lng: -71.098326 }, addressControlOptions: { position: google.maps.ControlPosition.BOTTOM_CENTER, }, linksControl: false, panControl: false, enableCloseButton: false, }, ); } window.initPano = initPano;
CSS
/* * Always set the map height explicitly to define the size of the div element * that contains the map. */ #map { height: 100%; } /* * Optional: Makes the sample page fill the window. */ html, body { height: 100%; margin: 0; padding: 0; }
HTML
<html>
<head>
<title>Street View Controls</title>
<link rel="stylesheet" type="text/css" href="./style.css" />
<script type="module" src="./index.js"></script>
</head>
<body>
<div id="map"></div>
<!--
The `defer` attribute causes the script to execute after the full HTML
document has been parsed. For non-blocking uses, avoiding race conditions,
and consistent behavior across browsers, consider loading using Promises. See
https://developers.google.com/maps/documentation/javascript/load-maps-js-api
for more information.
-->
<script
src="https://maps.googleapis.com/maps/api/js?key=AIzaSyB41DRUbKWJHPxaFjMAwdrzWzbVKartNGg&callback=initPano&v=weekly"
defer
></script>
</body>
</html>測試範例程式碼
直接存取街景服務資料
您可能會想透過程式輔助方式判斷是否有街景服務資料,或是傳回特定全景的相關資訊,而不需要直接處理地圖/全景。方法很簡單,您可以使用 StreetViewService 物件,為 Google 街景服務中儲存的資料提供介面。
街景服務要求
Google Maps API 必須呼叫外部伺服器,因此街景服務是以非同步的方式存取。基於這個理由,您必須傳遞在完成要求後執行的「回呼」方法。這個回呼方法會處理結果。
您可以使用 StreetViewPanoRequest 或 StreetViewLocationRequest 向 StreetViewService 提出要求。
使用 StreetViewPanoRequest 的要求會傳回全景資料,其中包含用於識別全景的參照 ID。請注意,這類參照 ID 僅在該全景圖的生命週期內保持不變。
使用 StreetViewLocationRequest 的要求會透過下列參數搜尋指定位置的全景資料:
location會指定要搜尋全景的位置 (經緯度)。preference用於進行偏好設定,指定在半徑範圍內尋找的全景:離指定位置最近的全景,或是半徑範圍內最好的全景。radius會設定半徑 (以公尺為單位),以指定經緯度為中心搜尋全景。如未提供,預設為 50。source會指定要搜尋的全景來源。有效值如下:default會使用街景服務的預設來源。搜尋範圍不限於特定來源。outdoor會將搜尋範圍限制在室外集錦。請注意,室外全景可能不適用於特定位置。
街景服務回應
從街景服務擷取結果後,getPanorama() 函式需要「回呼」函式才能執行。這個回呼函式會依序傳回 StreetViewPanoramaData 物件中的全景資料集,以及表示要求狀態的 StreetViewStatus 代碼。
StreetViewPanoramaData 物件規格包含街景服務全景相關中繼資料,形式如下:
{
  "location": {
    "latLng": LatLng,
    "description": string,
    "pano": string
  },
  "copyright": string,
  "links": [{
      "heading": number,
      "description": string,
      "pano": string,
      "roadColor": string,
      "roadOpacity": number
    }],
  "tiles": {
    "worldSize": Size,
    "tileSize": Size,
    "centerHeading": number
  }
}
請注意,這個資料物件本身並非 StreetViewPanorama 物件。如要使用這類資料建立街景服務物件,您必須建立 StreetViewPanorama 並呼叫 setPano(),將傳回的 location.pano 欄位中註明的 ID 傳遞至該物件。
status 代碼可能會傳回下列其中一個值:
OK表示服務找到相符的全景。ZERO_RESULTS表示服務找不到與所傳遞的條件相符的全景。UNKNOWN_ERROR表示由於某種不明原因,無法處理街景服務要求。
下列程式碼會建立 StreetViewService,其中建立標記來回應使用者對地圖的點擊,使用者按下標記時,系統會顯示該位置的 StreetViewPanorama。這個程式碼會使用服務傳回的 StreetViewPanoramaData 內容。
TypeScript
/* * Click the map to set a new location for the Street View camera. */ let map: google.maps.Map; let panorama: google.maps.StreetViewPanorama; function initMap(): void { const berkeley = { lat: 37.869085, lng: -122.254775 }; const sv = new google.maps.StreetViewService(); panorama = new google.maps.StreetViewPanorama( document.getElementById("pano") as HTMLElement ); // Set up the map. map = new google.maps.Map(document.getElementById("map") as HTMLElement, { center: berkeley, zoom: 16, streetViewControl: false, }); // Set the initial Street View camera to the center of the map sv.getPanorama({ location: berkeley, radius: 50 }).then(processSVData); // Look for a nearby Street View panorama when the map is clicked. // getPanorama will return the nearest pano when the given // radius is 50 meters or less. map.addListener("click", (event) => { sv.getPanorama({ location: event.latLng, radius: 50 }) .then(processSVData) .catch((e) => console.error("Street View data not found for this location.") ); }); } function processSVData({ data }: google.maps.StreetViewResponse) { const location = data.location!; const marker = new google.maps.Marker({ position: location.latLng, map, title: location.description, }); panorama.setPano(location.pano as string); panorama.setPov({ heading: 270, pitch: 0, }); panorama.setVisible(true); marker.addListener("click", () => { const markerPanoID = location.pano; // Set the Pano to use the passed panoID. panorama.setPano(markerPanoID as string); panorama.setPov({ heading: 270, pitch: 0, }); panorama.setVisible(true); }); } declare global { interface Window { initMap: () => void; } } window.initMap = initMap;
JavaScript
/* * Click the map to set a new location for the Street View camera. */ let map; let panorama; function initMap() { const berkeley = { lat: 37.869085, lng: -122.254775 }; const sv = new google.maps.StreetViewService(); panorama = new google.maps.StreetViewPanorama( document.getElementById("pano"), ); // Set up the map. map = new google.maps.Map(document.getElementById("map"), { center: berkeley, zoom: 16, streetViewControl: false, }); // Set the initial Street View camera to the center of the map sv.getPanorama({ location: berkeley, radius: 50 }).then(processSVData); // Look for a nearby Street View panorama when the map is clicked. // getPanorama will return the nearest pano when the given // radius is 50 meters or less. map.addListener("click", (event) => { sv.getPanorama({ location: event.latLng, radius: 50 }) .then(processSVData) .catch((e) => console.error("Street View data not found for this location."), ); }); } function processSVData({ data }) { const location = data.location; const marker = new google.maps.Marker({ position: location.latLng, map, title: location.description, }); panorama.setPano(location.pano); panorama.setPov({ heading: 270, pitch: 0, }); panorama.setVisible(true); marker.addListener("click", () => { const markerPanoID = location.pano; // Set the Pano to use the passed panoID. panorama.setPano(markerPanoID); panorama.setPov({ heading: 270, pitch: 0, }); panorama.setVisible(true); }); } window.initMap = initMap;
CSS
/* * Always set the map height explicitly to define the size of the div element * that contains the map. */ #map { height: 100%; } /* * Optional: Makes the sample page fill the window. */ html, body { height: 100%; margin: 0; padding: 0; }
HTML
<html>
<head>
<title>Directly Accessing Street View Data</title>
<link rel="stylesheet" type="text/css" href="./style.css" />
<script type="module" src="./index.js"></script>
</head>
<body>
<div id="map" style="width: 45%; height: 100%; float: left"></div>
<div id="pano" style="width: 45%; height: 100%; float: left"></div>
<!--
The `defer` attribute causes the script to execute after the full HTML
document has been parsed. For non-blocking uses, avoiding race conditions,
and consistent behavior across browsers, consider loading using Promises. See
https://developers.google.com/maps/documentation/javascript/load-maps-js-api
for more information.
-->
<script
src="https://maps.googleapis.com/maps/api/js?key=AIzaSyB41DRUbKWJHPxaFjMAwdrzWzbVKartNGg&callback=initMap&v=weekly"
defer
></script>
</body>
</html>測試範例程式碼
提供自訂街景服務全景
Maps JavaScript API 支援在 StreetViewPanorama 物件內顯示自訂全景。自訂全景可用於顯示建築物內部、景點風光,或是您想像的任何內容。您甚至可以將這些自訂全景全都連結至 Google 現有的街景服務全景。
如要自訂一組全景圖,請按照下列步驟操作:
- 為每個自訂全景建立基本全景圖片。這張基本圖片必須是最高解析度的圖片,以便提供放大圖像。
- (建議選用) 運用基本圖片建立一組包含各種縮放等級的全景圖塊。
- 連結不同的自訂全景。
- (選用) 在 Google 現有的街景服務圖像內指定「基本」全景,然後自行調整自訂組合與標準組合之間的連結。
- 為
StreetViewPanoramaData物件內的每張全景圖片定義中繼資料。 - 導入可以判定自訂全景資料和圖片的方法,並將該方法指定為您在
StreetViewPanorama物件內的自訂處理常式。
以下章節將說明這個程序。
建立自訂全景
每個街景服務全景都由一或多張圖片組成,提供單一位置的 360 度完整環景。StreetViewPanorama 物件會使用與等距長方投影一致的圖片。這種投影包含 360 度的水平視圖 (全環景) 與 180 度的垂直視圖 (由正上方到正下方)。這樣的視野可以產生顯示比例為 2:1 的圖片。全環景如下所示:
全景圖片一般是先在同一個位置拍攝多張相片,再使用全景軟體拼接而成 (詳情請參閱維基百科的「相片拼接應用程式的比較」一文)。這類圖片必須採用相同的「相機」擺放位置,而每張全景圖片都會從這個擺放位置拍攝。接著,產生的 360 度全景便可定義球體投影,在球體的 2D 表面上呈現圖片。
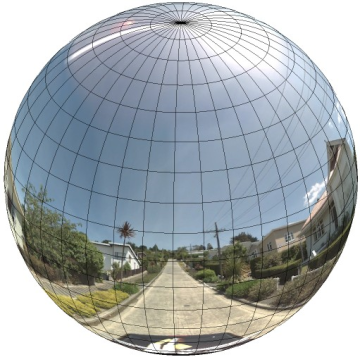
將圖片分割為直線式「圖塊」,並依據計算出的圖塊座標提供圖片時,建議您將全景視為使用直線座標系統在球體上做出的投影。
建立自訂全景圖塊
街景服務也支援各種圖片精細度,只要使用縮放控制項,就能縮小或放大預設檢視畫面。一般來說,不論是哪張全景圖片,街景服務都提供五種縮放等級解析度。如果您想要運用一張全景圖片提供所有縮放等級,這類圖片可能會十分龐大,大幅減緩應用程式速度,或是在高縮放等級下的解析度不佳,只能提供低像素圖片。不過,我們可以採取類似於提供不同縮放等級的 Google 地圖圖塊設計,為全景的各個縮放等級提供適當解析度的圖像。
在初次載入 StreetViewPanorama 時,預設會以縮放等級 1 顯示全景水平幅度為 25% (90 度弧線) 的圖片。這種檢視範圍大致符合常人的視野。縮小這個預設檢視畫面基本上會拉寬弧線,而放大則會將視野縮減至較小的弧線。StreetViewPanorama 會自動計算所選縮放等級的適當視野,然後選取大致與水平視野維度一致的圖塊組合,做為最適合該解析度的圖像。以下是視野與街景服務縮放等級的對照表:
| 街景服務縮放等級 | 視野 (角度) |
|---|---|
| 0 | 180 |
| 1 (預設值) | 90 |
| 2 | 45 |
| 3 | 22.5 |
| 4 | 11.25 |
請注意,街景服務內顯示的圖片尺寸,完全取決於街景服務容器的畫面尺寸 (寬度)。如果您提供較寬的容器,服務對於任何指定的縮放等級仍會提供相同的視野,但有可能會改選更適合該解析度的圖塊。
每個全景都是由等矩長方投影所組成,建立全景圖塊也就相對簡單。投影所提供圖片的顯示比例為 2:1,因此建議您也使用 2:1 比例的圖塊,但在正方形地圖上,使用正方形圖塊的效果或許更好 (因為視野為正方形)。
如果是 2:1 的圖塊,涵蓋整個全景的單一圖片就代表縮放等級為 0 的整個全景「世界」(基本圖片),且每增加一個縮放等級就會顯示 4 個 zoomLevel 圖塊 (舉例來說,縮放等級為 2 時,整個全景會包含 16 個圖塊)。注意:街景服務圖塊的縮放等級,不會直接與使用街景服務控制項時所提供的縮放等級相符。街景服務控制項縮放等級會改為選取視野,然後再依據視野選取適當的圖塊。
一般來說,您可以為圖片中的圖塊命名,以便透過程式輔助方式選取圖塊。我們會在下方的「處理自訂全景要求」一節中說明這類命名機制。
處理自訂全景要求
如要使用自訂全景,請呼叫 StreetViewPanorama.registerPanoProvider(),並指定自訂全景提供者方法的名稱。全景提供者方法必須傳回 StreetViewPanoramaData 物件,且具備下列簽章:
Function(pano):StreetViewPanoramaData
StreetViewPanoramaData 是一個物件,形式如下:
{
  copyright: string,
  location: {
    description: string,
    latLng: google.maps.LatLng,
    pano: string
  },
  tiles: {
    tileSize: google.maps.Size,
    worldSize: google.maps.Size,
    heading: number,
    getTileUrl: Function
  },
  links: [
    description: string,
    heading: number,
    pano: string,
    roadColor: string,
    roadOpacity: number
  ]
}
顯示自訂全景,如下所示:
- 將
StreetViewPanoramaOptions.pano屬性設為自訂值。 - 呼叫
StreetViewPanorama.registerPanoProvider()來提供自訂全景提供者函式。 - 導入自訂全景提供者函式來處理指定的
pano值。 - 建構
StreetViewPanoramaData物件。 - 將
StreetViewTileData.getTileUrl屬性設為您提供的自訂圖塊提供者函式名稱,例如:getCustomPanoramaTileUrl。 - 導入自訂圖塊提供者函式,如下例所示。
- 傳回
StreetViewPanoramaData物件。
注意:如果想要顯示自訂全景,請勿直接在 StreetViewPanorama 上設定 position,因為這類位置會指示街景服務要求靠近該位置的預設街景服務圖像。請改為在自訂 StreetViewPanoramaData 物件的 location.latLng 欄位內設定這個位置。
下例是 Google 雪梨辦公室的自訂全景。請注意,本例未使用地圖或預設街景服務圖像:
TypeScript
function initPano() { // Set up Street View and initially set it visible. Register the // custom panorama provider function. Set the StreetView to display // the custom panorama 'reception' which we check for below. const panorama = new google.maps.StreetViewPanorama( document.getElementById("map") as HTMLElement, { pano: "reception", visible: true } ); panorama.registerPanoProvider(getCustomPanorama); } // Return a pano image given the panoID. function getCustomPanoramaTileUrl( pano: string, zoom: number, tileX: number, tileY: number ): string { return ( "https://developers.google.com/maps/documentation/javascript/examples/full/images/" + "panoReception1024-" + zoom + "-" + tileX + "-" + tileY + ".jpg" ); } // Construct the appropriate StreetViewPanoramaData given // the passed pano IDs. function getCustomPanorama(pano: string): google.maps.StreetViewPanoramaData { if (pano === "reception") { return { location: { pano: "reception", description: "Google Sydney - Reception", }, links: [], // The text for the copyright control. copyright: "Imagery (c) 2010 Google", // The definition of the tiles for this panorama. tiles: { tileSize: new google.maps.Size(1024, 512), worldSize: new google.maps.Size(2048, 1024), // The heading in degrees at the origin of the panorama // tile set. centerHeading: 105, getTileUrl: getCustomPanoramaTileUrl, }, }; } // @ts-ignore TODO fix typings return null; } declare global { interface Window { initPano: () => void; } } window.initPano = initPano;
JavaScript
function initPano() { // Set up Street View and initially set it visible. Register the // custom panorama provider function. Set the StreetView to display // the custom panorama 'reception' which we check for below. const panorama = new google.maps.StreetViewPanorama( document.getElementById("map"), { pano: "reception", visible: true }, ); panorama.registerPanoProvider(getCustomPanorama); } // Return a pano image given the panoID. function getCustomPanoramaTileUrl(pano, zoom, tileX, tileY) { return ( "https://developers.google.com/maps/documentation/javascript/examples/full/images/" + "panoReception1024-" + zoom + "-" + tileX + "-" + tileY + ".jpg" ); } // Construct the appropriate StreetViewPanoramaData given // the passed pano IDs. function getCustomPanorama(pano) { if (pano === "reception") { return { location: { pano: "reception", description: "Google Sydney - Reception", }, links: [], // The text for the copyright control. copyright: "Imagery (c) 2010 Google", // The definition of the tiles for this panorama. tiles: { tileSize: new google.maps.Size(1024, 512), worldSize: new google.maps.Size(2048, 1024), // The heading in degrees at the origin of the panorama // tile set. centerHeading: 105, getTileUrl: getCustomPanoramaTileUrl, }, }; } // @ts-ignore TODO fix typings return null; } window.initPano = initPano;
CSS
/* * Always set the map height explicitly to define the size of the div element * that contains the map. */ #map { height: 100%; } /* * Optional: Makes the sample page fill the window. */ html, body { height: 100%; margin: 0; padding: 0; }
HTML
<html>
<head>
<title>Custom Street View Panoramas</title>
<link rel="stylesheet" type="text/css" href="./style.css" />
<script type="module" src="./index.js"></script>
</head>
<body>
<div id="map"></div>
<!--
The `defer` attribute causes the script to execute after the full HTML
document has been parsed. For non-blocking uses, avoiding race conditions,
and consistent behavior across browsers, consider loading using Promises. See
https://developers.google.com/maps/documentation/javascript/load-maps-js-api
for more information.
-->
<script
src="https://maps.googleapis.com/maps/api/js?key=AIzaSyB41DRUbKWJHPxaFjMAwdrzWzbVKartNGg&callback=initPano&v=weekly"
defer
></script>
</body>
</html>測試範例程式碼
自訂全景提供者會根據傳遞的全景 ID、縮放等級和全景圖塊座標,傳回適當的圖塊。系統是根據傳遞的值選取圖片,因此建議您根據這些傳遞的值,為可透過程式輔助方式選取的圖片命名,例如 pano_zoom_tileX_tileY.png。
下例除了預設的街景服務導覽箭頭之外,還在圖片中加入其他箭頭來指向 Google 雪梨,並連結至自訂圖像:
TypeScript
let panorama: google.maps.StreetViewPanorama; // StreetViewPanoramaData of a panorama just outside the Google Sydney office. let outsideGoogle: google.maps.StreetViewPanoramaData; // StreetViewPanoramaData for a custom panorama: the Google Sydney reception. function getReceptionPanoramaData(): google.maps.StreetViewPanoramaData { return { location: { pano: "reception", // The ID for this custom panorama. description: "Google Sydney - Reception", latLng: new google.maps.LatLng(-33.86684, 151.19583), }, links: [ { heading: 195, description: "Exit", pano: (outsideGoogle.location as google.maps.StreetViewLocation).pano, }, ], copyright: "Imagery (c) 2010 Google", tiles: { tileSize: new google.maps.Size(1024, 512), worldSize: new google.maps.Size(2048, 1024), centerHeading: 105, getTileUrl: function ( pano: string, zoom: number, tileX: number, tileY: number ): string { return ( "https://developers.google.com/maps/documentation/javascript/examples/full/images/" + "panoReception1024-" + zoom + "-" + tileX + "-" + tileY + ".jpg" ); }, }, }; } function initPanorama() { panorama = new google.maps.StreetViewPanorama( document.getElementById("street-view") as HTMLElement, { pano: (outsideGoogle.location as google.maps.StreetViewLocation).pano } ); // Register a provider for the custom panorama. panorama.registerPanoProvider( (pano: string): google.maps.StreetViewPanoramaData => { if (pano === "reception") { return getReceptionPanoramaData(); } // @ts-ignore TODO fix typings return null; } ); // Add a link to our custom panorama from outside the Google Sydney office. panorama.addListener("links_changed", () => { if ( panorama.getPano() === (outsideGoogle.location as google.maps.StreetViewLocation).pano ) { panorama.getLinks().push({ description: "Google Sydney", heading: 25, pano: "reception", }); } }); } function initMap(): void { // Use the Street View service to find a pano ID on Pirrama Rd, outside the // Google office. new google.maps.StreetViewService() .getPanorama({ location: { lat: -33.867386, lng: 151.195767 } }) .then(({ data }: google.maps.StreetViewResponse) => { outsideGoogle = data; initPanorama(); }); } declare global { interface Window { initMap: () => void; } } window.initMap = initMap;
JavaScript
let panorama; // StreetViewPanoramaData of a panorama just outside the Google Sydney office. let outsideGoogle; // StreetViewPanoramaData for a custom panorama: the Google Sydney reception. function getReceptionPanoramaData() { return { location: { pano: "reception", // The ID for this custom panorama. description: "Google Sydney - Reception", latLng: new google.maps.LatLng(-33.86684, 151.19583), }, links: [ { heading: 195, description: "Exit", pano: outsideGoogle.location.pano, }, ], copyright: "Imagery (c) 2010 Google", tiles: { tileSize: new google.maps.Size(1024, 512), worldSize: new google.maps.Size(2048, 1024), centerHeading: 105, getTileUrl: function (pano, zoom, tileX, tileY) { return ( "https://developers.google.com/maps/documentation/javascript/examples/full/images/" + "panoReception1024-" + zoom + "-" + tileX + "-" + tileY + ".jpg" ); }, }, }; } function initPanorama() { panorama = new google.maps.StreetViewPanorama( document.getElementById("street-view"), { pano: outsideGoogle.location.pano }, ); // Register a provider for the custom panorama. panorama.registerPanoProvider((pano) => { if (pano === "reception") { return getReceptionPanoramaData(); } // @ts-ignore TODO fix typings return null; }); // Add a link to our custom panorama from outside the Google Sydney office. panorama.addListener("links_changed", () => { if (panorama.getPano() === outsideGoogle.location.pano) { panorama.getLinks().push({ description: "Google Sydney", heading: 25, pano: "reception", }); } }); } function initMap() { // Use the Street View service to find a pano ID on Pirrama Rd, outside the // Google office. new google.maps.StreetViewService() .getPanorama({ location: { lat: -33.867386, lng: 151.195767 } }) .then(({ data }) => { outsideGoogle = data; initPanorama(); }); } window.initMap = initMap;
CSS
html, body { height: 100%; margin: 0; padding: 0; } #street-view { height: 100%; }
HTML
<html>
<head>
<title>Custom Street View Panorama Tiles</title>
<link rel="stylesheet" type="text/css" href="./style.css" />
<script type="module" src="./index.js"></script>
</head>
<body>
<div id="street-view"></div>
<!--
The `defer` attribute causes the script to execute after the full HTML
document has been parsed. For non-blocking uses, avoiding race conditions,
and consistent behavior across browsers, consider loading using Promises. See
https://developers.google.com/maps/documentation/javascript/load-maps-js-api
for more information.
-->
<script
src="https://maps.googleapis.com/maps/api/js?key=AIzaSyB41DRUbKWJHPxaFjMAwdrzWzbVKartNGg&callback=initMap&v=weekly"
defer
></script>
</body>
</html>