Page Summary
-
Info windows display textual or image-based information within popup windows anchored to markers on the map, appearing when the marker is tapped.
-
Developers can customize info windows by implementing the
InfoWindowAdapterinterface to control content and design. -
Info window events, such as clicks and closures, can be handled using listeners like
OnInfoWindowClickListenerandOnInfoWindowCloseListener. -
Info windows are rendered as static images, so interactive elements like buttons or checkboxes within them will not function as expected.
-
The content and appearance of info windows can be customized using methods like
getInfoWindow(Marker)andgetInfoContents(Marker), offering flexibility in design.
An info window displays text or images in a popup window above the map. Info windows are always anchored to a marker. Their default behavior is to display when the marker is tapped.
Code samples
The ApiDemos repository on GitHub includes a sample that demonstrates all info window features:
- MarkerDemoActivity - Java: Customizing info windows and using info window listeners
- MarkerDemoActivity - Kotlin: Customizing info windows and using info window listeners
Introduction
An info window allows you to display information to the user when they tap on a marker. Only one info window is displayed at a time. If a user clicks on a marker, the current info window will be closed and the new info window will be displayed. Note that if the user clicks on a marker that is currently showing an info window, that info window closes and re-opens.
An info window is drawn oriented against the device's screen, centered above its associated marker. The default info window contains the title in bold, with the (optional) snippet text below the title.
Add an info window
The simplest way to add an info window is to set the title() and snippet()
methods of the corresponding marker. Setting these properties will cause an
info window to appear whenever that marker is clicked.
Kotlin
val melbourneLatLng = LatLng(-37.81319, 144.96298)
val melbourne = map.addMarker(
    MarkerOptions()
        .position(melbourneLatLng)
        .title("Melbourne")
        .snippet("Population: 4,137,400")
)
Java
final LatLng melbourneLatLng = new LatLng(-37.81319, 144.96298);
Marker melbourne = map.addMarker(
    new MarkerOptions()
        .position(melbourneLatLng)
        .title("Melbourne")
        .snippet("Population: 4,137,400"));
Show/Hide an info window
Info windows are designed to respond to user touch events. If you prefer, you
can show an info window programmatically by calling
showInfoWindow()
on the target marker. An info window can be hidden by calling
hideInfoWindow().
Kotlin
val melbourneLatLng = LatLng(-37.81319, 144.96298)
val melbourne = map.addMarker(
    MarkerOptions()
        .position(melbourneLatLng)
        .title("Melbourne")
)
melbourne?.showInfoWindow()
Java
final LatLng melbourneLatLng = new LatLng(-37.81319, 144.96298);
Marker melbourne = map.addMarker(
    new MarkerOptions()
        .position(melbourneLatLng)
        .title("Melbourne"));
melbourne.showInfoWindow();
You can also create info windows for individual clustered markers. Read the guide to adding an info window for individual clustered markers.
Custom info windows
You are also able to customize the contents and design of info windows. To do
this, you must create a concrete implementation of the
InfoWindowAdapter interface and then call
GoogleMap.setInfoWindowAdapter() with your
implementation. The interface contains two methods for you to implement:
getInfoWindow(Marker) and getInfoContents(Marker). The
API will first call getInfoWindow(Marker) and if null is
returned, it will then call getInfoContents(Marker). If this also returns
null, then the default info window will be used.
The first of these (getInfoWindow()) allows you to provide a view that
will be used for the entire info window. The second of these
(getInfoContents()) allows you to just customize the contents of the window
but still keep the default info window frame and background.
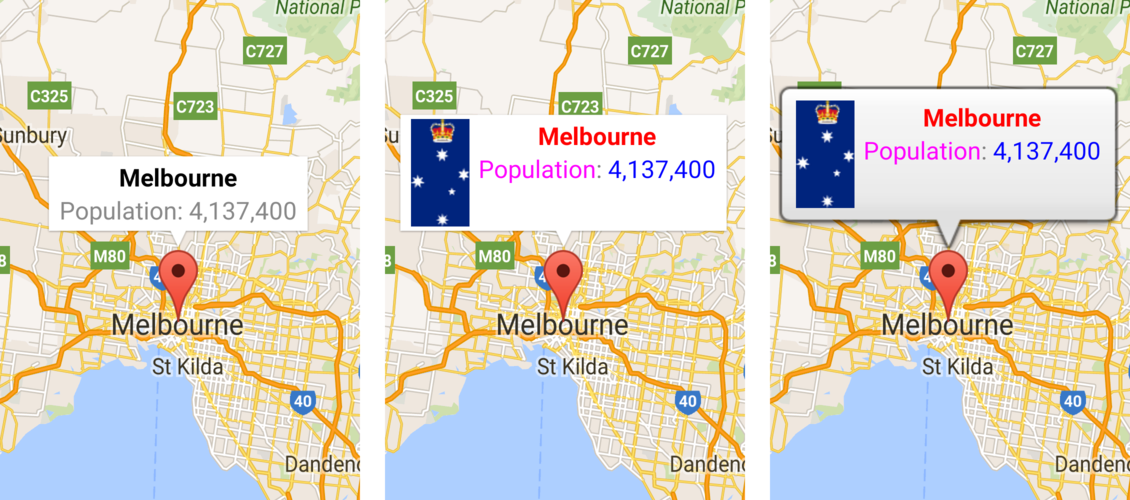
The images below show a default info window, an info window with customized contents, and an info window with customized frame and background.

Info window events
The MarkerDemoActivity sample includes example code for registering and handling info window events.
You can use an OnInfoWindowClickListener to
listen to click events on an info window. To set this listener on the map,
call GoogleMap.setOnInfoWindowClickListener(OnInfoWindowClickListener). When
a user clicks on an info window, onInfoWindowClick(Marker) is called
and the info window is highlighted in the default highlight color (gray).
Kotlin
internal inner class InfoWindowActivity : AppCompatActivity(),
    OnInfoWindowClickListener,
    OnMapReadyCallback {
    override fun onMapReady(googleMap: GoogleMap) {
        // Add markers to the map and do other map setup.
        // ...
        // Set a listener for info window events.
        googleMap.setOnInfoWindowClickListener(this)
    }

    override fun onInfoWindowClick(marker: Marker) {
        Toast.makeText(
            this, "Info window clicked",
            Toast.LENGTH_SHORT
        ).show()
    }
}
Java
class InfoWindowActivity extends AppCompatActivity implements
    GoogleMap.OnInfoWindowClickListener,
    OnMapReadyCallback {

    @Override
    public void onMapReady(GoogleMap googleMap) {
        // Add markers to the map and do other map setup.
        // ...
        // Set a listener for info window events.
        googleMap.setOnInfoWindowClickListener(this);
    }

    @Override
    public void onInfoWindowClick(Marker marker) {
        Toast.makeText(this, "Info window clicked",
            Toast.LENGTH_SHORT).show();
    }
}
Similarly, you can listen for long click events with an
OnInfoWindowLongClickListener, which you
can set by calling
GoogleMap.setOnInfoWindowCloseListener(OnInfoWindowCloseListener).
This listener behaves similarly to the click listener and will be notified on
long click events with an onInfoWindowClose(Marker) callback.
To be notified when the info window closes, use an
OnInfoWindowCloseListener, which you can
set by calling
GoogleMap.setOnInfoWindowCloseListener(OnInfoWindowCloseListener). You will
receive an onInfoWindowClose(Marker) callback.
Note about refreshing an info window: The onInfoWindowClose() event fires if
the user refreshes an info window by tapping a marker that already has an open
info window. But if you programmatically call Marker.showInfoWindow() on an
open info window, the onInfoWindowClose() event does not fire. The latter
behavior is based on the assumption that you are aware that the info window will
close and re-open.
As mentioned in the previous section on info windows, an info window is not a live view. Instead, the view is rendered as an image on the map. As a result, any listeners you set on the view are disregarded and you cannot distinguish between click events on various parts of the view. You are advised not to place interactive components — such as buttons, checkboxes, or text inputs — within your custom info window.
