
Page Summary
-
Ground overlays are images fixed to latitude/longitude coordinates on a map, changing orientation with map interactions like zoom, rotation, and tilt.
-
You can add a ground overlay by specifying an image, position, and optional settings like transparency using the
GroundOverlayOptionsobject. -
Ground overlays can be removed using the
remove()method and modified using methods likesetImage()for image updates. -
Positioning a ground overlay can be done by specifying a central location and dimensions or by defining the image's boundaries using
LatLngBounds. -
Ground overlays can be associated with custom data using
setTag()for retrieving and handling events, and their clickability can be controlled usingsetClickable().
Ground overlays are image overlays that are tied to latitude/longitude coordinates, so they move when you drag or zoom the map.
Code samples
The ApiDemos repository on GitHub includes a sample that demonstrates ground overlays:
- GroundOverlayDemoActivity - Java: Ground overlay features and listeners in Java
- GroundOverlayDemoActivity - Kotlin: Ground overlay features and listeners in Kotlin
Introduction
A ground overlay is an image that is fixed to a map. Unlike markers, ground overlays are oriented against the Earth's surface rather than the screen, so rotating, tilting or zooming the map will change the orientation of the image. Ground overlays are useful when you wish to fix a single image at one area on the map. If you want to add extensive imagery that covers a large portion of the map, you should consider a Tile overlay.
Add an overlay
To add a GroundOverlay, create a
GroundOverlayOptions object that defines both an
image and a position. You can optionally specify additional settings that will
affect the positioning of the image on the map. Once you've defined the
necessary options, pass the object to the GoogleMap.addGroundOverlay()
method to add the image to the map. The addGroundOverlay() method returns a
GroundOverlay object; you should retain a reference to
this object if you want to modify it later.
Step by step:
- Instantiate a new
GroundOverlayOptionsobject - Specify the image as a
BitmapDescriptor. - Set the position of the image using one of the available methods:
position(LatLng location, float width, float height)position(LatLng location, float width)positionFromBounds(LatLngBounds bounds)
- Set any optional properties, such as
transparency, as desired. - Call
GoogleMap.addGroundOverlay()to add the image to the map.
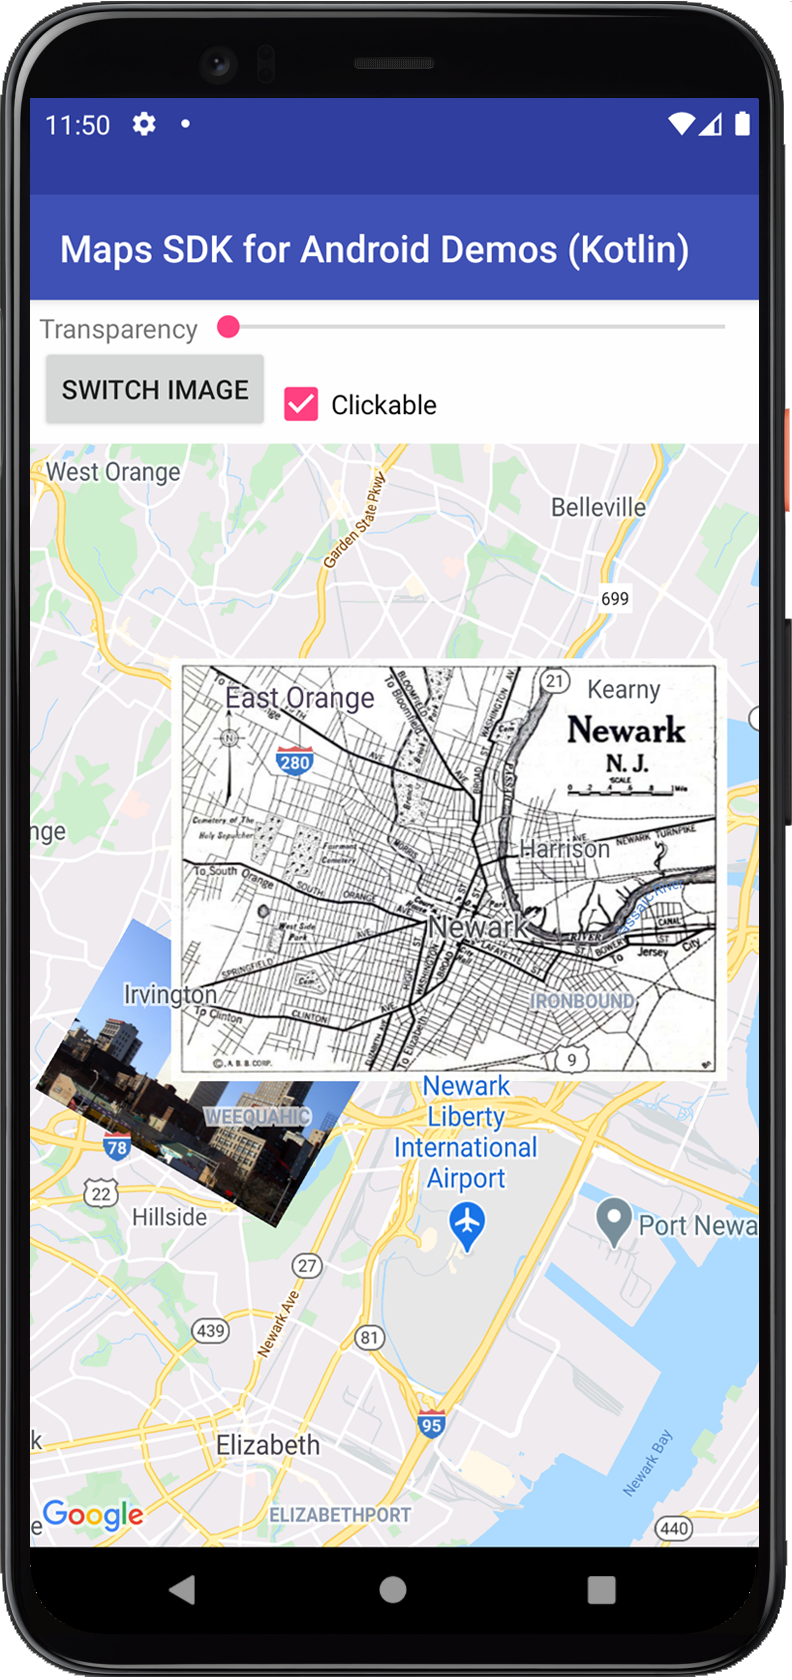
The below example demonstrates how to add a ground overlay to an existing
GoogleMap object.
Kotlin
val newarkLatLng = LatLng(40.714086, -74.228697)
val newarkMap = GroundOverlayOptions()
    .image(BitmapDescriptorFactory.fromResource(R.drawable.newark_nj_1922))
    .position(newarkLatLng, 8600f, 6500f)
map.addGroundOverlay(newarkMap)
Java
LatLng newarkLatLng = new LatLng(40.714086, -74.228697);

GroundOverlayOptions newarkMap = new GroundOverlayOptions()
    .image(BitmapDescriptorFactory.fromResource(R.drawable.newark_nj_1922))
    .position(newarkLatLng, 8600f, 6500f);
map.addGroundOverlay(newarkMap);
If you wish to change or remove a ground overlay after you've added it to
the map, ensure that you keep hold of the GroundOverlay object. You can
modify the overlay later by making changes to this object.
Kotlin
// Add an overlay to the map, retaining a handle to the GroundOverlay object.
val imageOverlay = map.addGroundOverlay(newarkMap)
Java
// Add an overlay to the map, retaining a handle to the GroundOverlay object.
GroundOverlay imageOverlay = map.addGroundOverlay(newarkMap);
Remove an overlay
You can remove a ground overlay with the
GroundOverlay.remove() method.
Kotlin
imageOverlay?.remove()
Java
imageOverlay.remove();
Change an overlay
You can change the ground overlay image after it's been added to the map with
the GroundOverlay.setImage(BitmapDescriptor) method.
Kotlin
// Update the GroundOverlay with a new image of the same dimension
imageOverlay?.setImage(BitmapDescriptorFactory.fromResource(R.drawable.newark_nj_1922))
Java
// Update the GroundOverlay with a new image of the same dimension
imageOverlay.setImage(BitmapDescriptorFactory.fromResource(R.drawable.newark_nj_1922));
The setImage() method will replace the existing image with another image of
the same dimensions.
Position a Ground Overlay
There are two ways to specify the position of the ground overlay:
- Using a
LatLngto center the overlay, and dimensions in meters to specify the size of the image. - Using a
LatLngBoundsto specify the north east and south west corners of the image.
You must specify the position of the ground overlay before it is added to the map.
Use location to position an image
When you add the image you specify a LatLng to which the anchor will be fixed
and the width of the overlay (in meters). The
anchor defaults to the center of the
image. You can optionally provide the height of the overlay (in meters). If
you do not provide the height of the overlay, it will be automatically
calculated to preserve the proportions of the image.
The below code places an image at position 40.714086, -74.228697
that is 8.6km wide by 6.5km high. The image is anchored at the bottom left.
Kotlin
val newarkMap = GroundOverlayOptions()
    .image(BitmapDescriptorFactory.fromResource(R.drawable.newark_nj_1922))
    .anchor(0f, 1f)
    .position(LatLng(40.714086, -74.228697), 8600f, 6500f)
Java
GroundOverlayOptions newarkMap = new GroundOverlayOptions()
    .image(BitmapDescriptorFactory.fromResource(R.drawable.newark_nj_1922))
    .anchor(0, 1)
    .position(new LatLng(40.714086, -74.228697), 8600f, 6500f);
Use LatLngBounds to position an image
You provide a LatLngBounds which contains the image. The
LatLngBounds sets the north east, and south west corners of the image. When
the image is drawn on the map it will be rotated to fit the bounds. If the
bounds do not match the original aspect ratio, the image will be skewed.
The below code places an image on the map with its South West corner bound to
40.712216,-74.22655 and its North East corner bound to
40.773941, -74.12544.
Kotlin
val newarkBounds = LatLngBounds(
    LatLng(40.712216, -74.22655),  // South west corner
    LatLng(40.773941, -74.12544)   // North east corner
)
val newarkMap = GroundOverlayOptions()
    .image(BitmapDescriptorFactory.fromResource(R.drawable.newark_nj_1922))
    .positionFromBounds(newarkBounds)
Java
LatLngBounds newarkBounds = new LatLngBounds(
    new LatLng(40.712216, -74.22655),       // South west corner
    new LatLng(40.773941, -74.12544));      // North east corner
GroundOverlayOptions newarkMap = new GroundOverlayOptions()
    .image(BitmapDescriptorFactory.fromResource(R.drawable.newark_nj_1922))
    .positionFromBounds(newarkBounds);
Associate data with a ground overlay
You can call GroundOverlay.setTag() to store an
arbitrary data object with a ground overlay, and retrieve the data
object using GroundOverlay.getTag().
The following code sample stores a string description with a ground overlay:
Kotlin
val sydneyGroundOverlay = map.addGroundOverlay(
    GroundOverlayOptions()
        .image(BitmapDescriptorFactory.fromResource(R.drawable.harbour_bridge))
        .position(LatLng(-33.873, 151.206), 100f)
        .clickable(true)
)
sydneyGroundOverlay?.tag = "Sydney"
Java
GroundOverlay sydneyGroundOverlay = map.addGroundOverlay(new GroundOverlayOptions()
    .image(BitmapDescriptorFactory.fromResource(R.drawable.harbour_bridge))
    .position(new LatLng(-33.873, 151.206), 100)
    .clickable(true));

sydneyGroundOverlay.setTag("Sydney");
Here are some examples of scenarios when it's useful to store and retrieve data with ground overlays:
- Your app may cater for different ground overlays, and you want to treat them differently when the user clicks them.
- You may be interfacing with a system that has unique record identifiers, where the overlays represent specific records in that system.
- The overlay data may indicate a priority to determine the z-index for the overlay.
Handle ground overlay events
By default, ground overlays are
not clickable. You can enable and disable the clickability by calling
GroundOverlay.setClickable(boolean).
Use an OnGroundOverlayClickListener
to listen to click events on a clickable ground overlay. To set this listener on
the map, call
GoogleMap.setOnGroundOverlayClickListener(OnGroundOverlayClickListener).
When a user clicks on a ground overlay, you will receive an
onGroundOverlayClick(GroundOverlay) callback.