
Page Summary
-
The Maps SDK for Android allows developers to configure Google Maps within their Android applications, both during initial setup and at runtime.
-
Map configuration includes options for map type, camera position, UI controls, gestures, traffic layer, indoor maps, and styling, impacting the map's appearance and functionality.
-
Developers can configure maps statically using XML attributes in the layout file or dynamically using code and GoogleMapOptions.
-
Map padding and color scheme options offer further customization possibilities for integrating maps seamlessly with application UI elements and system settings.
-
When using the Maps SDK, developers should consider localization, Google's terms of service regarding logo visibility, and the limitations of certain features like dark mode and background color customization.
This document describes how to configure a map that was added to an Android app using the Maps SDK for Android.
Overview
 After you add a map to your app, you can configure the initial and runtime
settings of the map. The initial settings need be configured based on whether
you added the map container (
After you add a map to your app, you can configure the initial and runtime
settings of the map. The initial settings need be configured based on whether
you added the map container (SupportMapFragment or
MapView) statically or dynamically. If the map container was
added statically, you can configure the initial map settings in the layout file.
If it was added dynamically, you can configure the initial settings in the
OnCreate callback with a GoogleMapOptions
object.
For details about adding a map container, see the Add a map.
The initial map settings include the following:
- The camera position, including: location, zoom, bearing and tilt. See Camera and View for details on camera positioning.
- The map type.
- The UI components to display, such as the zoom buttons and compass.
- The gestures to enable.
- Whether lite mode is enabled.
At runtime you can configure these settings and some addition settings by
updating the GoogleMap object in the onMapReady
callback. The additional settings are configured through the methods of the
GoogleMap class, such as those that configure the
traffic layer and map padding.
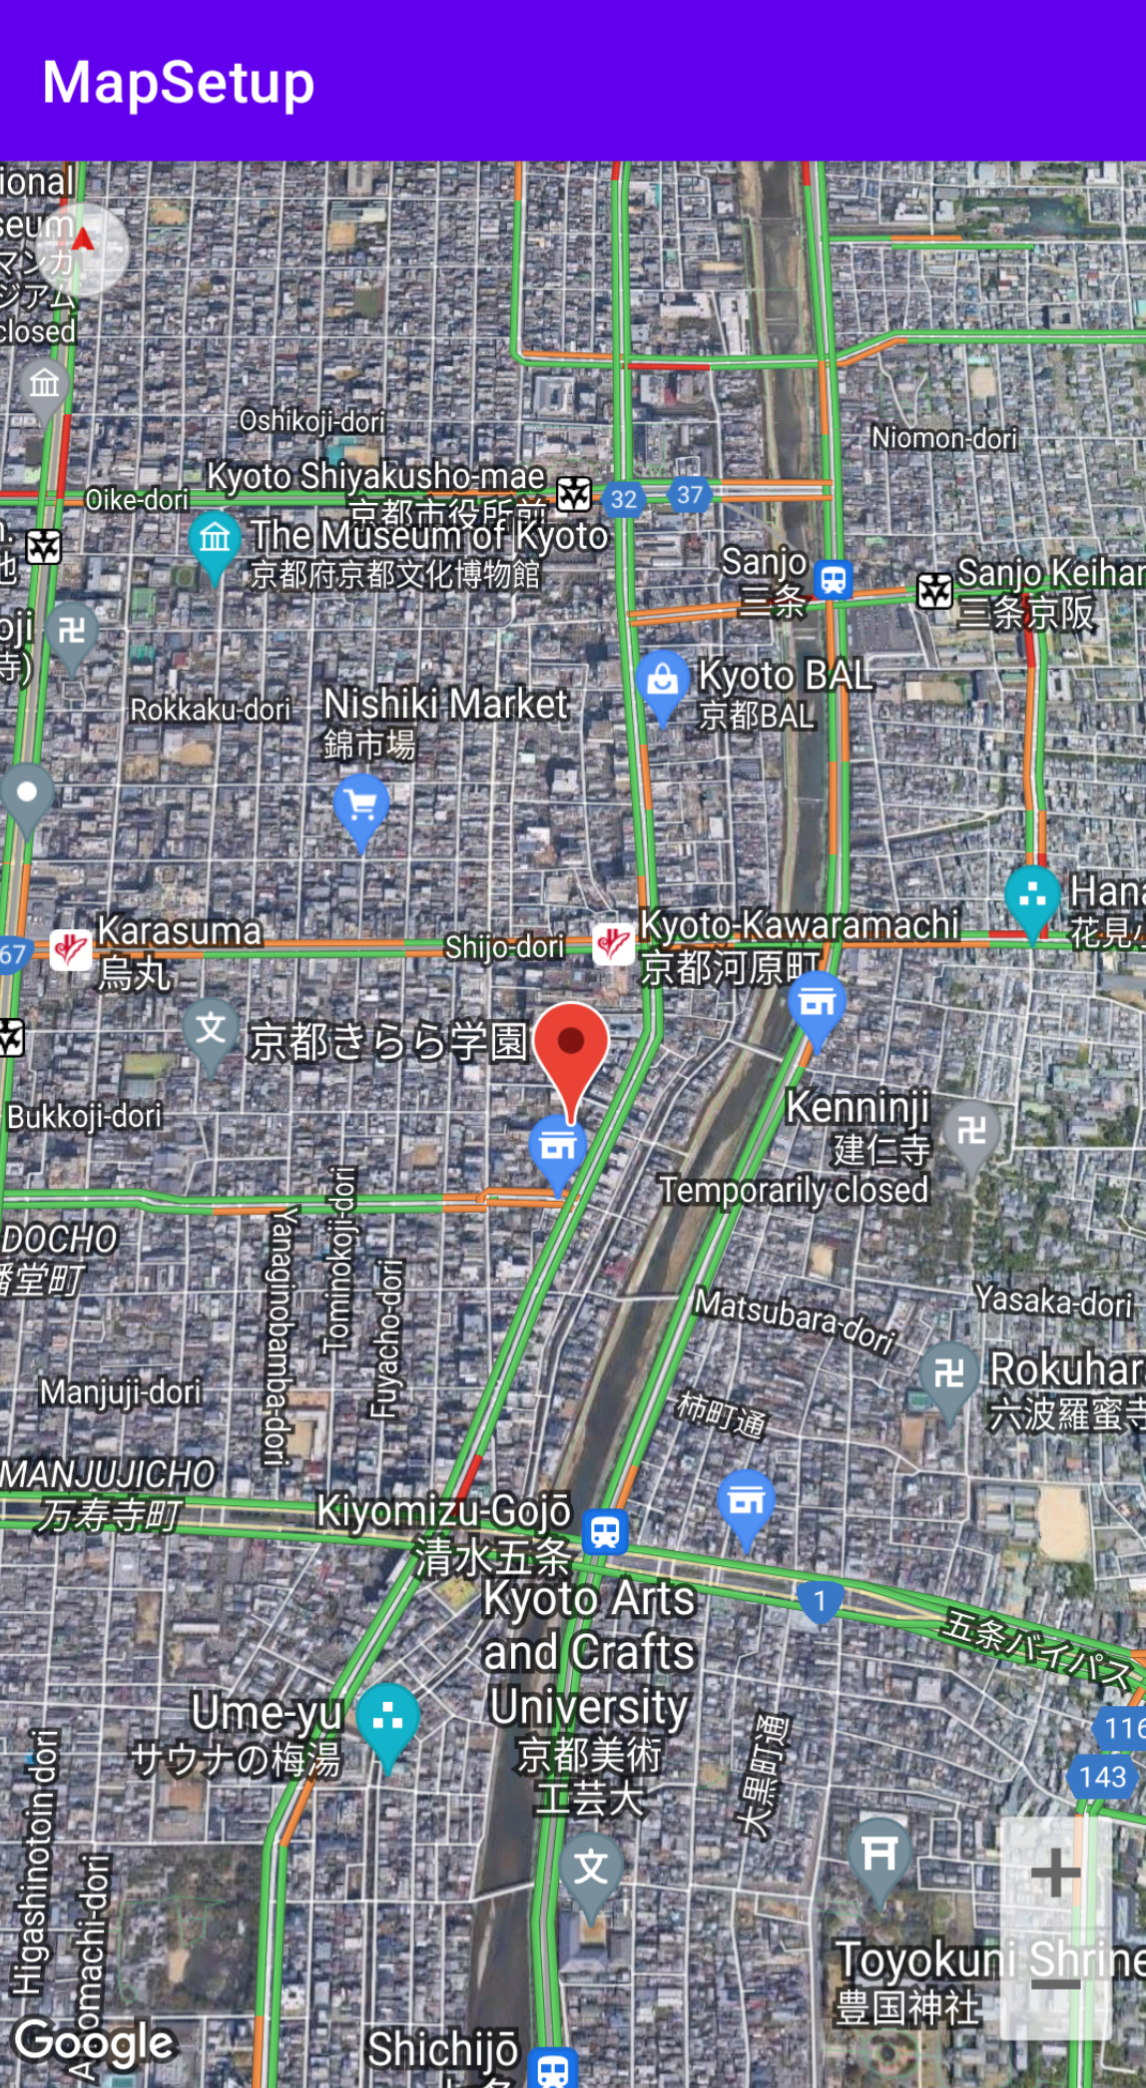
Example
In the example code below and the screenshot above, the map is configured with the following settings.
The initial settings are configured in the layout file:
- Enable zoom controls.
- Enable rotate gesture controls.
- Set the map tilt to 30.
The runtime settings:
- Center the camera on Kyoto Japan.
- Enable the hybrid map type.
- Turn on the traffic layer.
Initial settings
<?xml version="1.0" encoding="utf-8"?>
<fragment xmlns:android="http://schemas.android.com/apk/res/android"
    xmlns:map="http://schemas.android.com/apk/res-auto"
    xmlns:tools="http://schemas.android.com/tools"
    android:name="com.google.android.gms.maps.SupportMapFragment"
    android:id="@+id/map"
    android:layout_width="match_parent"
    android:layout_height="match_parent"
    map:uiZoomControls="true"
    map:uiRotateGestures="true"
    map:cameraTilt="30" />
Runtime settings
package com.example.mapsetup;

import androidx.appcompat.app.AppCompatActivity;

import android.os.Bundle;

import com.google.android.gms.maps.CameraUpdateFactory;
import com.google.android.gms.maps.GoogleMap;
import com.google.android.gms.maps.OnMapReadyCallback;
import com.google.android.gms.maps.SupportMapFragment;
import com.google.android.gms.maps.model.LatLng;
import com.google.android.gms.maps.model.MarkerOptions;

public class MainActivity extends AppCompatActivity implements OnMapReadyCallback {

    @Override
    protected void onCreate(Bundle savedInstanceState) {
        super.onCreate(savedInstanceState);
        setContentView(R.layout.activity_main);

        SupportMapFragment mapFragment = (SupportMapFragment) getSupportFragmentManager()
                .findFragmentById(R.id.map);
        mapFragment.getMapAsync(this);

    }

    // Update the map configuration at runtime.
    @Override
    public void onMapReady(GoogleMap googleMap) {
        // Set the map coordinates to Kyoto Japan.
        LatLng kyoto = new LatLng(35.00116, 135.7681);
        // Set the map type to Hybrid.
        googleMap.setMapType(GoogleMap.MAP_TYPE_HYBRID);
        // Add a marker on the map coordinates.
        googleMap.addMarker(new MarkerOptions()
                .position(kyoto)
                .title("Kyoto"));
        // Move the camera to the map coordinates and zoom in closer.
        googleMap.moveCamera(CameraUpdateFactory.newLatLng(kyoto));
        googleMap.moveCamera(CameraUpdateFactory.zoomTo(15));
        // Display traffic.
        googleMap.setTrafficEnabled(true);

    }
}
Before you begin
Before you begin, you can set up a project and add a basic map through the following options:
Create an app using the Maps template for Android Studio. The Maps template automatically configures your project and adds a basic map. A fragment is used as the map container and it is added statically. For details, see the quickstart.
Manually configure your project for the SDK and add a basic map. This allows you to use any Android template and add a map to an existing app.
Configure a map after adding it statically
This section describes how to set the initial state of the map if you added it statically to your layout file.
The Maps SDK for Android defines a set of custom XML attributes for a
SupportMapFragment or a MapView that you can use to configure the initial
state of the map directly from the layout file. The following attributes
are defined:
mapType— The type of map to display. Valid values include:none,normal,hybrid,satelliteandterrain.cameraTargetLat,cameraTargetLng,cameraZoom,cameraBearing,cameraTilt— The initial camera position. See the camera and views guide for details.uiZoomControls,uiCompass— Specifies whether zoom controls and the compass are displayed. SeeUiSettingsfor details.uiZoomGestures,uiScrollGestures,uiRotateGestures,uiTiltGestures— Specifies whether specific gestures are enabled. SeeUiSettingsfor details.zOrderOnTop— Indicates whether the surface of the map view is displayed on top of the map window, map controls, and any object in the window. See SurfaceView.setZOrderOnTop(boolean) for details.useViewLifecycle— Only valid with aSupportMapFragmentobject. Specifies whether the lifecycle of the map should be tied to the fragment's view or the fragment itself. See the reference documentation for details.liteMode—trueto enable lite mode; otherwise,false.mapColorScheme— Specifies the color scheme for a normal and terrain map. Values includelight(default),dark, andfollow_systemmeaning use the current system setting based on the device setting forUI_NIGHT_MODE_MASK. For more information, see Map color scheme.
In order to use these custom attributes within your layout file, it must
include the following namespace declaration. You can choose any namespace, it
doesn't have to be map:
xmlns:map="http://schemas.android.com/apk/res-auto"
You can then add the attributes with a map: prefix into your layout file.
The following layout file configures a SupportMapFragment object with custom
map attributes. The same attributes can be applied to a MapView object as
well.
<fragment xmlns:android="http://schemas.android.com/apk/res/android"
  xmlns:map="http://schemas.android.com/apk/res-auto"
  android:name="com.google.android.gms.maps.SupportMapFragment"
  android:id="@+id/map"
  android:layout_width="match_parent"
  android:layout_height="match_parent"
  map:cameraBearing="112.5"
  map:cameraTargetLat="-33.796923"
  map:cameraTargetLng="150.922433"
  map:cameraTilt="30"
  map:cameraZoom="13"
  map:mapType="normal"
  map:mapColorScheme="dark"
  map:uiCompass="false"
  map:uiRotateGestures="true"
  map:uiScrollGestures="false"
  map:uiTiltGestures="true"
  map:uiZoomControls="false"
  map:uiZoomGestures="true"/>
Configure a map after adding it dynamically
This section describes how to set the initial state of the map if you added it to your app dynamically.
If you added a SupportMapFragment or MapView dynamically, then you can
set the initial state of the map in a GoogleMapOptions object. The
options available are the same options that are available in the layout file.
You can create a GoogleMapOptions as follows:
Kotlin
val options = GoogleMapOptions()
Java
GoogleMapOptions options = new GoogleMapOptions();
And then configure it as follows:
Kotlin
options.mapType(GoogleMap.MAP_TYPE_SATELLITE)
    .compassEnabled(false)
    .rotateGesturesEnabled(false)
    .tiltGesturesEnabled(false)
Java
options.mapType(GoogleMap.MAP_TYPE_SATELLITE)
    .compassEnabled(false)
    .rotateGesturesEnabled(false)
    .tiltGesturesEnabled(false);
To apply these options when you are creating a map, do one of the following:
- If you are using a
SupportMapFragment, use theSupportMapFragment.newInstance(GoogleMapOptions options)static factory method to construct the fragment and pass in your settings. - If you are using a
MapView, use theMapView(Context, GoogleMapOptions)constructor and pass in your settings.
Localize your map
When you add a MapView or SupportMapFragment to your app, textual elements
on the map are displayed in the appropriate language based on the user's device
settings and location. You can restrict the languages used by your app to a
subset of all supported languages, by adding a resConfigs item to your Gradle
file. This is useful for stripping out unused languages, and also reduces your
app's binary size. For example:
defaultConfig {
    resConfigs "en", "fr", "es", "zh", "de", "ja", "ru", "ko", "pt", "in"
}
Read more about localizing your Android app.
Set up the traffic layer
You can display traffic data on your map by enabling the traffic layer. You can
enable and disable the traffic layer by calling the
setTrafficEnabled()
method, and you can determine whether the traffic layer is on by calling the
isTrafficEnabled()
method. The following screenshot displays a map with the traffic layer enabled.

Set up the transit layer
You can display transit data on your map by enabling the transit layer. You can
enable and disable the transit layer by calling the
setTransitEnabled()
method, and you can determine whether the transit layer is on by calling the
isTransitEnabled()
method. The following screenshot displays a map with the transit layer enabled.

Set the map type
To set the map type, call the setMapType method.
For example, to display a satellite map:
Kotlin
// Sets the map type to be "hybrid"
map.mapType = GoogleMap.MAP_TYPE_HYBRID
Java
// Sets the map type to be "hybrid"
map.setMapType(GoogleMap.MAP_TYPE_HYBRID);
The following image compares the normal, hybrid and terrain map types:

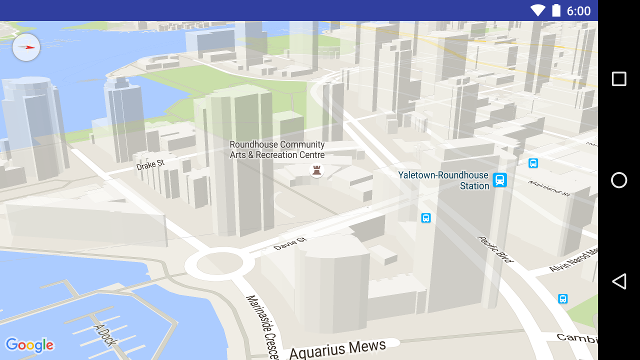
Set up 3D buildings
Many cities, when viewed close up, will have 3D buildings visible, as viewable
in the below picture of Vancouver, Canada. You can disable the 3d buildings by
calling
GoogleMap.setBuildingsEnabled(false).
Set up indoor map settings
At high zoom levels, the map shows floor plans for
indoor spaces such as airports, shopping malls, large retail stores, and transit
stations. These floor plans, called indoor maps, are displayed for the 'normal'
and 'satellite' map types (GoogleMap.MAP_TYPE_NORMAL and
GoogleMap.MAP_TYPE_SATELLITE). They are automatically enabled when the user
zooms in, and they fade away when the map is zoomed out.
Deprecation notice: In a future release, indoor
maps will only be available on the normal map type. From that
future release, indoor maps will not be supported on satellite,
terrain or hybrid maps. Even where indoor is not
supported, isIndoorEnabled() will continue to return the value
that has been set using setIndoorEnabled(), as it does now. By
default, setIndoorEnabled is true. The
release notes will let
you know when indoor support becomes unavailable on those map types.

Here is a summary of the indoor maps capabilities in the API:
- You can disable indoor maps by calling
GoogleMap.setIndoorEnabled(false). By default, indoor maps are enabled. Indoor maps are displayed on one map at a time. By default this is the first map added to your app. To display indoor maps on a different map, disable them on the first map, then callsetIndoorEnabled(true)on the second map. - To disable the default level picker (floor picker), call
GoogleMap.getUiSettings().setIndoorLevelPickerEnabled(false). For more details, see Interacting with the Map. OnIndoorStateChangeListener— defines listeners that that detect when a building comes into focus, or a level is activated in a building. For details, see Interacting with the Map.getFocusedBuilding— retrieves the building that is in focus. You can then find the active level by callingIndoorBuilding.getActiveLevelIndex().- Styling the base map does not affect indoor maps.
Set up map padding
This video shows an example of map padding.
A Google map is designed to fill the entire region defined by its container
element, typically a MapView or SupportMapFragment. Several aspects of how
the map appears and behaves are defined by the dimensions of its container:
- The camera's target will reflect the center of the padded region.
- Map controls are positioned relative to the edges of the map.
- Legal information, such as copyright statements or the Google logo appear along the bottom edge of the map.
You can add padding around the edges of the map using the
GoogleMap.setPadding() method. The map will
continue to fill the entire container, but text and control positioning, map
gestures, and camera movements will behave as if it has been placed in a
smaller space. This results in the following changes:
- Camera movements using API calls or button presses (e.g., compass, my location, zoom buttons) are relative to the padded region.
- The
getCameraPositionmethod returns the center of the padded region. - The
ProjectionandgetVisibleRegionmethods return the padded region. - UI controls are offset from the edge of the container by the specified number of pixels.
Padding can be helpful when designing UIs that overlap some portion of the map. In the following image, the map is padded along the top and right edges. Visible map controls and legal text will be displayed along the edges of the padded region, shown in green, while the map will continue to fill the entire container, shown in blue. In this example, you could float a menu over the right side of the map without obscuring map controls.

Map color scheme
For maps of type normal and terrain, you can set the map color scheme dynamically to dark, light, or to use the current system setting. For example, you can darken or lighten the map color scheme based on the time of day or indoor or outdoor use of the device.
By default, the map uses light mode. The current system setting value is based
on the device setting for UI_NIGHT_MODE_MASK.
Kotlin
mapFragment = SupportMapFragment.newInstance(GoogleMapOptions().mapColorScheme(MapColorScheme.DARK).mapId(mapId2))
Java
mapFragment = SupportMapFragment.newInstance(new GoogleMapOptions().mapColorScheme(MapColorScheme.DARK).mapId(mapId2));
You can toggle the color scheme using the
GoogleMap.setMapColorScheme()
method to set the current style to dark mode, light mode, or follow the system
settings.
Kotlin
googleMap.setMapColorScheme(MapColorScheme.DARK)
googleMap.setMapColorScheme(MapColorScheme.LIGHT)
googleMap.setMapColorScheme(MapColorScheme.FOLLOW_SYSTEM)
Java
googleMap.setMapColorScheme(MapColorScheme.DARK);
googleMap.setMapColorScheme(MapColorScheme.LIGHT);
googleMap.setMapColorScheme(MapColorScheme.FOLLOW_SYSTEM);
To create custom light styles and dark styles for your maps, use cloud-based maps styling.
Configure background color
When working in dark mode or switching between map views, it may be useful to
configure the default map background color. This can be achieved by setting the
map options backgroundColor property.
Kotlin
private val googleMapOptions: GoogleMapOptions =
    GoogleMapOptions().backgroundColor(Color.argb(255, 255, 0, 0));
Java
private GoogleMapOptions options = new GoogleMapOptions().backgroundColor(Color.argb(255, 255, 0, 0));
You can also use cloud-based maps styling to configure the background color. The background color set in maps styling has a higher priority than the local background color. For more information, see Change the app background color for cloud-based maps styling.