Page Summary
-
Google Messages and Google Wallet can be used together to create a seamless check-in process for users.
-
The check-in flow allows users to complete check-in, receive their boarding pass, and add it directly to Google Wallet from the Messages app.
-
Once added to Google Wallet, the boarding pass automatically updates with any changes to flight details.
-
Implementing this flow requires working with the Google Wallet API and the RBM API.
You can use Google Messages with RCS and Google Wallet to design a seamless check-in flow: the user completes their check-in, receives their boarding pass, and adds it directly to Google Wallet from the Messages app. Once in their wallet, the pass updates automatically if the flight details change. Users have fast access to an up-to-date boarding pass right on their phone.
This document describes the technical steps to implement a boarding pass to Google Wallet flow. It also features a sample conversation with design tips for a smooth and efficient check-in experience with RBM.
Technical implementation
To implement a boarding pass to Google Wallet flow, you'll work with the Google Wallet API and the RBM API.
Prerequisites
To get started with the Google Wallet API, follow these required steps:
- Sign up for a Wallet issuer account so you can create and distribute passes for Google Wallet.
- Create a Google Cloud (GCP) project if you don't already have one.
- Enable the Google Wallet API.
- Create a service account and key so you can call the Google Wallet API.
- Authorize the service account in the Google Pay and Wallet Console.
- Use the boarding pass template to create a new Boarding class.
Google Wallet API
To create a boarding pass and generate an Add to Google Wallet URL for RBM, follow these steps:
- Perform the necessary authentications and authorizations.
- Create a Passes Object.
- Obtain a signed JSON Web Token (JWT). The maximum length of an encoded JWT is 2048 characters.
- Use the JWT to generate an Add to Google Wallet URL.
RBM API
To send an Add to Google Wallet suggestion from RBM, send an Open URL action. In the message payload, do the following:
- For
text, enter "Add to Google Wallet". - For
url, enter the Add to Google Wallet URL.
The Google Wallet icon will automatically be shown on the suggestion label.

Conversation design
This sample uses the unique power of conversation to guide users through a complete check-in flow. It demonstrates how you can use natural dialog and rich features, like one-tap suggestions and rich cards, to help users reach their goals. In this case their goals are: (1) customize my flight experience, (2) receive my boarding pass, and (3) add it to Google Wallet for quick access at the airport.
Next is an overview of the conversation. It's followed by design tips and a step-by-step breakdown of the flow. To implement a similar design for your agent, see the code samples following the steps.
Design advice
Keep these principles in mind when designing your check-in flow:
- Your first message is the most important. Briefly state the purpose of the conversation so the user has a reason to engage.
- Each message should provide a small chunk of information and prompt the user to respond. Suggested replies and suggested actions help users take the next step.
- Your agent should be responsive, not robotic. Use language that reflects your brand's tone of voice. How would your ideal brand representative chat with a customer?
- People like to feel special. You can personalize the check-in experience by suggesting seats or meals based on the user's flight history.
- Rich cards and carousels make the conversation more dynamic. Use them to share images and details that will help the user choose among the options.
- A good conversation ends well. Confirm the user's check-in details before you send their boarding pass. Add a human touch with a friendly send-off.
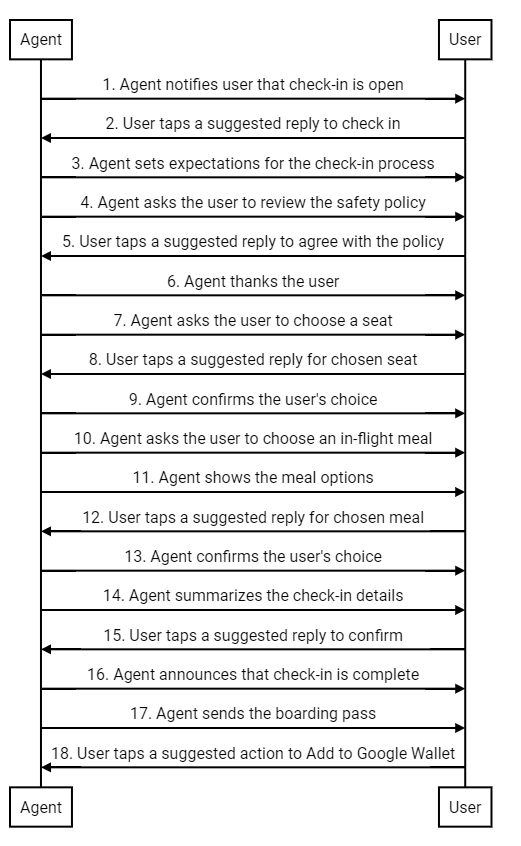
Check-in flow
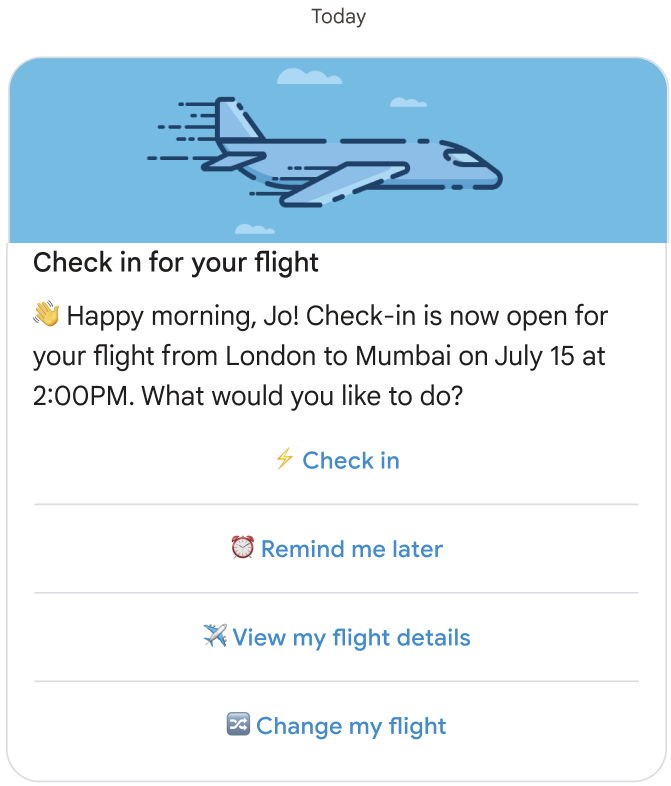
The agent notifies the user that check-in for their flight is open.
Code sample
const suggestions = [
  {
    reply: {
      text: '⚡ Check in',
      postbackData: 'checkIn',
    },
  },
  {
    reply: {
      text: '⏰ Remind me later',
      postbackData: 'remindMe',
    },
  },
  {
    reply: {
      text: '✈️ View my flight details',
      postbackData: 'flightDetails',
    },
  },
  {
    reply: {
      text: '🔀 Change my flight',
      postbackData: 'flightChange',
    },
  },
];

const params = {
  messageText: 'Check-in for your flight',
  messageDescription: '👏 Happy morning, Jo! Check-in is now open for your flight from London to Mumbai on ' + getFlightTime() + ' at 2:00PM. What would you like to do? ',
  msisdn: phoneNumber,
  suggestions: suggestions,
  imageUrl: getImageUrl('fly.png'),
  height: 'MEDIUM',
};

rbmApiHelper.sendRichCard(params);
The user taps a suggested reply to check in.
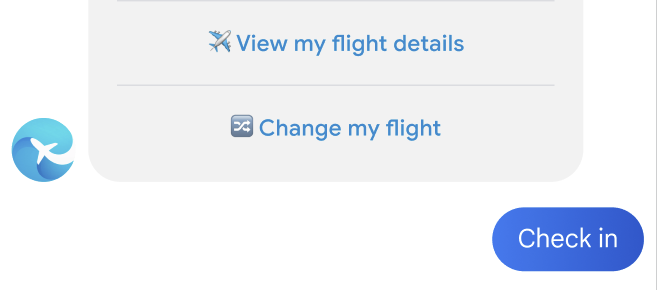
The agent sets expectations for the check-in process.
Code sample
const params = {
  messageText: "OK, great. It's just 3 simple steps to check in. Here's the first step to get you onboard:",
  msisdn: msisdn,
};

let self = this;

rbmApiHelper.sendMessage(params, function (response, err) {
  self.sendPolicyImage(msisdn);
});
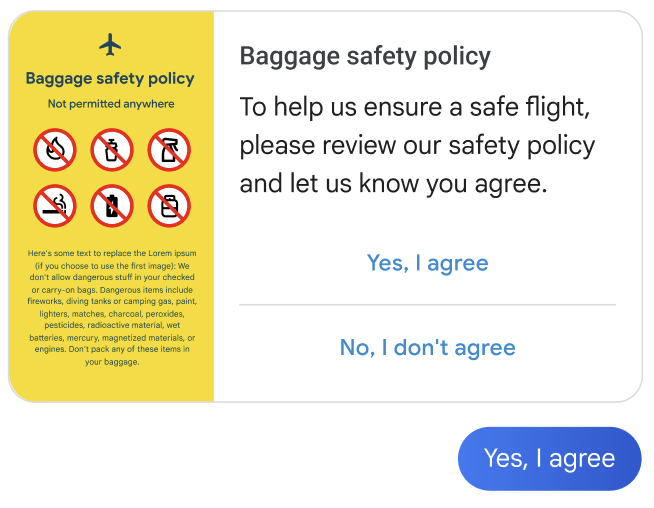
The agent asks the user to agree to the safety policy.
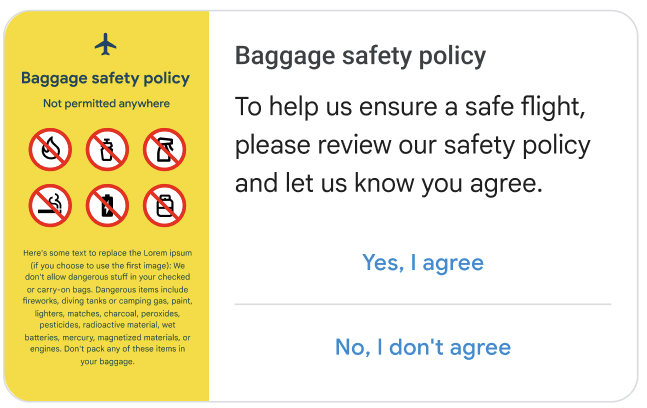
Code sample
const suggestions = [
  {
    reply: {
      text: 'Yes, I agree',
      postbackData: 'policy_agree',
    },
  },
  {
    reply: {
      text: "No, I don't agree",
      postbackData: 'policy_nack',
    },
  },
];

const params = {
  messageText: 'Baggage safety policy',
  messageDescription: 'To help us ensure a safe flight, please review our safety policy and let us know you agree',
  msisdn: msisdn,
  suggestions: suggestions,
  imageUrl: getImageUrl('policyImage.png'),
  height: 'MEDIUM',
  orientation: 'HORIZONTAL',
  thumbnailImageAlignment: 'LEFT',
};

rbmApiHelper.sendRichCard(params);
The user taps a suggested reply to agree.
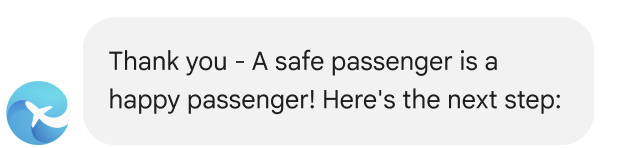
The agent thanks the user and introduces the next step.
Code sample
const params = {
  messageText: "Thank you - A safe passenger is a happy passenger! Here's the next step:",
  msisdn: msisdn,
};

let self = this;

rbmApiHelper.sendMessage(params, function (response, err) {
  self.sendPlan(msisdn);
});
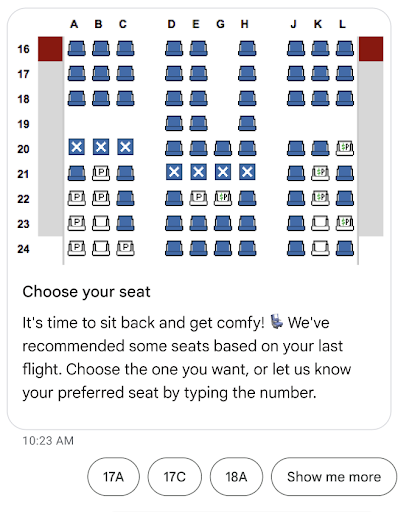
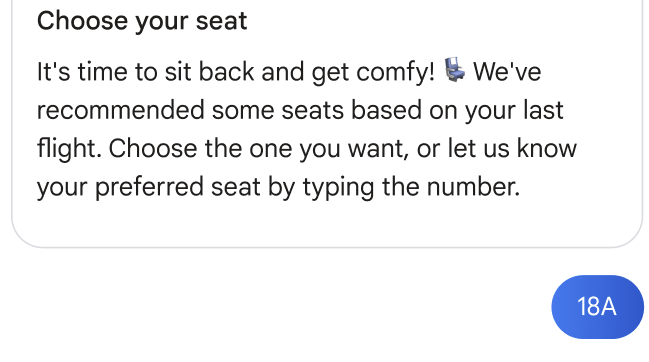
The agent prompts the user to choose a seat.
Code sample
const suggestions = [
  {
    reply: {
      text: 'View the seat map',
      postbackData: 'view_seat_map',
    },
  },
];

const outerSuggestions = [
  {
    reply: {
      text: '17A',
      postbackData: 'seat_17A',
    },
  },
  {
    reply: {
      text: '17C',
      postbackData: 'seat_17C',
    },
  },
  {
    reply: {
      text: '18A',
      postbackData: 'seat_18A',
    },
  },
  {
    reply: {
      text: 'Show me more',
      postbackData: 'more',
    },
  },
];

const params = {
  messageText: 'Choose your seat',
  messageDescription: "It's time to sit back and get comfy! 💺 We've recommended some seats based on your last flight. Choose the one you want, or let us know your preferred seat by typing the number.",
  msisdn: msisdn,
  imageUrl: getImageUrl('seatMap.png'),
  height: 'TALL',
  orientation: 'VERTICAL',
  outerSuggestions: outerSuggestions
};

rbmApiHelper.sendRichCard(params);
The user taps a suggested reply for their chosen seat.
The agent confirms the user's choice.

Code sample
this.seatmap[msisdn] = seat;

const params = {
  messageText: `Seat ${seat}, you got it`,
  msisdn: msisdn,
};

let self = this;
  rbmApiHelper.sendMessage(params, function(res) {
    self.sendFoodOptions(msisdn);
});
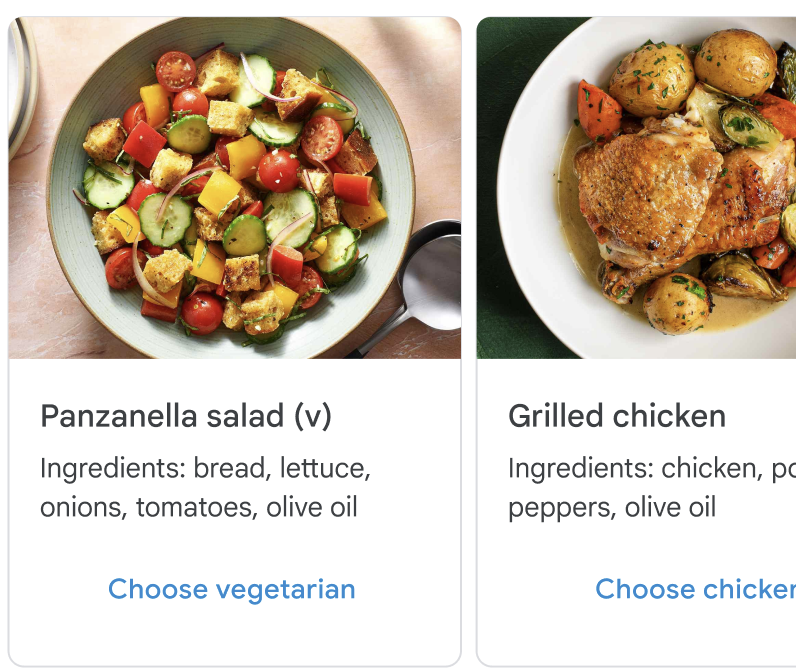
The agent asks the user to choose their in-flight meal.

Code sample
const params = {
  messageText: `Now let's talk food 😋 You can pre-order your in-flight meal. Would you be happy with a vegetarian entree or a chicken entree?`,
  msisdn: msisdn,
};

let self = this;

rbmApiHelper.sendMessage(params, function(res) {
  self.sendFoodDetails(msisdn);
});
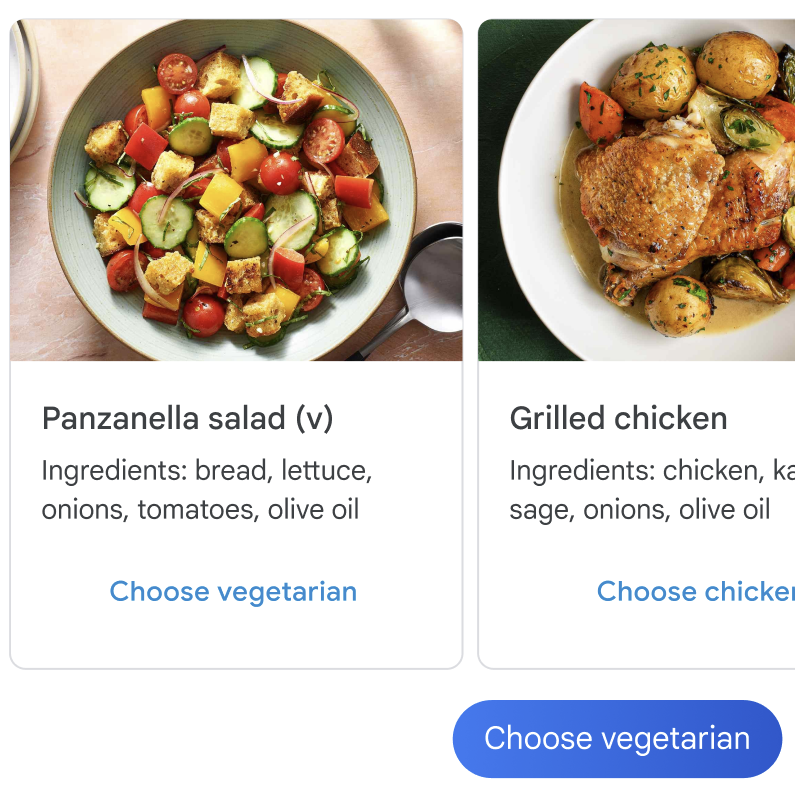
The agent shows the meal options.
Code sample
const cardContents = [
  {
    title: 'Panzanella salad (v)',
    description: 'Ingredients: bread, lettuce, onions, tomatoes, olive oil',
    suggestions: [
      {
        reply: {
          text: 'Choose vegetarian',
          postbackData: 'veggie',
        },
      },
    ],
    media: {
      height: 'MEDIUM',
      contentInfo: {
        fileUrl: getImageUrl('salad.jpg'),
      },
    },
  },
  {
    title: 'Grilled chicken with greens',
    description: 'Ingredients: chicken, potatoes, peppers, olive oil',
    suggestions: [
      {
        reply: {
          text: 'Choose chicken',
          postbackData: 'chicken',
        },
      },
    ],
    media: {
      height: 'MEDIUM',
      contentInfo: {
        fileUrl: getImageUrl('chicken.png'),
      },
    },
  },
];

const params = {
  msisdn: msisdn,
  cardContents: cardContents,
};

rbmApiHelper.sendCarouselCard(params);
The user taps a suggested reply for their chosen meal.
The agent confirms the user's choice.

Code sample
const params = {
  messageText: `Vegetarian it is 💚`,
  msisdn: msisdn,
};

let self = this;

rbmApiHelper.sendMessage(params, function (response, err) {
  self.sendAskConfirmation(msisdn);
});
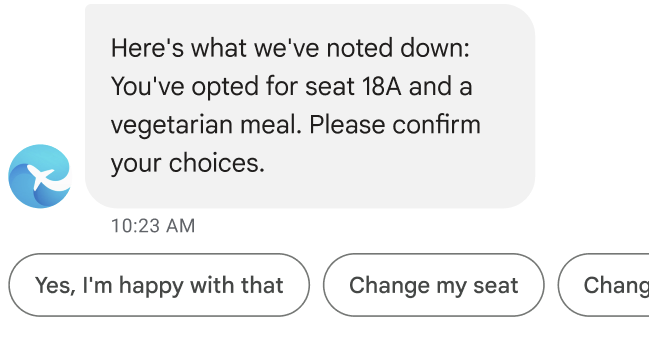
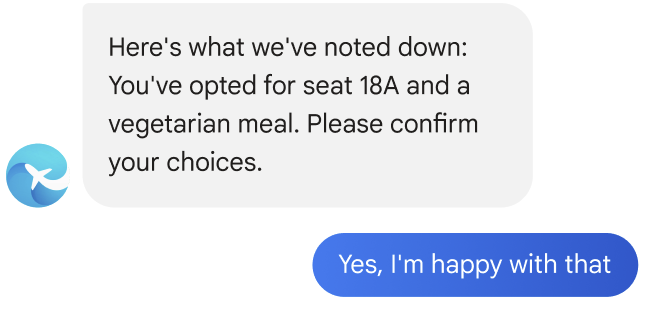
The agent summarizes the check-in details.
Code sample
let seat = this.seatmap[msisdn];

const suggestions = [
  {
    reply: {
      text: "Yes, I'm happy with that",
      postbackData: 'happy',
    },
  },
  {
    reply: {
      text: 'Change my seat',
      postbackData: 'change_seat',
    },
  },
  {
    reply: {
      text: 'Change my meal',
      postbackData: 'change_meal',
    },
  },
];

const params = {
  messageText: "Here's what we've noted down: You've opted for seat " + seat + " and a vegetarian meal. Please confirm your choices.",
  msisdn: msisdn,
  suggestions: suggestions
};

rbmApiHelper.sendMessage(params);
The user taps a suggested reply to confirm the check-in details.
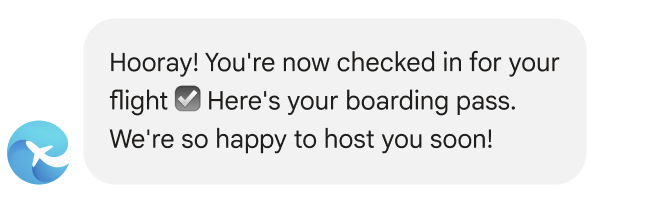
The agent announces that check-in is complete.
Code sample
const params = {
  messageText: "Hooray! You're now checked in for your flight ☑️ Here's your boarding pass. We're so happy to host you soon!",
  msisdn: msisdn,
};

let self = this;

rbmApiHelper.sendMessage(params, function (response, err) {
  self.sendWalletPass(msisdn);
});
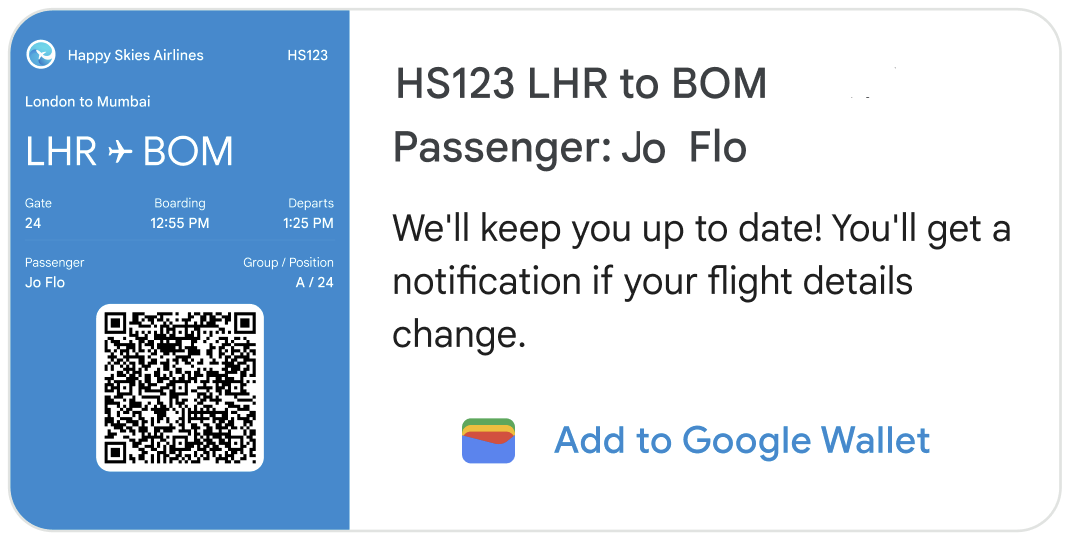
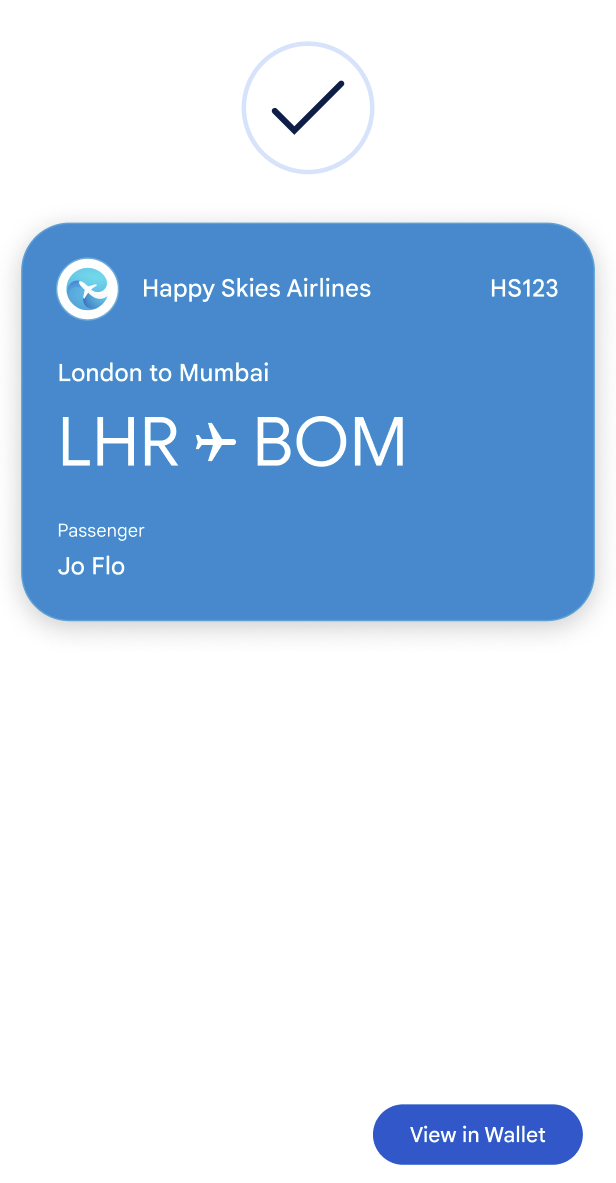
The agent sends the user's boarding pass.
Code sample
this.walletHelper.createFlightPassUrl(this.seatmap[msisdn]).then((url) => {
  let suggestions = [
    {
      action: {
        text: 'Add to Google Wallet',
        postbackData: 'addToWallet',
        openUrlAction: {
          url: url
        },
      },
    },
  ];

  const params = {
    messageText: 'HS123 LHR to BOM\nPassenger: Jo Flow',
    messageDescription: "We'll keep you up to date! You'll get a notification if your flight details change.",
    msisdn: msisdn,
    suggestions: suggestions,
    imageUrl: getImageUrl('boardingPass.png'),
    height: 'TALL',
    orientation: 'HORIZONTAL',
    thumbnailImageAlignment: 'LEFT',
  };

  rbmApiHelper.sendRichCard(params);
});
In this horizontal rich card, the image is a fully functional boarding pass provided by the airline. The image should display all the needed boarding information, including a scannable barcode. Users can tap the image to view and scan their boarding pass from Google's Messages app.
An Add to Google Wallet suggestion appears on the rich card. This suggestion triggers an Open URL action that opens the Google Wallet app, where the user can add the boarding pass to their wallet. (If the app isn't on the user's device, they're prompted to install it.) Once the pass is added to Google Wallet, the user automatically receives a flight reminder and status updates if their flight details change.
Users who don't add their pass to Google Wallet should also be kept up to date. Message the user about any changes to the boarding information shown on the rich card.
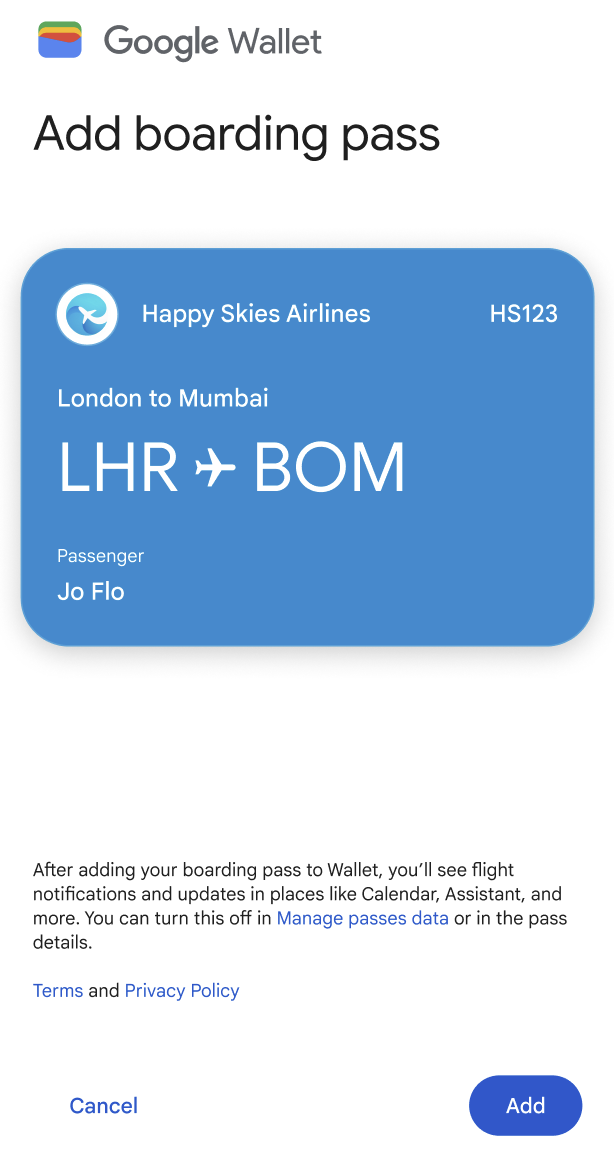
The user taps a suggested action to add the pass to Google Wallet.

The Google Wallet app opens. The user taps a button to add the pass to their wallet.
The user taps a button to view their pass.
The boarding pass with QR code is shown.
