應用程式傳送至商家檔案 API 的每項要求都必須包含授權權杖。授權權杖可向 Google 識別使用者或應用程式,讓使用者或應用程式存取 Business Profile API。您的應用程式必須使用 OAuth 2.0 通訊協定授權要求。
本指南將說明您可以在平台上實作 OAuth 2.0 的不同方法。Google Identity Platform 提供 Google 登入和 OAuth 功能,這兩項功能會在本指南中使用。
如要進一步瞭解如何針對網路伺服器應用程式使用 OAuth 2.0,請參閱這篇指南。
實作 OAuth 2.0 可帶來下列優點:
- 保護業務擁有者的資料存取權。
- 商家擁有者登入 Google 帳戶時,建立其身分。
- 確認合作夥伴平台或應用程式可在獲得商家業主明確同意後,存取及修改位置資料。擁有者日後可以撤銷這項存取權。
- 建立合作夥伴平台的 ID。
- 讓合作夥伴平台可代表商家擁有者執行線上或離線動作。包括回覆評論、建立貼文和更新選單項目。
使用 OAuth 2.0 存取 API
開始前,您必須設定 Google Cloud 專案並啟用 Business Profile API。詳情請參閱基本設定說明文件。
設定 OAuth 和同意畫面
請按照下列步驟建立憑證和同意聲明畫面:
- 在 API 控制台的「憑證」頁面中,按一下「建立憑證」,然後在下拉式清單中選取「OAuth Client ID」。
- 選取應用程式類型、填寫相關資訊,然後按一下「建立」。
- 按一下 [儲存]。
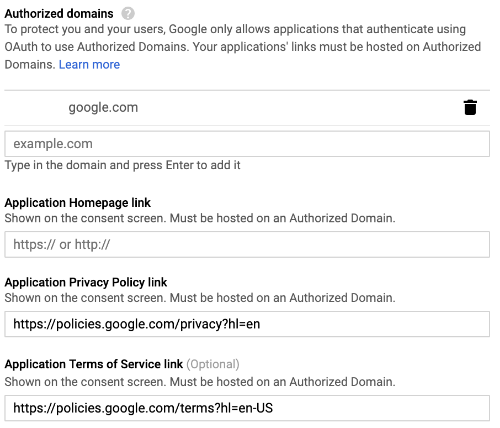
- 更新 OAuth 同意畫面設定。您可以在此更新應用程式名稱和標誌,以及加入服務條款和隱私權政策的連結。
下圖顯示 OAuth 同意畫面上的應用程式名稱和標誌欄位:
下圖顯示 OAuth 同意畫面上顯示的其他欄位:
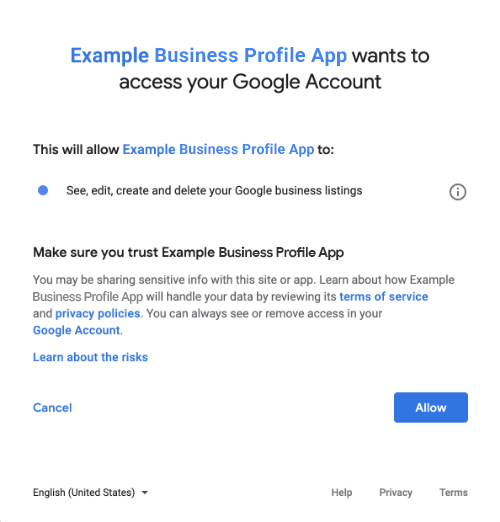
下圖為使用者在提供同意前可能看到的內容:
納入 OAuth 2.0 的方法
您可以使用下列方法實作 OAuth 2.0:
以下內容會提供這些方法的相關資訊,協助您將 OAuth 2.0 整合至應用程式。
授權範圍
需要下列其中一種 OAuth 範圍:
- https://www.googleapis.com/auth/business.manage
- https://www.googleapis.com/auth/plus.business.manage
plus.business.manage 範圍已淘汰,但仍可用於維持現有導入作業的回溯相容性。
用戶端程式庫
本頁面的語言專屬範例會使用 Google API 用戶端程式庫來實作 OAuth 2.0 授權。如要執行程式碼範例,您必須先安裝所用語言的用戶端程式庫。
用戶端程式庫支援以下語言:
Google 登入
Google 登入是將 OAuth 整合至平台最快速的方式。適用於 Android、iOS、網頁等。

Google 登入是一項安全的驗證系統,可讓使用者以 Google 帳戶登入,這也是他們用來登入其他 Google 服務的帳戶。使用者登入後,即可授權您的應用程式呼叫商家檔案 API,並交換用於取得更新和存取權杖的授權碼。
離線存取
您可能會想在使用者離線時,代表使用者呼叫商家檔案 API。建議平台整合這項功能,因為在使用者登入並同意後,您隨時可以編輯、查看及管理刊登項目。
Google 會假設使用者已登入 Google 帳戶,並授權您的應用程式呼叫商家檔案 API,且已交換授權碼,以便取得重新整理權杖,並稍後取得存取權杖。使用者可以安全地儲存更新權杖,並在日後隨時使用該權杖取得新的存取權杖。詳情請參閱「伺服器端應用程式的 Google 登入」。
下列程式碼片段說明如何在應用程式中實作離線存取功能。如要執行這段程式碼,請參閱「執行範例」。
<!-- The top of file index.html -->
<html itemscope itemtype="http://schema.org/Article">
<head>
  <!-- BEGIN Pre-requisites -->
  <script src="https://ajax.googleapis.com/ajax/libs/jquery/1.8.2/jquery.min.js">
  </script>
  <script src="https://apis.google.com/js/client:platform.js?onload=start" async defer>
  </script>
  <!-- END Pre-requisites -->
<!-- Continuing the <head> section -->
  <script>
    function start() {
      gapi.load('auth2', function() {
        auth2 = gapi.auth2.init({
          client_id: 'YOUR_CLIENT_ID.apps.googleusercontent.com',
          // Scopes to request in addition to 'profile' and 'email'
          scope: 'https://www.googleapis.com/auth/business.manage',
          immediate: true
        });
      });
    }
  </script>
</head>
<body>
  <!-- Add where you want your sign-in button to render -->
<!-- Use an image that follows the branding guidelines in a real app, more info here:
 https://developers.google.com/identity/branding-guidelines
-->
<h1>Business Profile Offline Access Demo</h1>

<p> This demo demonstrates the use of Google Identity Services and OAuth to gain authorization to call the Business Profile APIs on behalf of the user, even when the user is offline.

When a refresh token is acquired, store this token securely on your database. You will then be able to use this token to refresh the OAuth credentials and make offline API calls on behalf of the user.

The user may revoke access at any time from the <a href='https://myaccount.google.com/permissions'>Account Settings</a> page.
</p>

<button id="signinButton">Sign in with Google</button><br>
<input id="authorizationCode" type="text" placeholder="Authorization Code" style="width: 60%"><button id="accessTokenButton" disabled>Retrieve Access/Refresh Token</button><br>
 <input id="refreshToken" type="text" placeholder="Refresh Token, never expires unless revoked" style="width: 60%"><button id="refreshSubmit">Refresh Access Token</button><br>
 <input id="accessToken" type="text" placeholder="Access Token" style="width: 60%"><button id="gmbAccounts">Get Business Profile Accounts</button><br>
 <p>API Responses:</p>
<script>
    //Will be populated after sign in.
    var authCode;
  $('#signinButton').click(function() {
    // signInCallback
    auth2.grantOfflineAccess().then(signInCallback);
  });

  $('#accessTokenButton').click(function() {
    // signInCallback defined in step 6.
    retrieveAccessTokenAndRefreshToken(authCode);
  });

  $('#refreshSubmit').click(function() {
    // signInCallback defined in step 6.
    retrieveAccessTokenFromRefreshToken($('#refreshToken').val());
  });

   $('#gmbAccounts').click(function() {
    // signInCallback defined in step 6.
    retrieveGoogleMyBusinessAccounts($('#accessToken').val());
  });


function signInCallback(authResult) {
    //the 'code' field from the response, used to retrieve access token and bearer token
  if (authResult['code']) {
    // Hide the sign-in button now that the user is authorized, for example:
    $('#signinButton').attr('style', 'display: none');
    authCode = authResult['code'];

    $("#accessTokenButton").attr( "disabled", false );

    //Pretty print response
    var e = document.createElement("pre")
    e.innerHTML = JSON.stringify(authResult, undefined, 2);
    document.body.appendChild(e);

    //autofill authorization code input
    $('#authorizationCode').val(authResult['code'])


  } else {
    // There was an error.
  }
}

//WARNING: THIS FUNCTION IS DISPLAYED FOR DEMONSTRATION PURPOSES ONLY. YOUR CLIENT_SECRET SHOULD NEVER BE EXPOSED ON THE CLIENT SIDE!!!!
function retrieveAccessTokenAndRefreshToken(code) {
      $.post('https://www.googleapis.com/oauth2/v4/token',
      { //the headers passed in the request
        'code' : code,
        'client_id' : 'YOUR_CLIENT_ID.apps.googleusercontent.com',
        'client_secret' : 'YOUR_CLIENT_SECRET',
        'redirect_uri' : 'http://localhost:8000',
        'grant_type' : 'authorization_code'
      },
      function(returnedData) {
        console.log(returnedData);
        //pretty print JSON response
        var e = document.createElement("pre")
        e.innerHTML = JSON.stringify(returnedData, undefined, 2);
        document.body.appendChild(e);
        $('#refreshToken').val(returnedData['refresh_token'])
      });
}

//WARNING: THIS FUNCTION IS DISPLAYED FOR DEMONSTRATION PURPOSES ONLY. YOUR CLIENT_SECRET SHOULD NEVER BE EXPOSED ON THE CLIENT SIDE!!!!
function retrieveAccessTokenFromRefreshToken(refreshToken) {
    $.post('https://www.googleapis.com/oauth2/v4/token',
        { // the headers passed in the request
        'refresh_token' : refreshToken,
        'client_id' : 'YOUR_CLIENT_ID.apps.googleusercontent.com',
        'client_secret' : 'YOUR_CLIENT_SECRET',
        'redirect_uri' : 'http://localhost:8000',
        'grant_type' : 'refresh_token'
      },
      function(returnedData) {
        var e = document.createElement("pre")
        e.innerHTML = JSON.stringify(returnedData, undefined, 2);
        document.body.appendChild(e);
        $('#accessToken').val(returnedData['access_token'])
      });
}

function retrieveGoogleMyBusinessAccounts(accessToken) {
    $.ajax({
        type: 'GET',
        url: 'https://mybusinessaccountmanagement.googleapis.com/v1/accounts',
        headers: {
            'Authorization' : 'Bearer ' + accessToken
        },
        success: function(returnedData) {
            var e = document.createElement("pre")
            e.innerHTML = JSON.stringify(returnedData, undefined, 2);
            document.body.appendChild(e);
        }
    });
}
</script>
</body>
</html>
僅限線上存取
為了簡化實作程序,您可以呼叫 Business Profile API,而不需要快取使用者重新整理權杖。不過,使用者必須登入,平台才能以使用者身分執行 API 呼叫。
以下程式碼片段示範 Google 登入流程的實作方式,以及如何發出特定使用者的 API 呼叫。使用者使用 Google 帳戶登入並同意授權給您的應用程式後,系統就會授予存取權杖。這個存取權權杖可識別使用者,且必須在 Business Profile API 要求中做為標頭傳遞。
如要執行這段程式碼,請參閱「執行範例」。
<!-- The top of file index.html -->
<html lang="en">
  <head>
    <meta name="google-signin-scope" content="profile email https://www.googleapis.com/auth/business.manage">
    <meta name="google-signin-client_id" content="YOUR_CLIENT_ID.apps.googleusercontent.com">
    <script src="https://apis.google.com/js/platform.js" async defer></script>
  </head>
  <body>
    <div class="g-signin2" data-onsuccess="onSignIn" data-theme="dark"></div>
    <script>
      var gmb_api_version = 'https://mybusinessaccountmanagement.googleapis.com/v1';
      function onSignIn(googleUser) {
        // Useful data for your client-side scripts:
        var profile = googleUser.getBasicProfile();
        console.log('Full Name: ' + profile.getName());
        console.log("Email: " + profile.getEmail());
        var access_token = googleUser.getAuthResponse().access_token;

        //Using the sign in data to make a Business Profile APIs call
        var req = gmb_api_version + '/accounts';
        var xhr = new XMLHttpRequest();
        xhr.open('GET', req);
        xhr.setRequestHeader('Authorization', 'Bearer ' + access_token);

        //Displaying the API response
        xhr.onload = function () {
          document.body.appendChild(document.createTextNode(xhr.responseText));
        }
        xhr.send();
      }
    </script>
  </body>
</html>
執行範例
請按照下列步驟執行提供的範例程式碼:
- 將程式碼片段儲存到名為
index.html的檔案中。請確認檔案中已設定客戶 ID。 在工作目錄中使用下列指令啟動網路伺服器:
Python 2.X
python -m SimpleHTTPServer 8000
Python 3.X
python -m http.server 8000
在「Authorized JavaScript origins」(已授權的 JavaScript 來源) 欄位下方輸入網站網址,如要執行本指南中的程式碼範例,您也必須新增
http://localhost:8000。在瀏覽器中載入下列網址:
http://localhost:8000/index.html