
Introducción
Los marcadores identifican una ubicación en un mapa. De forma predeterminada, los marcadores contienen una imagen estándar. Los marcadores pueden mostrar imágenes personalizadas. En ese caso, se suelen denominar "íconos". Los marcadores y los íconos son objetos de tipo Marker. Puedes configurar un ícono personalizado en el constructor del marcador, o bien llamar a setIcon() en el marcador. Obtén más información sobre cómo personalizar la imagen del marcador.
En términos generales, los marcadores son un tipo de superposición. Para obtener información sobre otros tipos de superposiciones, consulta el artículo Cómo dibujar en el mapa.
Los marcadores están diseñados para ser interactivos. Por ejemplo, de forma predeterminada, reciben eventos 'click', por lo que puedes agregar un objeto de escucha de eventos para mostrar una ventana de información con datos personalizados. Para permitir que los usuarios muevan un marcador en el mapa, configura la propiedad draggable del marcador como true. Para obtener más información sobre los marcadores arrastrables, consulta la sección correspondiente a continuación.
Cómo agregar un marcador
El constructor google.maps.Marker toma un literal del objeto Marker options y especifica las propiedades iniciales del marcador.
Los siguientes campos son particularmente importantes y se suelen configurar al construir el marcador:
-
position(obligatorio) especifica las coordenadasLatLngque identifican la ubicación inicial del marcador. Una forma de recuperar las coordenadasLatLnges usando el servicio Geocoding. -
map(opcional) especifica elMapen el que se debe colocar el marcador. Si no especificas el mapa al construir el marcador, este se creará, pero no se adjuntará al mapa (ni se mostrará en él). Puedes agregar el marcador más adelante llamando al métodosetMap()del marcador.
En el siguiente ejemplo, se agrega un marcador simple a un mapa en Uluru, en la región central de Australia:
TypeScript
function initMap(): void { const myLatLng = { lat: -25.363, lng: 131.044 }; const map = new google.maps.Map( document.getElementById("map") as HTMLElement, { zoom: 4, center: myLatLng, } ); new google.maps.Marker({ position: myLatLng, map, title: "Hello World!", }); } declare global { interface Window { initMap: () => void; } } window.initMap = initMap;
JavaScript
function initMap() { const myLatLng = { lat: -25.363, lng: 131.044 }; const map = new google.maps.Map(document.getElementById("map"), { zoom: 4, center: myLatLng, }); new google.maps.Marker({ position: myLatLng, map, title: "Hello World!", }); } window.initMap = initMap;
Prueba la muestra
En el ejemplo anterior, el marcador se coloca en el mapa durante la construcción usando la propiedad map en las opciones del marcador.
También puedes agregar el marcador al mapa directamente con el método setMap() del marcador, como se muestra en el siguiente ejemplo:
var myLatlng = new google.maps.LatLng(-25.363882,131.044922);
var mapOptions = {
  zoom: 4,
  center: myLatlng
}
var map = new google.maps.Map(document.getElementById("map"), mapOptions);

var marker = new google.maps.Marker({
    position: myLatlng,
    title:"Hello World!"
});

// To add the marker to the map, call setMap();
marker.setMap(map);
El title del marcador aparecerá como información sobre la herramienta.
Si no deseas pasar Marker options en el constructor del marcador, pasa un objeto {} vacío en el último argumento del constructor.
Cómo quitar un marcador
Para quitar un marcador del mapa, llama al método setMap() y pasa null como argumento.
marker.setMap(null);
Ten en cuenta que, con el método anterior, no se borra el marcador. Simplemente se quita del mapa. Si deseas borrar el marcador, debes quitarlo del mapa y, luego, establecer su valor como null.
Si deseas administrar un conjunto de marcadores, debes crear un array que los contenga. Con este array, luego puedes llamar a setMap() en cada marcador del array cuando necesites quitarlos. Para borrar los marcadores, quítalos del mapa y, luego, configura el length del array como 0. De esta forma, se quitarán todas las referencias a los marcadores.
Cómo personalizar la imagen de un marcador
Para personalizar el aspecto visual de los marcadores, especifica un archivo de imagen o un ícono basado en vectores para que se muestren en lugar del ícono del pin predeterminado de Google Maps. Puedes agregar texto con una etiqueta de marcador y usar íconos complejos para definir regiones en las que se puede hacer clic y establecer el orden en que se deben apilar los marcadores.
Marcadores con íconos de imágenes
En el caso más básico, un ícono puede simplemente especificar una imagen en lugar del ícono del pin predeterminado de Google Maps. Para especificar ese ícono, establece la propiedad icon del marcador con la URL de una imagen. La API de Maps JavaScript ajustará el tamaño del ícono automáticamente.
TypeScript
// This example adds a marker to indicate the position of Bondi Beach in Sydney, // Australia. function initMap(): void { const map = new google.maps.Map( document.getElementById("map") as HTMLElement, { zoom: 4, center: { lat: -33, lng: 151 }, } ); const image = "https://developers.google.com/maps/documentation/javascript/examples/full/images/beachflag.png"; const beachMarker = new google.maps.Marker({ position: { lat: -33.89, lng: 151.274 }, map, icon: image, }); } declare global { interface Window { initMap: () => void; } } window.initMap = initMap;
JavaScript
// This example adds a marker to indicate the position of Bondi Beach in Sydney, // Australia. function initMap() { const map = new google.maps.Map(document.getElementById("map"), { zoom: 4, center: { lat: -33, lng: 151 }, }); const image = "https://developers.google.com/maps/documentation/javascript/examples/full/images/beachflag.png"; const beachMarker = new google.maps.Marker({ position: { lat: -33.89, lng: 151.274 }, map, icon: image, }); } window.initMap = initMap;
Prueba la muestra
Marcadores con íconos basados en vectores
Puedes usar rutas de vectores SVG personalizadas para definir el aspecto visual de los marcadores. Para ello, pasa un literal del objeto Symbol con la ruta deseada a la propiedad icon del marcador. Puedes definir una ruta personalizada con la notación de ruta SVG, o bien usar una de las rutas predefinidas en google.maps.SymbolPath. La propiedad anchor es necesaria para que el marcador se renderice correctamente cuando cambia el nivel de zoom. Obtén más información sobre cómo usar símbolos para crear íconos basados en vectores para los marcadores (y polilíneas).
TypeScript
// This example uses SVG path notation to add a vector-based symbol // as the icon for a marker. The resulting icon is a marker-shaped // symbol with a blue fill and no border. function initMap(): void { const center = new google.maps.LatLng(-33.712451, 150.311823); const map = new google.maps.Map( document.getElementById("map") as HTMLElement, { zoom: 9, center: center, } ); const svgMarker = { path: "M-1.547 12l6.563-6.609-1.406-1.406-5.156 5.203-2.063-2.109-1.406 1.406zM0 0q2.906 0 4.945 2.039t2.039 4.945q0 1.453-0.727 3.328t-1.758 3.516-2.039 3.070-1.711 2.273l-0.75 0.797q-0.281-0.328-0.75-0.867t-1.688-2.156-2.133-3.141-1.664-3.445-0.75-3.375q0-2.906 2.039-4.945t4.945-2.039z", fillColor: "blue", fillOpacity: 0.6, strokeWeight: 0, rotation: 0, scale: 2, anchor: new google.maps.Point(0, 20), }; new google.maps.Marker({ position: map.getCenter(), icon: svgMarker, map: map, }); } declare global { interface Window { initMap: () => void; } } window.initMap = initMap;
JavaScript
// This example uses SVG path notation to add a vector-based symbol // as the icon for a marker. The resulting icon is a marker-shaped // symbol with a blue fill and no border. function initMap() { const center = new google.maps.LatLng(-33.712451, 150.311823); const map = new google.maps.Map(document.getElementById("map"), { zoom: 9, center: center, }); const svgMarker = { path: "M-1.547 12l6.563-6.609-1.406-1.406-5.156 5.203-2.063-2.109-1.406 1.406zM0 0q2.906 0 4.945 2.039t2.039 4.945q0 1.453-0.727 3.328t-1.758 3.516-2.039 3.070-1.711 2.273l-0.75 0.797q-0.281-0.328-0.75-0.867t-1.688-2.156-2.133-3.141-1.664-3.445-0.75-3.375q0-2.906 2.039-4.945t4.945-2.039z", fillColor: "blue", fillOpacity: 0.6, strokeWeight: 0, rotation: 0, scale: 2, anchor: new google.maps.Point(0, 20), }; new google.maps.Marker({ position: map.getCenter(), icon: svgMarker, map: map, }); } window.initMap = initMap;
Prueba la muestra
Etiquetas de marcadores
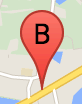
Una etiqueta de marcador es una letra o un número que aparecen dentro de un marcador. En la imagen del marcador de esta sección, se muestra una etiqueta de marcador con la letra "B". Puedes especificar una etiqueta de marcador como una cadena o un objeto MarkerLabel que incluyan una cadena y otras propiedades de la etiqueta.
Cuando creas un marcador, puedes especificar una propiedad label en el objeto MarkerOptions. También puedes llamar a setLabel() en el objeto Marker para configurar la etiqueta en un marcador existente.
En el siguiente ejemplo, se muestran marcadores etiquetados cuando el usuario hace clic en el mapa.
TypeScript
// In the following example, markers appear when the user clicks on the map. // Each marker is labeled with a single alphabetical character. const labels = "ABCDEFGHIJKLMNOPQRSTUVWXYZ"; let labelIndex = 0; function initMap(): void { const bangalore = { lat: 12.97, lng: 77.59 }; const map = new google.maps.Map( document.getElementById("map") as HTMLElement, { zoom: 12, center: bangalore, } ); // This event listener calls addMarker() when the map is clicked. google.maps.event.addListener(map, "click", (event) => { addMarker(event.latLng, map); }); // Add a marker at the center of the map. addMarker(bangalore, map); } // Adds a marker to the map. function addMarker(location: google.maps.LatLngLiteral, map: google.maps.Map) { // Add the marker at the clicked location, and add the next-available label // from the array of alphabetical characters. new google.maps.Marker({ position: location, label: labels[labelIndex++ % labels.length], map: map, }); } declare global { interface Window { initMap: () => void; } } window.initMap = initMap;
JavaScript
// In the following example, markers appear when the user clicks on the map. // Each marker is labeled with a single alphabetical character. const labels = "ABCDEFGHIJKLMNOPQRSTUVWXYZ"; let labelIndex = 0; function initMap() { const bangalore = { lat: 12.97, lng: 77.59 }; const map = new google.maps.Map(document.getElementById("map"), { zoom: 12, center: bangalore, }); // This event listener calls addMarker() when the map is clicked. google.maps.event.addListener(map, "click", (event) => { addMarker(event.latLng, map); }); // Add a marker at the center of the map. addMarker(bangalore, map); } // Adds a marker to the map. function addMarker(location, map) { // Add the marker at the clicked location, and add the next-available label // from the array of alphabetical characters. new google.maps.Marker({ position: location, label: labels[labelIndex++ % labels.length], map: map, }); } window.initMap = initMap;
Prueba la muestra
Íconos complejos
Puedes especificar formas complejas para indicar las regiones en las que se puede hacer clic y también indicar cómo deberían aparecer los íconos en relación con otras superposiciones (su "orden de pila"). Los íconos especificados de esta manera deben establecer sus propiedades icon en un objeto de tipo Icon.
Los objetos Icon definen una imagen. También definen el size del ícono, su origin (por ejemplo, si la imagen que quieres forma parte de una imagen más grande en un objeto) y el anchor donde se debe ubicar el hotspot del ícono (que se basa en el origen).
Si usas una etiqueta con un marcador personalizado, puedes colocarla con la propiedad labelOrigin en Icon.
TypeScript
// The following example creates complex markers to indicate beaches near // Sydney, NSW, Australia. Note that the anchor is set to (0,32) to correspond // to the base of the flagpole. function initMap(): void { const map = new google.maps.Map( document.getElementById("map") as HTMLElement, { zoom: 10, center: { lat: -33.9, lng: 151.2 }, } ); setMarkers(map); } // Data for the markers consisting of a name, a LatLng and a zIndex for the // order in which these markers should display on top of each other. const beaches: [string, number, number, number][] = [ ["Bondi Beach", -33.890542, 151.274856, 4], ["Coogee Beach", -33.923036, 151.259052, 5], ["Cronulla Beach", -34.028249, 151.157507, 3], ["Manly Beach", -33.80010128657071, 151.28747820854187, 2], ["Maroubra Beach", -33.950198, 151.259302, 1], ]; function setMarkers(map: google.maps.Map) { // Adds markers to the map. // Marker sizes are expressed as a Size of X,Y where the origin of the image // (0,0) is located in the top left of the image. // Origins, anchor positions and coordinates of the marker increase in the X // direction to the right and in the Y direction down. const image = { url: "https://developers.google.com/maps/documentation/javascript/examples/full/images/beachflag.png", // This marker is 20 pixels wide by 32 pixels high. size: new google.maps.Size(20, 32), // The origin for this image is (0, 0). origin: new google.maps.Point(0, 0), // The anchor for this image is the base of the flagpole at (0, 32). anchor: new google.maps.Point(0, 32), }; // Shapes define the clickable region of the icon. The type defines an HTML // <area> element 'poly' which traces out a polygon as a series of X,Y points. // The final coordinate closes the poly by connecting to the first coordinate. const shape = { coords: [1, 1, 1, 20, 18, 20, 18, 1], type: "poly", }; for (let i = 0; i < beaches.length; i++) { const beach = beaches[i]; new google.maps.Marker({ position: { lat: beach[1], lng: beach[2] }, map, icon: image, shape: shape, title: beach[0], zIndex: beach[3], }); } } declare global { interface Window { initMap: () => void; } } window.initMap = initMap;
JavaScript
// The following example creates complex markers to indicate beaches near // Sydney, NSW, Australia. Note that the anchor is set to (0,32) to correspond // to the base of the flagpole. function initMap() { const map = new google.maps.Map(document.getElementById("map"), { zoom: 10, center: { lat: -33.9, lng: 151.2 }, }); setMarkers(map); } // Data for the markers consisting of a name, a LatLng and a zIndex for the // order in which these markers should display on top of each other. const beaches = [ ["Bondi Beach", -33.890542, 151.274856, 4], ["Coogee Beach", -33.923036, 151.259052, 5], ["Cronulla Beach", -34.028249, 151.157507, 3], ["Manly Beach", -33.80010128657071, 151.28747820854187, 2], ["Maroubra Beach", -33.950198, 151.259302, 1], ]; function setMarkers(map) { // Adds markers to the map. // Marker sizes are expressed as a Size of X,Y where the origin of the image // (0,0) is located in the top left of the image. // Origins, anchor positions and coordinates of the marker increase in the X // direction to the right and in the Y direction down. const image = { url: "https://developers.google.com/maps/documentation/javascript/examples/full/images/beachflag.png", // This marker is 20 pixels wide by 32 pixels high. size: new google.maps.Size(20, 32), // The origin for this image is (0, 0). origin: new google.maps.Point(0, 0), // The anchor for this image is the base of the flagpole at (0, 32). anchor: new google.maps.Point(0, 32), }; // Shapes define the clickable region of the icon. The type defines an HTML // <area> element 'poly' which traces out a polygon as a series of X,Y points. // The final coordinate closes the poly by connecting to the first coordinate. const shape = { coords: [1, 1, 1, 20, 18, 20, 18, 1], type: "poly", }; for (let i = 0; i < beaches.length; i++) { const beach = beaches[i]; new google.maps.Marker({ position: { lat: beach[1], lng: beach[2] }, map, icon: image, shape: shape, title: beach[0], zIndex: beach[3], }); } } window.initMap = initMap;
Prueba la muestra
Cómo convertir objetos MarkerImage al tipo Icon
Hasta la versión 3.10 de la API de Maps JavaScript, los íconos complejos se definían como objetos MarkerImage. El literal del objeto Icon se agregó en la versión 3.10 y reemplaza a MarkerImage desde la versión 3.11 en adelante.
Los literales del objeto Icon admiten los mismos parámetros que MarkerImage, lo que te permite convertir con facilidad una MarkerImage en un Icon; para ello, debes quitar el constructor, unir los parámetros anteriores en {} y agregar los nombres de cada parámetro. Por ejemplo:
var image = new google.maps.MarkerImage(
    place.icon,
    new google.maps.Size(71, 71),
    new google.maps.Point(0, 0),
    new google.maps.Point(17, 34),
    new google.maps.Size(25, 25));
se convierte en
var image = {
  url: place.icon,
  size: new google.maps.Size(71, 71),
  origin: new google.maps.Point(0, 0),
  anchor: new google.maps.Point(17, 34),
  scaledSize: new google.maps.Size(25, 25)
};
Cómo optimizar marcadores
La optimización mejora el rendimiento mediante la renderización de muchos marcadores como un solo elemento estático. Esto resulta útil en los casos en los que se requiere una gran cantidad de marcadores. De manera predeterminada, la API de Maps JavaScript decide si se optimizará un marcador. Si hay una gran cantidad de marcadores, la API de Maps JavaScript intentará renderizarlos de forma optimizada. No todos los marcadores se pueden optimizar. En algunos casos, es posible que la API de Maps JavaScript necesite renderizar marcadores sin optimización. Inhabilita la renderización optimizada para archivos PNG o GIF animados, o cuando cada marcador se deba renderizar como un elemento separado del DOM. En el siguiente ejemplo, se muestra cómo crear un marcador optimizado:
var marker = new google.maps.Marker({
    position: myLatlng,
    title:"Hello World!",
    optimized: true
});
Cómo hacer que un marcador sea accesible
Para hacer que un marcador sea accesible, agrega un evento de objeto de escucha de clics y configura optimized como false. El objeto de escucha de clics le otorga al marcador una semántica de botones, a la que se puede acceder usando la navegación con teclado, lectores de pantalla, etc. Usa la opción title para presentar texto accesible para un marcador.
En el siguiente ejemplo, el primer marcador recibe el foco cuando se presiona la tecla Tab; luego, puedes utilizar las teclas de flechas para moverte entre marcadores. Vuelve a presionar la tecla Tab para seguir moviéndote por el resto de los controles del mapa. Si un marcador tiene una ventana de información, puedes abrirla haciendo clic en el marcador o presionando la tecla Intro o la barra espaciadora cuando el marcador está seleccionado. Cuando se cierre la ventana de información, el foco volverá al marcador asociado.
TypeScript
// The following example creates five accessible and // focusable markers. function initMap(): void { const map = new google.maps.Map( document.getElementById("map") as HTMLElement, { zoom: 12, center: { lat: 34.84555, lng: -111.8035 }, } ); // Set LatLng and title text for the markers. The first marker (Boynton Pass) // receives the initial focus when tab is pressed. Use arrow keys to // move between markers; press tab again to cycle through the map controls. const tourStops: [google.maps.LatLngLiteral, string][] = [ [{ lat: 34.8791806, lng: -111.8265049 }, "Boynton Pass"], [{ lat: 34.8559195, lng: -111.7988186 }, "Airport Mesa"], [{ lat: 34.832149, lng: -111.7695277 }, "Chapel of the Holy Cross"], [{ lat: 34.823736, lng: -111.8001857 }, "Red Rock Crossing"], [{ lat: 34.800326, lng: -111.7665047 }, "Bell Rock"], ]; // Create an info window to share between markers. const infoWindow = new google.maps.InfoWindow(); // Create the markers. tourStops.forEach(([position, title], i) => { const marker = new google.maps.Marker({ position, map, title: `${i + 1}. ${title}`, label: `${i + 1}`, optimized: false, }); // Add a click listener for each marker, and set up the info window. marker.addListener("click", () => { infoWindow.close(); infoWindow.setContent(marker.getTitle()); infoWindow.open(marker.getMap(), marker); }); }); } declare global { interface Window { initMap: () => void; } } window.initMap = initMap;
JavaScript
// The following example creates five accessible and // focusable markers. function initMap() { const map = new google.maps.Map(document.getElementById("map"), { zoom: 12, center: { lat: 34.84555, lng: -111.8035 }, }); // Set LatLng and title text for the markers. The first marker (Boynton Pass) // receives the initial focus when tab is pressed. Use arrow keys to // move between markers; press tab again to cycle through the map controls. const tourStops = [ [{ lat: 34.8791806, lng: -111.8265049 }, "Boynton Pass"], [{ lat: 34.8559195, lng: -111.7988186 }, "Airport Mesa"], [{ lat: 34.832149, lng: -111.7695277 }, "Chapel of the Holy Cross"], [{ lat: 34.823736, lng: -111.8001857 }, "Red Rock Crossing"], [{ lat: 34.800326, lng: -111.7665047 }, "Bell Rock"], ]; // Create an info window to share between markers. const infoWindow = new google.maps.InfoWindow(); // Create the markers. tourStops.forEach(([position, title], i) => { const marker = new google.maps.Marker({ position, map, title: `${i + 1}. ${title}`, label: `${i + 1}`, optimized: false, }); // Add a click listener for each marker, and set up the info window. marker.addListener("click", () => { infoWindow.close(); infoWindow.setContent(marker.getTitle()); infoWindow.open(marker.getMap(), marker); }); }); } window.initMap = initMap;
Prueba la muestra
Cómo animar un marcador
Puedes animar los marcadores para que exhiban movimientos dinámicos en varias circunstancias diferentes. Para especificar la forma en que se anima un marcador, usa la propiedad animation, del tipo google.maps.Animation. Se admiten los siguientes valores de Animation:
-
DROPindica que el marcador debe desplazarse desde la parte superior del mapa hasta su ubicación final cuando se lo coloque por primera vez allí. La animación finalizará una vez que el marcador esté en su posición, y el valor deanimationse revertirá anull. En general, este tipo de animación se especifica durante la creación delMarker. -
BOUNCEindica que el marcador debe rebotar en el lugar. Un marcador que rebota continuará rebotando hasta que su propiedadanimationse configure explícitamente comonull.
Para iniciar una animación en un marcador existente, llama a setAnimation() en el objeto Marker.
TypeScript
// The following example creates a marker in Stockholm, Sweden using a DROP // animation. Clicking on the marker will toggle the animation between a BOUNCE // animation and no animation. let marker: google.maps.Marker; function initMap(): void { const map = new google.maps.Map( document.getElementById("map") as HTMLElement, { zoom: 13, center: { lat: 59.325, lng: 18.07 }, } ); marker = new google.maps.Marker({ map, draggable: true, animation: google.maps.Animation.DROP, position: { lat: 59.327, lng: 18.067 }, }); marker.addListener("click", toggleBounce); } function toggleBounce() { if (marker.getAnimation() !== null) { marker.setAnimation(null); } else { marker.setAnimation(google.maps.Animation.BOUNCE); } } declare global { interface Window { initMap: () => void; } } window.initMap = initMap;
JavaScript
// The following example creates a marker in Stockholm, Sweden using a DROP // animation. Clicking on the marker will toggle the animation between a BOUNCE // animation and no animation. let marker; function initMap() { const map = new google.maps.Map(document.getElementById("map"), { zoom: 13, center: { lat: 59.325, lng: 18.07 }, }); marker = new google.maps.Marker({ map, draggable: true, animation: google.maps.Animation.DROP, position: { lat: 59.327, lng: 18.067 }, }); marker.addListener("click", toggleBounce); } function toggleBounce() { if (marker.getAnimation() !== null) { marker.setAnimation(null); } else { marker.setAnimation(google.maps.Animation.BOUNCE); } } window.initMap = initMap;
Prueba la muestra
Si tienes muchos marcadores, se recomienda que no los coloques a todos al mismo tiempo en el mapa. Puedes usar setTimeout() para espaciar las animaciones de tus marcadores con un patrón como el que se muestra a continuación:
function drop() {
  for (var i =0; i < markerArray.length; i++) {
    setTimeout(function() {
      addMarkerMethod();
    }, i * 200);
  }
}
Cómo configurar un marcador para que sea arrastrable
Para permitir que los usuarios arrastren un marcador a una ubicación diferente en el mapa, establece draggable en true en las opciones del marcador.
var myLatlng = new google.maps.LatLng(-25.363882,131.044922);
var mapOptions = {
  zoom: 4,
  center: myLatlng
}
var map = new google.maps.Map(document.getElementById("map"), mapOptions);

// Place a draggable marker on the map
var marker = new google.maps.Marker({
    position: myLatlng,
    map: map,
    draggable:true,
    title:"Drag me!"
});
Más opciones de personalización de marcadores
Si deseas crear un marcador completamente personalizado, consulta el ejemplo de la ventana emergente personalizada.
Para obtener más extensiones de la clase de marcador, administrar y agrupar los marcadores en clústeres y personalizar las superposiciones, consulta las bibliotecas de código abierto.