ImageCollection를 구성하는 이미지는 애니메이션 또는 '필름 스트립'이라고 하는 일련의 썸네일로 시각화할 수 있습니다. 이러한 방법은 ImageCollection의 콘텐츠를 빠르게 평가하고 시공간적 변화를 확인하는 데 효과적인 매체입니다 (그림 1).
getVideoThumbURL(): 애니메이션 이미지 시리즈를 생성합니다.getFilmstripThumbURL(): 썸네일 이미지 시리즈를 생성합니다.
다음 섹션에서는 시각화를 위해 ImageCollection를 준비하는 방법, 각 컬렉션 시각화 메서드의 코드 예시, 몇 가지 고급 애니메이션 기법을 설명합니다.
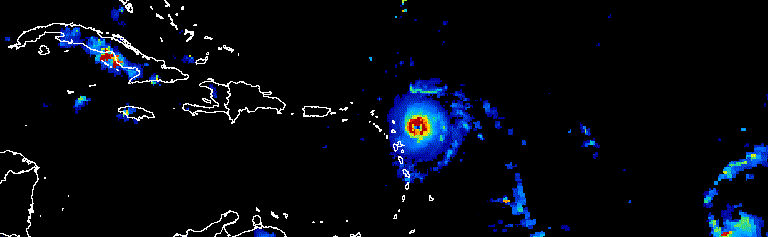
그림 1. 2017년 9월에 발생한 대서양 허리케인의 3일간의 진행 상황을 보여주는 애니메이션
컬렉션 준비
컬렉션 내에서 이미지를 필터링, 합성, 정렬, 스타일 지정하여 관심 있는 이미지만 표시하거나 현상을 강조할 수 있습니다. 모든 ImageCollection를 시각화 함수의 입력으로 제공할 수 있지만 연간 및 연내 기간, 관측 간격, 지역 범위, 품질, 표현을 고려하여 선별된 컬렉션을 사용하면 더 나은 결과를 얻을 수 있습니다.
필터링
이미지 모음을 필터링하여 시각화의 목적을 뒷받침하는 관련 데이터만 포함합니다. 특정 데이터 세트에 관한 날짜, 공간 범위, 품질, 기타 속성을 고려하세요.
예를 들어 다음을 기준으로 Sentinel-2 표면 반사율 컬렉션을 필터링할 수 있습니다.
단일 기간
코드 편집기 (JavaScript)
var s2col = ee.ImageCollection('COPERNICUS/S2_SR')
  .filterDate('2018-01-01', '2019-01-01');
일련번호로 된 일 년 중 기간
코드 편집기 (JavaScript)
var s2col = ee.ImageCollection('COPERNICUS/S2_SR')
  .filter(ee.Filter.calendarRange(171, 242, 'day_of_year'));
관심 지역
코드 편집기 (JavaScript)
var s2col = ee.ImageCollection('COPERNICUS/S2_SR')
  .filterBounds(ee.Geometry.Point(-122.1, 37.2));
또는 이미지 속성
코드 편집기 (JavaScript)
var s2col = ee.ImageCollection('COPERNICUS/S2_SR')
  .filter(ee.Filter.lt('CLOUDY_PIXEL_PERCENTAGE', 50));
여러 필터를 체이닝합니다.
코드 편집기 (JavaScript)
var s2col = ee.ImageCollection('COPERNICUS/S2_SR')
  .filterDate('2018-01-01', '2019-01-01')
  .filterBounds(ee.Geometry.Point(-122.1, 37.2))
  .filter('CLOUDY_PIXEL_PERCENTAGE < 50');
합성
연간 내부 및 외부 기간을 합성하여 컬렉션의 이미지 수를 줄이고 품질을 개선합니다. 예를 들어 아프리카의 연간 NDVI 시각화를 만들려고 한다고 가정해 보겠습니다. 한 가지 방법은 MODIS 16일 NDVI 컬렉션을 필터링하여 2018년 관측치를 모두 포함하는 것입니다.
코드 편집기 (JavaScript)
var ndviCol = ee.ImageCollection('MODIS/006/MOD13A2')
  .filterDate('2018-01-01', '2019-01-01')
  .select('NDVI');
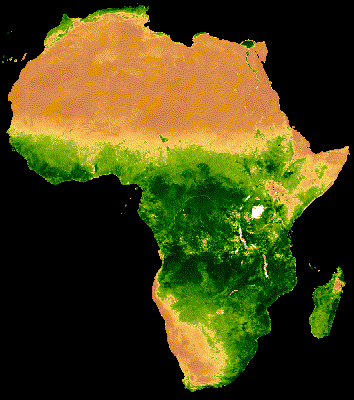
필터링 및 감소에 따른 연간 합성
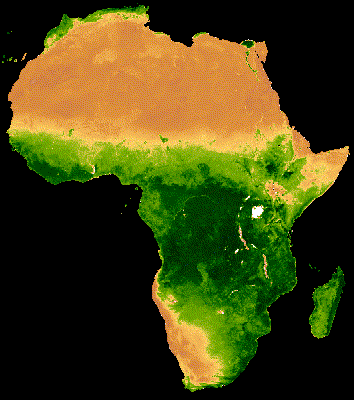
위 컬렉션을 시각화하면 구름이 많은 숲이 우거진 지역에서 상당한 노이즈가 발생하는 것을 볼 수 있습니다 (그림 2a). MODIS 컬렉션의 모든 연도에서 중간값을 기준으로 일련의 기간을 줄여 더 나은 표현을 얻을 수 있습니다.
코드 편집기 (JavaScript)
// Make a day-of-year sequence from 1 to 365 with a 16-day step.
var doyList = ee.List.sequence(1, 365, 16);

// Import a MODIS NDVI collection.
var ndviCol = ee.ImageCollection('MODIS/006/MOD13A2').select('NDVI');

// Map over the list of days to build a list of image composites.
var ndviCompList = doyList.map(function(startDoy) {
  // Ensure that startDoy is a number.
  startDoy = ee.Number(startDoy);

  // Filter images by date range; starting with the current startDate and
  // ending 15 days later. Reduce the resulting image collection by median.
  return ndviCol
    .filter(ee.Filter.calendarRange(startDoy, startDoy.add(15), 'day_of_year'))
    .reduce(ee.Reducer.median());
});

// Convert the image List to an ImageCollection.
var ndviCompCol = ee.ImageCollection.fromImages(ndviCompList);
이 컬렉션에서 생성된 애니메이션은 각 이미지가 20년 넘게 축적된 데이터의 16일 NDVI 합성물의 중간값을 나타내므로 노이즈가 적습니다(그림 1b). 이 애니메이션에 관한 자세한 내용은 이 튜토리얼을 참고하세요.
 |
 |
|---|---|
| 그림 2a. 연간 NDVI(연간 컴포지션 없음) | 그림 2b. 연간 NDVI(연간 컴포지팅 포함) |
필터 및 감소 기준 연간 내 합성
이전 예에서는 연간 합성 적용 일련의 연내 관측을 합성하는 데도 도움이 될 수 있습니다. 예를 들어 Landsat 데이터는 센서별로 지정된 장면의 경우 16일마다 수집되지만 이미지의 일부가 구름으로 가려지는 경우가 많습니다. 구름을 마스크 처리하고 같은 시즌의 여러 이미지를 합성하면 구름이 없는 이미지를 더 많이 만들 수 있습니다. 7월과 8월의 Landsat 5 이미지가 1985년부터 2011년까지 각 연도의 중간값을 사용하여 합성된 다음 예시를 고려해 보세요.
코드 편집기 (JavaScript)
// Assemble a collection of Landsat surface reflectance images for a given
// region and day-of-year range.
var lsCol = ee.ImageCollection('LANDSAT/LT05/C02/T1_L2')
  .filterBounds(ee.Geometry.Point(-122.9, 43.6))
  .filter(ee.Filter.dayOfYear(182, 243))
  // Add the observation year as a property to each image.
  .map(function(img) {
    return img.set('year', ee.Image(img).date().get('year'));
  });


// Define a function to scale the data and mask unwanted pixels.
function maskL457sr(image) {
  // Bit 0 - Fill
  // Bit 1 - Dilated Cloud
  // Bit 2 - Unused
  // Bit 3 - Cloud
  // Bit 4 - Cloud Shadow
  var qaMask = image.select('QA_PIXEL').bitwiseAnd(parseInt('11111', 2)).eq(0);
  var saturationMask = image.select('QA_RADSAT').eq(0);

  // Apply the scaling factors to the appropriate bands.
  var opticalBands = image.select('SR_B.').multiply(0.0000275).add(-0.2);
  var thermalBand = image.select('ST_B6').multiply(0.00341802).add(149.0);

  // Replace the original bands with the scaled ones and apply the masks.
  return image.addBands(opticalBands, null, true)
      .addBands(thermalBand, null, true)
      .updateMask(qaMask)
      .updateMask(saturationMask);
}

// Define a list of unique observation years from the image collection.
var years = ee.List(lsCol.aggregate_array('year')).distinct().sort();

// Map over the list of years to build a list of annual image composites.
var lsCompList = years.map(function(year) {
  return lsCol
    // Filter image collection by year.
    .filterMetadata('year', 'equals', year)
    // Apply cloud mask.
    .map(maskL457sr)
    // Reduce image collection by median.
    .reduce(ee.Reducer.median())
    // Set composite year as an image property.
    .set('year', year);
});

// Convert the image List to an ImageCollection.
var lsCompCol = ee.ImageCollection.fromImages(lsCompList);
조인 및 감소를 통한 연간 내 합성
이전 두 가지 합성 메서드는 List일과 년을 매핑하여 필터링하고 합성할 새 날짜를 점진적으로 정의합니다.
조인을 적용하는 것도 이 작업을 실행하는 또 다른 방법입니다. 다음 스니펫에서는 고유한 연도 컬렉션을 정의한 다음 saveAll 조인을 적용하여 특정 연도에 해당하는 모든 이미지를 식별합니다.
특정 연도에 속한 이미지는 List 객체로 그룹화되며, 이 객체는 고유한 연도 컬렉션에서 각 연도 대표의 속성으로 저장됩니다. 연간 합성물은 고유한 연도 컬렉션에 매핑된 함수에서 정의된 ImageCollections를 줄여 이러한 목록에서 생성됩니다.
코드 편집기 (JavaScript)
// Assemble a collection of Landsat surface reflectance images for a given
// region and day-of-year range.
var lsCol = ee.ImageCollection('LANDSAT/LT05/C02/T1_L2')
  .filterBounds(ee.Geometry.Point(-122.9, 43.6))
  .filter(ee.Filter.dayOfYear(182, 243))
  // Add the observation year as a property to each image.
  .map(function(img) {
    return img.set('year', ee.Image(img).date().get('year'));
  });

// Make a distinct year collection; one image representative per year.
var distinctYears = lsCol.distinct('year').sort('year');

// Define a join filter; one-to-many join on ‘year’ property.
var filter = ee.Filter.equals({leftField: 'year', rightField: 'year'});

// Define a join.
var join = ee.Join.saveAll('year_match');

// Apply the join; results in 'year_match' property being added to each distinct
// year representative image. The list includes all images in the collection
// belonging to the respective year.
var joinCol = join.apply(distinctYears, lsCol, filter);

// Define a function to scale the data and mask unwanted pixels.
function maskL457sr(image) {
  // Bit 0 - Fill
  // Bit 1 - Dilated Cloud
  // Bit 2 - Unused
  // Bit 3 - Cloud
  // Bit 4 - Cloud Shadow
  var qaMask = image.select('QA_PIXEL').bitwiseAnd(parseInt('11111', 2)).eq(0);
  var saturationMask = image.select('QA_RADSAT').eq(0);

  // Apply the scaling factors to the appropriate bands.
  var opticalBands = image.select('SR_B.').multiply(0.0000275).add(-0.2);
  var thermalBand = image.select('ST_B6').multiply(0.00341802).add(149.0);

  // Replace the original bands with the scaled ones and apply the masks.
  return image.addBands(opticalBands, null, true)
      .addBands(thermalBand, null, true)
      .updateMask(qaMask)
      .updateMask(saturationMask);
}

// Map over the distinct years collection to build a list of annual image
// composites.
var lsCompList = joinCol.map(function(img) {
  // Get the list of images belonging to the given year.
  return ee.ImageCollection.fromImages(img.get('year_match'))
    // Apply cloud mask.
    .map(maskL457sr)
    // Reduce image collection by median.
    .reduce(ee.Reducer.median())
    // Set composite year as an image property.
    .copyProperties(img, ['year']);
});

// Convert the image List to an ImageCollection.
var lsCompCol = ee.ImageCollection(lsCompList);
조인 및 감소를 통한 당일 합성
합성의 또 다른 사례는 공간적으로 연속된 이미지 모자이크를 만드는 것입니다. 관심 영역이 동일한 경로 내에서 두 개의 Landsat 행에 걸쳐 있고 2017년과 2018년의 각 Landsat 8 궤도에 대해 두 이미지의 이미지 모자이크를 표시하는 것이 목표라고 가정해 보겠습니다. 여기서 경로 및 행별로 컬렉션을 필터링한 후 조인 작업을 사용하여 획득 날짜로 정의된 동일한 관측 자료의 Landsat 이미지를 모자이크 처리합니다.
코드 편집기 (JavaScript)
var lsCol = ee.ImageCollection('LANDSAT/LC08/C02/T1_L2')
  .filterDate('2017-01-01', '2019-01-01')
  .filter('WRS_PATH == 38 && (WRS_ROW == 28 || WRS_ROW == 29)')
  .map(function(img) {
    var date = img.date().format('yyyy-MM-dd');
    return img.set('date', date);
  });

var distinctDates = lsCol.distinct('date').sort('date');
var filter = ee.Filter.equals({leftField: 'date', rightField: 'date'});
var join = ee.Join.saveAll('date_match');
var joinCol = join.apply(distinctDates, lsCol, filter);

var lsColMos = ee.ImageCollection(joinCol.map(function(col) {
  return ee.ImageCollection.fromImages(col.get('date_match')).mosaic();
}));
정렬
시간순으로 컬렉션을 정렬하여 올바른 연대순을 유지하거나 원하는 속성별로 정렬합니다. 기본적으로 시각화 프레임 계열은 컬렉션의 자연 순서로 정렬됩니다. sort 컬렉션 메서드를 사용하여 계열의 정렬을 변경할 수 있습니다. 이 메서드에서는 Image 속성이 선택되어 오름차순 또는 내림차순으로 정렬됩니다. 예를 들어 관찰 시간순으로 정렬하려면 어디서나 사용할 수 있는 system:time_start 속성을 사용하세요.
코드 편집기 (JavaScript)
var s2col = ee.ImageCollection('COPERNICUS/S2_SR')
  .filterBounds(ee.Geometry.Point(-122.1, 37.2))
  .sort('system:time_start');
또는 Sentinel-2 이미지의 경우와 같이 구름의 양이 증가함에 따라 순서를 정의해야 할 수도 있습니다.
코드 편집기 (JavaScript)
var s2col = ee.ImageCollection('COPERNICUS/S2_SR')
  .filterBounds(ee.Geometry.Point(-122.1, 37.2))
  .sort('CLOUDY_PIXEL_PERCENTAGE');
순서는 지역 NDVI 평균과 같은 파생 속성으로 정의할 수도 있습니다. 여기서 지역 NDVI는 매핑된 함수의 각 이미지에 속성으로 추가된 후 새 속성이 정렬됩니다.
코드 편집기 (JavaScript)
// Define an area of interest geometry.
var aoi = ee.Geometry.Point(-122.1, 37.2).buffer(1e4);

// Filter MODIS NDVI image collection by a date range.
var ndviCol = ee.ImageCollection('MODIS/061/MOD13A1')
  .filterDate('2018-01-01', '2019-01-01')
  .select('NDVI')
  // Map over the image collection to calculate regional mean NDVI and add
  // the result to each image as a property.
  .map(function(img) {
    var meanNdvi = img.reduceRegion({
      reducer: ee.Reducer.mean(), geometry: aoi, scale: 500});
    return img.set('meanNdvi', meanNdvi.get('NDVI'));
  })
  // Sort the collection by descending regional mean NDVI.
  .sort('meanNdvi', false);
이미지 시각화
이미지 시각화는 숫자를 색상으로 변환합니다. 컬렉션 시각화 메서드에서 이미지 데이터가 색상으로 표시되는 방식을 제어하는 방법에는 세 가지가 있습니다.
- 시각화 인수를
getVideoThumbURL및getFilmstripThumbURL에 직접 제공합니다. getVideoThumbURL및getFilmstripThumbURL를 적용하기 전에 이미지 컬렉션에visualize이미지 메서드를 매핑합니다.getVideoThumbURL및getFilmstripThumbURL를 적용하기 전에 이미지 컬렉션에sldStyle이미지 메서드를 매핑합니다. 자세한 내용은 스타일 지정된 레이어 설명자를 참고하세요.
이 가이드의 예에서는 옵션 1과 2를 사용합니다. 여기서 시각화는 멀티밴드 이미지의 세 가지 이미지 밴드를 빨간색, 녹색, 파란색 색상 채널에 매핑하거나 단일 밴드의 값을 색상 팔레트를 따라 선형으로 그레이딩하여 실행됩니다. 시각화 매개변수에는 다음이 포함됩니다.
| 매개변수 | 설명 | 유형 |
|---|---|---|
| 밴드 | RGB에 매핑할 3개의 밴드 이름을 쉼표로 구분한 목록입니다. | list |
| min | 0으로 매핑할 값 | 밴드별로 하나씩 세 개의 숫자 또는 목록 |
| max | 255에 매핑할 값 | 밴드별로 하나씩 세 개의 숫자 또는 목록 |
| gain | 각 픽셀 값에 곱할 값 | 밴드별로 하나씩 세 개의 숫자 또는 목록 |
| bias | 각 DN에 추가할 값 | 밴드별로 하나씩 세 개의 숫자 또는 목록 |
| gamma | 감마 보정 계수 | 밴드별로 하나씩 세 개의 숫자 또는 목록 |
| palette | CSS 스타일 색상 문자열 목록 (단일 밴드 이미지만 해당) | 쉼표로 구분된 16진수 문자열 목록 |
| opacity | 레이어의 불투명도입니다 (0.0은 완전히 투명하고 1.0은 완전히 불투명함). | 숫자 |
bands 인수를 사용하여 시각화할 밴드를 선택합니다. 밴드 이름 1개 또는 3개 목록을 제공합니다. 멀티밴드 이미지의 경우 기본적으로 처음 세 개의 밴드가 선택됩니다. 밴드 이름 순서에 따라 색상이 할당됩니다. 나열된 첫 번째, 두 번째, 세 번째 밴드는 각각 빨간색, 녹색, 파란색에 매핑됩니다.
데이터 범위 조정은 이미지를 시각화할 때 중요한 고려사항입니다. 기본적으로 0과 1 사이 (양 끝값 포함)의 부동 소수점 데이터 값은 0과 255 사이 (양 끝값 포함)로 조정됩니다. 이 범위를 벗어나는 값은 0보다 작거나 1보다 큰지에 따라 각각 0과 255로 강제 변환됩니다. 정수 데이터의 경우 유형으로 정의된 전체 용량이 0과 255 사이로 조정됩니다 (예: 부호 있는 16비트 데이터의 범위는 -32,768~32,767이며 기본적으로 [0, 255]로 조정됨). 기본값을 수락하면 이미지 지형지물 간에 대비가 거의 또는 전혀 없는 시각화가 생성되는 경우가 많습니다. min 및 max를 사용하여 대비를 개선하고 특정 데이터 범위를 강조 표시합니다. 일반적으로 min 및 max를 관심 영역 내 데이터의 2번째 및 98번째 백분위수를 나타내는 값으로 설정하는 것이 좋습니다. 디지털 지형 모델의 이러한 값을 계산하는 다음 예를 참고하세요.
코드 편집기 (JavaScript)
// Import SRTM global elevation model.
var demImg = ee.Image('USGS/SRTMGL1_003');

// Define a rectangular area of interest.
var aoi = ee.Geometry.Polygon(
  [[
    [-103.84153083119054, 49.083004219142886],
    [-103.84153083119054, 25.06838270664608],
    [-85.64817145619054, 25.06838270664608],
    [-85.64817145619054, 49.083004219142886]
  ]],
  null, false);

// Calculate the 2nd and 98th percentile elevation values from rescaled (to
// 500m) pixels intersecting the area of interest. A Dictionary is returned.
var percentClip = demImg.reduceRegion({
  reducer: ee.Reducer.percentile([2, 98]),
  geometry: aoi,
  scale: 500,
  maxPixels: 3e7
});

// Print the regional 2nd and 98th percentile elevation values. Get the
// dictionary keys and use them to get the values for each percentile summary.
var keys = percentClip.keys();
print('Set vis min to:', ee.Number(percentClip.get(keys.get(0))).round());
print('Set vis max to:', ee.Number(percentClip.get(keys.get(1))).round());
palette 매개변수는 8비트 시각화 이미지를 나타내는 색상을 정의합니다. 단일 밴드 표현에만 적용됩니다. 멀티 밴드 이미지로 지정하면 오류가 발생합니다.
데이터가 단일 밴드이거나 멀티 밴드 이미지에서 단일 밴드를 시각화하려면 forceRgbOutput 매개변수를 true로 설정합니다 (palette 인수가 제공된 경우에는 불필요). min 및 max 매개변수를 사용하여 0과 255 사이에서 선형으로 크기 조정할 값 범위를 정의합니다.
단일 밴드 이미지 모음에 시각화 함수를 매핑하는 예는 다음과 같습니다. MODIS NDVI 컬렉션이 가져오고, visualization 메서드의 시각화 인수가 설정되고, 값을 RGB 이미지 표현으로 변환하는 함수가 NDVI 컬렉션에 매핑됩니다.
코드 편집기 (JavaScript)
// Filter MODIS NDVI image collection by a date range.
var ndviCol = ee.ImageCollection('MODIS/061/MOD13A1')
  .filterDate('2018-01-01', '2019-01-01')
  .select('NDVI');

// Define visualization arguments.
var visArgs = {
  min: 0,
  max: 9000,
  palette: [
    'FFFFFF', 'CE7E45', 'DF923D', 'F1B555', 'FCD163', '99B718', '74A901',
    '66A000', '529400', '3E8601', '207401', '056201', '004C00', '023B01',
    '012E01', '011D01', '011301'
  ]
};

// Define a function to convert an image to an RGB visualization image and copy
// properties from the original image to the RGB image.
var visFun = function(img) {
  return img.visualize(visArgs).copyProperties(img, img.propertyNames());
};

// Map over the image collection to convert each image to an RGB visualization
// using the previously defined visualization function.
var ndviColVis = ndviCol.map(visFun);
다음은 멀티밴드 이미지 모음에 시각화 함수를 매핑하는 예입니다.
코드 편집기 (JavaScript)
// Assemble a collection of Sentinel-2 surface reflectance images for a given
// region and date range.
var s2col = ee.ImageCollection('COPERNICUS/S2_SR')
  .filterBounds(ee.Geometry.Point(-96.9037, 48.0395))
  .filterDate('2019-06-01', '2019-10-01');

// Define visualization arguments.
var visArgs = {bands: ['B11', 'B8', 'B3'], min: 300, max: 3500};

// Define a function to convert an image to an RGB visualization image and copy
// properties from the original image to the RGB image.
var visFun = function(img) {
  return img.visualize(visArgs).copyProperties(img, img.propertyNames());
};

// Map over the image collection to convert each image to an RGB visualization
// using the previously defined visualization function.
var s2colVis = s2col.map(visFun);
이 경우 각 RGB 레이어의 강도를 정의하는 세 개의 밴드가 제공되므로 팔레트 인수가 제공되지 않습니다. 두 예 모두 min 및 max 매개변수를 사용하여 8비트 RGB 데이터의 한도까지 늘어나는 값을 제어합니다.
동영상 썸네일
getVideoThumbURL() 함수는 각 이미지가 프레임을 나타내는 ImageCollection의 모든 이미지에서 애니메이션을 생성합니다. 애니메이션을 제작하는 일반적인 워크플로는 다음과 같습니다.
- 애니메이션의 지역 범위를 결정하는 경계가 있는
Geometry를 정의합니다. ImageCollection을 정의합니다.- 이미지 시각화를 고려하세요. 컬렉션에 이미지 시각화 함수를 매핑하거나 애니메이션 인수 집합에 이미지 시각화 인수를 추가합니다.
- 애니메이션 인수를 정의하고
getVideoThumbURL메서드를 호출합니다.
getVideoThumbURL의 결과는 URL입니다. URL을 콘솔에 출력하고 클릭하여 Earth Engine 서버를 시작하면 새 브라우저 탭에서 애니메이션이 실시간으로 생성됩니다. 또는 컬렉션에서 ui.Thumbnail 함수와 해당 애니메이션 인수를 호출하여 Code Editor 콘솔에서 애니메이션을 확인할 수 있습니다. 렌더링이 완료되면 애니메이션을 마우스 오른쪽 버튼으로 클릭하고 컨텍스트 메뉴에서 적절한 옵션을 선택하여 다운로드할 수 있습니다.
다음 예는 24시간 동안 전 세계 온도를 보여주는 애니메이션을 생성하는 방법을 보여줍니다. 이 예에서는 먼저 ImageCollection에 시각화 함수를 매핑하는 대신 애니메이션 인수와 함께 시각화 인수가 포함됩니다. 이 스크립트를 실행하면 Code Editor 콘솔에 그림 3과 유사한 애니메이션이 표시됩니다.
코드 편집기 (JavaScript)
// Define an area of interest geometry with a global non-polar extent.
var aoi = ee.Geometry.Polygon(
  [[[-179.0, 78.0], [-179.0, -58.0], [179.0, -58.0], [179.0, 78.0]]], null,
  false);

// Import hourly predicted temperature image collection for northern winter
// solstice. Note that predictions extend for 384 hours; limit the collection
// to the first 24 hours.
var tempCol = ee.ImageCollection('NOAA/GFS0P25')
  .filterDate('2018-12-22', '2018-12-23')
  .limit(24)
  .select('temperature_2m_above_ground');

// Define arguments for animation function parameters.
var videoArgs = {
  dimensions: 768,
  region: aoi,
  framesPerSecond: 7,
  crs: 'EPSG:3857',
  min: -40.0,
  max: 35.0,
  palette: ['blue', 'purple', 'cyan', 'green', 'yellow', 'red']
};

// Print the animation to the console as a ui.Thumbnail using the above defined
// arguments. Note that ui.Thumbnail produces an animation when the first input
// is an ee.ImageCollection instead of an ee.Image.
print(ui.Thumbnail(tempCol, videoArgs));

// Alternatively, print a URL that will produce the animation when accessed.
print(tempCol.getVideoThumbURL(videoArgs));
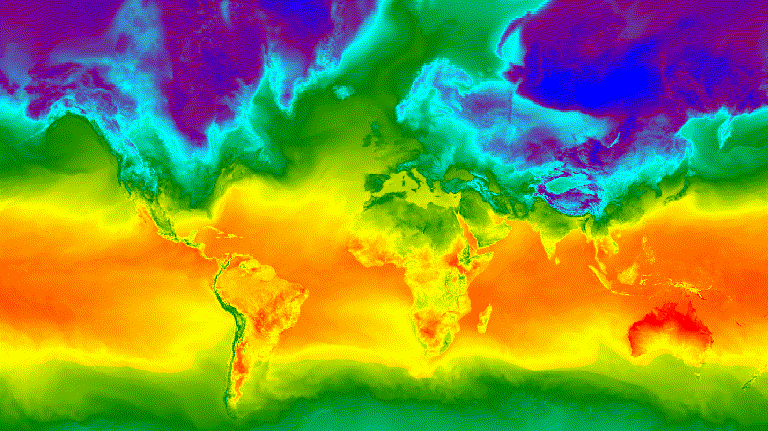
그림 3 북반구 겨울철 일식의 시간별 표면 온도가 애니메이션 GIF 이미지로 표시됩니다.
슬라이드
getFilmstripThumbUrl 함수는 ImageCollection의 모든 이미지를 북-남 시리즈로 연결한 것을 나타내는 단일 정적 이미지를 생성합니다. 필름 스트립 프레임의 순서는 컬렉션의 자연스러운 순서를 따릅니다.
getFilmstripThumbUrl의 결과는 URL입니다. URL을 콘솔에 출력하고 클릭하여 새 브라우저 탭에서 이미지를 실시간으로 생성하는 Earth Engine 서버를 시작합니다. 렌더링이 완료되면 이미지를 마우스 오른쪽 버튼으로 클릭하고 컨텍스트 메뉴에서 적절한 옵션을 선택하여 다운로드할 수 있습니다.
다음 코드 스니펫은 위의 동영상 썸네일 예와 동일한 컬렉션을 사용합니다. 이 스크립트를 실행하면 그림 4와 유사한 필름 스트립이 코드 편집기 콘솔에 표시됩니다.
코드 편집기 (JavaScript)
// Define an area of interest geometry with a global non-polar extent.
var aoi = ee.Geometry.Polygon(
  [[[-179.0, 78.0], [-179.0, -58.0], [179.0, -58.0], [179.0, 78.0]]], null,
  false);

// Import hourly predicted temperature image collection for northern winter
// solstice. Note that predictions extend for 384 hours; limit the collection
// to the first 24 hours.
var tempCol = ee.ImageCollection('NOAA/GFS0P25')
  .filterDate('2018-12-22', '2018-12-23')
  .limit(24)
  .select('temperature_2m_above_ground');

// Define arguments for the getFilmstripThumbURL function parameters.
var filmArgs = {
  dimensions: 128,
  region: aoi,
  crs: 'EPSG:3857',
  min: -40.0,
  max: 35.0,
  palette: ['blue', 'purple', 'cyan', 'green', 'yellow', 'red']
};

// Print a URL that will produce the filmstrip when accessed.
print(tempCol.getFilmstripThumbURL(filmArgs));
![]()
그림 4. 북반구 겨울철 일식의 시간별 표면 온도가 필름 스트립 PNG 이미지로 표시됩니다. 필름 스트립은 표시를 위해 4개의 섹션으로 나뉩니다. getFilmstripThumbURL의 결과는 북쪽과 남쪽이 결합된 단일 컬렉션 이미지 시리즈입니다.
고급 기법
다음 섹션에서는 클리핑, 불투명도, 레이어 합성을 사용하여 다각형 테두리를 추가하고, 관심 영역을 강조 표시하고, 컬렉션 내에서 이미지를 비교하여 시각화를 개선하는 방법을 설명합니다.
이 섹션의 다음 예시에서는 모두 여기에 정의된 동일한 기본 ImageCollection를 사용합니다.
코드 편집기 (JavaScript)
// Import hourly predicted temperature image collection for northern winter
// solstice. Note that predictions extend for 384 hours; limit the collection
// to the first 24 hours.
var tempCol = ee.ImageCollection('NOAA/GFS0P25')
  .filterDate('2018-12-22', '2018-12-23')
  .limit(24)
  .select('temperature_2m_above_ground');

// Define visualization arguments to control the stretch and color gradient
// of the data.
var visArgs = {
  min: -40.0,
  max: 35.0,
  palette: ['blue', 'purple', 'cyan', 'green', 'yellow', 'red']
};

// Convert each image to an RGB visualization image by mapping the visualize
// function over the image collection using the arguments defined previously.
var tempColVis = tempCol.map(function(img) {
  return img.visualize(visArgs);
});

// Import country features and filter to South American countries.
var southAmCol = ee.FeatureCollection('USDOS/LSIB_SIMPLE/2017')
  .filterMetadata('wld_rgn', 'equals', 'South America');

// Define animation region (South America with buffer).
var southAmAoi = ee.Geometry.Rectangle({
  coords: [-103.6, -58.8, -18.4, 17.4], geodesic: false});
오버레이
blend Image 메서드를 사용하여 여러 이미지를 오버레이할 수 있습니다. 이 메서드에서는 두 이미지의 겹치는 픽셀이 마스크 (불투명도)를 기반으로 혼합됩니다.
벡터 오버레이
행정 구역 경계 다각형 및 기타 도형을 이미지에 추가하면 유용한 공간적 맥락을 제공할 수 있습니다. 위의 전 세계 일일 표면 온도 애니메이션 (그림 3)을 살펴보세요. 육지와 바다의 경계는 어느 정도 구분할 수 있지만 국가의 다각형 오버레이를 추가하여 명확하게 표시할 수 있습니다.
벡터 데이터 (Features)는 paint 메서드를 적용하여 이미지에 그려집니다.
지형지물은 기존 이미지에 페인트할 수 있지만, 빈 이미지에 페인트하고 스타일을 지정한 후 결과를 다른 스타일의 이미지 레이어와 블렌딩하는 것이 좋습니다. 시각화 스택의 각 레이어를 독립적으로 처리하면 스타일을 더 세부적으로 제어할 수 있습니다.
다음 예에서는 남미 국가 경계를 빈 Image에 페인팅하고 결과를 전 세계 일일 기온 수집의 각 Image와 혼합하는 방법을 보여줍니다 (그림 5). 겹쳐진 국가 경계선은 육지와 물을 구분하고 온도 패턴에 맥락을 제공합니다.
코드 편집기 (JavaScript)
// Define an empty image to paint features to.
var empty = ee.Image().byte();

// Paint country feature edges to the empty image.
var southAmOutline = empty
  .paint({featureCollection: southAmCol, color: 1, width: 1})
  // Convert to an RGB visualization image; set line color to black.
  .visualize({palette: '000000'});

// Map a blend operation over the temperature collection to overlay the country
// border outline image on all collection images.
var tempColOutline = tempColVis.map(function(img) {
  return img.blend(southAmOutline);
});

// Define animation arguments.
var videoArgs = {
  dimensions: 768,
  region: southAmAoi,
  framesPerSecond: 7,
  crs: 'EPSG:3857'
};

// Display the animation.
print(ui.Thumbnail(tempColOutline, videoArgs));
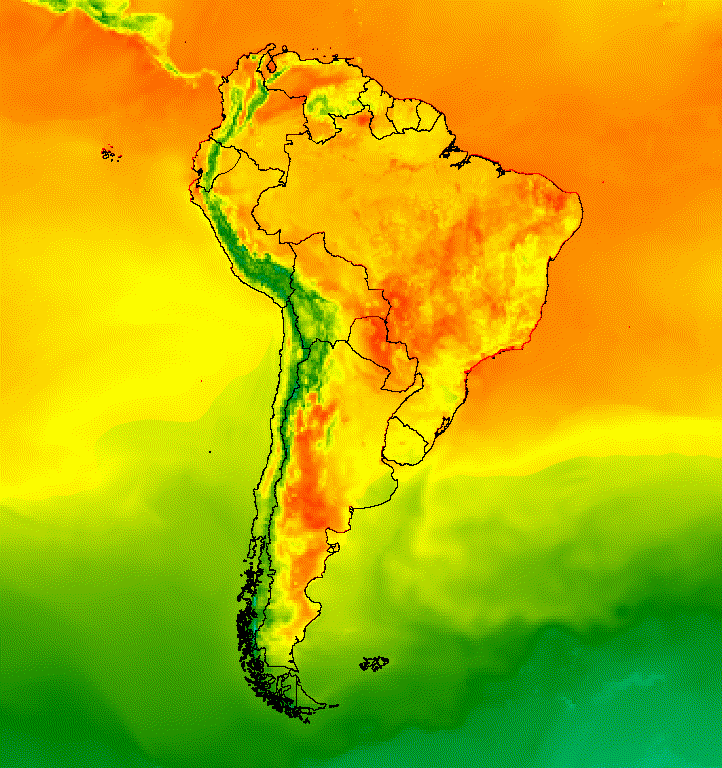
그림 5. 컬렉션의 이미지에 벡터 오버레이를 추가하여 공간적 맥락을 제공합니다.
이미지 오버레이
여러 이미지를 겹쳐서 원하는 스타일을 만들 수 있습니다. 관심 영역을 강조 표시하려고 한다고 가정해 보겠습니다. 이미지 시각화의 음소거된 사본을 기본 레이어로 만든 다음 원본 시각화의 잘린 버전을 오버레이할 수 있습니다. 이전 예를 바탕으로 다음 스크립트는 그림 6을 생성합니다.
코드 편집기 (JavaScript)
// Define an empty image to paint features to.
var empty = ee.Image().byte();

// Paint country feature edges to the empty image.
var southAmOutline = empty
  .paint({featureCollection: southAmCol, color: 1, width: 1})
  // Convert to an RGB visualization image; set line color to black.
  .visualize({palette: '000000'});

// Map a blend operation over the temperature collection to overlay the country
// border outline image on all collection images.
var tempColOutline = tempColVis.map(function(img) {
  return img.blend(southAmOutline);
});

// Define a partially opaque grey RGB image to dull the underlying image when
// blended as an overlay.
var dullLayer = ee.Image.constant(175).visualize({
  opacity: 0.6, min: 0, max: 255, forceRgbOutput: true});

// Map a two-part blending operation over the country outline temperature
// collection for final styling.
var finalVisCol = tempColOutline.map(function(img) {
  return img
    // Blend the dulling layer with the given country outline temperature image.
    .blend(dullLayer)
    // Blend a clipped copy of the country outline temperature image with the
    // dulled background image.
    .blend(img.clipToCollection(southAmCol));
});

// Define animation arguments.
var videoArgs = {
  dimensions: 768,
  region: southAmAoi,
  framesPerSecond: 7,
  crs: 'EPSG:3857'
};

// Display the animation.
print(ui.Thumbnail(finalVisCol, videoArgs));
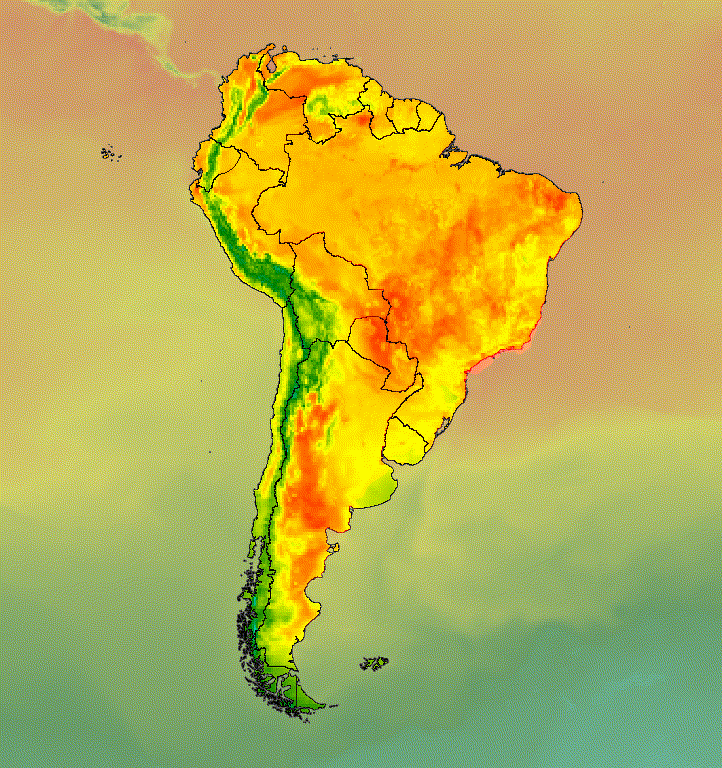
그림 6. 이미지를 클립하고 음소거된 사본에 오버레이하여 관심 영역을 강조 표시합니다.
이미지 데이터를 힐쉐이드 기본 레이어와 혼합하여 지형을 나타내고 시각화에 깊이를 더할 수도 있습니다 (그림 7).
코드 편집기 (JavaScript)
// Define a hillshade layer from SRTM digital elevation model.
var hillshade = ee.Terrain.hillshade(ee.Image('USGS/SRTMGL1_003')
  // Exaggerate the elevation to increase contrast in hillshade.
  .multiply(100))
  // Clip the DEM by South American boundary to clean boundary between
  // land and ocean.
  .clipToCollection(southAmCol);

// Map a blend operation over the temperature collection to overlay a partially
// opaque temperature layer on the hillshade layer.
var finalVisCol = tempColVis.map(function(img) {
  return hillshade
    .blend(img.clipToCollection(southAmCol).visualize({opacity: 0.6}));
});

// Define animation arguments.
var videoArgs = {
  dimensions: 768,
  region: southAmAoi,
  framesPerSecond: 7,
  crs: 'EPSG:3857'
};

// Display the animation.
print(ui.Thumbnail(finalVisCol, videoArgs));
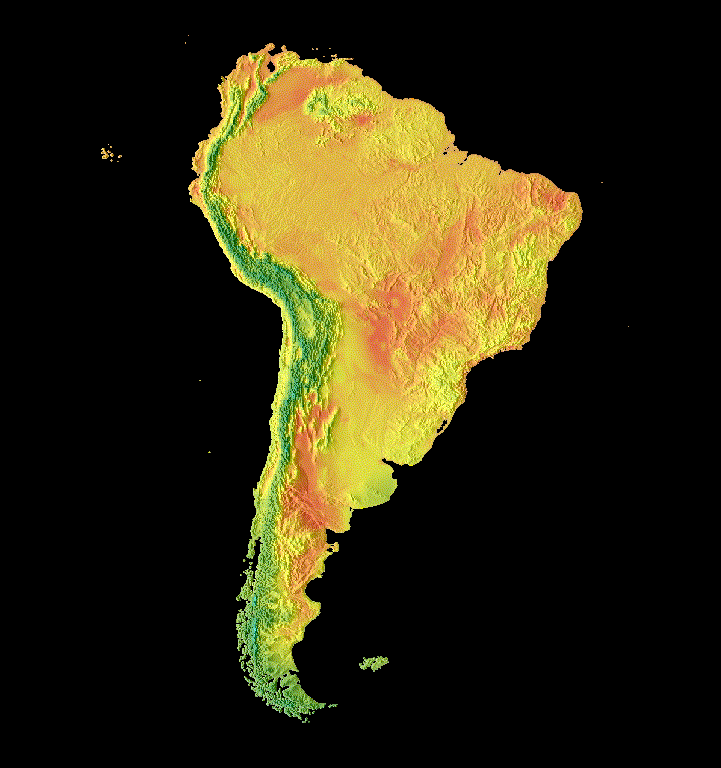
그림 7. 부분적으로 투명한 이미지 데이터를 힐쉐이드 레이어에 오버레이하여 지형을 표시합니다.
화면전환
이미지 모음을 맞춤설정하여 페이드, 플리커, 슬라이드 전환을 사용하여 모음 내 두 이미지의 차이를 보여주는 애니메이션을 만듭니다. 다음 예는 모두 다음 스크립트로 생성된 동일한 기본 시각화를 사용합니다.
코드 편집기 (JavaScript)
// Define an area of interest geometry with a global non-polar extent.
var aoi = ee.Geometry.Polygon(
  [[[-179.0, 78.0], [-179.0, -58.0], [179.0, -58.0], [179.0, 78.0]]], null,
  false);

// Import hourly predicted temperature image collection.
var temp = ee.ImageCollection('NOAA/GFS0P25')

// Define a northern summer solstice temperature image.
var summerSolTemp = temp
  .filterDate('2018-06-21', '2018-06-22')
  .filterMetadata('forecast_hours', 'equals', 12)
  .first()
  .select('temperature_2m_above_ground');

// Define a northern winter solstice temperature image.
var winterSolTemp = temp
  .filterDate('2018-12-22', '2018-12-23')
  .filterMetadata('forecast_hours', 'equals', 12)
  .first()
  .select('temperature_2m_above_ground');

// Combine the solstice images into a collection.
var tempCol = ee.ImageCollection([
  summerSolTemp.set('season', 'summer'),
  winterSolTemp.set('season', 'winter')
]);

// Import international boundaries feature collection.
var countries = ee.FeatureCollection('USDOS/LSIB_SIMPLE/2017');

// Define visualization arguments.
var visArgs = {
  min: -40.0,
  max: 35.0,
  palette: ['blue', 'purple', 'cyan', 'green', 'yellow', 'red']
};

// Convert the image data to RGB visualization images.
// The clip and unmask combination sets ocean pixels to black.
var tempColVis = tempCol.map(function(img) {
  return img
    .visualize(visArgs)
    .clipToCollection(countries)
    .unmask(0)
    .copyProperties(img, img.propertyNames());
});
깜박임, 점멸
여기와 같이 컬렉션에 이미지가 두 개만 있는 경우 컬렉션 애니메이션의 기본 표현은 플리커입니다. framesPerSecond 애니메이션 인수를 조정하여 플리커 속도를 높이거나 낮춥니다. 위의 컬렉션에 적용된 다음 시각화 인수로 그림 8이 생성됩니다.
코드 편집기 (JavaScript)
// Define arguments for animation function parameters.
var videoArgs = {
  dimensions: 768,
  region: aoi,
  framesPerSecond: 2,
  crs: 'EPSG:3857'
};

// Display animation to the Code Editor console.
print(ui.Thumbnail(tempColVis, videoArgs));
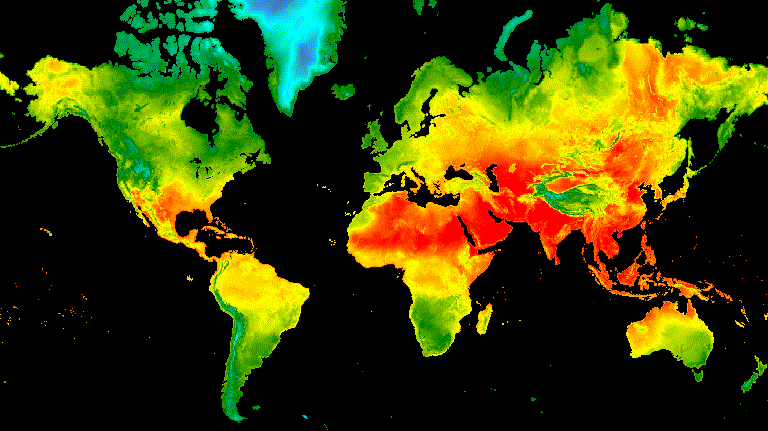
그림 8. 북쪽과 동지에서 오후 12시(GMT) 표면 온도 간에 깜박이는 예시
페이드
두 레이어 간의 페이드 전환은 한 레이어의 불투명도를 동시에 줄이면서 다른 레이어의 불투명도를 0에 가까운 값에서 1로 증가시키는 일련의 불투명도 증분을 통해 실행됩니다 (그림 9).
코드 편집기 (JavaScript)
// Define a sequence of decreasing opacity increments. Note that opacity cannot
// be 0, so near 1 and 0 are used. Near 1 is needed because a compliment is
// calculated in a following step that can result in 0 if 1 is an element of the
// list.
var opacityList = ee.List.sequence({start: 0.99999, end: 0.00001, count: 20});

// Filter the summer and winter solstice images from the collection and set as
// image objects.
var summerImg = tempColVis.filter(ee.Filter.eq('season', 'summer')).first();
var winterImg = tempColVis.filter(ee.Filter.eq('season', 'winter')).first();

// Map over the list of opacity increments to iteratively adjust the opacity of
// the two solstice images. Returns a list of images.
var imgList = opacityList.map(function(opacity) {
  var opacityCompliment = ee.Number(1).subtract(ee.Number(opacity));
  var winterImgFade = winterImg.visualize({opacity: opacity});
  var summerImgFade = summerImg.visualize({opacity: opacityCompliment});
  return summerImgFade.blend(winterImgFade).set('opacity', opacity);
});

// Convert the image list to an image collection; the forward phase.
var fadeForward = ee.ImageCollection.fromImages(imgList);

// Make a copy of the collection that is sorted by ascending opacity to
// represent the reverse phase.
var fadeBackward = fadeForward.sort({property: 'opacity'});

// Merge the forward and reverse phase frame collections.
var fadeCol = fadeForward.merge(fadeBackward);

// Define animation arguments.
var videoArgs = {
  dimensions: 768,
  region: aoi,
  framesPerSecond: 25,
  crs: 'EPSG:3857'
};

// Display the animation.
print(ui.Thumbnail(fadeCol, videoArgs));
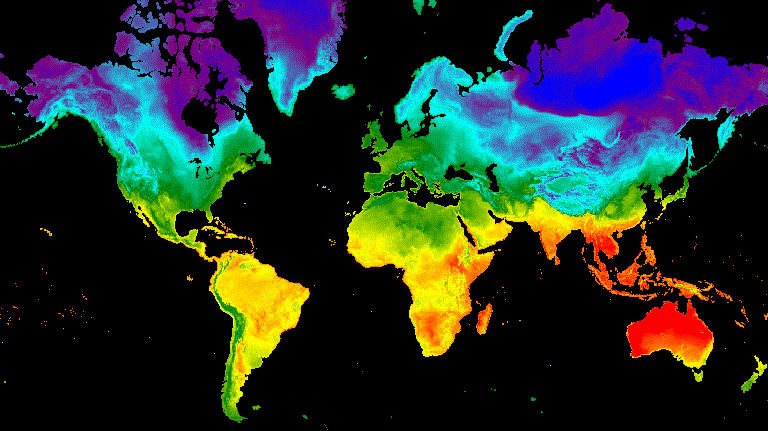
그림 9. 여름과 동지 중 오후 12시(GMT) 표면 온도 간에 페이드 처리된 예시
슬라이더
슬라이더 전환은 기본 이미지 레이어를 점진적으로 표시하고 숨깁니다. 이는 다양한 경도에서 겹쳐진 이미지의 불투명도를 반복적으로 조정하여 실행됩니다 (그림 10).
코드 편집기 (JavaScript)
// Define a sequence of longitude increments. Start and end are defined by the
// min and max longitude of the feature to be provided to the region parameter
// of the animation arguments dictionary.
var lonSeq = ee.List.sequence({start: -179, end: 179, count: 20});

// Define a longitude image.
var longitude = ee.Image.pixelLonLat().select('longitude');

// Filter the summer and winter solstice images from the collection and set as
// image objects.
var summerImg = tempColVis.filter(ee.Filter.eq('season', 'summer')).first();
var winterImg = tempColVis.filter(ee.Filter.eq('season', 'winter')).first();

// Map over the list of longitude increments to iteratively adjust the mask
// (opacity) of the overlying image layer. Returns a list of images.
var imgList = lonSeq.map(function(lon) {
  lon = ee.Number(lon);
  var mask = longitude.gt(lon);
  return summerImg.blend(winterImg.updateMask(mask)).set('lon', lon);
});

// Convert the image list to an image collection; concealing phase.
var sliderColForward = ee.ImageCollection.fromImages(imgList);

// Make a copy of the collection that is sorted by descending longitude to
// represent the revealing phase.
var sliderColbackward = sliderColForward
  .sort({property: 'lon', ascending: false});

// Merge the forward and backward phase frame collections.
var sliderCol = sliderColForward.merge(sliderColbackward);

// Define animation arguments.
var videoArgs = {
  dimensions: 768,
  region: aoi,
  framesPerSecond: 25,
  crs: 'EPSG:3857'
};

// Display the animation.
print(ui.Thumbnail(sliderCol, videoArgs));

그림 10. 여름과 동지 중 오후 12시(GMT) 지표면 온도 간의 전환을 보여주는 예시입니다.