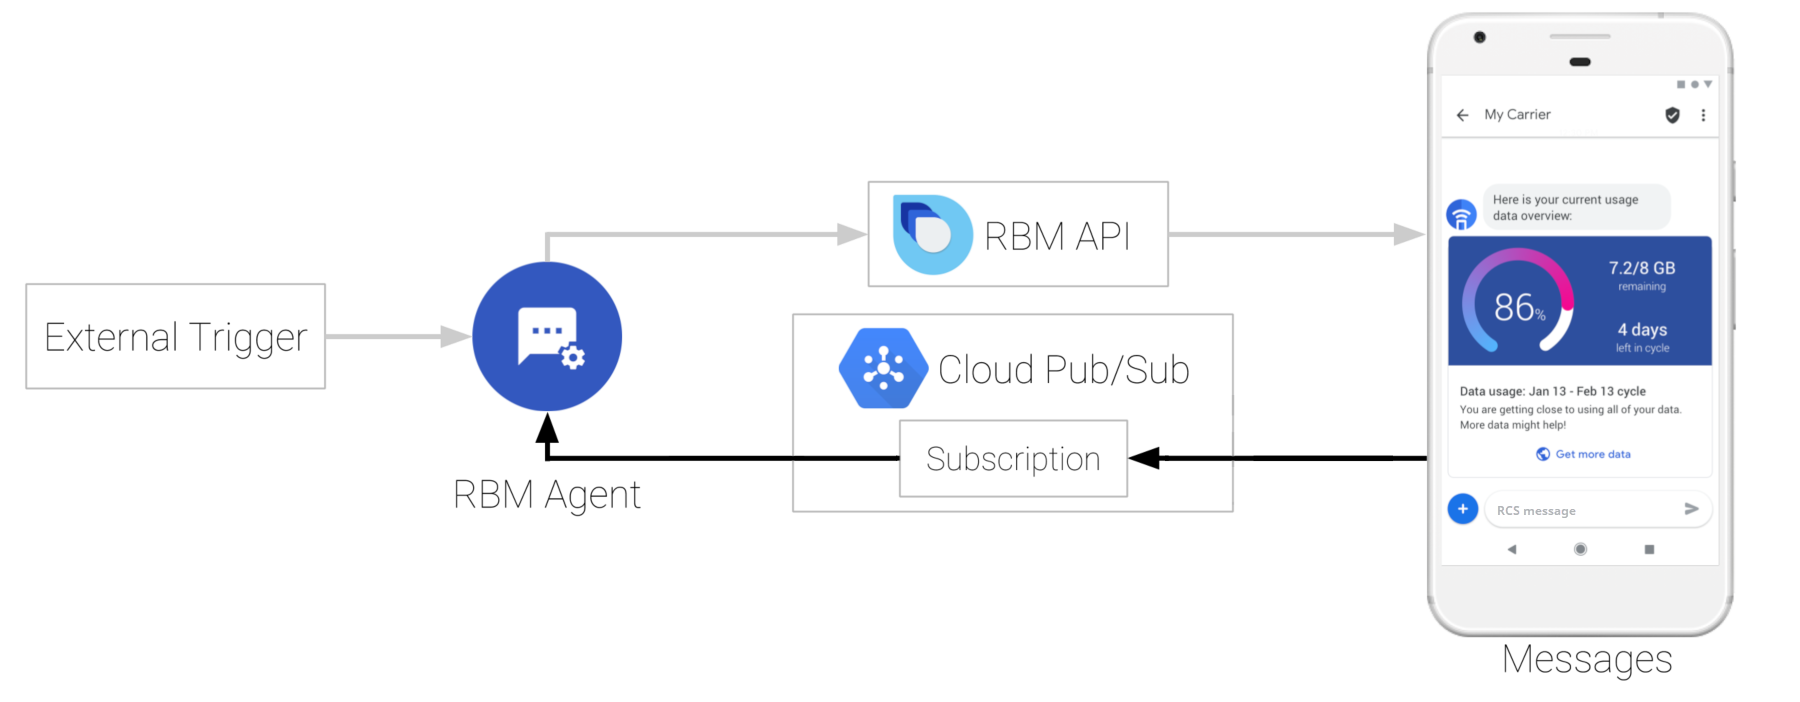
RBM 代理通过与 Cloud Pub/Sub 之间的发布/订阅关系接收消息和事件。当用户向您的代理发送消息或生成事件时,其即时通讯应用会将信息发送到代理的 Pub/Sub 订阅,您的代理可以从中访问消息或事件。请参阅接收消息。
代理的 Pub/Sub 订阅类型决定了代理接收消息的方式,因此您需要先配置 Pub/Sub 订阅,代理才能接收消息。RBM 代理支持pull订阅和push订阅。
拉取订阅
借助拉取订阅,您的代理将联系 Cloud Pub/Sub 并提取消息、事件和其他请求。
前提条件
在开始之前,您需要一个 RBM 代理。
初始设置
- 打开 Business Communications 开发者控制台,使用您的 RBM Google 帐号登录,然后点击您的代理。
- 在左侧导航栏中,点击集成。
- 点击修改订阅。
- 选择拉取,然后点击保存。
- 将代理配置为使用拉取订阅:
查找您的项目 ID
某些拉取订阅机制要求您指定代理的 Google Cloud 项目 (GCP) 项目 ID。代理的项目 ID 嵌入在拉取订阅名称中的 project/ 后面。
- 打开 Business Communications 开发者控制台,使用您的 RBM Google 帐号登录,然后点击您的代理。
- 在左侧导航栏中,点击集成。
- 找到代理的订阅名称。
- 找到
project/和下面的/之间的文本段。这是您的代理的项目 ID。 例如,如果订阅名称为projects/rbm-growing-tree-bank-nbdjkl6t/subscriptions/rbm-agent-subscription,则代理的项目 ID 为rbm-growing-tree-bank-nbdjkl6t。
C#
private async void InitPullMessages(string projectId, string jsonPath)
{
  GoogleCredential googleCredential = null;
  using (var jsonStream = new FileStream(jsonPath, FileMode.Open,
    FileAccess.Read, FileShare.Read))
  {
    googleCredential = GoogleCredential.FromStream(jsonStream)
      .CreateScoped(SubscriberServiceApiClient.DefaultScopes);
  }

  SubscriptionName subscriptionName = new SubscriptionName(projectId, subscriptionId);
  SubscriberClient subscriber = new SubscriberClientBuilder
  {
    SubscriptionName = subscriptionName,
    GoogleCredential = googleCredential

  }.Build();

  // setup listener for pubsub messages
  await subscriber.StartAsync(
    async (PubsubMessage message, CancellationToken cancel) =>
    {
      string text = System.Text.Encoding.UTF8.GetString(message.Data.ToArray());

      JObject jsonObject = JObject.Parse(jsonAsString);

      string userResponse = GetResponseText(jsonObject);
      string eventType = (string)jsonObject["eventType"];

      // check if the message is a user response message
      if ((userResponse.Length > 0) && (eventType == null))
      {
        string messageId = (string)jsonObject["messageId"];
        string msisdn = (string)jsonObject["senderPhoneNumber"];
        // let the user know their message has been read
        kitchenSinkBot.SendReadMessage(messageId, msisdn);
        HandleUserResponse(userResponse, msisdn);
      }
      await Console.Out.WriteLineAsync(
        $"Message {message.MessageId}: {jsonAsString}");
      return SubscriberClient.Reply.Ack;
    });
  }
}
此代码摘自 RBM 示例代理。
推送订阅
通过推送订阅,Cloud Pub/Sub 会将消息、事件和其他请求推送到您指定的 webhook 网址。
前提条件
在开始之前,您需要做好以下准备:
初始设置
- 打开 Business Communications 开发者控制台,使用您的 RBM Google 帐号登录,然后点击您的代理。
- 在左侧导航栏中,点击集成。
- 点击修改订阅。
- 选择推送。
- 在网络钩子端点网址部分,输入 webhook 的网址,以“https://”开头。
将 webhook 配置为接受具有指定
clientToken参数的POST请求,并发送包含secret参数的值的200 OK响应。例如,如果您的网络钩子收到包含以下正文内容的 POST 请求
{
  "clientToken":"SJENCPGJESMGUFPY",
  "secret":"1234567890"
}
网络钩子应确认
clientToken值,如果clientToken正确,则返回正文为secret: 1234567890的200 OK响应。在控制台中,点击验证。
当 RBM 平台验证您的 webhook 时,Configure your webhook 对话框随即关闭。
点击保存。
配置代理以接收来自网络钩子的消息:
- 如果您将示例代理与推送订阅搭配使用,请按照示例 README 文件中的说明进行操作。
- 如果不使用示例代理,请将您的基础架构配置为将消息从 webhook 传递给代理。
Node.js
let requestBody = req.body;

if ((requestBody.hasOwnProperty('clientToken')) && (requestBody.hasOwnProperty('secret'))) {
  console.log('RBM webhook verification request');

  // Confirm that the clientToken is the one we are seeing in the RBM console
  if (requestBody.clientToken == CLIENT_TOKEN) {
    console.log('Tokens match, returning secret');
    res.status(200).send('secret: ' + requestBody.secret);
  }
  else {
    // Client tokens did not match - sending permission denied
    console.log('Tokens do not match');
    res.sendStatus(403);
  }
}
验证收到的邮件
由于网络钩子可以接收来自任何发件人的消息,因此您应该在处理消息内容之前验证 Google 是否发送了传入消息。
要验证 Google 是否向您发送了邮件,请按以下步骤操作:
- 提取消息的
X-Goog-Signature标头。这是消息正文载荷的经过哈希处理、base64 编码的副本。 - 对请求的
message.body元素中的 RBM 载荷进行 Base-64 解码。 - 使用 webhook 的客户端令牌(您在设置推送订阅时指定)作为密钥,创建采用 base-64 解码消息载荷字节的 SHA512 HMAC,并对结果进行 base64 编码。
- 将
X-Goog-Signature哈希与您创建的哈希进行比较。- 如果哈希值一致,则表示您已确认此消息是由 Google 发送的。
如果哈希值不匹配,请检查已知良好消息的哈希处理过程。
如果您的哈希处理流程正常运行,并且您收到了您认为存在欺诈行为发送给您的邮件,请与我们联系。
Node.js
if ((requestBody.hasOwnProperty('message')) && (requestBody.message.hasOwnProperty('data'))) {
  // Validate the received hash to ensure the message came from Google RBM
  let userEventString = Buffer.from(requestBody.message.data, 'base64');
  let hmac = crypto.createHmac('sha512', CLIENT_TOKEN);
  let data = hmac.update(userEventString);
  let genHash = data.digest('base64');
  let headerHash = req.header('X-Goog-Signature');

  if (headerHash === genHash) {
    let userEvent = JSON.parse(userEventString);

    console.log('userEventString: ' + userEventString);
    handleMessage(userEvent);
  }
  else {
    console.log('hash mismatch - ignoring message');
  }
}

res.sendStatus(200);
后续步骤
配置订阅并设置代理以与 Cloud Pub/Sub 通信后,您的代理就可以从测试设备接收消息。 发送消息以验证您的设置。