
Page Summary
-
OAuth-based App Flip Linking allows users to easily and quickly link accounts in your authentication system to their Google accounts by seamlessly flipping them to your app for authorization if it's installed.
-
This process is faster as users don't need to re-enter credentials, leveraging existing account information in your app.
-
To implement App Flip, you must have an Android or iOS app and own or manage an OAuth 2.0 server supporting the authorization code flow.
-
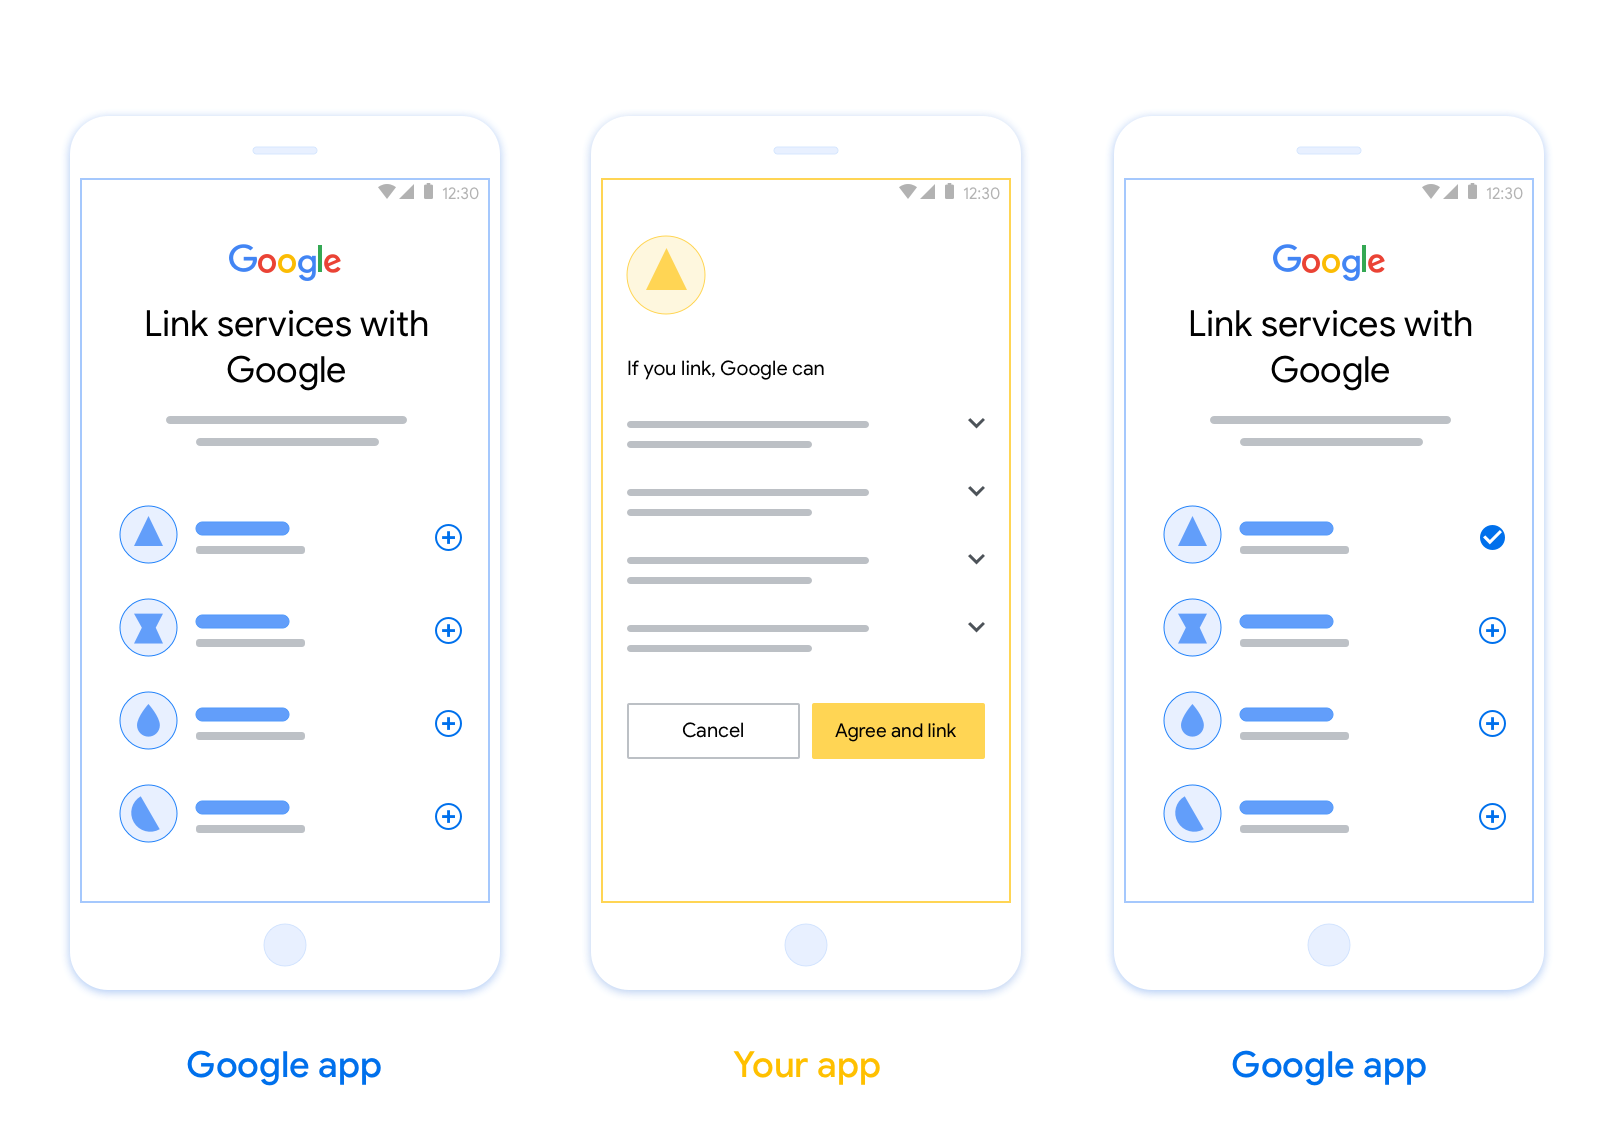
Designing the consent screen involves communicating that the linking is to Google, not a specific product, and providing clear information, options to cancel, unlink, and switch accounts, and including your logo.
-
Setting up App Flip involves creating an Action, setting up an OAuth 2.0 server, and configuring App Flip in the Actions console.
OAuth-based App Flip Linking (App Flip) allows your users to quickly link their accounts in your authentication system to their Google Accounts. If your app is installed on your user's phone when they initiate the account linking process, they are seamlessly flipped to your app to obtain user authorization.
This approach provides a faster linking process since the user does not have to re-enter their username and password to authenticate; instead, App Flip leverages the credentials from the user's account on your app. Once a user has linked their Google Account with your app, they can take advantage of any integrations that you have developed.
You can set up App Flip for both iOS and Android apps.
Requirements
To implement App Flip, you must fulfill the following requirements:
- You must have an Android or iOS app.
- You must own, manage and maintain an OAuth 2.0 server which supports the OAuth 2.0 authorization code flow.
OAuth-based App Flip Flow
The following sequence diagram details the interaction between the User, Google App, Your App, and Your Authorization Server for App Flip.
Roles and responsibilities
The following table defines the roles and responsibilities of the actors in the App Flip flow.
| Actor / Component | GAL Role | Responsibilities |
|---|---|---|
| Google App / Server | OAuth Client | Initiates the linking process, triggers a deep link to your mobile app, exchanges the authorization code for tokens, and securely stores them to access your service's APIs. |
| Your App | Authorization Agent | Authenticates the user (typically using existing app credentials), obtains consent, and retrieves an authorization code from your server. |
| Your Authorization Server | Authorization Server | Validates authorization codes and refresh tokens, and issues access tokens to the Google Server. |
For more information on the OAuth linking authorization code flow, see Implement your OAuth server.
Design guidelines
This section describes the design requirements and recommendations for the App Flip account linking consent screen. After Google calls your app, your app displays the consent screen to the user.
Requirements
- You must communicate that the user’s account is being linked to Google, not to a specific Google product, such as Google Home or Google Assistant.
Recommendations
We recommend that you do the following:
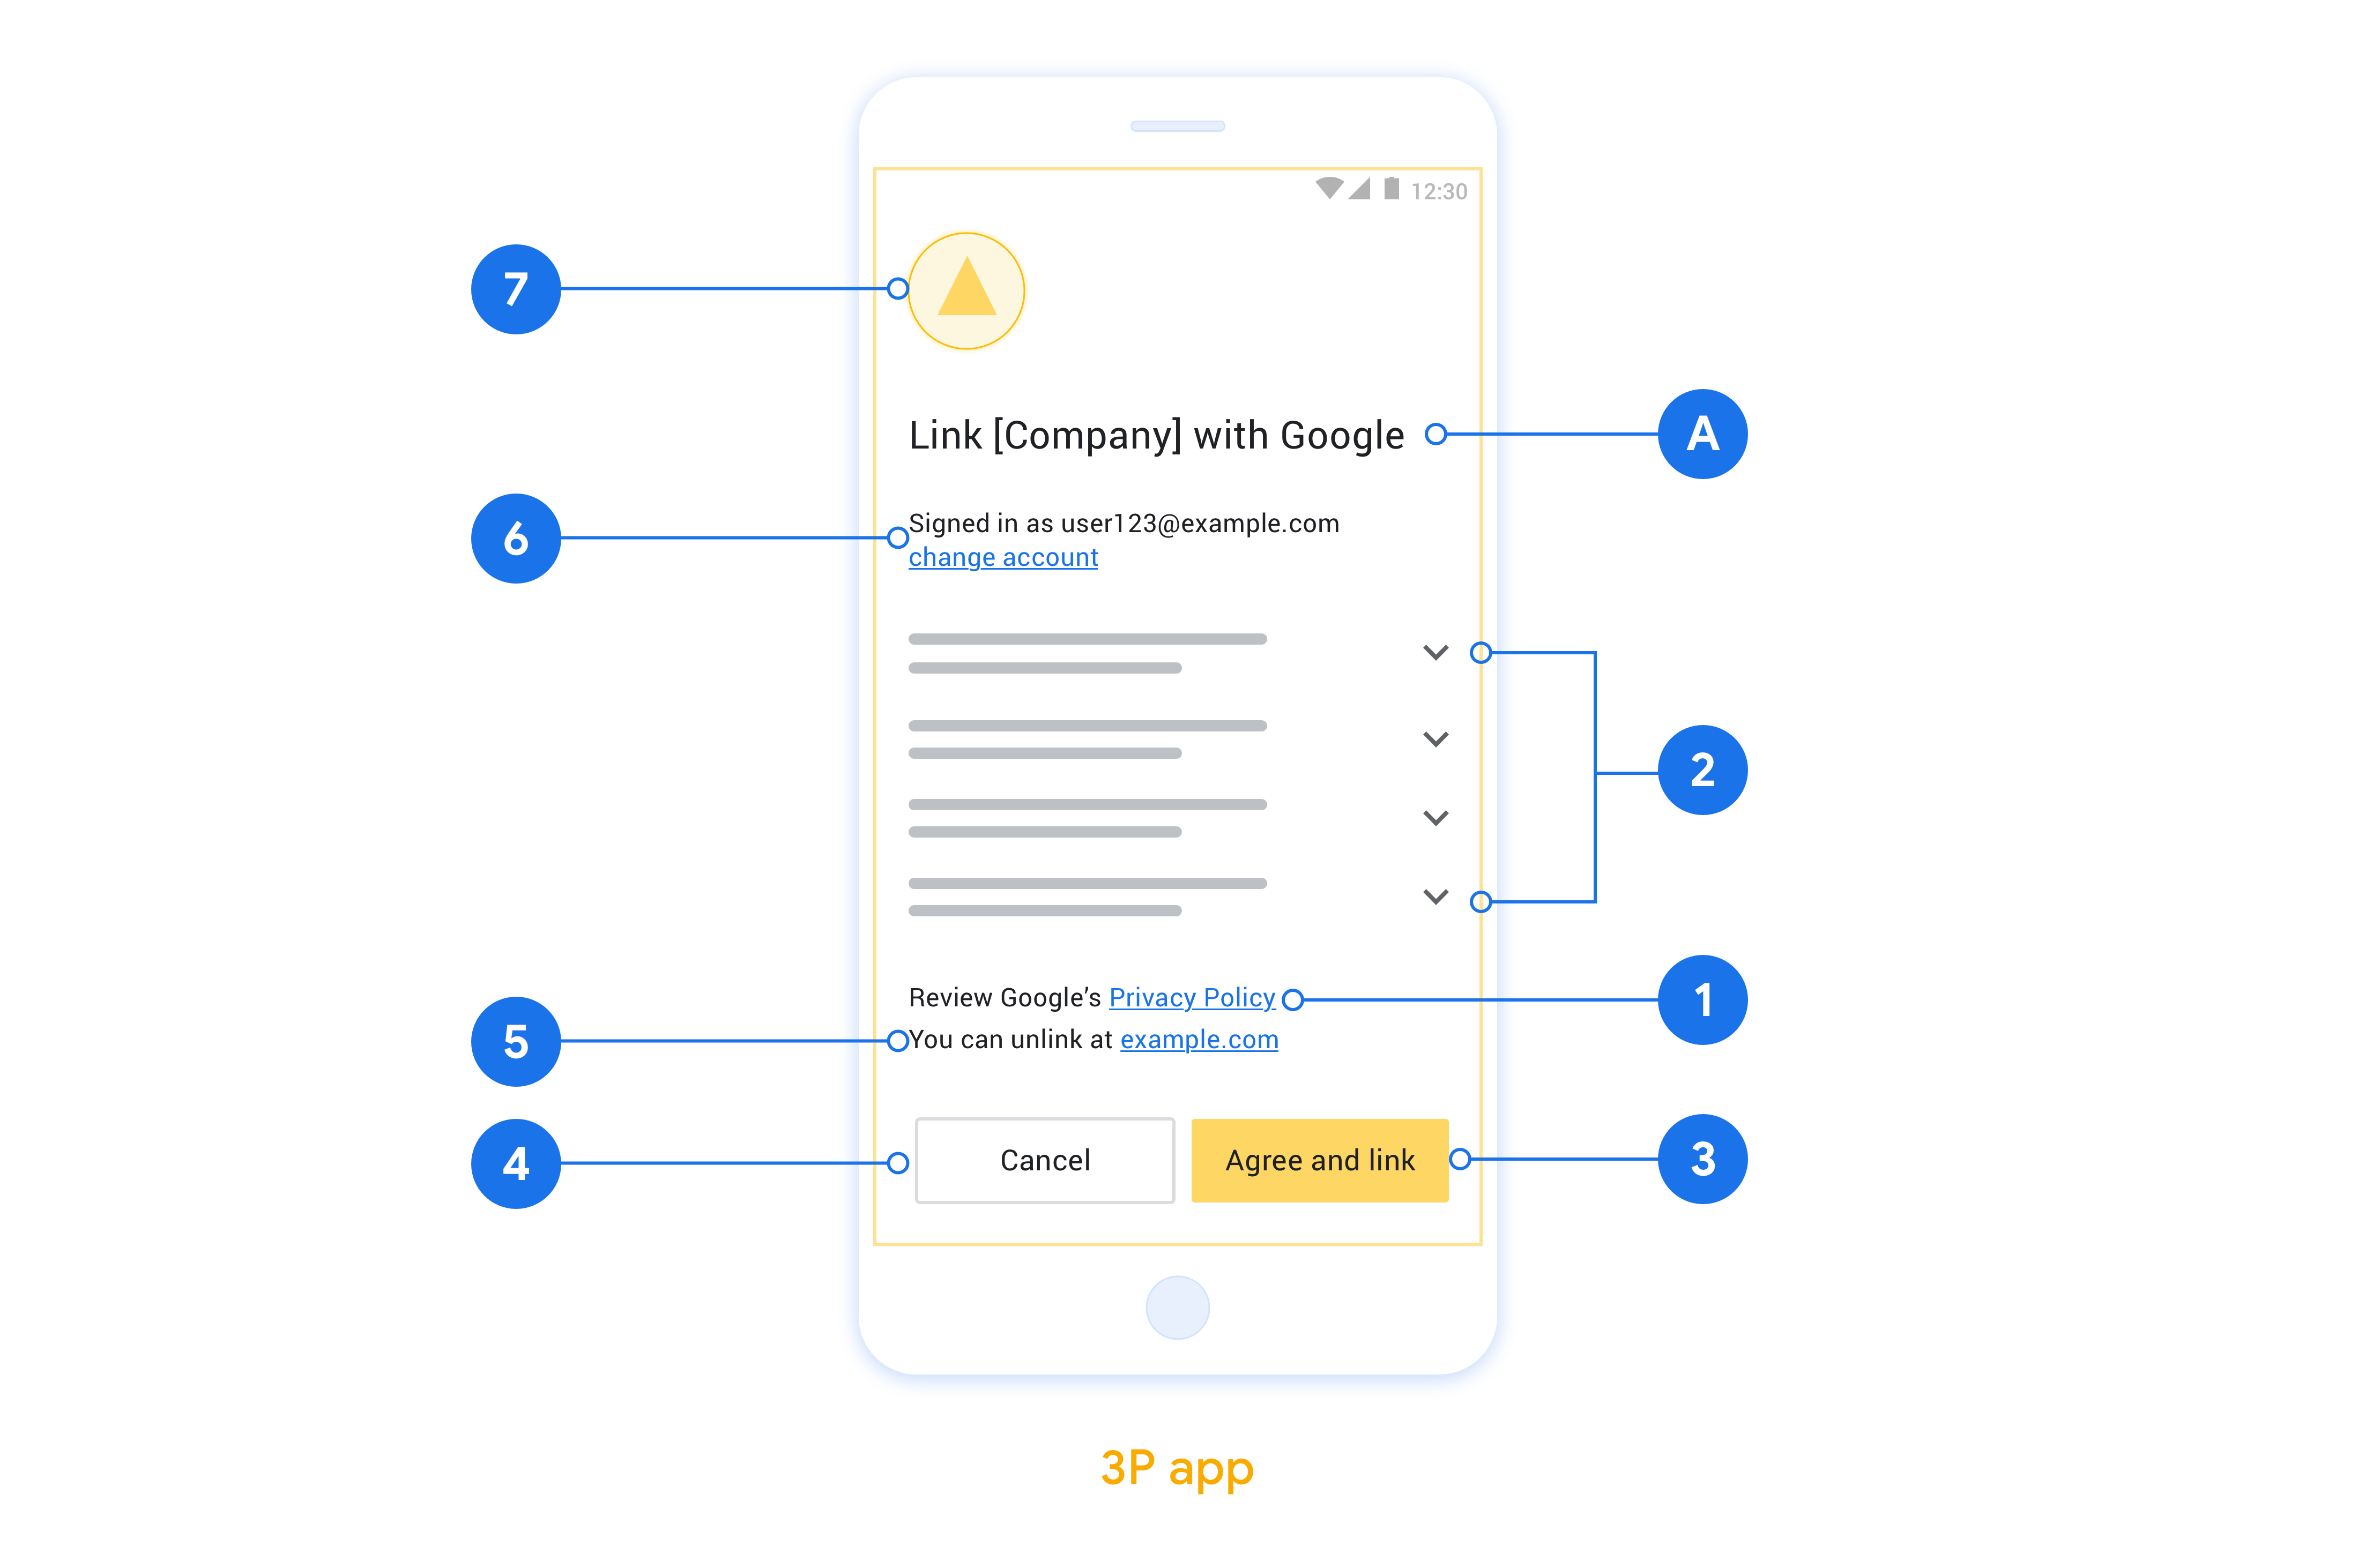
Display Google's Privacy Policy. Include a link to Google’s Privacy Policy on the consent screen.
Data to be shared. Use clear and concise language to tell the user what data of theirs Google requires and why.
Clear call-to-action. State a clear call-to-action on your consent screen, such as “Agree and link.” This is because users need to understand what data they're required to share with Google to link their accounts.
Ability to deny or cancel. Provide a way for users to go back, deny, or cancel, if they choose not to link.
Ability to unlink. Offer a mechanism for users to unlink, such as a URL to their account settings on your platform. Alternatively, you can include a link to Google Account where users can manage their linked account.
Ability to change user account. Suggest a method for users to switch their account(s). This is especially beneficial if users tend to have multiple accounts.
- If a user must close the consent screen to switch accounts, send a recoverable error to Google so the user can sign in to the desired account with OAuth linking and the implicit flow.
Include your logo. Display your company logo on the consent screen. Use your style guidelines to place your logo. If you wish to also display Google's logo, see Logos and trademarks.
Set up for OAuth-based App Flip
The following sections describe the prerequisites for OAuth-based App Flip and how to configure your App Flip project in the Actions console.
Create an Action and set up an OAuth 2.0 server
Before you can configure App Flip, you need to do the following:
- Create an Action. To create an Action, follow the instructions in the Create a project section.
- Set up an OAuth 2.0 server. For more information about setting up an OAuth server, see Implement OAuth account linking.
Configure App Flip in the Actions console
The following section describes how to configure App Flip in the Actions console.
- Click Develop in the top navigation. Then, click Account linking in the left navigation.
- Toggle on the switch next to Account linking.
- Under Account creation, select No, I only want to allow account creation on my website.
- Click Next.
- Under Linking type, select OAuth and Authorization code from the drop-down menus.
- Click Next.
- Fill out all the fields under OAuth Client information. (If App Flip isn’t supported, regular OAuth is used as a fallback.)
- Click Next.
- Under Use your app for account linking (optional), check Enable for iOS.
- Fill out the Universal Link field. For more information about universal links, see Allowing Apps and Websites to Link to your Content .
- If you want to optionally configure your client, add scopes and click Add scope under Configure your client (optional). If not, click Next.
- Under Testing instructions, type
test(or any other string) as a placeholder. (Filling in this field with a test account is only necessary if you are actually submitting your Action to be published.) - Click Save.
You can now continue to the next section to implement App Flip in your iOS or Android app.
Implement App Flip in your native apps
To implement App Flip, you need to modify the user authorization code in your app to accept a deep link from Google.
Test App Flip on your device
Now that you’ve created an Action and configured App Flip on the console and in your app, you can test App Flip on your mobile device. You can use the Google Assistant app to test App Flip.
To test App Flip from the Assistant app, follow these steps:
- Go to the Actions console and select your project.
- Click Test in the top navigation.
- Trigger the account linking flow from the Assistant app:
- Open the Google Assistant app.
- Click Settings.
- On the Assistant tab, click Home Control.
- Click Add(+).
- Select your Action from the list of providers. It will be prefixed with “[test]” in the list. When you select your [test] Action from the list, it should open your app.
- Verify that your app was launched and begin testing your authorization flow.