
Page Summary
-
Google Sign-In simplifies account linking and creation for Assistant Actions, allowing access to profile information like name, email, and picture for personalization.
-
Implementing Google Sign-In involves configuring your project in the Actions Console by enabling account linking and selecting Google Sign-In as the linking type.
-
You should design the voice user interface to check user verification status and only prompt for account linking when necessary, ideally after a guest flow.
-
After a user links their account, your backend receives a Google ID token containing their profile information which needs to be validated and decoded to access the data.
-
Profile information from the decoded token, such as the email address, can be used to identify and handle data access requests for existing users in your database.
Google Sign-In for the Assistant provides the simplest and easiest user experience to users and developers both for account linking and account creation. Your Action can request access to your user's Google profile during a conversation, including the user's name, email address, and profile picture.
The profile information can be used to create a personalized user experience in your Action. If you have apps on other platforms and they use Google Sign-In, you can also find and link to an existing user's account, create a new account, and establish a direct channel of communication to the user.
To perform account linking with Google Sign-In, you ask the user to give consent to access their Google profile. You then use the information in their profile, for example their email address, to identify the user in your system.
Implement Google Sign-In account linking
Follow the steps in the following sections to add Google Sign-In account linking to your Action.
Configure the project
To configure your project to use Google Sign-In account linking, follow these steps:
- Open the Actions Console and select a project.
- Click the Develop tab and choose Account linking.
- Enable the switch next to Account linking.
- In the Account creation section, select Yes.
In Linking type, select Google Sign In.
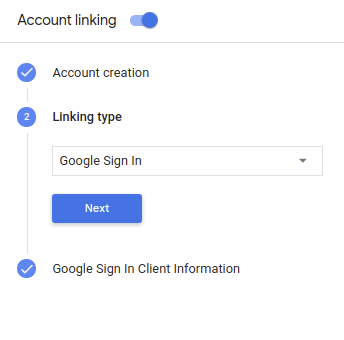
Open Client Information and take note of the value of Client ID issued by Google to your Actions.
Click Save.
Design the voice user interface for the authentication flow
Check if the user is verified and start the account linking flow
- Open your Actions Builder project in the Actions Console.
- Create a new scene to start account linking in your Action:
- Click Scenes.
- Click the add (+) icon to add a new scene.
- In the newly created scene, click the add add icon for Conditions.
- Add a condition that checks if the user associated with the conversation is a
a verified user. If the check fails, your Action can't perform account linking
during the conversation, and should fall back to providing access to
functionality that doesn't require account linking.
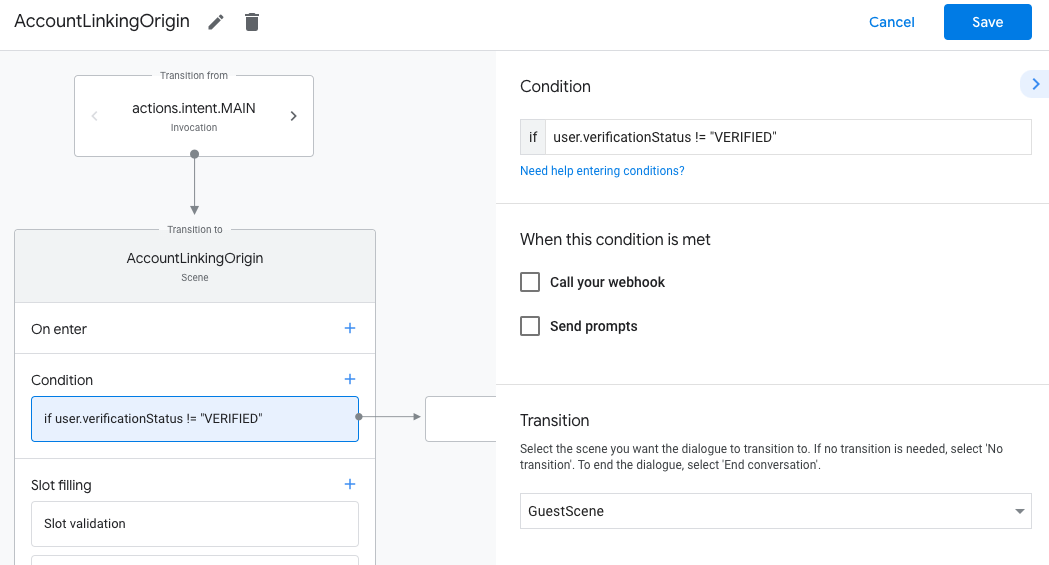
- In the
Enter new expressionfield under Condition, enter the following logic:user.verificationStatus != "VERIFIED" - Under Transition, select a scene that doesn't require account linking or a scene that is the entry point to guest-only functionality.
- In the
- Click the add add icon for Conditions.
- Add a condition to trigger an account linking flow if the user doesn't have
an associated identity.
- In the
Enter new expressionfield under Condition, enter the following logic::user.verificationStatus == "VERIFIED" - Under Transition, select the Account Linking system scene.
- Click Save.
- In the
![]()
After saving, a new account linking system scene called <SceneName>_AccountLinking
is added to your project.
Customize the account linking scene
- Under Scenes, select the account linking system scene.
- Click Send prompt and add a short sentence to describe to the user why the Action needs to access their identity (for example "To save your preferences").
- Click Save.

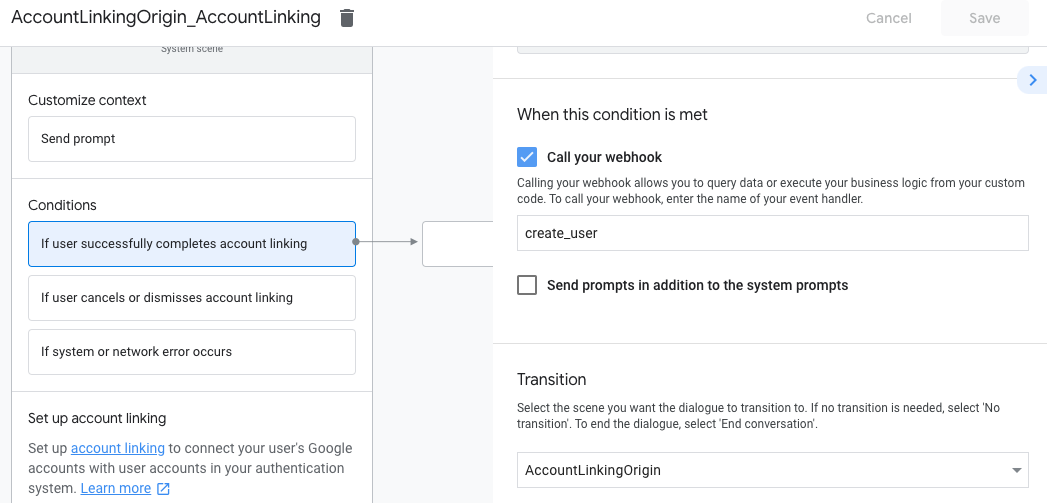
- Under Conditions, click If user successfully completes account linking.
- Configure how the flow should proceed if the user agrees to link their account. For example, call the webhook to process any custom business logic required and transition back to the originating scene.
- Click Save.
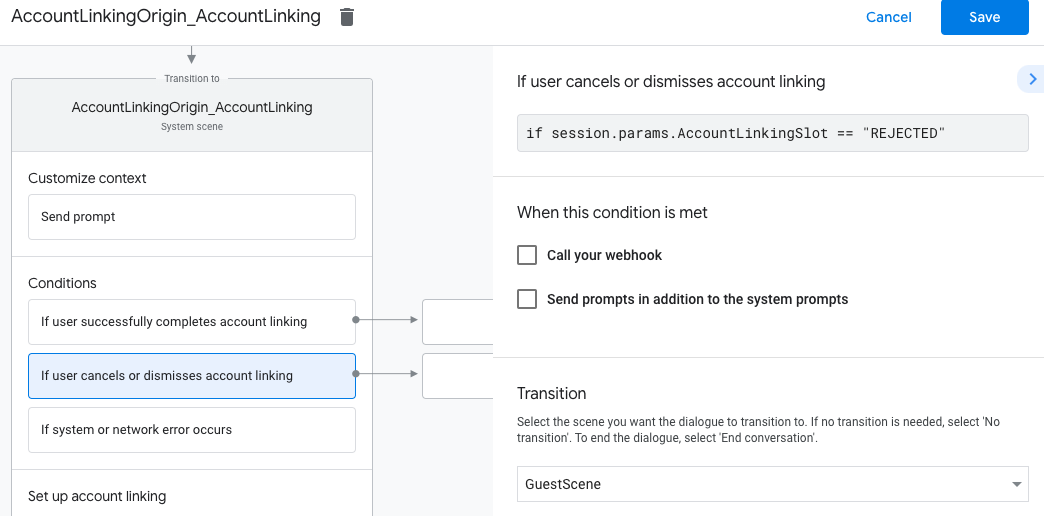
- Under Conditions, click If user cancels or dismisses account linking.
- Configure how the flow should proceed if the user doesn't agree to link their account. For example, send an acknowledging message and redirect to scenes that provide functionality that doesn't require account linking.
- Click Save.
- Under Conditions, click If system or network error occurs.
- Configure how the flow should proceed if the account linking flow can't be completed because of system or network errors. For example, send an acknowledging message and redirect to scenes that provide functionality that doesn't require account linking.
- Click Save.
Access profile information in your backend
After the user authorizes your action to access their Google profile, you will receive a Google ID token that contains the user's Google profile information in every subsequent request to your action.
To access the user's profile information, you need to first validate and decode the token by doing the following:
- Use a JWT-decoding library for your language to decode the token, and use Google's public keys (available in JWK or PEM format) to verify the token's signature.
- Verify that the token's issuer (
issfield in the decoded token) ishttps://accounts.google.comand that the audience (audfield in the decoded token) is the value of Client ID issued by Google to your Actions, which is assigned to your project in the Actions console.
The following is an example of a decoded token:
{
  "sub": 1234567890,        // The unique ID of the user's Google Account
  "iss": "https://accounts.google.com",        // The token's issuer
  "aud": "123-abc.apps.googleusercontent.com", // Client ID assigned to your Actions project
  "iat": 233366400,         // Unix timestamp of the token's creation time
  "exp": 233370000,         // Unix timestamp of the token's expiration time
  "name": "Jan Jansen",
  "given_name": "Jan",
  "family_name": "Jansen",
  "email": "jan@gmail.com", // If present, the user's email address
  "locale": "en_US"
}
If you use the Actions on Google Fulfillment library for Node.js, it takes care of validating and decoding the token for you, and gives you access to the profile content, as shown in the following code snippets.
...
const app = conversation({
  // REPLACE THE PLACEHOLDER WITH THE CLIENT_ID OF YOUR ACTIONS PROJECT
  clientId: CLIENT_ID,
});
...
// Invoked on successful completion of account linking flow, check if we need to
// create a Firebase user.
app.handle('linkAccount', async conv => {
  let payload = conv.headers.authorization;
  if (payload) {
  // Get UID for Firebase auth user using the email of the user
    const email = payload.email;
    if (!conv.user.params.uid && email) {
      try {
        conv.user.params.uid = (await auth.getUserByEmail(email)).uid;
      } catch (e) {
        if (e.code !== 'auth/user-not-found') {
          throw e;
        }
        // If the user is not found, create a new Firebase auth user
        // using the email obtained from Google Assistant
        conv.user.params.uid = (await auth.createUser({email})).uid;
      }
    }
  }
});
Handle data access requests
To handle data access request, just verify that the user asserted by the Google ID token is already present in your database. The following snippet of code shows an example of how to check if orders for a user already exist in a Firestore database:
...
app.handle('Place_Order', async conv => {
  const order = conv.session.params.order;
  const userDoc = dbs.user.doc(conv.user.params.uid);
  const orderHistory = userDoc.collection("orderHistory");
  if (orderHistory) {
    // Order history exists, so the user already placed an order.
    // Update counter for order type.
    await orderHistory.doc(order).update({ count: admin.firestore.FieldValue.increment(1)});
  } else {
    // First order they place
    await orderHistory.doc(order).set({ option: order, count: 1});
    options.forEach(opt => {
      if (opt != order) {
        orderHistory.doc(opt).set({ option: opt, count: 0});
      }
    });
  }
  return conv.add(`Your ${order} has been placed. ` +
      'Thanks for using Boba Bonanza, see you soon!');
});