
این راهنما برای توسعهدهندگانی است که از Cloud Run برای برچسبگذاری سمت سرور استفاده میکنند و میخواهند یک سرور پیشنمایش خصوصی راهاندازی کنند.
برچسبگذاری سمت سرور به شما امکان میدهد قبل از اعمال تغییرات برچسبگذاری، آنها را در حالت پیشنمایش و اشکالزدایی پیشنمایش کنید . این بخش مهمی از گردش کار توسعه است تا اطمینان حاصل شود که برچسبهای شما مطابق انتظار رفتار میکنند. برای فعال کردن این قابلیت، به دو استقرار Cloud Run نیاز است: یکی برای سرور برچسبگذاری و دیگری برای سرور پیشنمایش. این راهنما اطلاعات بیشتری در مورد نحوه ارتباط دو سرور و نحوه پیکربندی آنها در یک محیط سازمانی ارائه میدهد.
نمای کلی
وقتی برچسبگذاری سمت سرور را در Cloud Run مستقر میکنید، میتوانید آن را با یا بدون متعادلکننده بار مستقر کنید. برای استقرارهای چند منطقهای، به یک متعادلکننده بار نیاز دارید تا ترافیک را به نزدیکترین نمونه هدایت کند.
بدون متعادل کننده بار
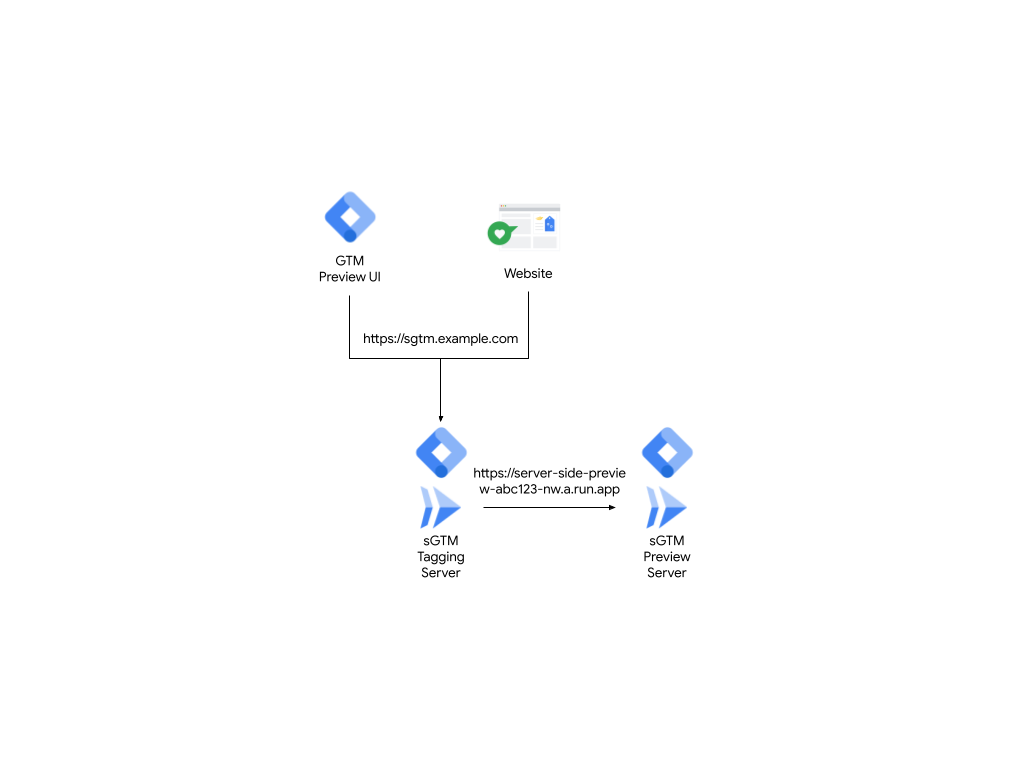
شکل ۱: استقرار بدون متعادلکننده بار.
با متعادل کننده بار
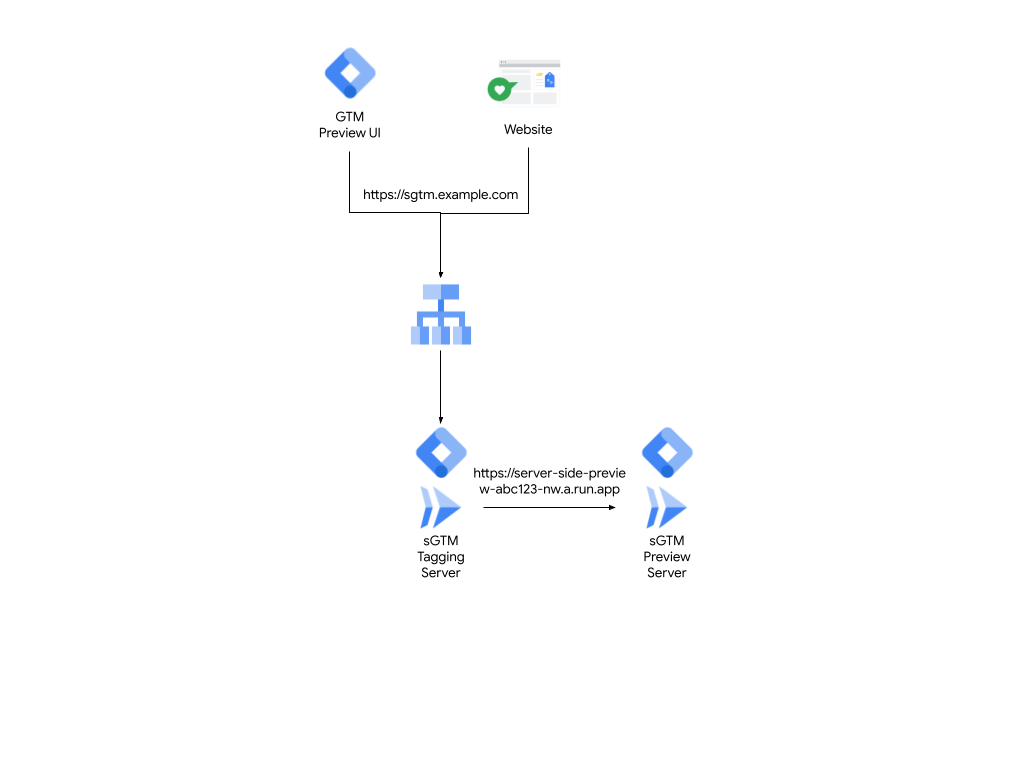
شکل 2: استقرار با متعادلکننده بار.
در هر دو پیادهسازی، نقطه ورود برای سرور پیشنمایش و محیط برچسبگذاری در محیط عملیاتی، یک URL یکسان است (برای مثال، sgtm.example.com ). سرور برچسبگذاری با یک متغیر محیطی به نام PREVIEW_SERVER_URL پیادهسازی میشود که نشاندهنده URL سرور پیشنمایش است.
وقتی از tagmanager.google.com بازدید میکنید و حالت پیشنمایش را باز میکنید، Tag Manager به sgtm.example.com?id=[gtm_server_id]>m_auth=[auth_id]>m_preview=[env_id] میرود و یک کوکی تنظیم میکند. وقتی از همان مرورگر برای کاوش در وبسایت هدف استفاده میکنید، درخواستهای ارسال شده به sgtm.example.com نیز کوکی را ارسال میکنند. به دلیل وجود کوکی، سرور برچسبگذاری میداند که اینها رویدادهای شما هستند، بنابراین فقط رویدادهای شما را برای مشاهده و عیبیابی به سرور پیشنمایش ارسال میکند.
سرور برچسبگذاری، این رویدادها را با ارسال درخواستهای HTTP به URL تنظیمشده در متغیر محیطی PREVIEW_SERVER_URL ارسال میکند.
درباره سرورهای پیشنمایش عمومی
این رفتار پیشفرض مستلزم آن است که سرور پیشنمایش شما عمومی باشد. با این حال، این برای برخی سازمانها مشکلساز است زیرا محدودیتهایی در مورد اینکه چه زیرساختهایی میتوانند عمومی باشند، دارند و معمولاً اقدامات امنیتی اضافی را از طریق یک متعادلکننده بار اعمال میکنند. یک متعادلکننده بار موارد زیر را در اختیار شما قرار میدهد:
- کنترل بیشتر بر ویژگیهایی مانند سیاستهای SSL برای محدود کردن مجموعههای رمز.
- ادغام بومی با Cloud Armor برای فایروال برنامههای وب (WAF) یا حملات انکار سرویس توزیعشده (DDoS).
- قابلیتهای پیشرفته مدیریت ترافیک
سرور پیشنمایش خود را از طریق یک متعادلکننده بار مسیریابی کنید
برای ایجاد یک سرور پیشنمایش خصوصی، از مسیریابی مبتنی بر میزبان از طریق متعادلکننده بار با یک زیردامنه اضافی استفاده کنید. ادامه این راهنما نحوه مسیریابی سرور پیشنمایش خود را از طریق متعادلکننده بار توضیح میدهد.
پیشنیازها
- سرور برچسبگذاری روی Cloud Run و پشت یک متعادلکننده بار مستقر شده است.
- دسترسی به پروژه گوگل کلود
- دسترسی به یک زیر دامنه جدید برای سرور پیشنمایش، برای مثال،
preview.sgtm.example.com.
مرحله ۱: متغیر محیطی را با یک زیردامنه جدید بهروزرسانی کنید
برای استفاده از دامنه سرور پیشنمایش جدید، متغیر محیطی سرور برچسبگذاری سمت سرور PREVIEW_SERVER_URL را بهروزرسانی کنید:
- برنامه Cloud Run را باز کنید.
- سرور برچسبگذاری را انتخاب کنید.
- روی ویرایش و استقرار نسخه جدید کلیک کنید.
- در تب متغیرها و اسرار ، در بخش کانتینرها ،
PREVIEW_SERVER_URLبه دامنه جدید تغییر دهید. برای مثال:preview.sgtm.example.com.
مرحله ۲: متعادلکننده بار موجود را برای استفاده از مسیریابی مبتنی بر میزبان پیکربندی کنید
برای پیکربندی متعادلکننده بار موجود، از مسیریابی مبتنی بر میزبان استفاده کنید و ترافیک را به سرور صحیح ارسال کنید:
- در Cloud Run، صفحه Load balancing را باز کنید و روی نام load balancer خود کلیک کنید.
- روی دکمه ویرایش کلیک کنید.
- روی صفحه پیکربندی Backend کلیک کنید و منوی کشویی مربوط به سرویسهای Backend و سطلهای backend را باز کنید.
- روی ایجاد یک سرویس backend کلیک کنید و موارد زیر را تکمیل کنید:
- یک نام مناسب به آن بدهید (برای مثال،
preview-backend-service). - نوع backend را به عنوان Serverless network endpoint group انتخاب کنید.
- یک نام مناسب به آن بدهید (برای مثال،
- در بخش Backend ، یک گروه نقطه پایانی شبکه بدون سرور جدید ایجاد کنید و موارد زیر را تکمیل کنید:
- یک نام به آن بدهید و منطقهای را که سرور پیشنمایش در آن میزبانی میشود، انتخاب کنید.
- Cloud Run را به عنوان نوع گروه نقطه پایانی شبکه بدون سرور و سرور پیشنمایش را به عنوان سرویس انتخاب کنید.
- روی ایجاد کلیک کنید.
- در صورت نیاز، سایر تنظیمات را تغییر دهید یا پیشفرضها را حفظ کنید و روی ایجاد کلیک کنید.
مرحله ۳: یک قانون جدید اضافه کنید و کنترل ورود را بهروزرسانی کنید
برای افزودن یک قانون برای آدرس میزبان جدید و بهروزرسانی کنترل ورودی:
- صفحه قوانین میزبان و مسیر را باز کنید.
- یک قانون جدید اضافه کنید که در آن:
- میزبان، آدرس اینترنتی جدید است:
preview.sgtm.example.com - مسیر این است:
/* - بکاند عبارت است از:
preview-backend-service
- میزبان، آدرس اینترنتی جدید است:
- برای راهاندازی مجدد متعادلکننده بار، روی دکمه بهروزرسانی کلیک کنید.
- دوباره به Cloud Run برگردید و سرور پیشنمایش را باز کنید و تب Networking را انتخاب کنید.
- کنترل Ingress را به Internal تغییر دهید و تیک گزینه Allow traffic from external application load balancers را بزنید تا به صورت عمومی قابل دسترسی نباشد.
نتیجه : معماری سرور شما اکنون باید مانند شکل 3 باشد، که در آن درخواستهای ترافیک همگی به سرور برچسبگذاری هدایت میشوند و سرور برچسبگذاری قادر است درخواستها را به سرور پیشنمایش ارسال کند.
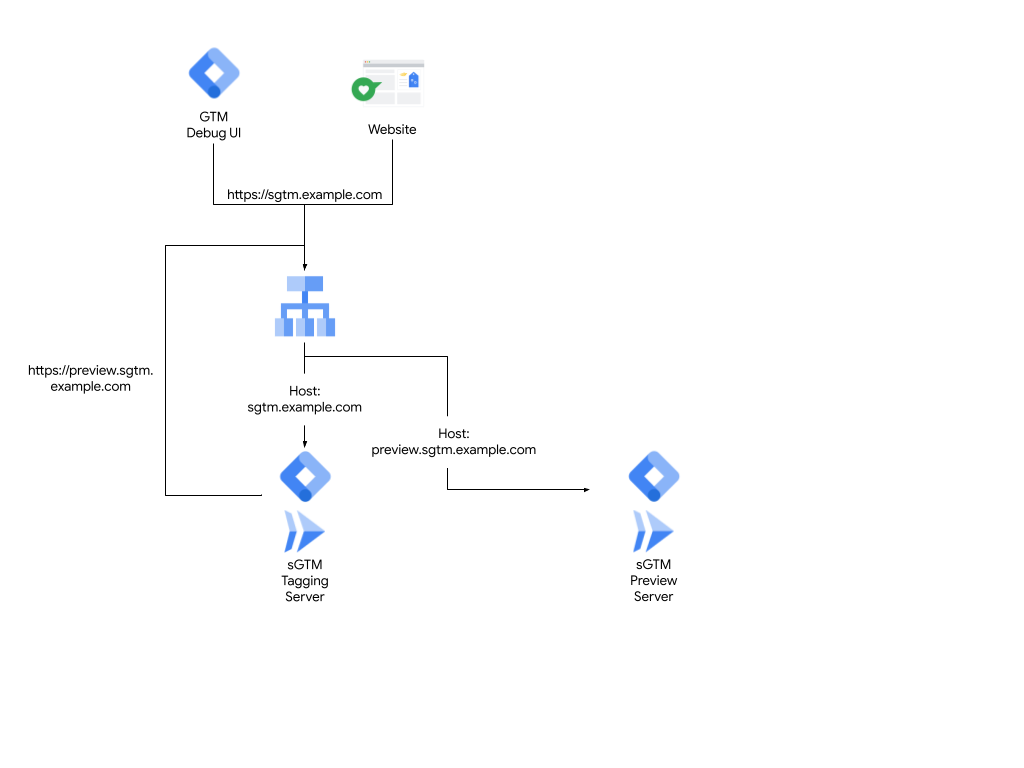
شکل ۳: استفاده از مسیریابی مبتنی بر میزبان.
پیکربندی خود را بررسی کنید
برای بررسی پیکربندی خود:
- گوگل تگ منیجر را باز کنید .
- کانتینر سرور خود را باز کنید.
- روی مدیریت > تنظیمات کانتینر کلیک کنید و آدرس کانتینر سرور را روی آدرس سرور برچسبگذاری تنظیم کنید.
- پنجره را ببندید و پیشنمایش فضای کاری را ببینید. پنجره اشکالزدایی باز میشود. هنگام پیمایش وبسایت، رویدادهای شما باید در پنجره اشکالزدایی ظاهر شوند.