Page Summary
-
This guide details how to set up a private preview server for server-side tagging in Google Tag Manager using Cloud Run.
-
A private preview server enhances security by routing traffic through a load balancer with host-based routing and an additional subdomain.
-
The setup involves updating environment variables, configuring the load balancer, and adjusting ingress control for the preview server.
-
This approach allows developers to preview tagging changes in a secure environment before applying them to the production tagging server.
-
Path-based routing is not recommended as it may prevent events from reaching the correct destination; host-based routing provides better separation.
This guide is for developers using Cloud Run for server-side tagging who want to set up a private preview server.
Server-side tagging lets you preview tagging changes in preview and debug mode before applying them. This is a critical part of the development workflow to ensure your tags behave as intended. To enable this capability requires two Cloud Run deployments: one for a tagging server and one for a preview server. This guide provides more information on how the two servers communicate and how you can configure them in an enterprise environment.
Overview
When you deploy server-side tagging to Cloud Run you can deploy it with or without a load balancer. For multi-region deployments, you need a load balancer to direct traffic to the nearest instance.
Without load balancer
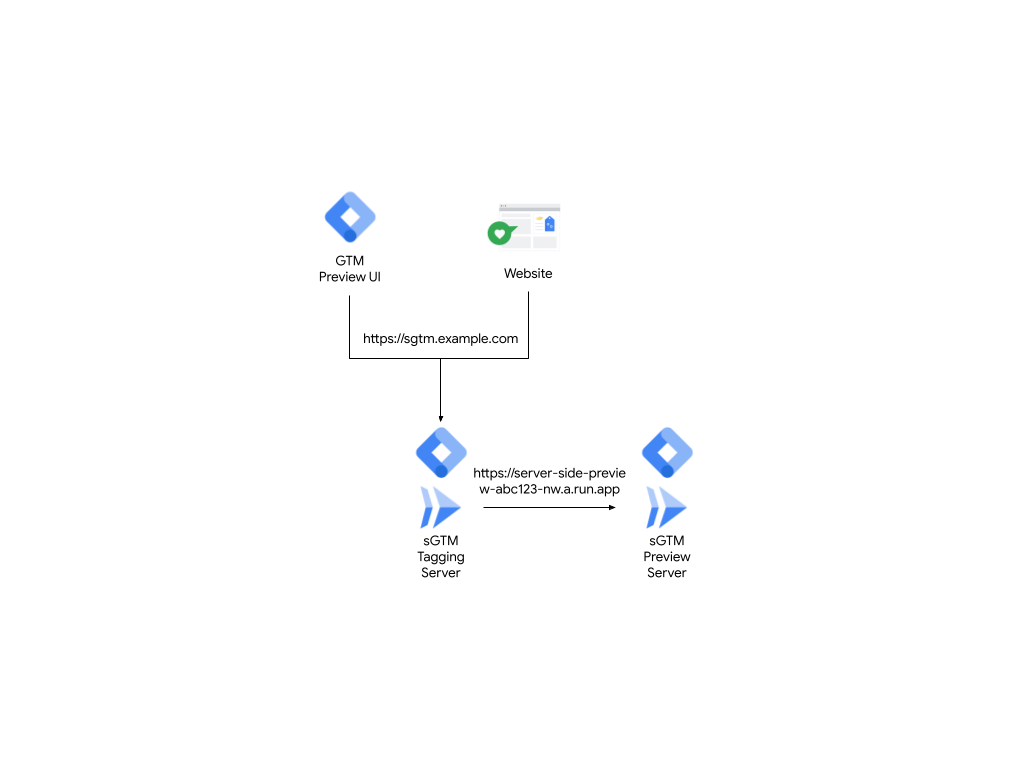
Figure 1: Deployment without a load balancer.
With load balancer
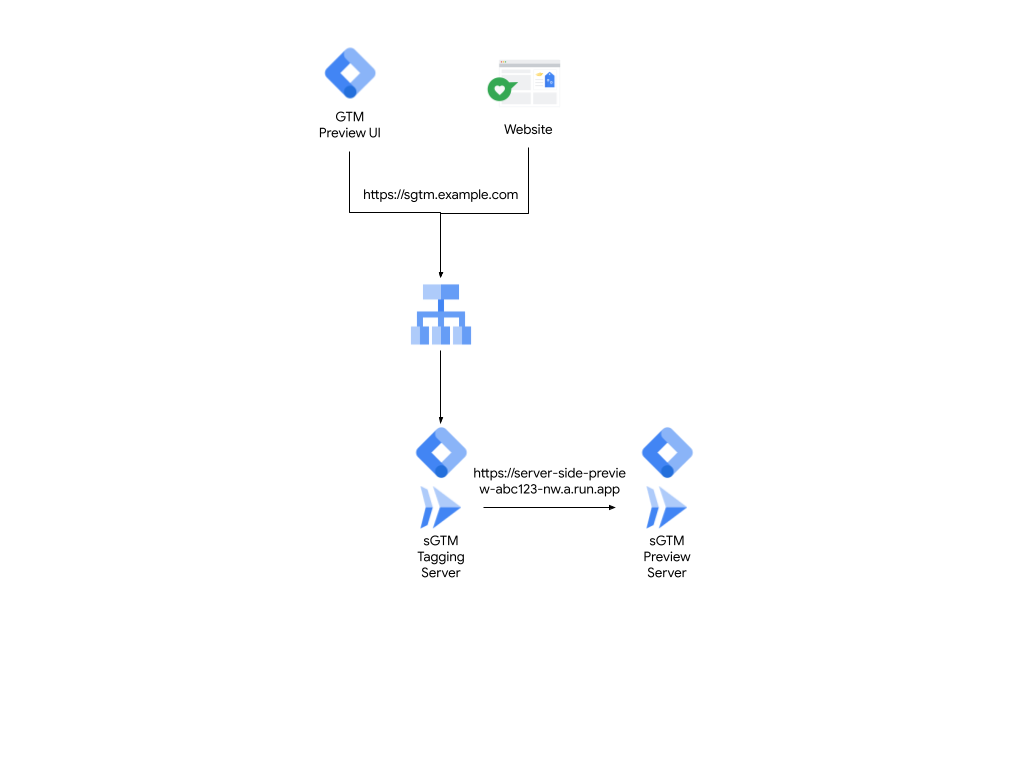
Figure 2: Deployment with a load balancer.
In both deployments, the entry point for both the preview server and production
tagging environment is the same URL (for example, sgtm.example.com). The
tagging server is deployed with an environment variable called
PREVIEW_SERVER_URL which represents the URL of the preview server.
When you visit tagmanager.google.com and open preview mode, Tag Manager
navigates to
sgtm.example.com?id=[gtm_server_id]>m_auth=[auth_id]>m_preview=[env_id]
and sets a cookie. When you then use the same browser to explore the target
website, requests sent to sgtm.example.com also forward the cookie. Because
of the cookie, the tagging server knows these are your events, so it only
forwards your events on to the preview server for you to view and troubleshoot.
The tagging server forwards these events by making HTTP requests to the URL set
in the PREVIEW_SERVER_URL environment variable.
About public-facing preview servers
This default behavior requires your preview server to be public. However, this is problematic for some organizations as they have restrictions about what infrastructure can be public facing and usually enforce additional security measures through a load balancer. A load balancer gives you:
- More control over features such as SSL policies to restrict cipher suites.
- Native integration with Cloud Armor for web-application firewall (WAF) or distributed denial-of-service (DDoS).
- Advanced traffic-management capabilities.
Route your preview server through a load balancer
To create a private preview server, use host-based routing through the load balancer with an additional subdomain. The rest of this guide explains how to route your preview server through a load balancer.
Prerequisites
- Tagging server is deployed on Cloud Run behind a load balancer.
- Access to the Google Cloud project.
- Access to a new subdomain for the preview server, for exaple,
preview.sgtm.example.com.
Step 1: Update the environment variable with a new subdomain
To use the new preview server domain, update the
server-side tagging server environment variable PREVIEW_SERVER_URL:
- Open Cloud Run.
- Select the tagging server.
- Click Edit and Deploy new revision.
- Under the Variables and secrets tab, in the Containers section,
change the
PREVIEW_SERVER_URLto the new domain. For example:preview.sgtm.example.com.
Step 2: Configure the existing load balancer to use host-based routing
To configure the existing load balancer, use host-based routing and send traffic to the correct server:
- In Cloud Run, open the Load balancing page and click the name of your load balancer.
- Click the Edit button.
- Click the Backend configuration page and open the drop down for Backend services and backend buckets.
- Click Create a backend service and complete the following:
- Give it an appropriate name (for example,
preview-backend-service). - Select the backend type as Serverless network endpoint group.
- Give it an appropriate name (for example,
- In the Backend section, create a new serverless network endpoint
group and complete the following:
- Give it a name and select the region where the preview server is hosted.
- Select Cloud Run as the serverless network endpoint group type, and the preview server as the service.
- Click Create.
- Change other settings as needed, or keep the defaults, and click Create.
Step 3: Add a new rule and update the ingress control
To add a rule for the new host URL and update the ingress control:
- Open the Host and path rules page.
- Add a new rule where:
- The host is the new URL:
preview.sgtm.example.com - The path is:
/* - The backend is:
preview-backend-service
- The host is the new URL:
- Click the Update button to redeploy the load balancer.
- Back in Cloud Run open the preview server, and select the Networking tab.
- Change the Ingress control to Internal and check Allow traffic from external application load balancers so that it isn't publicly accessible.
Result: Your server architecture should now look like Figure 3, where traffic requests are all directed to the tagging server, and the tagging server is able to forward requests to the preview server.
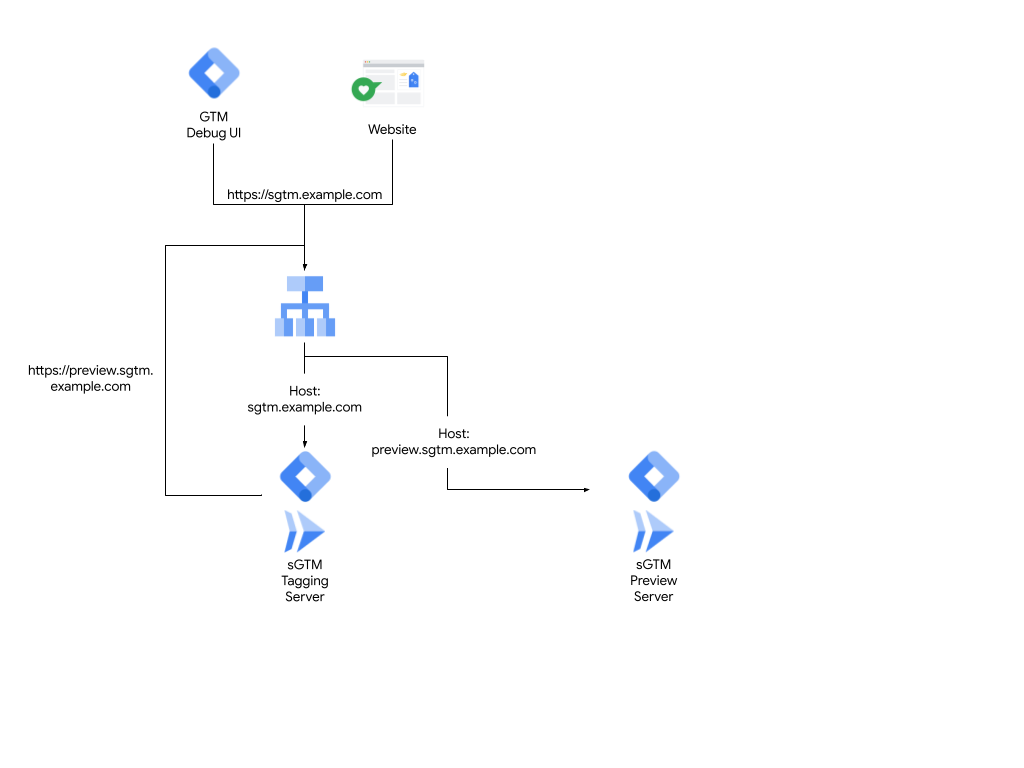
Figure 3: Using host-based routing.
Check your configuration
To check your configuration:
- Open Google Tag Manager.
- Open your server container.
- Click Admin > Container settings and set the server container URL to the tagging server URL.
- Close the window and preview the workspace. The debug window opens. As you navigate your website, your events should appear in the debug window.