इस पेज पर मार्कर क्लस्टरिंग की एक सुविधा के बारे में बताया गया है जो iOS के लिए Maps SDK टूल के लिए यूटिलिटी लाइब्रेरी में उपलब्ध है.
अपने मार्कर को क्लस्टर में जोड़कर, मैप पर बड़ी संख्या में मार्कर लगाए जा सकते हैं. इससे, मैप को पढ़ने में कोई परेशानी नहीं होती. मार्कर क्लस्टरिंग यूटिलिटी से, आपको अलग-अलग ज़ूम लेवल पर एक से ज़्यादा मार्कर मैनेज करने में मदद मिलती है.
जब कोई उपयोगकर्ता मैप को ज़्यादा ज़ूम लेवल पर देखता है, तो मैप पर अलग-अलग मार्कर दिखते हैं. जब उपयोगकर्ता ज़ूम आउट करता है, तब मार्कर क्लस्टर में एक साथ इकट्ठा होते हैं, ताकि मैप को देखने में आसानी हो.
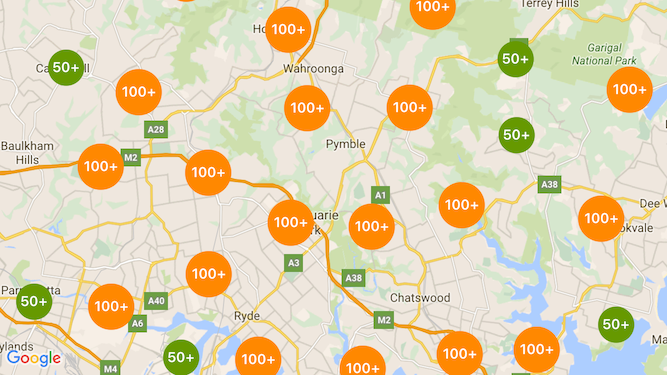
नीचे दिया गया स्क्रीनशॉट, मार्कर क्लस्टर की डिफ़ॉल्ट स्टाइल दिखाता है:

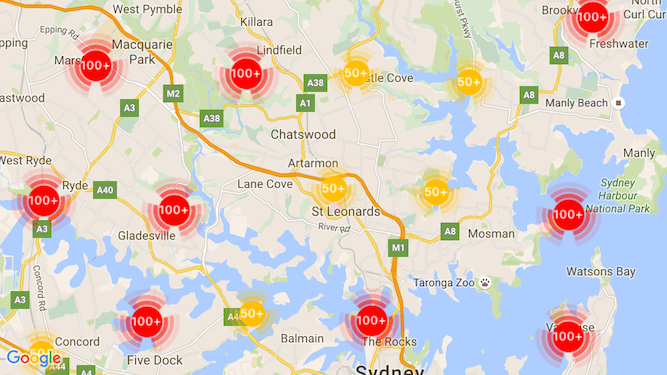
नीचे कस्टम मार्कर क्लस्टर का एक उदाहरण दिया गया है:

ज़रूरी शर्तें और ज़रूरी जानकारी
iOS यूटिलिटी लाइब्रेरी के लिए Maps SDK टूल
मार्कर क्लस्टरिंग यूटिलिटी, iOS के लिए Maps SDK यूटिलिटी लाइब्रेरी का हिस्सा है. अगर आपने अभी तक लाइब्रेरी सेट अप नहीं की है, तो इस पेज के बाकी हिस्से को पढ़ने से पहले सेटअप गाइड का पालन करें.
बेहतर परफ़ॉर्मेंस के लिए, ज़्यादा से ज़्यादा 10,000 मार्कर इस्तेमाल करने का सुझाव दिया जाता है.
जगह की जानकारी की अनुमति
यह उदाहरण उपयोगकर्ता और उनके निर्देशांकों पर मैप को खोजने के लिए डिवाइस के GPS का इस्तेमाल करता है. इसे चालू करने के लिए, आपको प्रोजेक्ट की Info.plist फ़ाइल में, NSLocationWhenInUseUsageDescription अनुमति में जानकारी जोड़नी होगी.
इसे जोड़ने के लिए, ये करें:
- प्रॉपर्टी सूची एडिटर खोलने के लिए, Xcode के प्रोजेक्ट नेविगेटर में
Info.plistफ़ाइल पर क्लिक करें. - नई प्रॉपर्टी जोड़ने के लिए, 'प्रॉपर्टी की जानकारी की सूची' के बगल में मौजूद '+' आइकॉन पर क्लिक करें.
- 'कुंजी' फ़ील्ड में, 'NSLocationFromInUseUsageDescription' टाइप करें. Xcode अपने-आप इसे लंबे नाम 'निजता - जगह की जानकारी का इस्तेमाल करते समय इस्तेमाल किया जाने वाला ब्यौरा' में बदल देगा. जगह की जानकारी की अनुमति वाली प्रॉपर्टी की पूरी सूची देखने के लिए, Apple Developer के दस्तावेज़ में जगह की जानकारी के लिए अनुमति का अनुरोध करना लेख पढ़ें.
- 'टाइप' फ़ील्ड को 'स्ट्रिंग' पर सेट रहने दें.
- 'वैल्यू' फ़ील्ड में, यह जानकारी दें कि आपके ऐप्लिकेशन को उपयोगकर्ता की जगह की जानकारी का इस्तेमाल क्यों करना चाहिए. उदाहरण के लिए, "आस-पास के कारोबार की लिस्टिंग देने के लिए उपयोगकर्ता का पता लगाता है."
मार्कर क्लस्टर लागू करना
मार्कर क्लस्टर लागू करने के तीन चरण होते हैं:
- क्लस्टर मैनेजर का इंस्टेंस बनाएं.
- उन मार्कर को पास करें जिन्हें आपको क्लस्टर मैनेजर में क्लस्टर करना है.
- क्लस्टर मैनेजर को शुरू करें.
क्लस्टर मैनेजर बनाया जा रहा है
क्लस्टर मैनेजर का इस्तेमाल करने के लिए, ये काम करें:
- उस
ViewControllerको सेट करें जहां आपके मैप को रेंडर करने के लिए,GMSMapViewDelegateप्रोटोकॉल का पालन किया जाता है. GMUClusterManagerका एक इंस्टेंस बनाएं.GMSMapViewके उस इंस्टेंस कोGMUClusterManagerइंस्टेंस में पास करें जिसमें आपको मार्कर क्लस्टरिंग और यहां बताए गए प्रोटोकॉल लागू करने हैं:GMUClusterIconGenerator: यह ऐसा ऐप्लिकेशन लॉजिक देता है जो अलग-अलग ज़ूम लेवल पर इस्तेमाल किए जाने के लिए, क्लस्टर के आइकॉन फ़ेच करता है.GMUClusterAlgorithm: यह एक एल्गोरिदम के बारे में बताता है जो मार्कर को क्लस्टर में बांटने के तरीके का व्यवहार तय करता है. जैसे, एक ही क्लस्टर में शामिल किए जाने वाले मार्कर के बीच की दूरी.GMUClusterRenderer: ऐप्लिकेशन लॉजिक देता है, जो मैप पर क्लस्टर आइकॉन की असल रेंडरिंग को मैनेज करता है.
GMUClusterManagerइंस्टेंस पर, मैप का प्रतिनिधि सेट करें.
यूटिलिटी लाइब्रेरी में आइकॉन जनरेटर (GMUDefaultClusterIconGenerator), एल्गोरिदम (GMUNonHierarchicalDistanceBasedAlgorithm), और रेंडरर (GMUDefaultClusterRenderer) को डिफ़ॉल्ट रूप से लागू करना शामिल है.
आपके पास कस्टम क्लस्टरिंग आइकॉन जनरेट करने वाला टूल, एल्गोरिदम, और रेंडरर बनाने का विकल्प भी है.
यह कोड, ViewController के viewDidLoad कॉलबैक में, इन डिफ़ॉल्ट सेटिंग का इस्तेमाल करके क्लस्टर मैनेजर बनाता है:
Swift
import GoogleMaps
import GoogleMapsUtils

class MarkerClustering: UIViewController, GMSMapViewDelegate {
  private var mapView: GMSMapView!
  private var clusterManager: GMUClusterManager!

  override func viewDidLoad() {
    super.viewDidLoad()

    // Set up the cluster manager with the supplied icon generator and
    // renderer.
    let iconGenerator = GMUDefaultClusterIconGenerator()
    let algorithm = GMUNonHierarchicalDistanceBasedAlgorithm()
    let renderer = GMUDefaultClusterRenderer(mapView: mapView,
                                clusterIconGenerator: iconGenerator)
    clusterManager = GMUClusterManager(map: mapView, algorithm: algorithm,
                                                      renderer: renderer)

    // Register self to listen to GMSMapViewDelegate events.
    clusterManager.setMapDelegate(self)
    // ...
  }
  // ...
}
Objective-C
@import GoogleMaps;
@import GoogleMapsUtils;

@interface MarkerClustering () <GMSMapViewDelegate>

@end

@implementation MarkerClustering {
  GMSMapView *_mapView;
  GMUClusterManager *_clusterManager;
}

- (void)viewDidLoad {
  [super viewDidLoad];

  // Set up the cluster manager with a supplied icon generator and renderer.
  id<GMUClusterAlgorithm> algorithm =
      [[GMUNonHierarchicalDistanceBasedAlgorithm alloc] init];
  id<GMUClusterIconGenerator> iconGenerator =
      [[GMUDefaultClusterIconGenerator alloc] init];
  id<GMUClusterRenderer> renderer =
      [[GMUDefaultClusterRenderer alloc] initWithMapView:_mapView
                                    clusterIconGenerator:iconGenerator];
  _clusterManager =
      [[GMUClusterManager alloc] initWithMap:_mapView
                                   algorithm:algorithm
                                    renderer:renderer];

  // Register self to listen to GMSMapViewDelegate events.
  [_clusterManager setMapDelegate:self];
  // ...
}
// ...
@end
मार्कर जोड़ना
मार्कर क्लस्टर में मार्कर जोड़ने के दो तरीके हैं: अलग-अलग या किसी अरे के रूप में.
अलग-अलग मार्कर
Swift
let position = CLLocationCoordinate2D(latitude: 47.60, longitude: -122.33)
let marker = GMSMarker(position: position)
clusterManager.add(marker)
Objective-C
CLLocationCoordinate2D position = CLLocationCoordinate2DMake(47.60, -122.33);
GMSMarker *marker = [GMSMarker markerWithPosition:position];
[_clusterManager addItem:marker];
मार्कर की रेंज
Swift
let position1 = CLLocationCoordinate2D(latitude: 47.60, longitude: -122.33)
let marker1 = GMSMarker(position: position1)

let position2 = CLLocationCoordinate2D(latitude: 47.60, longitude: -122.46)
let marker2 = GMSMarker(position: position2)

let position3 = CLLocationCoordinate2D(latitude: 47.30, longitude: -122.46)
let marker3 = GMSMarker(position: position3)

let position4 = CLLocationCoordinate2D(latitude: 47.20, longitude: -122.23)
let marker4 = GMSMarker(position: position4)

let markerArray = [marker1, marker2, marker3, marker4]
clusterManager.add(markerArray)
Objective-C
CLLocationCoordinate2D position1 = CLLocationCoordinate2DMake(47.60, -122.33);
GMSMarker *marker1 = [GMSMarker markerWithPosition:position1];

CLLocationCoordinate2D position2 = CLLocationCoordinate2DMake(47.60, -122.46);
GMSMarker *marker2 = [GMSMarker markerWithPosition:position2];

CLLocationCoordinate2D position3 = CLLocationCoordinate2DMake(47.30, -122.46);
GMSMarker *marker3 = [GMSMarker markerWithPosition:position3];

CLLocationCoordinate2D position4 = CLLocationCoordinate2DMake(47.20, -122.23);
GMSMarker *marker4 = [GMSMarker markerWithPosition:position4];

NSArray<GMSMarker *> *markerArray = @[marker1, marker2, marker3, marker4];
[_clusterManager addItems:markerArray];
मार्कर क्लस्टर की सुविधा शुरू करना
जब आप अपना मार्कर क्लस्टर बना लेते हैं और उसे उन मार्कर पास कर लेते हैं जिन्हें आपको क्लस्टर करना है, तो आपको बस अपने मार्कर क्लस्टर
इंस्टेंस पर cluster तरीके को कॉल करना होगा.
Swift
clusterManager.cluster()
Objective-C
[_clusterManager cluster];
मार्कर और क्लस्टर पर इवेंट मैनेज करें
आम तौर पर, iOS के लिए Maps SDK टूल का इस्तेमाल करते समय, मैप पर इवेंट सुनने के लिए, आपको
GMSMapViewDelegate प्रोटोकॉल लागू करना होगा. मैप इवेंट सुने जा सकते हैं, लेकिन टाइप के हिसाब से सुरक्षित क्लस्टर मैनेजर इवेंट नहीं सुने जा सकते. जब उपयोगकर्ता किसी मार्कर,
किसी क्लस्टर आइटम या क्लस्टर पर टैप करता है, तो एपीआई
mapView:didTapMarker: को ट्रिगर करता है. साथ ही, अतिरिक्त क्लस्टर डेटा को
marker.userData प्रॉपर्टी में जोड़ देता है. इसके बाद, यह देखा जा सकता है कि userData, GMUCluster प्रोटोकॉल के मुताबिक है या नहीं. इससे यह पता चलता है कि किसी क्लस्टर आइकॉन या मार्कर को टैप किया गया है या नहीं.
Swift
func mapView(_ mapView: GMSMapView, didTap marker: GMSMarker) -> Bool {
  // center the map on tapped marker
  mapView.animate(toLocation: marker.position)
  // check if a cluster icon was tapped
  if marker.userData is GMUCluster {
    // zoom in on tapped cluster
    mapView.animate(toZoom: mapView.camera.zoom + 1)
    NSLog("Did tap cluster")
    return true
  }

  NSLog("Did tap a normal marker")
  return false
}
Objective-C
- (BOOL)mapView:(GMSMapView *)mapView didTapMarker:(GMSMarker *)marker {
  // center the map on tapped marker
    [_mapView animateToLocation:marker.position];
    // check if a cluster icon was tapped
    if ([marker.userData conformsToProtocol:@protocol(GMUCluster)]) {
      // zoom in on tapped cluster
      [_mapView animateToZoom:_mapView.camera.zoom + 1];
      NSLog(@"Did tap cluster");
      return YES;
    }

    NSLog(@"Did tap marker in cluster");
    return NO;
}
क्लस्टर मैनेजर अब ऐसे किसी भी इवेंट को रोकता है जिसे आपने
clusterManager पर लागू किया है. अगर यह बताया गया हो, तो यह बचे हुए किसी भी इवेंट को मैप
डेलिगेट को फ़ॉरवर्ड कर देता है. ध्यान दें कि मानक मार्कर के लिए इवेंट (यानी, ऐसे मार्कर जो क्लस्टर रेंडरर से जनरेट नहीं किए गए) हमेशा मैप का प्रतिनिधि को भेजे जाते हैं.
मार्कर क्लस्टरिंग को पसंद के मुताबिक बनाएं
आपके पास
GMUClusterRenderer, GMUClusterIconGenerator या
GMUClusterAlgorithm के लिए, अपनी पसंद के मुताबिक लागू करने का विकल्प उपलब्ध कराया जा सकता है. यूटिलिटी लाइब्रेरी में शामिल इन प्रोटोकॉल के सैंपल को लागू करने के तरीके को, पसंद के मुताबिक लागू करने की प्रक्रिया को आधार बनाया जा सकता है
या प्रोटोकॉल का पालन करके, पूरी तरह से कस्टम तरीके को लागू किया जा सकता है.

