Uploading table assets
You can use the Asset Manager or command line interface (CLI) to upload datasets in the Shapefile or CSV format. (See Importing Raster Data for details on importing rasters using the Code Editor or CLI.) Your uploaded assets are initially private, but can be shared as described in the Sharing Assets Section.
Upload a Shapefile
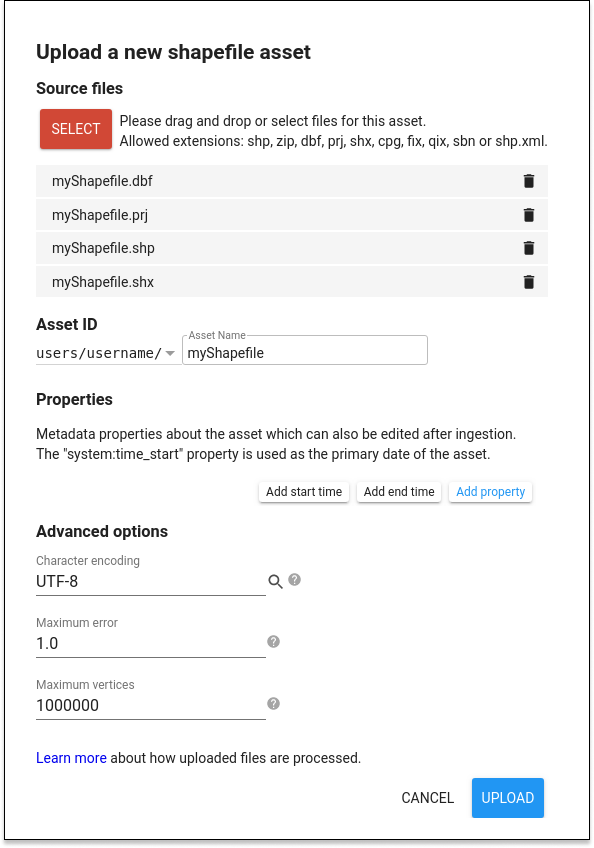
To upload a Shapefile from the Code Editor, click the
 button, then select
Shape files under the Table
Upload section. An upload dialog similar to
Figure 1 will be presented. Click the SELECT button and navigate to a
Shapefile or Zip archive containing a Shapefile on your local file system. When selecting a
.shp file, be sure to select the related .dbf, .shx and .prj files. Earth
Engine will default to WGS84 (longitude, latitude) coordinates if a .prj file is not
provided. If you are uploading a Zip archive, make sure it contains only one Shapefile
(set of .shp, .dbf, .shx, .prj, etc.) and no duplicate filenames. Make sure filenames
do not include additional periods or dots. (Filenames will include a single period before
the extension.)
button, then select
Shape files under the Table
Upload section. An upload dialog similar to
Figure 1 will be presented. Click the SELECT button and navigate to a
Shapefile or Zip archive containing a Shapefile on your local file system. When selecting a
.shp file, be sure to select the related .dbf, .shx and .prj files. Earth
Engine will default to WGS84 (longitude, latitude) coordinates if a .prj file is not
provided. If you are uploading a Zip archive, make sure it contains only one Shapefile
(set of .shp, .dbf, .shx, .prj, etc.) and no duplicate filenames. Make sure filenames
do not include additional periods or dots. (Filenames will include a single period before
the extension.)
Give the table an appropriate asset ID (which doesn't already exist) in your user folder. Click UPLOAD to start the upload.
Upload a CSV file
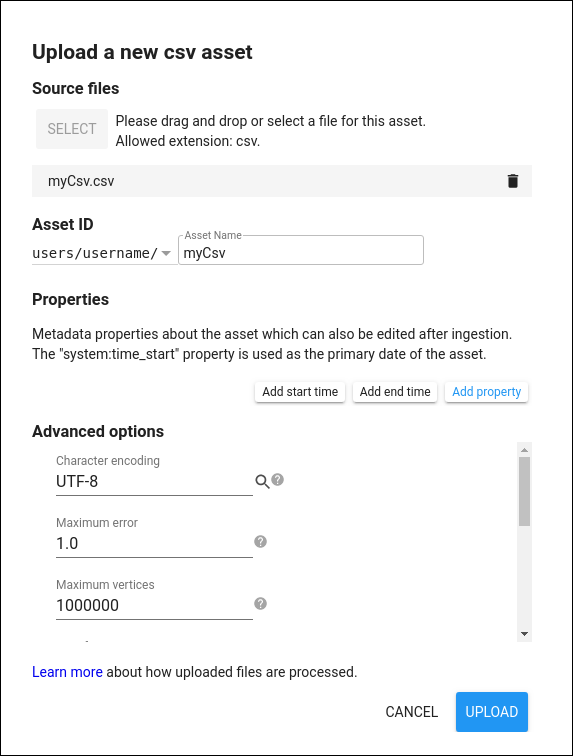
To upload a CSV from the Code Editor, activate the Assets tab, then click
the button and select
CSV file under the Table Upload section. An upload dialog
similar to Figure 2 will be presented. Click the SELECT button and navigate
to a .csv file on your local file system. Give the table a unique, relevant asset ID name.
Click OK
to start the upload.
The CSV file should contain a row for each feature and as many columns as there are properties or variables for the feature set. If features are geospatial, they must have a geolocation defined by either a geometry string (GeoJSON, WKT) or x and y position properties. If the CSV file is an export from a GIS or geospatial data tool such as GDAL/OGR, a properly formatted and named geometry column should already exist. Alternatively, two columns for x and y coordinates representing point locations can be defined in a spreadsheet application and exported as CSV format along with any other variables.
Advanced Options
In the Advanced options section of the upload dialog, view and change default settings. Performance of Earth Engine can be improved by splitting up geometries that have a large number of vertices. Earth Engine does not allow features with more than 1 million vertices. During table upload, Earth Engine will automatically split geometries that have more than 1 million vertices. You can specify a lower value to improve vector rendering performance.
Earth Engine will attempt to detect a primary geometry column and assumes the data projection is WGS84 unless otherwise specified. The geodesic state of the geometries are determined by the default edge interpretation of the given projection (e.g. WGS84 uses geodesic geometries), but this can be overridden in the Advanced settings menu. If the geometry of your data are points defined by x and y columns, be sure to name the respective columns "longitude" and "latitude" or specify the x and y column names under Advanced settings.
Tracking upload progress
After starting a table upload, an 'Asset ingestion' task is added to the Task Manager, found
under the Tasks tab at the right side of the Code Editor. Check the upload
status by clicking on the ? icon that appears when hovering over the
task. To cancel an upload, click on the spinning icon
 next to the
task. Once the ingestion is complete, the task cell will turn blue and the asset will appear
in your user folder under the Assets tab with
a icon.
next to the
task. Once the ingestion is complete, the task cell will turn blue and the asset will appear
in your user folder under the Assets tab with
a icon.
Table Upload Limits
When uploading tables, the maximum number of features in the table is 100 million. The maximum number of properties on a feature is 1,024. These limits ensure that the resulting asset can be queried efficiently. Additionally, each feature has a maximum number of vertices as explained in the "Advanced Options" section above.
Loading a table asset to your script
To create a FeatureCollection in your script from a table asset, import it as
described on the Managing Assets
page.