
OAuth 連結類型支援兩種符合業界標準的 OAuth 2.0 流程,分別是隱含和授權碼流程。
在隱式程式碼流程中,Google 會在使用者的瀏覽器中開啟您的授權端點。成功登入後,系統會將長期存取權杖傳回 Google。從現在起,每次透過 Google 助理傳送給您動作的要求中,都會包含這個存取權杖。
在授權碼流程中,您需要兩個端點:
- 授權端點,該端點負責將登入 UI 提供給未登入的使用者,並以簡碼授權代碼的形式,記錄使用者要求的存取權。
- 權杖交換端點,負責以下兩種交換類型:
- 交換長期更新權杖的授權碼和短期存取權杖。這項交換作業會在使用者完成帳戶連結流程時進行。
- 對短期存取權杖交換交換憑證。當 Google 需要新的存取權杖,因為更新權杖已過期時,就會發生此交換行為。
雖然隱含程式碼流程的實作方式較簡單,但 Google 建議使用隱含流程發布的存取權杖不會過期,因為若權杖與隱含流程搭配使用,就會強制使用者重新連結帳戶。如果基於安全考量而需要權杖過期,您應該考慮改用授權碼流程。
實作 OAuth 帳戶連結
設定專案
如要設定專案以使用 OAuth 連結,請按照下列步驟操作:
- 開啟 Actions 管理中心,然後選取要使用的專案。
- 按一下「開發」分頁,然後選擇「帳戶連結」。
- 啟用「帳戶連結」旁的切換鈕。
- 在「帳戶建立」部分,選取「否,我只想允許在我的網站上建立帳戶」。
在「連結類型」中,選取「OAuth」和「隱含」。
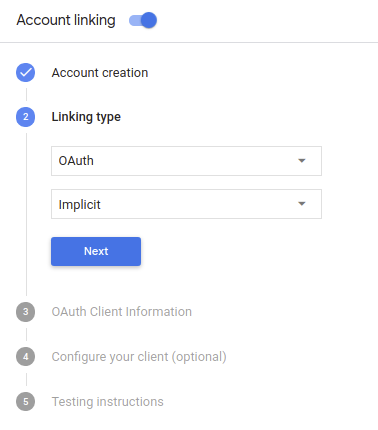
在「用戶端資訊」中:
- 為「Google 簽發給動作的用戶端 ID」指派值,以識別來自 Google 的要求。
- 插入授權和權杖交換端點的網址。
- 按一下 [儲存]。
導入 OAuth 伺服器
為支援 OAuth 2.0 隱含流程,您的服務會進行授權 並可透過 HTTPS 存取端點這個端點會負責驗證 徵得使用者同意,才能存取資料。授權端點 為使用者提供未登入並記錄登入的登入使用者介面 同意授予請求的存取權。
當您的動作需要呼叫服務的其中一個已授權 API 時,Google 會使用 以取得使用者授權,讓他們能在自己的
由 Google 發起的一般 OAuth 2.0 隱含流程工作階段,是 下列流程:
- Google 會在使用者的瀏覽器中開啟授權端點。 使用者登入後,並授權 Google 存取 並透過您的 API 取得資料。
- 您的服務會建立存取權杖,並傳回給 將使用者的瀏覽器重新導向回 Google,取得存取權杖 附加在要求中
- Google 會呼叫服務的 API,並將存取權杖附加至 每個要求您的服務會確認存取權杖是否已授予 Google 授權存取 API,然後完成 API 呼叫。
處理授權要求
當您的動作需要透過 OAuth 2.0 隱含流程進行帳戶連結時, Google 會在要求中附加以下內容,將使用者傳送到您的授權端點 分別是
| 授權端點參數 | |
|---|---|
client_id |
您指派給 Google 的用戶端 ID。 |
redirect_uri |
您傳送回應到這項要求的網址。 |
state |
傳回給 Google 的記帳金額,值維持不變 重新導向 URI |
response_type |
要在回應中傳回的值類型。以 OAuth 2.0 隱含
回應類型則一律為 token。 |
舉例來說,如果您的授權端點位於 https://myservice.example.com/auth,
要求看起來可能像這樣:
GET https://myservice.example.com/auth?client_id=GOOGLE_CLIENT_ID&redirect_uri=REDIRECT_URI&state=STATE_STRING&response_type=token
如要讓授權端點處理登入要求,請按照下列步驟操作:
確認
client_id和redirect_uri的值如下: 防止授予非預期或設定錯誤的用戶端應用程式存取權:- 確認
client_id與您用戶端 ID 相符 而是指派給 Google - 確認
redirect_uri指定的網址 參數的格式如下:https://oauth-redirect.googleusercontent.com/r/YOUR_PROJECT_ID
- 確認
檢查使用者是否已登入您的服務。如果使用者未簽署 的登入或申請流程。
產生 Google 將用來存取您的 API 的存取權杖。 存取權杖可以是任何字串值,但必須明確代表 以及該權杖適用的用戶端,且不可猜測。
傳送 HTTP 回應,將使用者的瀏覽器重新導向至網址 由
redirect_uri參數指定。包含所有 網址片段中的下列參數:access_token:您剛剛產生的存取權杖token_type:字串bearerstate:原始資料中未經修改的狀態值 要求 以下是最終網址的範例:https://oauth-redirect.googleusercontent.com/r/YOUR_PROJECT_ID#access_token=ACCESS_TOKEN&token_type=bearer&state=STATE_STRING
Google 的 OAuth 2.0 重新導向處理常式將收到存取權杖並確認
state 值未變更。Google 取得
服務的存取權杖,Google 會在後續的呼叫中附加該權杖
作為 AppRequest 的一部分動作。
設計驗證流程的語音使用者介面
檢查使用者是否已通過驗證,然後開始帳戶連結流程
- 在 Actions Console 中開啟 Actions Builder 專案。
- 在動作中建立新場景,開始連結帳戶:
- 按一下「場景」。
- 按一下「新增」 (+) 圖示,即可新增場景。
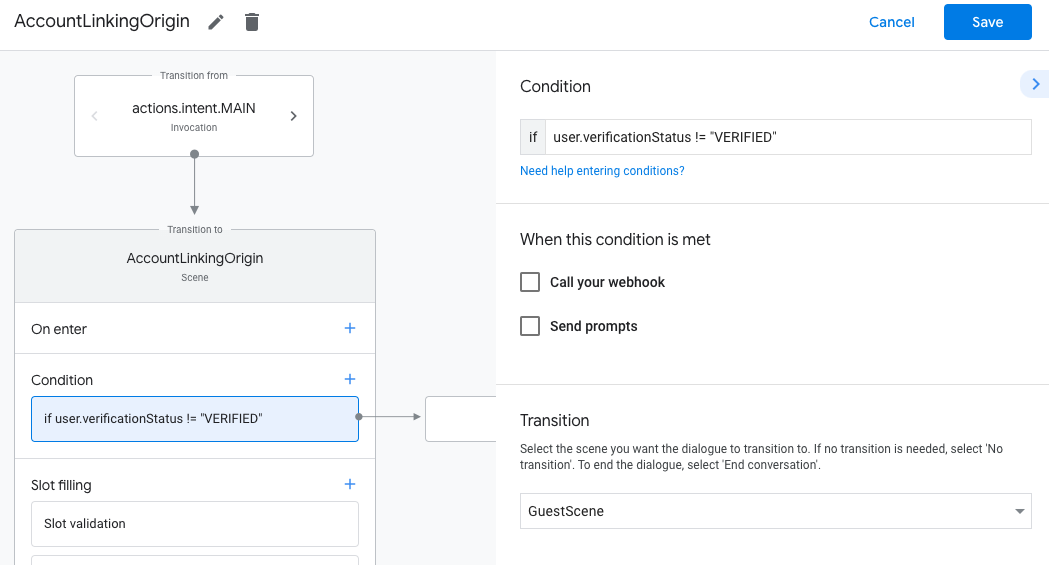
- 在新建立的場景中,按一下「條件」的「新增」圖示 add。
- 新增條件,檢查與對話相關聯的使用者是否為已驗證使用者。如果檢查失敗,動作就無法在對話期間執行帳戶連結,且應改為提供不需要帳戶連結的功能存取權。
- 在「條件」下方的
Enter new expression欄位中,輸入下列邏輯:user.verificationStatus != "VERIFIED" - 在「轉場效果」下方,選取不需要連結帳戶的場景,或是僅限訪客使用的功能進入點場景。
- 在「條件」下方的
- 按一下「條件」的「新增」add圖示。
- 新增條件,在使用者沒有相關聯的身分時觸發帳戶連結流程。
- 在「條件」下方的
Enter new expression欄位中,輸入下列邏輯:user.verificationStatus == "VERIFIED" - 在「Transition」下方,選取「Account Linking」系統場景。
- 按一下 [儲存]。
- 在「條件」下方的
![]()
儲存後,專案中會新增名為「<SceneName>_AccountLinking」的帳戶連結系統場景。
自訂帳戶連結場景
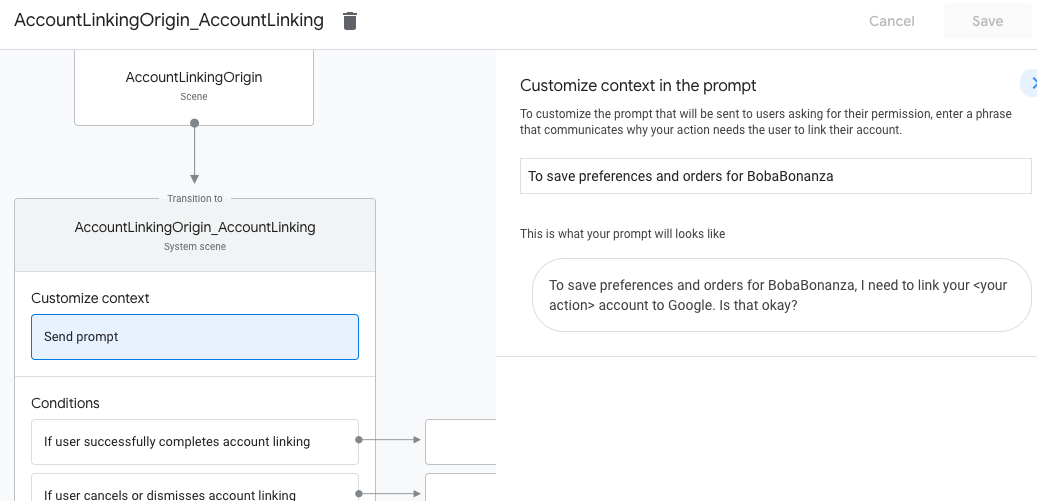
- 在「場景」下方,選取帳戶連結系統場景。
- 按一下「傳送提示」,並新增簡短句子,向使用者說明動作為何需要存取身分識別資訊 (例如「儲存偏好設定」)。
- 按一下 [儲存]。
- 按一下「條件」下方的「如果使用者成功完成帳戶連結」。
- 設定使用者同意連結帳戶時,流程應如何繼續進行。 舉例來說,呼叫 Webhook 來處理任何必要的自訂商業邏輯,然後返回原始場景。
- 按一下 [儲存]。

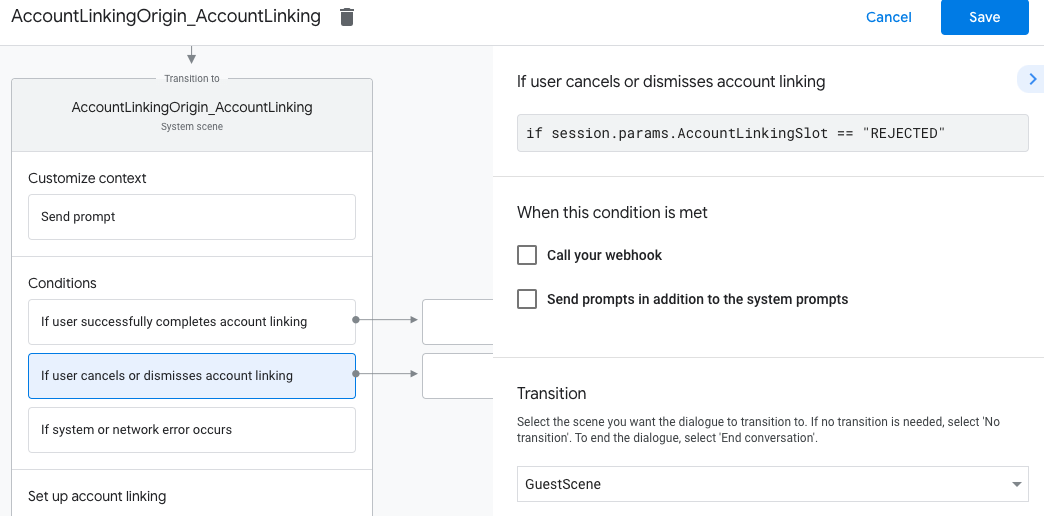
- 在「條件」下方,按一下「如果使用者取消或關閉帳戶連結」。
- 設定使用者不同意連結帳戶時,流程應如何進行。舉例來說,傳送確認訊息,然後重新導向至不需要帳戶連結的功能場景。
- 按一下 [儲存]。
- 在「條件」下方,按一下「如果發生系統或網路錯誤」。
- 設定帳戶連結流程因系統或網路錯誤而無法完成時,流程應如何繼續。舉例來說,傳送確認訊息,然後重新導向至不需要帳戶連結的功能場景。
- 按一下 [儲存]。
處理資料存取要求
如果Google 助理要求包含存取權杖,請先檢查存取權杖是否有效 (未過期),然後從資料庫中擷取相關聯的使用者帳戶。