
การลิงก์บัญชีจะเสร็จสิ้นในแอปบนอุปกรณ์เคลื่อนที่ได้โดยตรง ซึ่งช่วยให้ผู้ใช้ลิงก์บัญชีของคุณกับบริการกับบัญชี Google ของตนได้ ลิงก์ที่สร้างขึ้นให้สิทธิ์แก่ Google ในการเข้าถึงข้อมูลที่ผู้ใช้ยินยอมที่จะแชร์
แนวทางนี้ช่วยปรับปรุงประสิทธิภาพการลิงก์บัญชีด้วยการดึงดูดผู้ใช้ภายในบริบทที่คุ้นเคยของแอปแทนการสนทนากับ Assistant โดยสามารถผสานรวมเข้ากับการเริ่มต้นใช้งานของผู้ใช้ การตั้งค่า และแพลตฟอร์มอื่นๆ ของแอป ซึ่งจะสร้างโอกาสในการค้นพบและการมีส่วนร่วมกับ Google Assistant Action ของคุณ เช่น หลังจากลิงก์แล้ว คุณอาจเสนอที่จะนำผู้ใช้ไปยังแอ็กชันของคุณโดยตรง
ข้อดีสําหรับผู้ใช้มีดังนี้
- ผู้ใช้จะเริ่มทําตามขั้นตอนการลิงก์บัญชีในแอปรวมถึงสภาพแวดล้อมที่ผู้ใช้คุ้นเคยอยู่แล้วได้
- ผู้ใช้ไม่จําเป็นต้องมีข้อมูลเข้าสู่ระบบเนื่องจากผ่านการตรวจสอบสิทธิ์ในอุปกรณ์และในแอปบนอุปกรณ์เคลื่อนที่ของคุณแล้ว
สิทธิประโยชน์สําหรับนักพัฒนาซอฟต์แวร์มีดังนี้
- ควบคุมตําแหน่งที่จะโปรโมตและเริ่มต้นการลิงก์บัญชีในแอปบนอุปกรณ์เคลื่อนที่ เช่น ในการตั้งค่าของผู้ใช้ โฆษณาคั่นระหว่างหน้า หรือหลังจากที่ผู้ใช้ลงชื่อเข้าใช้แอปบนอุปกรณ์เคลื่อนที่ การเพิ่มจุดเข้าหลายๆ จุดเพื่อเริ่มการลิงก์บัญชีจะช่วยให้ลิงก์บัญชีได้ง่ายขึ้น ส่งผลให้เกิดการมีส่วนร่วมเพิ่มขึ้นและจํานวนบัญชีที่ลิงก์
- การเพิ่มขึ้นของอัตรา Conversion เนื่องจากผู้ใช้สามารถทําการลิงก์ให้เสร็จได้น้อยกว่าขั้นตอนOAuth แบบเว็บมาตรฐาน
- ต้องใช้ความพยายามด้านวิศวกรรมเล็กน้อยในการนําลิงก์จากแพลตฟอร์ม (Android) ไปใช้ เนื่องจากขั้นตอนนี้ใช้ประโยชน์จากการใช้งาน OAuth2.0 ที่มีอยู่ หากคุณติดตั้งใช้งานแล้ว
- ลดอัตราการออกจากเว็บไซต์เนื่องจากผู้ใช้ไม่จําเป็นต้องป้อนข้อมูลเข้าสู่ระบบอีกครั้ง และดําเนินการตามขั้นตอนให้เสร็จสมบูรณ์ได้ภายในขั้นตอนน้อยลง อัตราการออกจากแพลตฟอร์มอาจสูงถึง 80% ในกระบวนการที่ผู้ใช้ต้องเรียกคืนและป้อนข้อมูลเข้าสู่ระบบ
วิธีการทำงาน
การลิงก์จากแพลตฟอร์มจะเสร็จสมบูรณ์ในขั้นตอนต่อไปนี้
- ผู้ใช้จะคลิก / สลับทริกเกอร์การลิงก์ในแอปบนอุปกรณ์เคลื่อนที่
- ผู้ใช้เลือกบัญชี Google ที่จะลิงก์
- ผู้ใช้เลือกบัญชี Google ที่มีอยู่ในอุปกรณ์เพื่อลิงก์ หรือลงชื่อเข้าใช้ด้วยบัญชีใหม่
- ระบบจะแสดงหน้าจอขอความยินยอมที่โฮสต์โดย Google ให้ผู้ใช้เห็น และผู้ใช้ต้องให้ความยินยอมเพื่อดำเนินการต่อหรือยกเลิกเพื่อหยุดกระบวนการเชื่อมต่อ
- ระบบจะแสดงหน้าจอขอความยินยอมของคุณให้ผู้ใช้เห็น และผู้ใช้ต้องให้ความยินยอมเพื่อดำเนินการต่อหรือยกเลิกเพื่อหยุดกระบวนการเชื่อมต่อ
- ระบบจะสร้างลิงก์ระหว่างบัญชีของผู้ใช้ในบริการของคุณกับบัญชี Google ของผู้ใช้
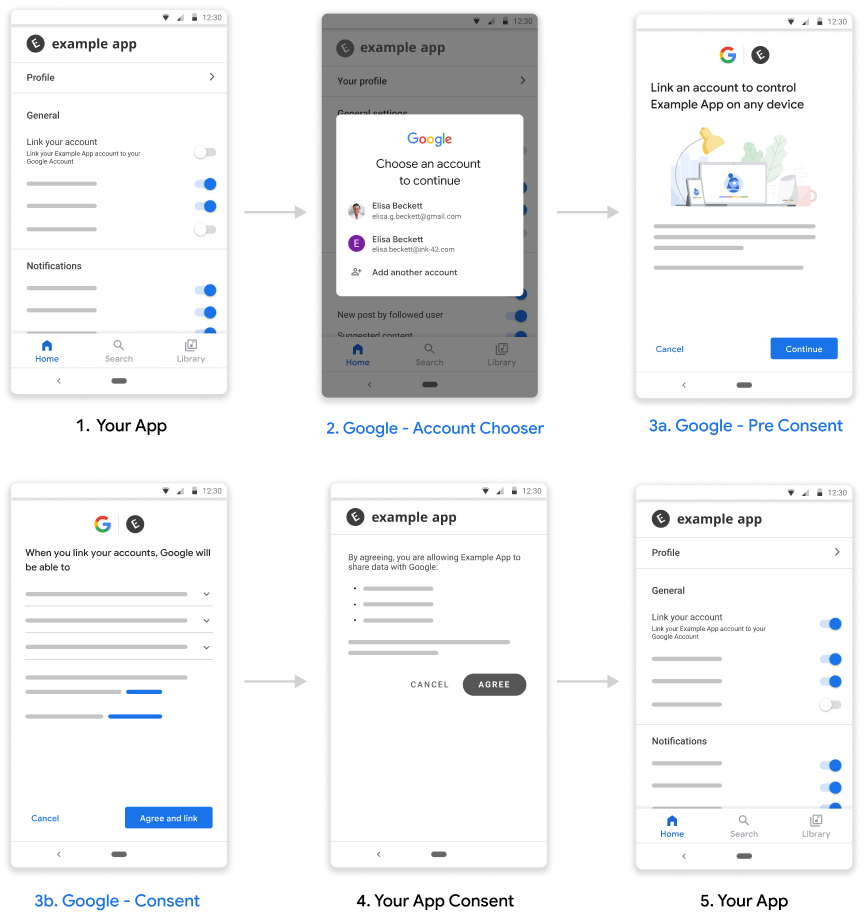
รูปที่ 1 ขั้นตอนการลิงก์จากแพลตฟอร์ม
ข้อกำหนด
หากต้องการใช้การลิงก์จากแพลตฟอร์ม คุณต้องมีสิ่งต่อไปนี้
- แอป Android
- เป็นเจ้าของ จัดการ และดูแลเซิร์ฟเวอร์ OAuth 2.0 ที่รองรับขั้นตอนรหัสการให้สิทธิ์ OAuth 2.0 authorization code flow
ตั้งค่า
ก่อนดำเนินการตามขั้นตอนด้านล่าง คุณต้องทำกระบวนการลงทะเบียนการลิงก์บัญชีให้เสร็จสมบูรณ์ registration process.
ตั้งค่าสภาพแวดล้อมในการพัฒนาซอฟต์แวร์
ดาวน์โหลดบริการ Google Play เวอร์ชันล่าสุดในโฮสต์การพัฒนาซอฟต์แวร์โดยทำดังนี้
ค้นหา บริการ Google Play ในส่วน SDK Tools
หากสถานะของแพ็กเกจเหล่านี้ไม่ใช่ "ติดตั้งแล้ว" ให้เลือกทั้ง 2 แพ็กเกจ แล้วคลิกติดตั้งแพ็กเกจ
กำหนดค่าแอป
ในไฟล์
build.gradleระดับโปรเจ็กต์ ให้ใส่ที่เก็บ Maven ของ Google ไว้ในทั้งส่วนbuildscriptและallprojectsbuildscript { repositories { google() } } allprojects { repositories { google() } }เพิ่มทรัพยากร Dependency สำหรับ API "ลิงก์กับ Google" ลงในไฟล์ Gradle ระดับแอปของโมดูล ซึ่งโดยปกติจะเป็นไฟล์
app/build.gradleโดยทำดังนี้dependencies { implementation 'com.google.android.gms:play-services-auth:21.5.1' }
เพิ่มการรองรับการลิงก์จากแพลตฟอร์ม
ขั้นตอนการลิงก์จากแพลตฟอร์มจะส่งผลให้ Google บันทึกโทเค็นเพื่อการเข้าถึงที่บริการของคุณเป็นผู้ให้ คุณต้องได้รับความยินยอมก่อนที่จะส่งคืนโทเค็นให้ผู้ใช้
ทำตามขั้นตอนด้านล่างเพื่อขอความยินยอมจากผู้ใช้และส่งคืนโทเค็นรหัสการให้สิทธิ์ผ่าน Google Play services SDK
สร้าง PendingIntent ที่สามารถเปิดใช้งานกิจกรรมขอความยินยอมได้ โดย API ของบริการ Google Play จะเป็นผู้เปิดใช้งานความยินยอม คุณจะต้องระบุ
PendingIntent(ซึ่งจะเรียกว่าconsentPendingIntentเพื่อความชัดเจน) เมื่อมีการเรียก APIKotlin
// Build a PendingIntent that can launch the consent activity
val consentPendingIntent = buildConsentPendingIntent()
Java
// Build a PendingIntent that can launch your consent activity
PendingIntent consentPendingIntent =
          buildConsentPendingIntent();
สร้างกิจกรรมที่เกี่ยวข้องเพื่อจัดการ Intent ความยินยอม
Kotlin
  class ConsentActivity : AppCompatActivity

  private fun onConsentAccepted() {
      // Obtain a token (for simplicity, we’ll ignore the async nature
      // of the following call)
      val token = getToken()
      val intent = Intent()
                  .putExtra(SaveAccountLinkingTokenRequest.EXTRA_TOKEN,
                            token)
      setResult(Activity.RESULT_OK, intent)
      finish()
  }

  private fun onConsentRejectedOrCanceled() {
      setResult(Activity.RESULT_CANCELED)
      finish()
  }
Java
  public class ConsentActivity extends AppCompatActivity {
    ...
    private void onConsentAccepted() {
      // Obtain a token (for simplicity, we’ll ignore the async nature of
      // the following call
      String token = getToken();
      Intent intent = new Intent();
      intent.putExtra(SaveAccountLinkingTokenRequest.EXTRA_TOKEN, token);
      setResult(Activity.RESULT_OK, intent);
      finish();
    }

    private void onConsentRejectedOrCanceled() {
      setResult(Activity.RESULT_CANCELED, null);
      finish();
    }
 }
เราถือว่ามีการเรียกใช้เมธอด
onConsentAccpeted()และonConsentRejectedOrCanceled()หากผู้ใช้ให้ความยินยอมหรือปฏิเสธ/ยกเลิกความยินยอมของคุณตามลำดับสร้างคำขอเพื่อบันทึกโทเค็น และส่ง
PendingIntentที่สร้างขึ้นในขั้นตอนที่ 1 ด้านบน รวมถึงพารามิเตอร์การกำหนดค่าอื่นๆKotlin
  // Create an ActivityResultLauncher which registers a callback for the
  // Activity result contract
  val activityResultLauncher = registerForActivityResult(
    ActivityResultContracts.StartIntentSenderForResult())
    { result ->
      if (result.resultCode == RESULT_OK) {
        // Successfully finished the flow and saved the token
      } else {
        // Flow failed, for example the user may have canceled the flow
      }
    }

  // Build token save request
  val request = SaveAccountLinkingTokenRequest.builder()
    .setTokenType(SaveAccountLinkingTokenRequest.TOKEN_TYPE_AUTH_CODE)
    .setConsentPendingIntent(consentPendingIntent)
    .setServiceId("service-id-of-and-defined-by-developer")
    //Set the scopes that the token is valid for on your platform
    .setScopes(scopes)
    .build()

   // Launch consent activity and retrieve token
   Identity.getCredentialSavingClient(this)
     .saveAccountLinkingToken(request)
     .addOnSuccessListener( saveAccountLinkingTokenResult -> {
        if (saveAccountLinkingTokenResult.hasResolution()) {
          val pendingIntent = saveAccountLinkingTokenResult
                              .getPendingIntent()
          val intentSenderRequest = IntentSenderRequest
                                    .Builder(pendingIntent).build()
          activityResultLauncher.launch(intentSenderRequest)
        } else {
           // This should not happen, let’s log this
           Log.e(TAG, "Failed to save token");
        }
      })
      .addOnFailureListener(e -> Log.e(TAG, “Failed to save token”, e))
Java
  // Create an ActivityResultLauncher which registers a callback for the
  // Activity result contract
  ActivityResultLauncher<IntentSenderRequest>
      activityResultLauncher =
      registerForActivityResult(new ActivityResultContracts
                                    .StartIntentSenderForResult(),
                                result -> {
      if (result.getResultCode() == RESULT_OK) {
          // Successfully finished the flow and saved the token
      } else {
          // Flow failed, for example the user may have canceled the flow
      }
  });

 // Build token save request
 SaveAccountLinkingTokenRequest request =
    SaveAccountLinkingTokenRequest.builder()
        .setTokenType(
            SaveAccountLinkingTokenRequest.TOKEN_TYPE_AUTH_CODE)
        .setConsentPendingIntent(consentPendingIntent)
        .setServiceId("service-id-of-and-defined-by-developer")
        //Set the scopes that the token is valid for on your platform
        .setScopes(scopes)
        .build();

  // Launch consent activity and retrieve token
  Identity.getCredentialSavingClient(this)
      .saveAccountLinkingToken(request)
      .addOnSuccessListener(
          saveAccountLinkingTokenResult -> {
            if (saveAccountLinkingTokenResult.hasResolution()) {
              // Launch the resolution intent
              PendingIntent pendingIntent =
                  saveAccountLinkingTokenResult.getPendingIntent();
              IntentSenderRequest intentSenderRequest =
                  new IntentSenderRequest.Builder(pendingIntent).build();
              activityResultLauncher.launch(intentSenderRequest);
            } else {
              // This should not happen, let’s log this
              Log.e(TAG, "Failed to save token");
            }
          })
      .addOnFailureListener(e -> Log.e(TAG, "Failed to save token", e));
  ```
ขั้นตอนข้างต้นจะแจ้งให้ผู้ใช้ให้ความยินยอมและส่งคืนรหัสการให้สิทธิ์ไปยัง Google
แนวทางปฏิบัติแนะนำ
แอปควรระบุสถานะการลิงก์ให้ผู้ใช้ทราบผ่านปุ่ม สวิตช์ หรือองค์ประกอบภาพที่คล้ายกัน

รูปที่ 1 ตัวอย่างรูปภาพสถานะการลิงก์
คุณควรแจ้งให้ผู้ใช้ทราบหลังจากลิงก์สำเร็จแล้ว เช่น แสดงข้อความโทสต์ เปลี่ยนสถานะสวิตช์ หรือเปลี่ยนเส้นทางผู้ใช้ไปยังหน้าความสำเร็จในการลิงก์แยกต่างหาก
คุณควรพิจารณาแจ้งให้ผู้ใช้ในแอปลิงก์บัญชี โดยควรพิจารณาจากสัญญาณที่ชัดเจนว่าการลิงก์จะเป็นประโยชน์ต่อผู้ใช้ดังกล่าว
หลังจากลิงก์สำเร็จแล้ว คุณควรแสดงตัวอย่างสิ่งที่ผู้ใช้ทำได้ด้วยบัญชีที่ลิงก์ไว้ เช่น หากคุณเพิ่งลิงก์บริการสตรีมมิงเพลง ให้ขอให้ Google Assistant เปิดเพลง
อนุญาตให้ผู้ใช้จัดการบัญชีที่ลิงก์ไว้ รวมถึงตัวเลือกในการ ยกเลิกการลิงก์ และชี้ให้ผู้ใช้ไปยังหน้าการจัดการบัญชี Google ที่ลิงก์ไว้ ซึ่งก็คือ https://myaccount.google.com/accountlinking