
Page Summary
-
Libraries are script projects that allow functions to be reused in other scripts, although this can slightly decrease execution speed.
-
To use a library, you need at least view-level access and the library's script ID to add it to your project.
-
Libraries are used like default services, with the identifier you set acting as the reference to the library's methods.
-
When creating a library, consider best practices like choosing a meaningful name, using underscores for private methods, and including JSDoc documentation.
-
Libraries have both shared resources, accessible by both the library and including script, and not-shared resources, which require explicit functions to be accessed by the including script.
A library is a script project whose functions can be reused in other scripts.
A script that uses a library doesn't run as quickly as it would if all the code were contained within a single script project. Although libraries can make development and maintenance more convenient, use them sparingly in projects where speed is critical. Because of this issue, library use should be limited in Google Workspace add-ons.
Gain access to a library
To include a library in your project you must have at least view-level access to it. If you aren't the author of the library that you want to include, contact the author and request access.
You need the script ID of the library you want to include. When you have access to the library, find the script ID on the Project Settings page.
Add a library to your script project
- At the left of the Apps Script editor, next to "Libraries," click Add a library .
- In the "Script ID" field, paste in the script ID of the library.
- Click Look up.
- Click the Version drop-down and select the version of the library to use.
- Check to see if the default "Identifier" name is the one that you want to
use with this library. This is the name that your script uses to
refer to the library. For example, if you set it to
Testthen call a method of that library as follows:Test.libraryMethod. - Click Add.
Use a library
Use your included library as you would use a default service. For
example, if Test is the identifier for your library, type
Test immediately followed by a period to see the list of methods in the
library.
Open the reference documentation for an included library by following these steps:
At the left of the script editor, next to the library name, click More > Open in a new tab.
Remove a library
At the left of the script editor, next to the library name, click More > Remove > Remove library.
If a library is deleted by the author you still need to remove it from your list of included libraries.
Update a library
Change the version of the library or update its identifier.
- At the left of the editor, under "Libraries," click the name of the library.
- Make your changes and click Save.
Create and share a library
To use and share your script project as a library, follow these steps:
- Create a versioned deployment of your script.
- Share at least view-level access with all potential users of the library.
- Give those users the script ID, which can be found on the Project Settings page.
Best practices
Here are some guidelines to follow when writing a library:
- Choose a meaningful name for your project since it's used as the default identifier when your library is included by others.
- To make one or more methods of your script not be visible (nor
usable) to your library users, end the name of the method with an
underscore. For example,
myPrivateMethod_. - Only enumerable global properties are visible to library users. This includes
function declarations, variables created outside a function with
var, and properties explicitly set on the global object. For example,Object.defineProperty()withenumerableset tofalsecreates a symbol you can use in your library, but this symbol isn't accessible by your users. To ensure your library users can make use of the script editor autocomplete and the automatically generated documentation, include JSDoc-style documentation for all your functions. Here's an example:
/**
 * Raises a number to the given power, and returns the result.
 *
 * @param {number} base the number we're raising to a power
 * @param {number} exp the exponent we're raising the base to
 * @return {number} the result of the exponential calculation
 */
function power(base, exp) { ... }
Resource scoping
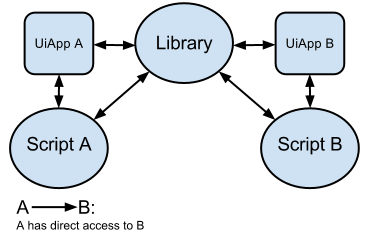
There are two types of resources when you are working with libraries: shared and not-shared. A shared resource means that both the library and the including script have a built-in access to the same instance of the resource. The following diagram illustrates a shared resource using the example of User Properties:
A not-shared resource means that both library and the including script have built-in access only to their instance of the resource. However, a library can provide access to its not-shared resources by having explicit functions that operate on them. Here is an example of a function that you would include in your library to expose its Script Properties:
  function getLibraryProperty(key) {
    const scriptProperties = PropertiesService.getScriptProperties();
    return scriptProperties.getProperty(key);
  }
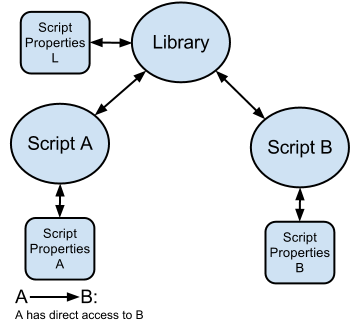
The following diagram illustrates a not-shared resource using the example of Script Properties:
This table lists the shared and not-shared resources for your reference:
| Resource | Shared* | Not-Shared** | Notes |
|---|---|---|---|
| Lock |  |
The same instance is visible to all including scripts when created in the library. | |
| Script Properties | |
The same instance is visible to all including scripts when created in the library. | |
| Cache | |
The same instance is visible to all including scripts when created in the library. | |
| Triggers | |
Simple triggers created in library are not triggered by the including script. | |
| ScriptApp | |
||
| UiApp |
|
||
| User Properties | |
||
| Logger and execution transcript | |
||
| Sites, Sheets and other containers | |
A call to getActive returns the container of the
including script. |
|
| MailApp and GmailApp | |
||
|
* This means that the library does not have its own instance of the
feature/resource and instead is using the one created by the script
that invoked it.
** This means that library has its own instance of the resource/feature and that all scripts that use the library share and have access to that same instance. | |||
Test a library
To test your library, use the head deployment. Anyone who has editor-level access to the script can use the head deployment.
You still need at least one version of the library saved.
Debug a library
When you debug a script that includes a library, you can't step into the library code or set breakpoints in it. If you try to step into a library function in debug mode, the debugger skips the function and steps to the next line in the calling script.
Using HEAD (Development Mode) for the library version doesn't enable stepping into the library or hitting breakpoints within it.
To debug library code, use one of the following methods:
- Debug from the library project: Open the library script project in the Apps Script editor. To test library functions with specific arguments, create a temporary "test" function within the library project that calls your library functions, then run that test function in debug mode.
- Logging: Use
console.log()within your library functions to output information to the execution logs. When the library is called by another script, these logs appear in the execution logs of the calling script.