

คอมโพเนนต์เครื่องหมายระบุสถานที่
คอมโพเนนต์เครื่องหมายสถานที่ช่วยให้คุณสร้างคำอธิบายประกอบแผนที่ที่ปรับแต่งได้ซึ่งแสดงข้อมูลสถานที่สำคัญบนแผนที่โดยตรง คุณสามารถแสดงเนื้อหา เช่น คะแนนของสถานที่ ประเภทของสถานที่ สถานะเปิดหรือปิด ช่วงราคา หรือข้อความที่กำหนดเอง (เช่น ป้ายกำกับที่ AI สร้างขึ้นหรือหมายเลขแผนการเดินทาง) ซึ่งจะช่วยให้ผู้ใช้ได้รับประสบการณ์การสำรวจแผนที่ที่ให้ข้อมูลมากขึ้นโดยไม่ต้องแตะการ์ดสถานที่แบบละเอียด
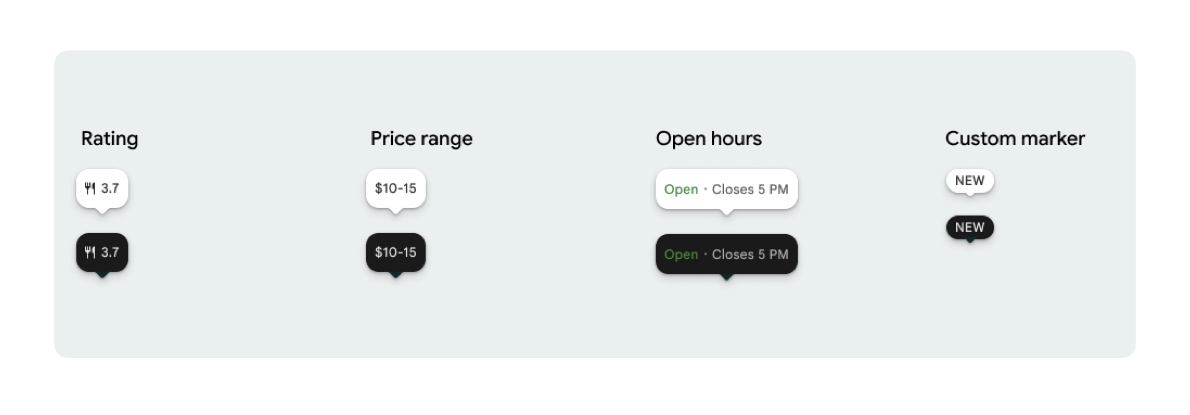
คุณแสดงไอคอนเครื่องหมาย 1 รายการและข้อความเครื่องหมาย (ไม่บังคับ) ต่อ PlaceMarker ได้
ไอคอนที่ใช้ได้มีดังนี้
type: ประเภทสถานที่none: ไม่มีไอคอน
rating: คะแนนการจัดประเภทpriceRange: ช่วงราคา (เช่น 100-200 บาท)openStatus: ธุรกิจเปิดหรือปิดอยู่custom: ข้อความที่กำหนดเอง (เช่น "ยอดนิยม")
อ้างอิงสถานที่โดยใช้รหัสสถานที่ (.placeID) ชื่อทรัพยากร (.resourceName) หรือพิกัดทางภูมิศาสตร์ (.coordinate)
ข้อกำหนดในการแสดงผลและการระบุแหล่งที่มา
เมื่อแสดงเครื่องหมายแผนที่ของ Places UI Kit เครื่องหมายต้องไม่ปรากฏแยกกัน โดยจะต้องโต้ตอบได้และเปิดคอมโพเนนต์รายละเอียดสถานที่หรือ Lightbox ที่เชื่อมโยงเมื่อมีการคลิกหรือแตะ เพื่อให้การสร้างแบรนด์ของ Google การระบุแหล่งที่มาของผู้มีส่วนร่วม และขั้นตอนการรายงานปัญหาเป็นไปตามที่กำหนด
ดูข้อกำหนดในการระบุแหล่งที่มาของรูปภาพและรีวิวสำหรับกรณีที่มีพื้นที่จำกัด
ตัวอย่างเครื่องหมายระบุสถานที่
การปรับแต่งเครื่องหมายพื้นฐาน
ตัวอย่างโค้ดต่อไปนี้แสดงการปรับแต่งเครื่องหมายตำแหน่งพื้นฐาน
Swift
import GooglePlacesSwift
import SwiftUI

@MainActor
struct DefaultMarker: View {
  var body: some View {
    PlaceMarker(
      identifier: PlaceIdentifier.placeID("PLACE_ID"),
      markerIcon: .none
    )
  }
}

@MainActor
struct RatingMarker: View {
  var body: some View {
    PlaceMarker(
      identifier: PlaceIdentifier.placeID("PLACE_ID"),
      markerIcon: .none,
      markerText: .rating
    )
  }
}

@MainActor
struct TypeAndRatingMarker: View {
  var body: some View {
    PlaceMarker(
      identifier: PlaceIdentifier.placeID("PLACE_ID"),
      markerIcon: .type,
      markerText: .rating
    )
  }
}


@MainActor
struct PriceRangeMarker: View {
  var body: some View {
    PlaceMarker(
      identifier: PlaceIdentifier.resourceName("places/PLACE_RESOURCE_NAME"),
      markerIcon: .none,
      markerType: .priceRange
    )
  }
}


@MainActor
struct OpenStatusMarker: View {
  var body: some View {
    PlaceMarker(
      identifier: PlaceIdentifier.coordinate(CLLocationCoordinate2D(latitude: 37.7749, longitude: -122.4194)),
      markerIcon: .icon,
      markerText: .openStatus
    )
  }
}
@MainActor
struct PhotoMarker: View {
    PlaceMarker(
        identifier: PlaceIdentifier.resourceName("places/PLACE_RESOURCE_NAME")
        markerIcon =.Photo
    )
}


@MainActor
struct CustomMarker: View {
  var body: some View {
    PlaceMarker(
      identifier: PlaceIdentifier.placeID("PLACE_ID"),
      markerIcon: .none,
      markerType: .custom(label: "3")
    )
  }
}
ปรับแต่งลักษณะที่ปรากฏของเครื่องหมาย
ตัวอย่างโค้ดต่อไปนี้แสดงวิธีใช้ตัวแก้ไขมุมมอง SwiftUI แบบประกาศเพื่อปรับแต่งลักษณะที่ปรากฏของเครื่องหมายโดยการซ่อนจงอยปากพูดรูปสามเหลี่ยม และให้การเรียกกลับเมื่อแตะเพื่อทริกเกอร์การดำเนินการของแอปที่กำหนดเองเมื่อผู้ใช้แตะเครื่องหมาย
Swift
@MainActor
struct ModifierStyleMarker: View {
  var body: some View {
    PlaceMarker(
      identifier: .placeID("PLACE_ID"),
      markerIcon: .none,
      markerText: .openStatus,
      configuration: PlaceMarkerConfiguration(beakPresence: false)
    )
    .onTap { placeID in
      print("Marker tapped for place: \(placeID)")
    }
  }
}
จัดการการติดต่อกลับ
ตัวอย่างโค้ดต่อไปนี้แสดงวิธีใช้การเรียกกลับเพื่อจัดการข้อผิดพลาดในการแสดงผลที่สำเร็จหรือข้อมูลที่ขาดหายไป
Swift
import GooglePlacesSwift
import SwiftUI


@MainActor
struct StatusHandlingMarker: View {
  var body: some View {
    PlaceMarker(
      identifier: PlaceIdentifier.placeID("PLACE_ID"),
      markerIcon: .none
      markerText: .priceRange,
    )
    /// Triggered when place data is successfully fetched or when data fetching fails or
    /// required data is missing for the place..
    .onLoad { result in
        if let place = result.place {
          print("Marker successfully loaded for place ID: \(place.placeID)")
        } else if let error = result.error {
          print("Failed to load marker: \(error)")
      }
    }
  }
}
ผสานรวมกับ Maps SDK
ตัวอย่างโค้ดต่อไปนี้แสดงวิธีฝัง PlaceMarker ภายใน GMSMarker ของ Google Maps SDK สำหรับ iOS โดยใช้คลาสตัวช่วย PlaceMarkerHostingView เพื่อห่อหุ้ม PlaceMarker
Swift
import GoogleMaps
import GooglePlacesSwift
import SwiftUI
import UIKit


func addPlaceMarker(to mapView: GMSMapView, placeID: String) {
  let marker = GMSMarker()
  let markerView = PlaceMarker(
    identifier: .placeID(placeID),
    markerType: .rating(showIcon: true),
  ).onLoad { result in
    switch Result
    case .success(let place)
      marker.position = place.coordinate
    case .error(let error) {
      print("Failed to load marker: \(error)")
    }
  }

  marker.iconView = PlaceMakerHostingView(markerView)
  marker.map = mapView
}