
Maps SDK สำหรับ iOS มีวิธีต่างๆ ให้คุณเพิ่มรูปร่างลงในแผนที่ ระบบรองรับรูปร่างต่อไปนี้
- เส้นหลายเส้นคือชุดของส่วนเส้นที่เชื่อมต่อกันซึ่งสามารถสร้างรูปร่างใดก็ได้ตามต้องการ และใช้เพื่อทำเครื่องหมายเส้นทางบนแผนที่ได้
- รูปหลายเหลี่ยมคือรูปร่างปิดที่ใช้ทำเครื่องหมายพื้นที่บนแผนที่ได้
- วงกลมคือการฉายภาพวงกลมบนพื้นผิวโลกอย่างแม่นยำทางภูมิศาสตร์
คุณสามารถแก้ไขลักษณะที่ปรากฏของแต่ละรูปร่างได้หลายวิธี
เส้นประกอบ
Polyline ช่วยให้คุณวาดเส้นบนแผนที่ได้ ออบเจ็กต์ GMSPolyline
แสดงลำดับตำแหน่งที่เรียงตามลำดับ ซึ่งแสดงเป็นชุดของ
ส่วนของเส้น คุณตั้งค่าสีของเส้นประกอบได้ด้วย
GMSStrokeStyle
หากต้องการสร้างเส้นหลายส่วน คุณจะต้องระบุเส้นทางโดยการสร้างออบเจ็กต์ GMSMutablePath ที่สอดคล้องกันซึ่งมีจุดอย่างน้อย 2 จุด
CLLocationCoordinate2D แต่ละรายการแสดงถึงจุดหนึ่งบนพื้นผิวโลก ระบบจะวาดส่วนของเส้น
ระหว่างจุดตามลำดับที่คุณเพิ่มจุดลงในเส้นทาง
คุณเพิ่มจุดไปยังเส้นทางได้ด้วยวิธี addCoordinate: หรือ
addLatitude:longitude:
Swift
let path = GMSMutablePath()
path.add(CLLocationCoordinate2D(latitude: -33.85, longitude: 151.20))
path.add(CLLocationCoordinate2D(latitude: -33.70, longitude: 151.40))
path.add(CLLocationCoordinate2D(latitude: -33.73, longitude: 151.41))
let polyline = GMSPolyline(path: path)
Objective-C
GMSMutablePath *path = [GMSMutablePath path];
[path addCoordinate:CLLocationCoordinate2DMake(-33.85, 151.20)];
[path addCoordinate:CLLocationCoordinate2DMake(-33.70, 151.40)];
[path addCoordinate:CLLocationCoordinate2DMake(-33.73, 151.41)];
GMSPolyline *polyline = [GMSPolyline polylineWithPath:path];
การเพิ่มเส้นประกอบ
- สร้างออบเจ็กต์
GMSMutablePath - กำหนดจุดในเส้นทางด้วยวิธี
addCoordinate:หรือaddLatitude:longitude: - สร้างออบเจ็กต์
GMSPolylineใหม่โดยใช้เส้นทางเป็นอาร์กิวเมนต์ - ตั้งค่าพร็อพเพอร์ตี้อื่นๆ เช่น
strokeWidthและstrokeColorตามต้องการ - ตั้งค่าพร็อพเพอร์ตี้
mapของGMSPolyline - เส้นประกอบจะปรากฏบนแผนที่
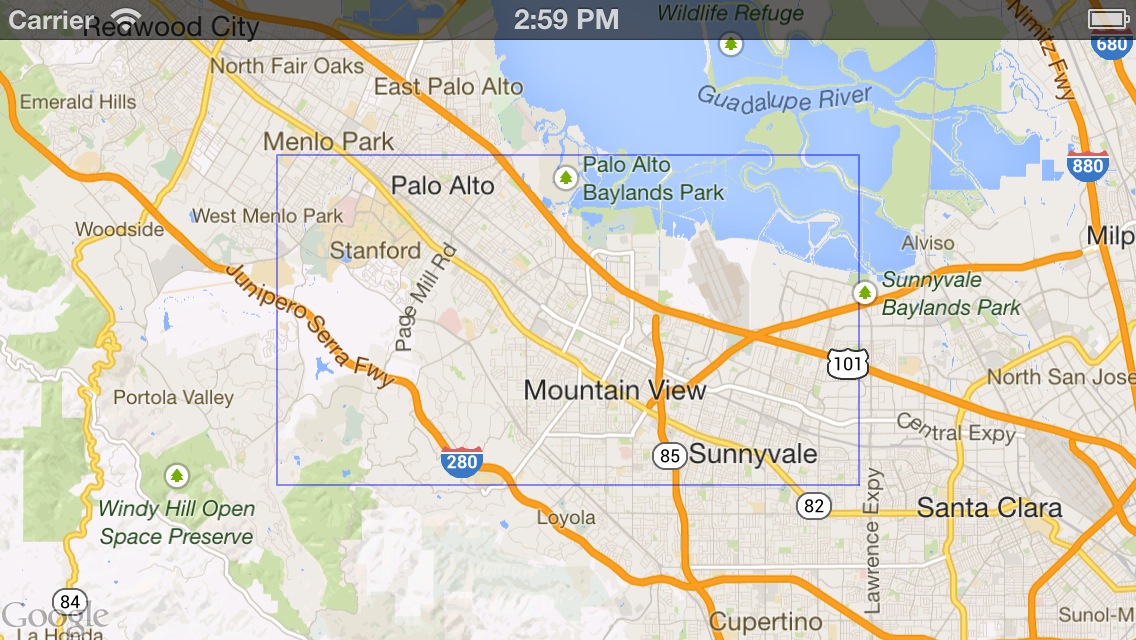
ข้อมูลโค้ดต่อไปนี้จะเพิ่มสี่เหลี่ยมผืนผ้าลงในแผนที่
Swift
let rectanglePath = GMSMutablePath()
rectanglePath.add(CLLocationCoordinate2D(latitude: 37.36, longitude: -122.0))
rectanglePath.add(CLLocationCoordinate2D(latitude: 37.45, longitude: -122.0))
rectanglePath.add(CLLocationCoordinate2D(latitude: 37.45, longitude: -122.2))
rectanglePath.add(CLLocationCoordinate2D(latitude: 37.36, longitude: -122.2))
rectanglePath.add(CLLocationCoordinate2D(latitude: 37.36, longitude: -122.0))

let rectangle = GMSPolyline(path: path)
rectangle.map = mapView
Objective-C
GMSMutablePath *rectanglePath = [GMSMutablePath path];
[rectanglePath addCoordinate:CLLocationCoordinate2DMake(37.36, -122.0)];
[rectanglePath addCoordinate:CLLocationCoordinate2DMake(37.45, -122.0)];
[rectanglePath addCoordinate:CLLocationCoordinate2DMake(37.45, -122.2)];
[rectanglePath addCoordinate:CLLocationCoordinate2DMake(37.36, -122.2)];
[rectanglePath addCoordinate:CLLocationCoordinate2DMake(37.36, -122.0)];

GMSPolyline *rectangle = [GMSPolyline polylineWithPath:path];
rectangle.map = mapView;
การนำโพลีไลน์ออก
คุณนำเส้นประกอบออกจากแผนที่ได้โดยตั้งค่าพร็อพเพอร์ตี้ GMSPolylinemap
เป็น nil หรือจะนำการซ้อนทับทั้งหมด (รวมถึง
เส้นหลายเส้นและรูปร่างอื่นๆ) ออกจากแผนที่ก็ได้โดยเรียกใช้เมธอด GMSMapView
clear
Swift
mapView.clear()
Objective-C
[mapView clear];
การปรับแต่งเส้นประกอบ
ออบเจ็กต์ GMSPolyline มีพร็อพเพอร์ตี้หลายรายการเพื่อควบคุม
ลักษณะที่ปรากฏของเส้น โดยรองรับตัวเลือกต่อไปนี้
strokeWidth- ความกว้างของทั้งบรรทัดในหน่วยจุดบนหน้าจอ ค่าเริ่มต้นคือ 1 ความกว้าง จะไม่ปรับขนาดเมื่อซูมแผนที่
geodesic-
เมื่อ
YESให้แสดงขอบของเส้นประกอบนี้เป็นเส้นโค้งบนพื้นผิวทรงกลม ส่วนโค้งของเส้นทางที่สั้นที่สุดบนพื้นผิวโลก จะปรากฏเป็นเส้นโค้งบนแผนที่ที่มีการฉายภาพแบบเมอร์เคเตอร์ ส่วนที่ไม่ใช่เส้นโค้งบนพื้นผิวโลก จะวาดเป็นเส้นตรงบนแผนที่ ค่าเริ่มต้นคือNO spans- ใช้เพื่อระบุสีของส่วนอย่างน้อย 1 ส่วนของเส้นหลายเส้น พร็อพเพอร์ตี้
spans คืออาร์เรย์ของออบเจ็กต์
GMSStyleSpanการตั้งค่าพร็อพเพอร์ตี้spansเป็นวิธีที่แนะนำในการ เปลี่ยนสีของเส้นหลายเส้น strokeColor- ออบเจ็กต์
UIColorที่ระบุสีของเส้นหลายส่วน ค่าเริ่มต้นคือblueColorระบบจะไม่สนใจพร็อพเพอร์ตี้strokeColorหากตั้งค่าspans
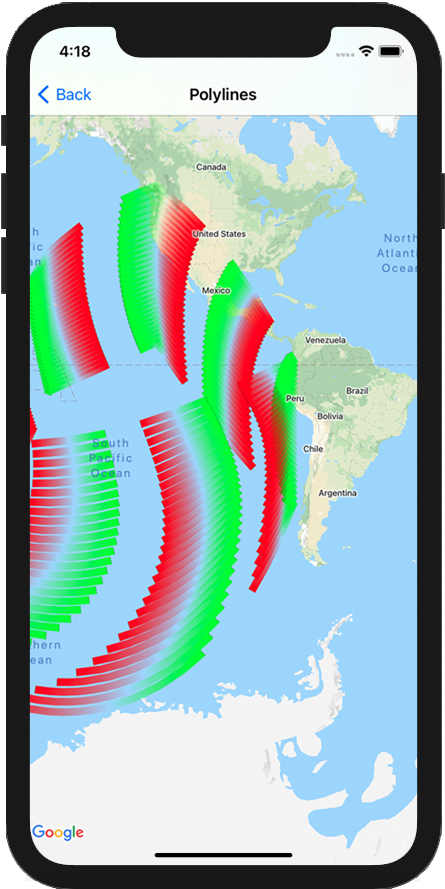
ข้อมูลโค้ดต่อไปนี้จะเพิ่มเส้นประกอบหนาจากเมลเบิร์นไปยังเพิร์ธ โดยใช้การประมาณค่าแบบ Geodesic
Swift
let path = GMSMutablePath()
path.addLatitude(-37.81319, longitude: 144.96298)
path.addLatitude(-31.95285, longitude: 115.85734)
let polyline = GMSPolyline(path: path)
polyline.strokeWidth = 10.0
polyline.geodesic = true
polyline.map = mapView
Objective-C
GMSMutablePath *path = [GMSMutablePath path];
[path addLatitude:-37.81319 longitude:144.96298];
[path addLatitude:-31.95285 longitude:115.85734];
GMSPolyline *polyline = [GMSPolyline polylineWithPath:path];
polyline.strokeWidth = 10.f;
polyline.geodesic = YES;
polyline.map = mapView;
หากต้องการแก้ไขเส้นประกอบหลังจากที่เพิ่มลงในแผนที่แล้ว ให้เก็บออบเจ็กต์ GMSPolyline ไว้
Swift
polyline.strokeColor = .blue
Objective-C
polyline.strokeColor = [UIColor blueColor];
การเปลี่ยนสีของเส้นหลายส่วน
ระบบจะวาดเส้นหลายเส้นเป็นชุดของส่วนบนแผนที่ คุณเปลี่ยนสี
ของแต่ละกลุ่มหรือทั้งเส้นได้ด้วยพร็อพเพอร์ตี้ spans แม้ว่าพร็อพเพอร์ตี้นี้จะช่วยให้คุณควบคุมการระบายสีของเส้นหลายเส้นได้อย่างละเอียด แต่ก็มีฟีเจอร์อำนวยความสะดวกหลายอย่างที่ช่วยให้คุณใช้รูปแบบเดียวกับทั้งเส้นได้
ข้อมูลโค้ดด้านล่างใช้วิธี spanWithColor: เพื่อเปลี่ยนสีของ
ทั้งบรรทัดเป็นสีแดง
Swift
polyline.spans = [GMSStyleSpan(color: .red)]
Objective-C
polyline.spans = @[[GMSStyleSpan spanWithColor:[UIColor redColor]]];
หรือหากมีสิทธิ์เข้าถึงออบเจ็กต์ GMSStrokeStyle อยู่แล้ว คุณก็ใช้วิธี spanWithStyle: ได้
Swift
let solidRed = GMSStrokeStyle.solidColor(.red)
polyline.spans = [GMSStyleSpan(style: solidRed)]
Objective-C
GMSStrokeStyle *solidRed = [GMSStrokeStyle solidColor:[UIColor redColor]];
polyline.spans = @[[GMSStyleSpan spanWithStyle:solidRed]];
ก่อนที่จะมี Maps SDK สำหรับ iOS เวอร์ชัน 1.7 คุณสามารถใช้พร็อพเพอร์ตี้เดียว
strokeColorเพื่อตั้งค่าสีทั้งหมดของ
GMSPolyline พร็อพเพอร์ตี้ spans จะมีความสำคัญเหนือกว่า
strokeColor
Swift
polyline.strokeColor = .red
Objective-C
polyline.strokeColor = [UIColor redColor];
รูปแบบ
หากแอปใช้สีเส้นขอบเดียวกันหลายครั้ง คุณอาจเห็นว่าการกำหนดสไตล์ที่นำกลับมาใช้ใหม่ได้มีประโยชน์
คุณระบุรูปแบบเส้นหลายเส้นได้โดยใช้ออบเจ็กต์ GMSStrokeStyle รูปแบบเส้นขอบอาจเป็นสีเดียว
หรือการไล่ระดับสีจากสีหนึ่งไปยังอีกสีหนึ่ง เมื่อสร้าง
สไตล์แล้ว คุณจะนำไปใช้กับGMSStyleSpanได้โดยใช้เมธอด
spanWithStyle:
Swift
// Create two styles: one that is solid blue, and one that is a gradient from red to yellow
let solidBlue = GMSStrokeStyle.solidColor(.blue)
let solidBlueSpan = GMSStyleSpan(style: solidBlue)
let redYellow = GMSStrokeStyle.gradient(from: .red, to: .yellow)
let redYellowSpan = GMSStyleSpan(style: redYellow)
Objective-C
// Create two styles: one that is solid blue, and one that is a gradient from red to yellow
GMSStrokeStyle *solidBlue = [GMSStrokeStyle solidColor:[UIColor blueColor]];
GMSStyleSpan *solidBlueSpan = [GMSStyleSpan spanWithStyle:solidBlue];
GMSStrokeStyle *redYellow =
    [GMSStrokeStyle gradientFromColor:[UIColor redColor] toColor:[UIColor yellowColor]];
GMSStyleSpan *redYellowSpan = [GMSStyleSpan spanWithStyle:redYellow];
รูปแบบของ span จะยังคงมีผลจนกว่าจะสิ้นสุดเส้นหลายส่วน หรือจนกว่าจะมีการตั้งค่ารูปแบบใหม่ คุณเปลี่ยนสีของทั้งเส้นได้โดยตั้งค่าพร็อพเพอร์ตี้ spans
ของ Polyline เป็น GMSStyleSpan เดียว ตัวอย่าง
แสดงวิธีใช้การไล่ระดับสีตลอดความยาวของ Polyline
Swift
polyline.spans = [GMSStyleSpan(style: redYellow)]
Objective-C
polyline.spans = @[[GMSStyleSpan spanWithStyle:redYellow]];
การเปลี่ยนสีของแต่ละส่วนของเส้น
หากต้องการจัดรูปแบบแต่ละส่วนของเส้นหลายเส้นแยกกัน คุณสามารถทำได้
โดยสร้างอาร์เรย์ของออบเจ็กต์ GMSStyleSpan แล้วส่งอาร์เรย์นี้
ไปยังพร็อพเพอร์ตี้ spans โดยค่าเริ่มต้น แต่ละรายการในอาร์เรย์จะกำหนดสีของส่วนเส้นที่เกี่ยวข้อง หากมีองค์ประกอบในอาร์เรย์มากกว่า
กลุ่มในบรรทัด ระบบจะไม่สนใจองค์ประกอบที่เกินมา หากมีองค์ประกอบในอาร์เรย์น้อยกว่านี้ GMSStyleSpan สุดท้ายจะอธิบายสีสำหรับส่วนที่เหลือของเส้น
คุณสามารถใช้บล็อกสีและ/หรือเส้นหลายเส้นแบบไล่ระดับสีเพื่อระบุการเปลี่ยนแปลงตาม เส้นหลายเส้น เช่น ระดับความสูงหรือความเร็ว ข้อมูลโค้ดด้านล่างจะตั้งค่าสีของ ส่วนแรก 2 ส่วนของเส้นประกอบเป็นสีแดง และส่วนที่เหลือของเส้นจะเป็น การไล่ระดับสีจากสีแดงเป็นสีเหลือง
Swift
polyline.spans = [
  GMSStyleSpan(style: solidRed),
  GMSStyleSpan(style: solidRed),
  GMSStyleSpan(style: redYellow)
]
Objective-C
polyline.spans = @[[GMSStyleSpan spanWithStyle:solidRed],
                   [GMSStyleSpan spanWithStyle:solidRed],
                   [GMSStyleSpan spanWithStyle:redYellow]];
คุณสามารถใช้spanWithStyle:segments:เพื่อตั้งค่าสไตล์สำหรับหลาย
ส่วนพร้อมกันได้ ตัวอย่างเช่น โค้ดต่อไปนี้มีความหมายเหมือนกับโค้ดด้านบน
ระบบจะไม่สนใจความยาวของกลุ่ม GMSStyleSpan สุดท้ายเสมอ
เนื่องจากใช้รูปแบบเพื่ออธิบายส่วนที่เหลือของบรรทัด
Swift
polyline.spans = [
  GMSStyleSpan(style: solidRed, segments:2),
  GMSStyleSpan(style: redYellow, segments:10)
]
Objective-C
polyline.spans = @[[GMSStyleSpan spanWithStyle:solidRed segments:2],
                   [GMSStyleSpan spanWithStyle:redYellow segments:10]];
กลุ่มเศษส่วน
นอกจากนี้ยังระบุกลุ่มเป็นค่าเศษส่วนได้ด้วย ซึ่งจะใช้รูปแบบ
กับจำนวนเศษส่วนของกลุ่ม ซึ่งอาจทำให้กลุ่มเดียว
แยกออก GMSStyleSpan แต่ละรายการจะเริ่มทันทีหลังจากรายการก่อนหน้า
ในตัวอย่างด้านล่าง สีเทาจะเริ่มตั้งแต่ครึ่งหนึ่งของ
กลุ่มที่ 2 และต่อเนื่องไปจนถึงครึ่งหนึ่งของกลุ่มที่ 3
Swift
polyline.spans = [
  GMSStyleSpan(style: solidRed, segments: 2.5),
  GMSStyleSpan(color: .gray),
  GMSStyleSpan(color: .purple, segments: 0.75),
  GMSStyleSpan(style: redYellow)
]
Objective-C
polyline.spans = @[[GMSStyleSpan spanWithStyle:solidRed segments:2.5],
                   [GMSStyleSpan spanWithColor:[UIColor grayColor]],
                   [GMSStyleSpan spanWithColor:[UIColor purpleColor] segments:0.75],
                   [GMSStyleSpan spanWithStyle:redYellow]];
การเพิ่มรูปแบบสีที่ทำซ้ำลงในเส้นหลายส่วน
หากต้องการเพิ่มรูปแบบให้กับ Polyline คุณสามารถใช้วิธีการยูทิลิตี
GMSStyleSpans ใน GMSGeometryUtils เมธอด
GMSStyleSpansยอมรับอาร์เรย์ 2 รายการที่กำหนดรูปแบบที่ทำซ้ำ อาร์เรย์หนึ่งกำหนดรูปแบบที่ควรทำซ้ำ และอีกอาร์เรย์หนึ่งกำหนด
ช่วงเวลาของการทำซ้ำ เมื่อใช้ร่วมกัน คุณจะสร้างรูปแบบที่ใช้กับเส้นหลายเส้นได้ ไม่ว่าเส้นจะยาวเท่าใดหรือมีจำนวนส่วนเท่าใดก็ตาม
ตัวอย่างเช่น ข้อมูลโค้ดด้านล่างกำหนดเส้นประกอบที่มีรูปแบบสลับสีดำและสีขาว ระบบจะถือว่าความยาวเป็นเมตรตามเส้นรอมบ์ (ใน
Mercator เส้นนี้เป็นเส้นตรง) เมื่อระบุประเภทเป็น
kGMSLengthRhumb
Swift
let styles = [
  GMSStrokeStyle.solidColor(.white),
  GMSStrokeStyle.solidColor(.black)
]
let lengths: [NSNumber] = [100000, 50000]
polyline.spans = GMSStyleSpans(
  polyline.path!,
  styles,
  lengths,
  GMSLengthKind.rhumb
)
Objective-C
NSArray *styles = @[[GMSStrokeStyle solidColor:[UIColor whiteColor]],
                    [GMSStrokeStyle solidColor:[UIColor blackColor]]];
NSArray *lengths = @[@100000, @50000];
polyline.spans = GMSStyleSpans(polyline.path, styles, lengths, kGMSLengthRhumb);
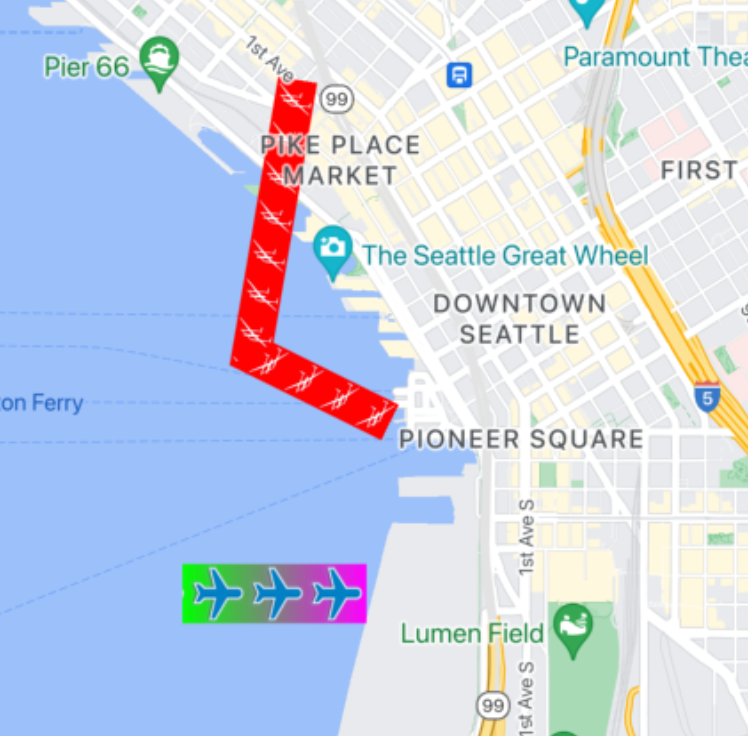
โพลีไลน์ที่มีการประทับตราสไปรท์
เส้นประกอบที่ประทับสไปรต์ช่วยให้คุณสร้างเส้นประกอบโดยใช้รูปภาพบิตแมปที่ทำซ้ำตามที่คุณเลือก รูปร่างจะแสดงพร้อมเส้นขอบพื้นหลังที่ชัดเจน แต่ระบบจะไม่ตัดเครื่องหมาย รอบมุมเส้น ซึ่งทำให้มีประโยชน์ในสถานการณ์ต่างๆ เช่น จุดสำหรับแสดงเส้นทางเดินเท้า
คุณใช้ฟีเจอร์นี้ได้โดยใช้ GMSSpriteStyle และตั้งค่าเป็นแสตมป์โดยใช้พร็อพเพอร์ตี้ stampStyle ของ GMSStrokeStyle
Swift
let path = GMSMutablePath()
path.addLatitude(-37.81319, longitude: 144.96298)
path.addLatitude(-31.95285, longitude: 115.85734)
let polyline = GMSPolyline(path: path)
polyline.strokeWidth = 20
let image = UIImage(named: "imageFromBundleOrAsset")! // Image could be from anywhere
let stampStyle = GMSSpriteStyle(image: image)
let transparentStampStroke = GMSStrokeStyle.transparentStroke(withStamp: stampStyle)
let span = GMSStyleSpan(style: transparentStampStroke)
polyline.spans = [span]
polyline.map = mapView
Objective-C
GMSMutablePath *path = [GMSMutablePath path];
[path addLatitude:-37.81319 longitude:144.96298];
[path addLatitude:-31.95285 longitude:115.85734];
polyline.strokeWidth = 20;
GMSPolyline *polyline = [GMSPolyline polylineWithPath:path];

UIImage *image = [UIImage imageNamed:@"imageFromBundleOrAsset"];
GMSStrokeStyle *transparentStampStroke = [GMSStrokeStyle transparentStrokeWithStampStyle:[GMSSpriteStyle spriteStyleWithImage:image]];

GMSStyleSpan *span = [GMSStyleSpan spanWithStyle:transparentStampStroke];
polyline.spans = @[span];
polyline.map = _mapView;
เส้นประกอบที่มีการประทับพื้นผิว
เส้นประกอบที่ประทับพื้นผิวช่วยให้คุณสร้างเส้นประกอบโดยใช้พื้นผิวที่ทำซ้ำตามที่คุณเลือกได้ รูปร่างสามารถแสดงด้วยสีทึบที่ชัดเจนหรือเส้นขอบพื้นหลังแบบไล่ระดับสี พื้นผิวจะปรับขนาดเมื่อระดับการซูมเปลี่ยนไป ระบบจะตัดรูปภาพที่ส่วนท้าย ของจุดสิ้นสุดหรือจุดเริ่มต้นของเส้นทาง หรือจุดเส้นทางที่ระดับการซูมหนึ่งๆ
คุณใช้ฟีเจอร์นี้ได้โดยใช้ GMSTextureStyle และตั้งค่าให้เป็นแสตมป์โดยใช้พร็อพเพอร์ตี้ stampStyle ของ GMSStrokeStyle
Swift
let path = GMSMutablePath()
path.addLatitude(-37.81319, longitude: 144.96298)
path.addLatitude(-31.95285, longitude: 115.85734)
let polyline = GMSPolyline(path: path)
polyline.strokeWidth = 20
let redWithStamp = GMSStrokeStyle.solidColor(.red)
let image = UIImage(named: "imageFromBundleOrAsset")! // Image could be from anywhere
redWithStamp.stampStyle = GMSTextureStyle(image: image)
let span = GMSStyleSpan(style: redWithStamp)
polyline.spans = [span]
polyline.map = mapView
Objective-C
GMSMutablePath *path = [GMSMutablePath path];
[path addLatitude:-37.81319 longitude:144.96298];
[path addLatitude:-31.95285 longitude:115.85734];
GMSPolyline *polyline = [GMSPolyline polylineWithPath:path];
polyline.strokeWidth = 20;
GMSStrokeStyle *redWithStamp = [GMSStrokeStyle solidColor:[UIColor redColor]];

UIImage *image = [UIImage imageNamed:@"imageFromBundleOrAsset"]; // Image could be from anywhere
redWithStamp.stampStyle = [GMSTextureStyle textureStyleWithImage:image];

GMSStyleSpan *span = [GMSStyleSpan spanWithStyle:redWithStamp];
polyline.spans = @[span];
polyline.map = _mapView;
ความสามารถของแผนที่
พร็อพเพอร์ตี้ mapCapabilities ใน GMSMapView จะเพิ่มการตรวจสอบแบบเป็นโปรแกรม
สำหรับฟีเจอร์เฉพาะแผนที่ ซึ่งจะเป็นประโยชน์เมื่อต้องการทราบว่าcapabilitiesบางอย่างในแผนที่พร้อมใช้งานหรือไม่ก่อนเรียกใช้ API ที่เฉพาะเจาะจง คำค้นหานี้จะพิจารณาว่ามุมมองแผนที่รองรับเส้นหลายเส้นที่ประทับสไปรต์หรือไม่
Swift
let path = GMSMutablePath()
path.addLatitude(-37.81319, longitude: 144.96298)
path.addLatitude(-31.95285, longitude: 115.85734)
let polyline = GMSPolyline(path: path)
polyline.strokeWidth = 20
let image = UIImage(named: "imageFromBundleOrAsset")! // Image could be from anywhere
let spans: [GMSStyleSpan]
if (mapView.mapCapabilities.contains(.spritePolylines)) {
  let spriteStyle = GMSSpriteStyle(image: image)
  let stroke = GMSStrokeStyle.transparentStroke(withStamp: spriteStyle)
  spans = [ GMSStyleSpan(style: stroke) ]
} else {
  let stroke = GMSStrokeStyle.solidColor(.clear)
  stroke.stampStyle = GMSTextureStyle(image: image)
  spans = [ GMSStyleSpan(style: stroke) ]
}
polyline.spans = spans
polyline.map = mapView
Objective-C
GMSMutablePath *path = [GMSMutablePath path];
[path addLatitude:-37.81319 longitude:144.96298];
[path addLatitude:-31.95285 longitude:115.85734];

UIImage *_Nonnull image = [UIImage imageNamed:@"imageFromBundleOrAsset"]; // Image could be from anywhere

NSArray<GMSStyleSpan *> * spans;
if (_mapView.mapCapabilities & GMSMapCapabilityFlagsSpritePolylines) {
  GMSSpriteStyle *spriteStyle = [GMSSpriteStyle spriteStyleWithImage:image];
  GMSStrokeStyle *stroke = [GMSStrokeStyle transparentStrokeWithStampStyle:spriteStyle];
  spans = @[ [GMSStyleSpan spanWithStyle:stroke] ];
} else {
  GMSStrokeStyle *stroke = [GMSStrokeStyle solidColor:UIColor.clearColor];
  stroke.stampStyle = [GMSTextureStyle textureStyleWithImage:image];
  spans = @[ [GMSStyleSpan spanWithStyle:stroke] ];
}

GMSPolyline *polyline = [GMSPolyline polylineWithPath:path];
polyline.strokeWidth = 20;
polyline.spans = spans;
polyline.map = _mapView;
รูปแบบนี้ช่วยให้คุณติดตามการเปลี่ยนแปลงและตอบสนองต่อการอัปเดตด้วยสถานะ MapView ได้
นอกจากนี้ คุณยังใช้ didChangeMapCapabilities ใน
GMSMapViewDelegate เพื่อรับข้อมูลอัปเดตเกี่ยวกับความพร้อมใช้งานของฟีเจอร์ได้ด้วย
รูปหลายเหลี่ยม
รูปหลายเหลี่ยมคล้ายกับเส้นประกอบตรงที่ประกอบด้วยชุดพิกัดในลำดับที่เรียงตามลำดับ
อย่างไรก็ตาม รูปหลายเหลี่ยมได้รับการออกแบบมาเพื่อกำหนดภูมิภาคที่แน่นอนภายในลูปปิดแทนที่จะเป็นแบบเปิด
รูปหลายเหลี่ยมใน Maps SDK สำหรับ iOS กำหนดโดยคลาส GMSPolygon
คุณเพิ่ม GMSPolygon ลงในแผนที่ได้ในลักษณะเดียวกับการเพิ่มGMSPolyline ก่อนอื่น ให้ระบุเส้นทางโดยสร้างออบเจ็กต์ GMSMutablePath ที่สอดคล้องกันและเพิ่มจุดลงในออบเจ็กต์
จุดเหล่านี้จะประกอบกันเป็นโครงร่างของรูปหลายเหลี่ยม CLLocationCoordinate2D แต่ละรายการ
แสดงถึงจุดหนึ่งบนพื้นผิวโลก ระบบจะวาดส่วนของเส้นระหว่างจุดตามลำดับที่คุณเพิ่มลงในเส้นทาง
เพิ่มรูปหลายเหลี่ยม
- สร้างออบเจ็กต์
GMSMutablePath - กำหนดจุดในเส้นทางด้วยวิธี
addCoordinate:หรือaddLatitude:longitude:จุดเหล่านี้ประกอบกันเป็นโครงร่างของรูปหลายเหลี่ยม - สร้างออบเจ็กต์
GMSPolygonใหม่โดยใช้เส้นทางเป็นอาร์กิวเมนต์ - ตั้งค่าพร็อพเพอร์ตี้อื่นๆ เช่น
strokeWidth,strokeColorและfillColorตามต้องการ - กำหนดรูปหลายเหลี่ยมให้กับออบเจ็กต์
GMSMapViewโดยตั้งค่าพร็อพเพอร์ตี้GMSPolygon.map - รูปหลายเหลี่ยมจะปรากฏบนแผนที่
ข้อมูลโค้ดต่อไปนี้จะเพิ่มสี่เหลี่ยมผืนผ้าลงในแผนที่
Swift
// Create a rectangular path
let rect = GMSMutablePath()
rect.add(CLLocationCoordinate2D(latitude: 37.36, longitude: -122.0))
rect.add(CLLocationCoordinate2D(latitude: 37.45, longitude: -122.0))
rect.add(CLLocationCoordinate2D(latitude: 37.45, longitude: -122.2))
rect.add(CLLocationCoordinate2D(latitude: 37.36, longitude: -122.2))

// Create the polygon, and assign it to the map.
let polygon = GMSPolygon(path: rect)
polygon.fillColor = UIColor(red: 0.25, green: 0, blue: 0, alpha: 0.05);
polygon.strokeColor = .black
polygon.strokeWidth = 2
polygon.map = mapView
Objective-C
// Create a rectangular path
GMSMutablePath *rect = [GMSMutablePath path];
[rect addCoordinate:CLLocationCoordinate2DMake(37.36, -122.0)];
[rect addCoordinate:CLLocationCoordinate2DMake(37.45, -122.0)];
[rect addCoordinate:CLLocationCoordinate2DMake(37.45, -122.2)];
[rect addCoordinate:CLLocationCoordinate2DMake(37.36, -122.2)];

// Create the polygon, and assign it to the map.
GMSPolygon *polygon = [GMSPolygon polygonWithPath:rect];
polygon.fillColor = [UIColor colorWithRed:0.25 green:0 blue:0 alpha:0.05];
polygon.strokeColor = [UIColor blackColor];
polygon.strokeWidth = 2;
polygon.map = mapView;
คุณปรับแต่งลักษณะที่ปรากฏของรูปหลายเหลี่ยมได้ทั้งก่อนและหลังเพิ่มลงในแผนที่
การนำรูปหลายเหลี่ยมออก
นำรูปหลายเหลี่ยมออกโดยตั้งค่าพร็อพเพอร์ตี้ GMSPolygon.map เป็น nil และยกเลิกการเชื่อมต่อ
layer จากองค์ประกอบหลัก
Swift
 polygon.map = nil
 polygon.layer.removeFromSuperLayer()
Objective-C
 polygon.map = nil;
 [polygon.layer removeFromSuperlayer];
วงกลม
นอกจากคลาส GMSPolygon ทั่วไปแล้ว Maps SDK สำหรับ iOS ยังมี GMSCircle ซึ่งช่วยให้คุณวาดวงกลมบนพื้นผิวโลกได้
หากต้องการสร้างวงกลม คุณต้องระบุพร็อพเพอร์ตี้ 2 รายการต่อไปนี้
positionเป็นCLLocationCoordinate2Dradiusเป็นเมตร
จากนั้นจะมีการกำหนดวงกลมให้เป็นชุดของจุดทั้งหมดบนพื้นผิวโลก
ซึ่งอยู่ห่างจาก center ที่กำหนดเป็นระยะทาง radius เมตร เนื่องจาก
การฉายภาพแบบเมอร์เคเตอร์ที่ใช้โดย Maps API จะแสดงทรงกลมบนพื้นผิวเรียบ
จึงปรากฏเป็นวงกลมที่เกือบสมบูรณ์แบบบนแผนที่เมื่ออยู่ใกล้
เส้นศูนย์สูตร และจะปรากฏเป็นวงกลมที่ไม่สมบูรณ์มากขึ้น (บนหน้าจอ) เมื่อวงกลม
เคลื่อนที่ออกจากเส้นศูนย์สูตร
การเพิ่มแวดวง
ข้อมูลโค้ดต่อไปนี้จะเพิ่มวงกลมลงในแผนที่
Swift
let circleCenter = CLLocationCoordinate2D(latitude: 37.35, longitude: -122.0)
let circle = GMSCircle(position: circleCenter, radius: 1000)
circle.map = mapView
Objective-C
CLLocationCoordinate2D circleCenter = CLLocationCoordinate2DMake(37.35, -122.0);
GMSCircle *circle = [GMSCircle circleWithPosition:circleCenter
                                         radius:1000];
circle.map = mapView;
คุณปรับแต่งลักษณะที่ปรากฏของวงกลมได้ทั้งก่อนและหลังเพิ่มลงในแผนที่
การปรับแต่งแวดวง
คุณระบุสีแบบกำหนดเองและความกว้างของเส้นโครงร่างได้โดยการแก้ไขพร็อพเพอร์ตี้ของ
GMSCircle โดยรองรับตัวเลือกต่อไปนี้
fillColor- ออบเจ็กต์
UIColorที่ระบุสีภายในของ วงกลม ค่าเริ่มต้นคือโปร่งใส strokeColor- ออบเจ็กต์
UIColorที่ระบุสีของ เส้นขอบวงกลม ค่าเริ่มต้นคือblackColor strokeWidth- ความหนาของเส้นขอบวงกลมในหน่วยจุดบนหน้าจอ ค่าเริ่มต้นคือ 1 ความหนาจะไม่ปรับขนาดเมื่อซูมแผนที่
ข้อมูลโค้ดต่อไปนี้จะเพิ่มวงกลมสีแดงหนาที่มี ด้านในสีแดงกึ่งโปร่งใส
Swift
circle.fillColor = UIColor(red: 0.35, green: 0, blue: 0, alpha: 0.05)
circle.strokeColor = .red
circle.strokeWidth = 5
Objective-C
circle.fillColor = [UIColor colorWithRed:0.25 green:0 blue:0 alpha:0.05];
circle.strokeColor = [UIColor redColor];
circle.strokeWidth = 5;
การสร้างรูปหลายเหลี่ยมกลวง
คุณรวมเส้นทางหลายเส้นไว้ในออบเจ็กต์ GMSPolygon เดียวเพื่อสร้างรูปร่างที่ซับซ้อน เช่น วงแหวนที่เติมสี หรือโดนัท (ซึ่งพื้นที่รูปหลายเหลี่ยมจะปรากฏภายในรูปหลายเหลี่ยมเป็นรูปร่างแยกกัน) ได้ รูปร่างที่ซับซ้อนคือ
การประกอบเส้นทางหลายเส้น
สร้างรูปหลายเหลี่ยมที่มีเส้นทางที่ระบุพื้นที่ที่ใหญ่ที่สุดซึ่งครอบคลุมโดยรูปหลายเหลี่ยม จากนั้นระบุพร็อพเพอร์ตี้ holes ของรูปหลายเหลี่ยมเป็นอาร์เรย์ของออบเจ็กต์ GMSPath อย่างน้อย 1 รายการ ซึ่งกำหนดรูภายในรูปหลายเหลี่ยม
หากเส้นทางที่เล็กกว่าอยู่ภายในเส้นทางที่ใหญ่กว่าทั้งหมด จะดูเหมือนว่าได้นำชิ้นส่วน ของรูปหลายเหลี่ยมออกไป
ตัวอย่างโค้ดต่อไปนี้สร้างรูปหลายเหลี่ยมที่มีรู 2 รู
Swift
let hydeParkLocation = CLLocationCoordinate2D(latitude: -33.87344, longitude: 151.21135)
let camera = GMSCameraPosition.camera(withTarget: hydeParkLocation, zoom: 16)
let mapView = GMSMapView.map(withFrame: .zero, camera: camera)
mapView.animate(to: camera)

let hydePark = "tpwmEkd|y[QVe@Pk@BsHe@mGc@iNaAKMaBIYIq@qAMo@Eo@@[Fe@DoALu@HUb@c@XUZS^ELGxOhAd@@ZB`@J^BhFRlBN\\BZ@`AFrATAJAR?rAE\\C~BIpD"
let archibaldFountain = "tlvmEqq|y[NNCXSJQOB[TI"
let reflectionPool = "bewmEwk|y[Dm@zAPEj@{AO"

let hollowPolygon = GMSPolygon()
hollowPolygon.path = GMSPath(fromEncodedPath: hydePark)
hollowPolygon.holes = [GMSPath(fromEncodedPath: archibaldFountain)!, GMSPath(fromEncodedPath: reflectionPool)!]
hollowPolygon.fillColor = UIColor(red: 1.0, green: 0.0, blue: 0.0, alpha: 0.2)
hollowPolygon.strokeColor = UIColor(red: 1.0, green: 0.0, blue: 0.0, alpha: 1.0)
hollowPolygon.strokeWidth = 2
hollowPolygon.map = mapView
Objective-C
CLLocationCoordinate2D hydeParkLocation = CLLocationCoordinate2DMake(-33.87344, 151.21135);
GMSCameraPosition *camera = [GMSCameraPosition cameraWithTarget:hydeParkLocation
                                                           zoom:16];
mapView = [GMSMapView mapWithFrame:CGRectZero camera:camera];

NSString *hydePark = @"tpwmEkd|y[QVe@Pk@BsHe@mGc@iNaAKMaBIYIq@qAMo@Eo@@[Fe@DoALu@HUb@c@XUZS^ELGxOhAd@@ZB`@J^BhFRlBN\\BZ@`AFrATAJAR?rAE\\C~BIpD";
NSString *archibaldFountain = @"tlvmEqq|y[NNCXSJQOB[TI";
NSString *reflectionPool = @"bewmEwk|y[Dm@zAPEj@{AO";

GMSPolygon *hollowPolygon = [[GMSPolygon alloc] init];
hollowPolygon.path = [GMSPath pathFromEncodedPath:hydePark];
hollowPolygon.holes = @[[GMSPath pathFromEncodedPath:archibaldFountain],
                  [GMSPath pathFromEncodedPath:reflectionPool]];
hollowPolygon.fillColor = [UIColor colorWithRed:1.0 green:0.0 blue:0.0 alpha:0.2];
hollowPolygon.strokeColor = [UIColor colorWithRed:1.0 green:0.0 blue:0.0 alpha:1.0];
hollowPolygon.strokeWidth = 2;
hollowPolygon.map = mapView;