
Android 스튜디오용 Google 지도 뷰 템플릿을 사용하여 지도를 표시하는 Android 앱을 만드세요. 설정할 Android 스튜디오 프로젝트가 이미 있는 경우에는 Android 스튜디오 프로젝트 설정을 참고하세요.
이 빠른 시작은 Kotlin 또는 Java를 사용한 기본적인 Android 개발에 익숙한 개발자를 위한 것입니다.
개발 환경에 대한 정보
이 빠른 시작은 Android 스튜디오 Hedgehog 및 Android Gradle 플러그인 버전 8.2를 사용하여 개발되었습니다.
Android 기기 설정하기
Android용 Maps SDK를 사용하는 앱을 실행하려면 Google API를 포함하는 Android 6.0 이상의 Android 기기 또는 에뮬레이터에 Android용 Maps SDK를 배포해야 합니다.
- Android 기기를 사용하려면 하드웨어 기기에서 앱 실행의 안내를 따르세요.
- Android Emulator를 사용하려면 Android 스튜디오와 함께 제공되는 Android Virtual Device(AVD) Manager를 이용해 가상 기기를 만들고 에뮬레이터를 설치하면 됩니다.
Android 스튜디오에서 Google 지도 프로젝트 만들기
Android 스튜디오에서 Google 지도 프로젝트를 만드는 절차는 Android 스튜디오 Flamingo 및 이후 출시 버전에서 변경되었습니다.
Android 스튜디오를 열고 Welcome to Android Studio 창에서 New Project를 클릭합니다.
New Project 창의 Phone and Tablet 카테고리에서 No Activity를 선택하고 Next를 클릭합니다.
New Project 양식을 작성합니다.
Language를 Java 또는 Kotlin으로 설정합니다. 두 언어 모두 Android용 Maps SDK에서 완벽하게 지원됩니다. Kotlin에 관한 자세한 내용은 Kotlin으로 Android 앱 개발을 참고하세요.
Minimum SDK를 테스트 기기와 호환되는 SDK 버전으로 설정합니다. Android용 Maps SDK 버전 20.0.x, Android API 수준 23 ('Marshmallow', Android 6.0) 이상에 필요한 최소 버전보다 높은 버전을 선택해야 합니다. SDK 버전 요구사항에 대한 최신 정보는 출시 노트를 참고하세요.
빌드 구성 언어를 Kotlin DSL 또는 Groovy DSL로 설정합니다. 두 빌드 구성 언어의 스니펫이 다음 절차에 표시되어 있습니다.
Finish를 클릭합니다.
Android 스튜디오가 Gradle을 시작하고 프로젝트를 빌드합니다. 다소 시간이 걸릴 수 있습니다.
다음과 같이 Google Maps Views Activity를 추가합니다.
- 프로젝트의
app폴더를 마우스 오른쪽 버튼으로 클릭합니다. New > Google > Google Maps Views Activity를 선택합니다.

New Android Activity 대화상자에서 Launcher Activity 체크박스를 선택합니다.
Finish를 선택합니다.
자세한 내용은 템플릿에서 코드 추가하기를 참고하세요.
- 프로젝트의
빌드가 완료되면 Android 스튜디오에서
AndroidManifest.xml및MapsActivity파일을 엽니다. 활동의 이름은 다를 수 있지만 설정 중에 구성한 것입니다.
Google Cloud 프로젝트 설정
다음 탭을 차례로 클릭하여 필요한 Cloud 콘솔 설정 단계를 완료합니다.
1단계
콘솔
-
Google Cloud 콘솔의 프로젝트 선택기 페이지에서 프로젝트 만들기를 클릭하여 새 Cloud 프로젝트를 만듭니다.
-
Cloud 프로젝트에 결제가 사용 설정되어 있어야 하므로 프로젝트에 결제가 사용 설정되어 있는지 확인합니다.
Google Cloud에서는 무료 체험판을 제공합니다. 무료 체험판은 90일 후 또는 계정에서 300달러에 해당하는 누적 비용이 발생한 시점 중 더 빠른 시점에 만료됩니다. 취소는 언제든지 가능합니다. 자세한 내용은 결제 계정 크레딧 및 결제를 참고하세요.
Cloud SDK
gcloud projects create "PROJECT"
Google Cloud SDK, Cloud SDK 설치 및 다음 명령어에 대해 자세히 알아보세요.
2단계
Google Maps Platform을 사용하려면 프로젝트에 사용할 API 또는 SDK를 사용 설정해야 합니다.
콘솔
Cloud SDK
gcloud services enable \
    --project "PROJECT" \
    "maps-android-backend.googleapis.com"
Google Cloud SDK, Cloud SDK 설치 및 다음 명령어에 대해 자세히 알아보세요.
3단계
이 단계에서는 API 키만 만듭니다. 프로덕션에서 API 키를 사용하는 경우 API 키를 제한하는 것이 좋습니다. 자세한 내용은 제품별 API 키 사용 페이지를 참고하세요.
API 키는 사용 및 결제 목적으로 프로젝트와 관련된 요청을 인증하는 고유 식별자입니다. 프로젝트에 연결된 API 키가 하나 이상 있어야 합니다.
API 키를 만들려면 다음 단계를 따르세요.
콘솔
-
Google Maps Platform > 사용자 인증 정보 페이지로 이동합니다.
-
사용자 인증 정보 페이지에서 사용자 인증 정보 만들기 > API 키를 클릭합니다.
API 키 생성 완료 대화상자에 새로 만든 API 키가 표시됩니다. -
닫기를 클릭합니다.
새 API 키는 사용자 인증 정보 페이지의 API 키 아래 나열됩니다.
(프로덕션에 사용하기 전에 API 키를 제한하세요.)
Cloud SDK
gcloud services api-keys create \
    --project "PROJECT" \
    --display-name "DISPLAY_NAME"
Google Cloud SDK, Cloud SDK 설치 및 다음 명령어에 대해 자세히 알아보세요.
앱에 API 키 추가하기
이 섹션에서는 앱이 더욱 안전하게 참조할 수 있도록 API 키를 저장하는 방법을 설명합니다. API 키는 버전 제어 시스템에 체크인하면 안 되며, 프로젝트의 루트 디렉터리에 있는 secrets.properties 파일에 저장하는 것이 좋습니다. secrets.properties 파일에 관한 자세한 내용은
Gradle 속성 파일을 참고하세요.
이 작업을 간소화하려면 Android용 Secrets Gradle 플러그인을 사용하는 것이 좋습니다.
Android용 Secrets Gradle 플러그인을 설치하고 API 키를 저장하려면 다음 단계를 따르세요.
-
Android 스튜디오에서 루트 수준
build.gradle파일을 열고 다음 코드를buildscript아래dependencies요소에 추가합니다.Groovy
buildscript {
    dependencies {
        // ...
        classpath "com.google.android.libraries.mapsplatform.secrets-gradle-plugin:secrets-gradle-plugin:2.0.1"
    }
}
Kotlin
buildscript {
    dependencies {
        // ...
        classpath("com.google.android.libraries.mapsplatform.secrets-gradle-plugin:secrets-gradle-plugin:2.0.1")
    }
}
-
앱 수준
build.gradle파일을 열고plugins요소에 다음 코드를 추가합니다.Groovy
plugins {
    id 'com.android.application'
    // ...
    id 'com.google.android.libraries.mapsplatform.secrets-gradle-plugin'
}
Kotlin
plugins {
    id("com.android.application")
    // ...
    id("com.google.android.libraries.mapsplatform.secrets-gradle-plugin")
}
- Android 스튜디오를 사용하는 경우 Gradle과 프로젝트를 동기화합니다.
-
프로젝트 수준 디렉터리에서
local.properties를 열고 다음 코드를 추가합니다.YOUR_API_KEY를 직접 생성한 API 키로 변경합니다.MAPS_API_KEY=YOUR_API_KEY
-
AndroidManifest.xml파일에서com.google.android.geo.API_KEY로 이동한 후android:value속성을 다음과 같이 업데이트합니다.<meta-data android:name="com.google.android.geo.API_KEY" android:value="${MAPS_API_KEY}" />참고:
com.google.android.geo.API_KEY는 API 키의 권장 메타데이터 이름입니다. 이 이름의 키는 Android 플랫폼에서 Android용 Maps SDK 등 여러 Google 지도 기반 API를 인증하는 데 사용할 수 있습니다. 이전 버전과의 호환성을 위해 API에서는com.google.android.maps.v2.API_KEY이름도 지원합니다. 이 기존 이름을 사용하면 Android 지도 API v2에 대한 인증만 가능합니다. 애플리케이션에서는 API 키 메타데이터 이름을 하나만 지정할 수 있습니다. 두 개가 모두 지정되면 API에서 예외가 발생합니다.
코드 보기
템플릿에서 제공되는 코드를 살펴봅니다. 특히 Android 스튜디오 프로젝트에서 다음 파일을 살펴봅니다.
지도 활동 파일
지도 활동 파일은 앱의 기본 활동으로, 지도를 관리하고 표시하기 위한
코드를 포함합니다. 기본적으로 활동을 정의하는
파일의 이름은 MapsActivity.java로 지정되거나, Kotlin을 앱의 언어로 설정하는 경우에는
MapsActivity.kt로 지정됩니다.
지도 활동의 기본 요소는 다음과 같습니다.
SupportMapFragment객체는 지도의 수명 주기를 관리하며 앱 UI의 상위 요소입니다.GoogleMap객체는 지도 데이터 및 뷰에 대한 액세스 권한을 제공합니다. Android용 Maps SDK의 기본 클래스입니다. 지도 객체 가이드에서SupportMapFragment객체와GoogleMap객체를 자세히 설명합니다.moveCamera함수는 오스트레일리아 시드니의LatLng좌표에 지도의 중심을 맞춥니다. 지도를 추가할 때 가장 먼저 구성해야 하는 설정은 지도 위치 및 카메라 설정(예: 보기 각도, 지도 방향, 확대/축소 수준)입니다. 자세한 내용은 카메라 및 뷰 가이드를 참고하세요.
모듈 Gradle 파일
모듈 build.gradle.kts 파일에는 Android용 Maps SDK에서 요구하는 다음과 같은 지도 종속 항목이 포함됩니다.
dependencies {

    // Maps SDK for Android
    implementation(libs.play.services.maps)
}
지도 종속 항목 관리에 대한 자세한 내용은 버전 관리를 참고하세요.
XML 레이아웃 파일
activity_maps.xml 파일은 앱 UI의 구조를 정의하는 XML 레이아웃
파일입니다. 이 파일은 res/layout 디렉터리에 있습니다.
activity_maps.xml 파일은 다음 요소를 포함하는 프래그먼트를
선언합니다.
tools:context는 프래그먼트의 기본 활동을 지도 활동 파일에 정의된MapsActivity로 설정합니다.android:name은 프래그먼트의 클래스 이름을 지도 활동 파일에서 사용하는 프래그먼트 유형인SupportMapFragment로 설정합니다.
XML 레이아웃 파일에는 다음 코드가 포함되어 있습니다.
<fragment xmlns:android="http://schemas.android.com/apk/res/android"
    xmlns:map="http://schemas.android.com/apk/res-auto"
    xmlns:tools="http://schemas.android.com/tools"
    android:id="@+id/map"
    android:name="com.google.android.gms.maps.SupportMapFragment"
    android:layout_width="match_parent"
    android:layout_height="match_parent"
    tools:context=".MapsActivity" />
앱 배포 및 실행하기
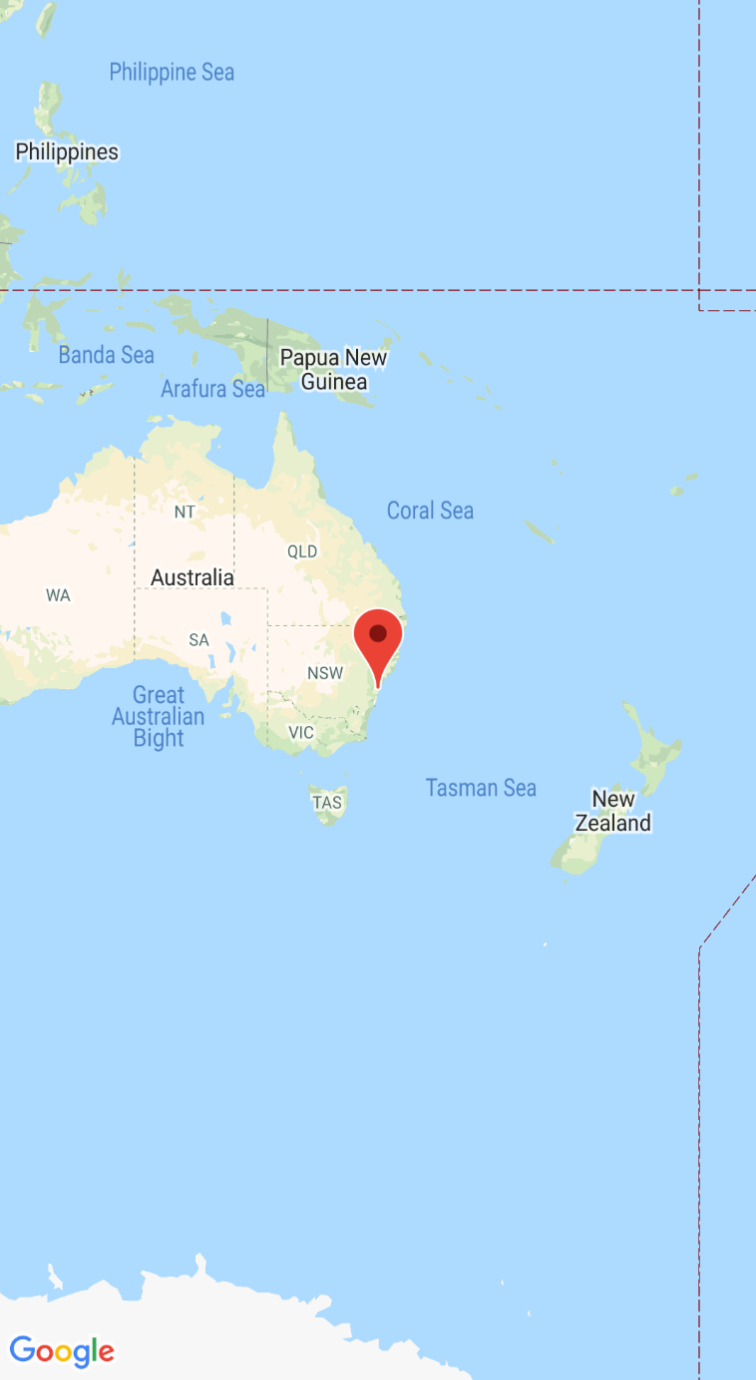
앱을 성공적으로 실행하면 다음 스크린샷에서처럼 중심에 오스트레일리아 시드니가 있고 시드니에 마커가 표시된 지도가 나타납니다.
앱을 배포하고 실행하려면 다음 안내를 따르세요.
- Android 스튜디오에서 Run 메뉴 옵션(또는 재생 버튼 아이콘)을 클릭하여 앱을 실행합니다.
- 기기를 선택하라는 메시지가 나타나면 다음 옵션 중 하나를 선택합니다.
- 컴퓨터에 연결된 Android 기기를 선택합니다.
- 또는 Launch emulator 라디오 버튼을 선택하고 설정한 가상 기기를 선택합니다.
- OK를 클릭합니다. Android 스튜디오에서 Gradle을 시작하여 앱을 빌드한 후 기기 또는 에뮬레이터에 결과를 표시합니다. 앱이 시작되기까지 몇 분 정도 걸릴 수 있습니다.
다음 단계
지도 설정: 이 문서에서는 카메라 위치, 지도 유형, UI 구성요소, 동작 등 지도의 초기 설정 및 런타임 설정 방법을 설명합니다.
Android 앱에 지도 추가(Kotlin): 이 Codelab에서는 Android용 Maps SDK의 몇 가지 추가 기능을 보여주는 앱을 시연합니다.
Maps Android KTX 라이브러리 사용: 이 Kotlin 확장 프로그램(KTX) 라이브러리를 사용하면 Android용 Maps SDK를 사용하는 동안 여러 Kotlin 언어 기능을 활용할 수 있습니다.