

প্রোজেকশন ডকুমেন্টে যেমন উল্লেখ করা হয়েছে, Earth Engine রিপ্রোজেকশনের সময় ডিফল্ট হিসেবে
নিকটতম প্রতিবেশী রিস্যাম্পলিং করে। আপনি resample() বা reduceResolution() পদ্ধতি ব্যবহার করে
এই আচরণ পরিবর্তন করতে পারবেন। বিশেষ করে, যখন এই পদ্ধতিগুলির মধ্যে একটি ইনপুট ইমেজে প্রয়োগ করা হয়, তখন ইনপুটের যেকোনও প্রয়োজনীয় রিপ্রোজেকশন নির্দেশিত রিস্যাম্পলিং বা অ্যাগ্রিগেশন পদ্ধতি ব্যবহার করে করা হবে।
রিস্যাম্পলিং
resample()-এর কারণে পরবর্তী রিপ্রোজেকশনে নির্দেশিত রিস্যাম্পলিং পদ্ধতি ('bilinear' বা
'bicubic') ব্যবহার করা হয়। যেহেতু আউটপুট প্রোজেকশনে ইনপুট চাওয়া হয়, তাই ইনপুটের উপর অন্য কোনও অপারেশন করার আগে
একটি অন্তর্নিহিত রিপ্রোজেকশন হতে পারে। এই কারণে, ইনপুট ছবিতে সরাসরি resample() কল করুন। নিচের সহজ উদাহরণটি দেখুন:
কোড এডিটর (জাভাস্ক্রিপ্ট)
// Load a Landsat image over San Francisco, California, UAS.
var landsat = ee.Image('LANDSAT/LC08/C02/T1_TOA/LC08_044034_20160323');

// Set display and visualization parameters.
Map.setCenter(-122.37383, 37.6193, 15);
var visParams = {bands: ['B4', 'B3', 'B2'], max: 0.3};

// Display the Landsat image using the default nearest neighbor resampling.
// when reprojecting to Mercator for the Code Editor map.
Map.addLayer(landsat, visParams, 'original image');

// Force the next reprojection on this image to use bicubic resampling.
var resampled = landsat.resample('bicubic');

// Display the Landsat image using bicubic resampling.
Map.addLayer(resampled, visParams, 'resampled');
import ee
import geemap.core as geemap
Colab (Python)
# Load a Landsat image over San Francisco, California, UAS.
landsat = ee.Image('LANDSAT/LC08/C02/T1_TOA/LC08_044034_20160323')

# Set display and visualization parameters.
m = geemap.Map()
m.set_center(-122.37383, 37.6193, 15)
vis_params = {'bands': ['B4', 'B3', 'B2'], 'max': 0.3}

# Display the Landsat image using the default nearest neighbor resampling.
# when reprojecting to Mercator for the Code Editor map.
m.add_layer(landsat, vis_params, 'original image')

# Force the next reprojection on this image to use bicubic resampling.
resampled = landsat.resample('bicubic')

# Display the Landsat image using bicubic resampling.
m.add_layer(resampled, vis_params, 'resampled')
মনে রাখবেন যে 'bicubic' রিস্যাম্পলিংয়ের ফলে আউটপুট পিক্সেল আসল ছবির (ছবি ১) তুলনায়
মসৃণ দেখায়।
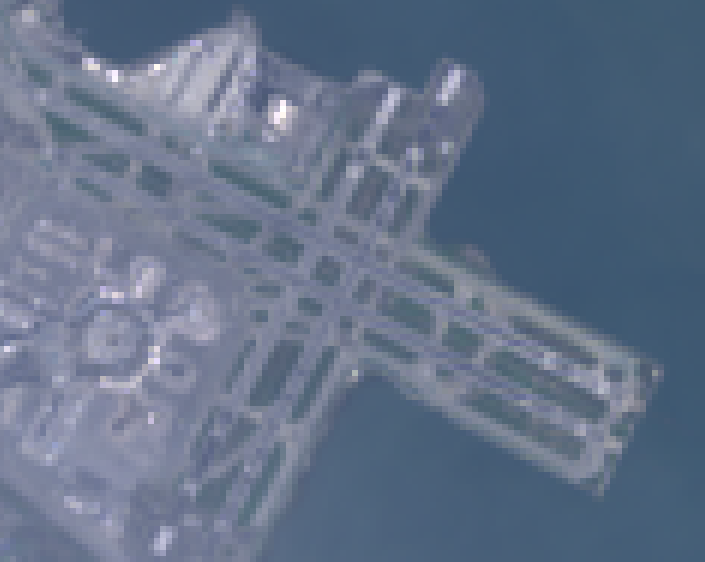
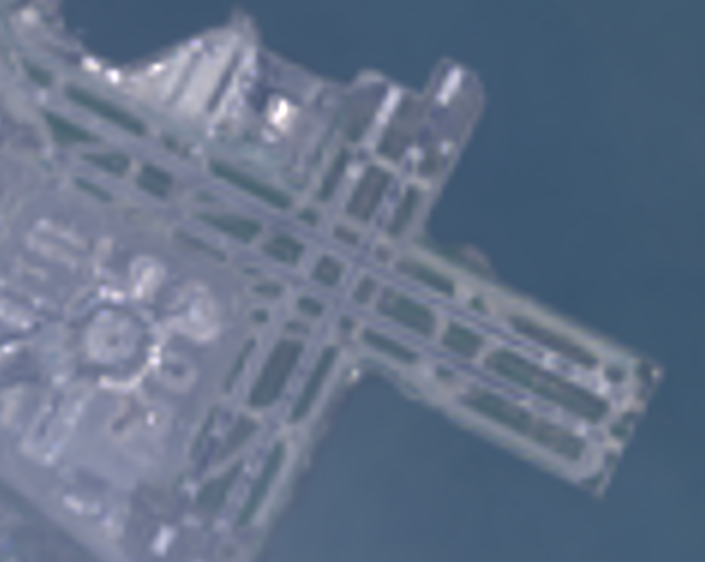
এই কোড স্যাম্পেলের জন্য অপারেশনের ক্রম চিত্র ২-এ ডায়াগ্রামের মাধ্যমে দেখানো হয়েছে। বিশেষ করে, maps mercator প্রোজেকশনে ইমপ্লিসিট রিপ্রোজেকশন ইনপুট ইমেজে নির্দিষ্ট করা রিস্যাম্পলিং পদ্ধতির মাধ্যমে করা হয়।
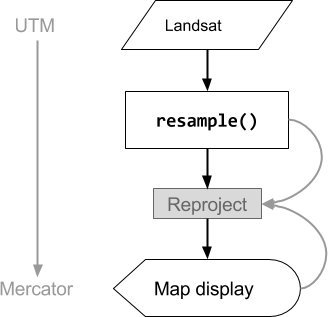
ছবি ২. কোড এডিটরে দেখানোর আগে ইনপুট ইমেজে resample() কল করা হলে
অপারেশনের ফ্লো চার্ট। বক্ররেখা রিপ্রোজেকশনে তথ্যের প্রবাহ নির্দেশ করে: বিশেষ করে, আউটপুট প্রোজেকশন, স্কেল এবং
রিস্যাম্পলিং পদ্ধতি ব্যবহার করতে হবে।
রেজোলিউশন কমান
ধরুন, রিপ্রোজেকশনের সময় রিস্যাম্পেলিং করার পরিবর্তে, আপনার লক্ষ্য হল
অন্য প্রোজেকশনে পিক্সেলগুলিকে আরও বড় পিক্সেলে অ্যাগ্রিগেট করা। এটি বিভিন্ন স্কেলে ইমেজ ডেটাসেট তুলনা করার সময় উপযোগী, যেমন Landsat-ভিত্তিক প্রোডাক্ট থেকে ৩০-মিটার পিক্সেল থেকে MODIS-ভিত্তিক প্রোডাক্ট থেকে মোটা পিক্সেল (উচ্চ স্কেল)। আপনি reduceResolution()
পদ্ধতির মাধ্যমে এই অ্যাগ্রিগেশন প্রসেস নিয়ন্ত্রণ করতে পারবেন। resample()-এর মতো, ইনপুটে reduceResolution() কল করুন, যাতে
ছবির পরবর্তী রিপ্রোজেকশন প্রভাবিত হয়। নিম্নলিখিত উদাহরণে ৩০-মিটার রেজোলিউশনে ফরেস্ট কভার ডেটার সাথে ৫০০-মিটার রেজোলিউশনে
উদ্ভিদ সূচকের তুলনা করতে reduceResolution() ব্যবহার করা হয়েছে:
কোড এডিটর (জাভাস্ক্রিপ্ট)
// Load a MODIS EVI image.
var modis = ee.Image(ee.ImageCollection('MODIS/061/MOD13A1').first())
    .select('EVI');

// Display the EVI image near La Honda, California.
Map.setCenter(-122.3616, 37.5331, 12);
Map.addLayer(modis, {min: 2000, max: 5000}, 'MODIS EVI');

// Get information about the MODIS projection.
var modisProjection = modis.projection();
print('MODIS projection:', modisProjection);

// Load and display forest cover data at 30 meters resolution.
var forest = ee.Image('UMD/hansen/global_forest_change_2025_v1_13')
    .select('treecover2000');
Map.addLayer(forest, {max: 80}, 'forest cover 30 m');

// Get the forest cover data at MODIS scale and projection.
var forestMean = forest
    // Force the next reprojection to aggregate instead of resampling.
    .reduceResolution({
      reducer: ee.Reducer.mean(),
      maxPixels: 1024
    })
    // Request the data at the scale and projection of the MODIS image.
    .reproject({
      crs: modisProjection
    });

// Display the aggregated, reprojected forest cover data.
Map.addLayer(forestMean, {max: 80}, 'forest cover at MODIS scale');
import ee
import geemap.core as geemap
Colab (Python)
# Load a MODIS EVI image.
modis = ee.Image(ee.ImageCollection('MODIS/061/MOD13A1').first()).select('EVI')

# Display the EVI image near La Honda, California.
m.set_center(-122.3616, 37.5331, 12)
m.add_layer(modis, {'min': 2000, 'max': 5000}, 'MODIS EVI')

# Get information about the MODIS projection.
modis_projection = modis.projection()
display('MODIS projection:', modis_projection)

# Load and display forest cover data at 30 meters resolution.
forest = ee.Image('UMD/hansen/global_forest_change_2025_v1_13').select(
    'treecover2000'
)
m.add_layer(forest, {'max': 80}, 'forest cover 30 m')

# Get the forest cover data at MODIS scale and projection.
forest_mean = (
    forest
    # Force the next reprojection to aggregate instead of resampling.
    .reduceResolution(reducer=ee.Reducer.mean(), maxPixels=1024)
    # Request the data at the scale and projection of the MODIS image.
    .reproject(crs=modis_projection)
)

# Display the aggregated, reprojected forest cover data.
m.add_layer(forest_mean, {'max': 80}, 'forest cover at MODIS scale')
এই উদাহরণে, লক্ষ্য করুন যে আউটপুট প্রোজেকশন স্পষ্টভাবে
reproject()-এর সাথে সেট করা আছে। MODIS সাইনুসয়ডাল প্রজেকশনে রিপ্রোজেকশন করার সময়, রিস্যাম্পেলিং করার পরিবর্তে, ছোট পিক্সেলগুলি নির্দিষ্ট রিডিউসারের (উদাহরণে ee.Reducer.mean()) সাথে অ্যাগ্রিগেট করা হয়। এই সিকোয়েন্স
অপারেশন চিত্র ৩-এ দেখানো হয়েছে। যদিও এই উদাহরণে reduceResolution()-এর প্রভাব ভিজ্যুয়ালাইজ করতে সাহায্য করার জন্য
reproject() ব্যবহার করা হয়েছে, বেশিরভাগ স্ক্রিপ্টের
স্পষ্টভাবে রিপ্রোজেক্ট করার প্রয়োজন নেই; সতর্কতা
এখানে দেখুন।
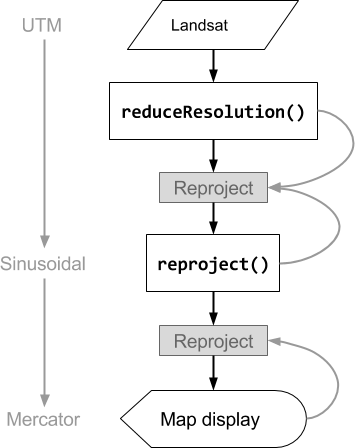
ছবি ৩. reproject()-এর আগে ইনপুট ইমেজে reduceResolution() কল করা হলে,
অপারেশনের ফ্লো চার্ট। বক্ররেখা রিপ্রোজেকশনে তথ্যের প্রবাহ নির্দেশ করে: বিশেষ করে, আউটপুট প্রজেকশন, স্কেল এবং
পিক্সেল অ্যাগ্রিগেশন পদ্ধতি ব্যবহার করতে হবে।
ReduceResolution-এর জন্য পিক্সেল ওয়েট
reduceResolution() অ্যাগ্রিগেশন প্রসেসের সময় ব্যবহৃত পিক্সেলের ওয়েট
ছোট পিক্সেল অ্যাগ্রিগেট করা এবং আউটপুট প্রোজেকশন দ্বারা নির্দিষ্ট করা বড় পিক্সেলের
মধ্যে ওভারল্যাপের উপর নির্ভর করে। এটি ৪ নম্বর ছবিতে
দেখানো হয়েছে।
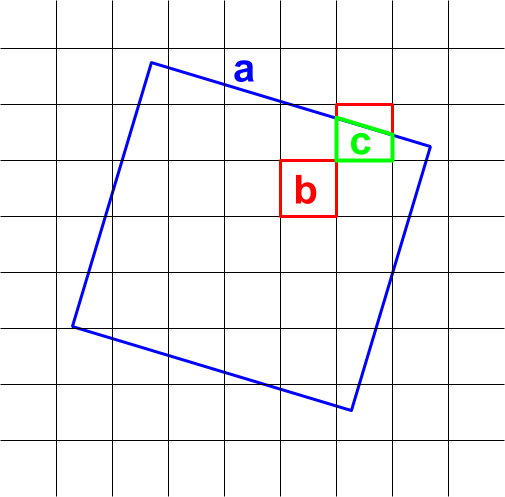
ছবি ৪. reduceResolution()-এর জন্য
ইনপুট পিক্সেল (কালো) এবং আউটপুট পিক্সেল (নীল)।
ডিফল্ট অ্যাকশন হল ইনপুট পিক্সেল ওয়েটকে আউটপুট পিক্সেল এরিয়ার ভগ্নাংশ হিসেবে গণনা করা হয়,
যা ইনপুট পিক্সেল দ্বারা কভার করা হয়। ডায়াগ্রামে, আউটপুট
পিক্সেলের ক্ষেত্রফল হল a, ইন্টারসেকশন ক্ষেত্রফল b সহ ইনপুট পিক্সেলের ওয়েট
b/a হিসেবে এবং ইন্টারসেকশন ক্ষেত্রফল c সহ ইনপুট পিক্সেলের ওয়েট
c/a হিসেবে গণনা করা হয়। গড় রিডিউসার ছাড়া অন্য কোনও রিডিউসার ব্যবহার করার সময়
এই আচরণের ফলে অপ্রত্যাশিত ফলাফল দেখা যেতে পারে। যেমন, প্রতি পিক্সেলে বনাঞ্চলের পরিমাণ গণনা করতে, পিক্সেলের কত অংশ ঢাকা পড়েছে তা গণনা করার জন্য গড় রিডিউসার ব্যবহার করুন, তারপর
ক্ষেত্রফল দিয়ে গুণ করুন (ছোট পিক্সেলে ক্ষেত্রফল গণনা করে তারপর যোগ রিডিউসার দিয়ে
সেগুলি যোগ করার পরিবর্তে):
কোড এডিটর (জাভাস্ক্রিপ্ট)
// Compute forest area per MODIS pixel.
var forestArea = forest.gt(0)
    // Force the next reprojection to aggregate instead of resampling.
    .reduceResolution({
      reducer: ee.Reducer.mean(),
      maxPixels: 1024
    })
    // The reduce resolution returns the fraction of the MODIS pixel
    // that's covered by 30 meter forest pixels.  Convert to area
    // after the reduceResolution() call.
    .multiply(ee.Image.pixelArea())
    // Request the data at the scale and projection of the MODIS image.
    .reproject({
      crs: modisProjection
    });
Map.addLayer(forestArea, {max: 500 * 500}, 'forested area at MODIS scale');
import ee
import geemap.core as geemap
Colab (Python)
# Compute forest area per MODIS pixel.
forest_area = (
    forest.gt(0)
    # Force the next reprojection to aggregate instead of resampling.
    .reduceResolution(reducer=ee.Reducer.mean(), maxPixels=1024)
    # The reduce resolution returns the fraction of the MODIS pixel
    # that's covered by 30 meter forest pixels.  Convert to area
    # after the reduceResolution() call.
    .multiply(ee.Image.pixelArea())
    # Request the data at the scale and projection of the MODIS image.
    .reproject(crs=modis_projection)
)
m.add_layer(forest_area, {'max': 500 * 500}, 'forested area at MODIS scale')
m