
모바일 계정 내에서 직접 계정 연결을 완료하면 사용자가 서비스의 계정을 Google 계정과 연결할 수 있습니다. 설정된 링크는 사용자가 공유하는 데 동의한 데이터에 대해 Google에 액세스 권한을 부여합니다.
이 접근 방식은 어시스턴트 대화가 아닌 앱의 익숙한 컨텍스트 내에서 사용자의 참여를 유도하여 계정 연결 성능을 개선합니다. 사용자 온보딩, 설정, 기타 앱 표시 경로에 통합하여 Google 어시스턴트 작업을 발견하고 참여할 기회를 만들 수 있습니다. 예를 들어 연결 후 사용자를 바로 작업으로 안내할 수 있습니다.
사용자에게 제공되는 이점은 다음과 같습니다.
- 사용자는 익숙한 계정인 앱에서 계정 연결 절차를 시작하고 완료할 수 있습니다.
- 사용자는 기기 및 모바일 앱에서 이미 인증되었으므로 로그인 사용자 인증 정보가 필요하지 않습니다.
개발자에게 제공되는 이점은 다음과 같습니다.
- 사용자 설정, 전면 광고, 사용자가 모바일 앱에 로그인한 후 등 모바일 앱에서 계정 연결을 홍보하고 시작할 위치를 관리합니다. 계정 연결을 시작하는 데 여러 진입점을 추가하면 계정을 더 쉽게 검색할 수 있습니다. 그 결과 참여도를 높이고 연결된 계정의 수가 증가했습니다.
- 사용자가 표준 웹 기반 OAuth 흐름보다 적은 단계로 연결 프로세스를 완료할 수 있으므로 전환율이 증가합니다.
- 이미 구현되어 있다고 가정하면 이 흐름은 기존 OAuth2.0 구현을 활용하기 때문에 플랫폼 (Android)에서 링크를 구현하는 데 필요한 엔지니어링 작업이 적습니다.
- 사용자가 로그인 사용자 인증 정보를 다시 입력하지 않아도 되고 더 적은 단계로 프로세스를 완료할 수 있으므로 이탈률을 낮출 수 있습니다. 사용자가 로그인 사용자 인증 정보를 기억하고 입력해야 하는 절차에서 중단율이 80% 까지 높아질 수 있습니다.
작동 방식
플랫폼에서 연결은 다음 단계로 완료됩니다.
- 사용자가 모바일 앱에서 연결 트리거를 클릭하거나 전환합니다.
- 사용자가 연결할 Google 계정을 선택합니다.
- 사용자가 연결할 기존 Google 계정을 기기에서 선택하거나 새 계정으로 로그인합니다.
- 사용자에게 Google 호스팅 동의 화면이 표시되며, 계속하려면 동의해야 하고 연결 프로세스를 중지하려면 취소해야 합니다.
- 사용자에게 동의 화면이 표시되며, 계속하려면 동의해야 하고 연결 프로세스를 중지하려면 취소해야 합니다.
- 사용자의 계정(서비스에 있음)과 Google 계정 간에 연결이 설정됩니다.
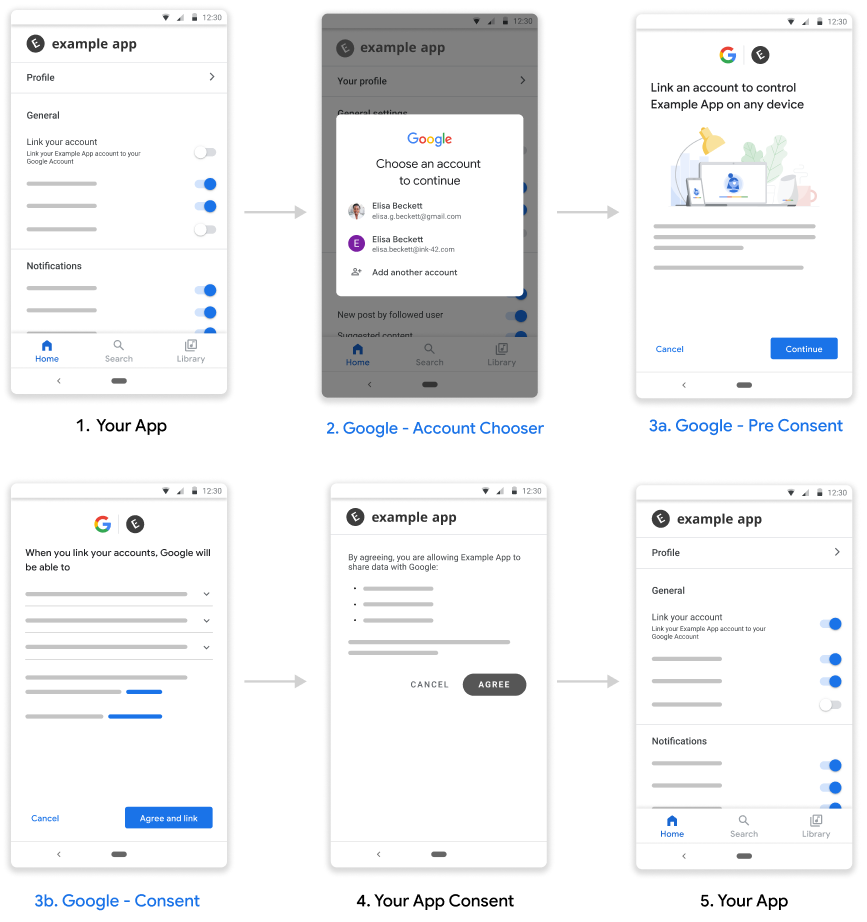
그림 1. 플랫폼 흐름에서 연결
요구사항
플랫폼에서 링크를 구현하려면 다음이 필요합니다.
- Android 앱
- OAuth 2.0 승인 코드 플로우를 지원하는 OAuth 2.0 서버를 소유, 관리, 유지합니다.
설정
아래 단계를 진행하기 전에 계정 연결 등록 절차를 완료해야 합니다.
개발 환경 설정
개발 호스트에서 최신 Google Play 서비스를 가져옵니다.
- Android SDK Manager를 엽니다.
SDK 도구에서 Google Play 서비스를 찾습니다.
이러한 패키지의 상태가 '설치됨'이 아닌 경우 두 패키지를 모두 선택하고 패키지 설치를 클릭합니다.
앱 구성
프로젝트 수준
build.gradle파일의buildscript및allprojects섹션에 Google의 Maven 저장소를 포함합니다.buildscript { repositories { google() } } allprojects { repositories { google() } }모듈의 앱 수준 Gradle 파일(일반적으로
app/build.gradle)에 'Google 계정 연동' API의 종속 항목을 추가합니다.dependencies { implementation 'com.google.android.gms:play-services-auth:21.5.1' }
플랫폼에서 링크 지원 추가
플랫폼에서 연결 흐름을 진행하면 서비스에서 제공하는 액세스 토큰이 Google에 저장됩니다. 사용자 토큰을 반환하기 전에 동의를 받아야 합니다.
다음 단계에 따라 사용자로부터 동의를 받고 Google Play 서비스 SDK를 통해 승인 코드 토큰을 반환합니다.
동의 활동을 실행할 수 있는 PendingIntent를 빌드합니다. 동의는 Play 서비스 API에 의해 실행됩니다. API가 호출될 때
PendingIntent(명확히 하자면consentPendingIntent)를 제공해야 합니다.Kotlin
// Build a PendingIntent that can launch the consent activity
val consentPendingIntent = buildConsentPendingIntent()
자바
// Build a PendingIntent that can launch your consent activity
PendingIntent consentPendingIntent =
          buildConsentPendingIntent();
동의 인텐트를 처리하는 해당 활동 만들기
Kotlin
  class ConsentActivity : AppCompatActivity

  private fun onConsentAccepted() {
      // Obtain a token (for simplicity, we’ll ignore the async nature
      // of the following call)
      val token = getToken()
      val intent = Intent()
                  .putExtra(SaveAccountLinkingTokenRequest.EXTRA_TOKEN,
                            token)
      setResult(Activity.RESULT_OK, intent)
      finish()
  }

  private fun onConsentRejectedOrCanceled() {
      setResult(Activity.RESULT_CANCELED)
      finish()
  }
자바
  public class ConsentActivity extends AppCompatActivity {
    ...
    private void onConsentAccepted() {
      // Obtain a token (for simplicity, we’ll ignore the async nature of
      // the following call
      String token = getToken();
      Intent intent = new Intent();
      intent.putExtra(SaveAccountLinkingTokenRequest.EXTRA_TOKEN, token);
      setResult(Activity.RESULT_OK, intent);
      finish();
    }

    private void onConsentRejectedOrCanceled() {
      setResult(Activity.RESULT_CANCELED, null);
      finish();
    }
 }
사용자가 동의를 수락하거나 거부/취소하면 각각
onConsentAccpeted()및onConsentRejectedOrCanceled()메서드가 호출된다고 가정합니다.토큰을 저장하는 요청을 만들고 다른 구성 매개변수 중에서 위의 1단계에서 만든
PendingIntent를 전달합니다.Kotlin
  // Create an ActivityResultLauncher which registers a callback for the
  // Activity result contract
  val activityResultLauncher = registerForActivityResult(
    ActivityResultContracts.StartIntentSenderForResult())
    { result ->
      if (result.resultCode == RESULT_OK) {
        // Successfully finished the flow and saved the token
      } else {
        // Flow failed, for example the user may have canceled the flow
      }
    }

  // Build token save request
  val request = SaveAccountLinkingTokenRequest.builder()
    .setTokenType(SaveAccountLinkingTokenRequest.TOKEN_TYPE_AUTH_CODE)
    .setConsentPendingIntent(consentPendingIntent)
    .setServiceId("service-id-of-and-defined-by-developer")
    //Set the scopes that the token is valid for on your platform
    .setScopes(scopes)
    .build()

   // Launch consent activity and retrieve token
   Identity.getCredentialSavingClient(this)
     .saveAccountLinkingToken(request)
     .addOnSuccessListener( saveAccountLinkingTokenResult -> {
        if (saveAccountLinkingTokenResult.hasResolution()) {
          val pendingIntent = saveAccountLinkingTokenResult
                              .getPendingIntent()
          val intentSenderRequest = IntentSenderRequest
                                    .Builder(pendingIntent).build()
          activityResultLauncher.launch(intentSenderRequest)
        } else {
           // This should not happen, let’s log this
           Log.e(TAG, "Failed to save token");
        }
      })
      .addOnFailureListener(e -> Log.e(TAG, “Failed to save token”, e))
자바
  // Create an ActivityResultLauncher which registers a callback for the
  // Activity result contract
  ActivityResultLauncher<IntentSenderRequest>
      activityResultLauncher =
      registerForActivityResult(new ActivityResultContracts
                                    .StartIntentSenderForResult(),
                                result -> {
      if (result.getResultCode() == RESULT_OK) {
          // Successfully finished the flow and saved the token
      } else {
          // Flow failed, for example the user may have canceled the flow
      }
  });

 // Build token save request
 SaveAccountLinkingTokenRequest request =
    SaveAccountLinkingTokenRequest.builder()
        .setTokenType(
            SaveAccountLinkingTokenRequest.TOKEN_TYPE_AUTH_CODE)
        .setConsentPendingIntent(consentPendingIntent)
        .setServiceId("service-id-of-and-defined-by-developer")
        //Set the scopes that the token is valid for on your platform
        .setScopes(scopes)
        .build();

  // Launch consent activity and retrieve token
  Identity.getCredentialSavingClient(this)
      .saveAccountLinkingToken(request)
      .addOnSuccessListener(
          saveAccountLinkingTokenResult -> {
            if (saveAccountLinkingTokenResult.hasResolution()) {
              // Launch the resolution intent
              PendingIntent pendingIntent =
                  saveAccountLinkingTokenResult.getPendingIntent();
              IntentSenderRequest intentSenderRequest =
                  new IntentSenderRequest.Builder(pendingIntent).build();
              activityResultLauncher.launch(intentSenderRequest);
            } else {
              // This should not happen, let’s log this
              Log.e(TAG, "Failed to save token");
            }
          })
      .addOnFailureListener(e -> Log.e(TAG, "Failed to save token", e));
  ```
위 단계에서는 사용자에게 동의를 요청하고 Google에 승인 코드를 반환합니다.
권장사항
앱은 버튼, 전환 스위치 또는 유사한 시각적 요소를 통해 사용자에게 연결 상태를 표시해야 합니다.

그림 1. 샘플 링크 상태 이미지
연결이 완료되면 사용자에게 알림을 보내야 합니다(예: 토스트 메시지 표시, 전환 상태 변경 트리거, 사용자를 별도의 연결 성공 페이지로 리디렉션).
앱 내 사용자에게 계정 연결을 요청하는 것을 고려해야 합니다. 계정 연결이 사용자에게 도움이 된다는 강력한 신호를 기반으로 하는 것이 좋습니다.
연결이 완료되면 연결된 계정으로 할 수 있는 작업의 예를 사용자에게 제공해야 합니다. 예를 들어 음악 스트리밍 서비스를 연결한 경우 Google 어시스턴트에게 음악을 재생해 달라고 요청합니다.
사용자가 연결된 계정을 관리할 수 있도록 지원합니다(연결 해제 옵션 포함). Google 연결 계정 관리 페이지(https://myaccount.google.com/accountlinking)로 안내합니다.