
Google Apps Script 프로젝트는 Google Docs, Google Sheets 또는 Google Forms에 바인딩되어 미리 빌드된 알림, 프롬프트, 토스트 메시지, 대화상자, 사이드바와 같은 사용자 인터페이스 요소를 표시할 수 있습니다. 이러한 요소는 일반적으로 맞춤 HTML 서비스 콘텐츠를 포함하며 메뉴 항목에서 열리는 경우가 많습니다. Forms에서 사용자 인터페이스 요소는 양식을 열어 수정하는 편집자에게만 표시되며 응답자에게는 표시되지 않습니다.
알림 대화상자

알림은 Docs, Sheets, Slides 또는 Forms 편집기 내에서 열리는 미리 빌드된 대화상자입니다. 메시지와 확인 버튼을 표시하며 제목과 대체 버튼은 선택사항입니다. 웹브라우저 내에서 클라이언트 측 JavaScript에서
window.alert
를 호출하는 것과 비슷합니다.
알림은 대화상자가 열려 있는 동안 서버 측 스크립트를 일시중지합니다. 사용자가 대화상자를 닫으면 스크립트 가 재개되지만 JDBC 연결은 일시중지 상태에서 유지되지 않습니다.
다음 예와 같이 Docs, Forms,
Slides, Sheets는 모두 세 가지 변형으로 제공되는
Ui.alert 메서드를 사용합니다. 기본 확인 버튼을 재정의하려면
Ui.ButtonSet enum의 값을 buttons
인수로 전달합니다. 사용자가 클릭한 버튼을 평가하려면 반환 값
alert을 Ui.Button enum과 비교합니다.
function onOpen() {
  SpreadsheetApp.getUi() // Or DocumentApp or SlidesApp or FormApp.
    .createMenu("Custom Menu")
    .addItem("Show alert", "showAlert")
    .addToUi();
}

function showAlert() {
  const ui = SpreadsheetApp.getUi(); // Same variations.

  const result = ui.alert(
    "Please confirm",
    "Are you sure you want to continue?",
    ui.ButtonSet.YES_NO,
  );

  // Process the user's response.
  if (result === ui.Button.YES) {
    // User clicked "Yes".
    ui.alert("Confirmation received.");
  } else {
    // User clicked "No" or X in the title bar.
    ui.alert("Permission denied.");
  }
}
프롬프트 대화상자
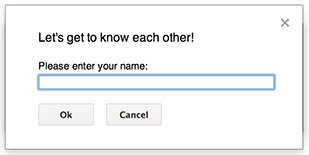
프롬프트는 Docs, Sheets, Slides 또는 Forms 편집기 내에서 열리는 미리 빌드된 대화상자입니다. 메시지, 텍스트 입력란, 확인 버튼을 표시하며 제목과 대체 버튼은 선택사항입니다. 웹브라우저 내에서 클라이언트 측 JavaScript에서
window.prompt
를 호출하는 것과 비슷합니다.
프롬프트는 대화상자가 열려 있는 동안 서버 측 스크립트를 일시중지합니다. 사용자가 대화상자를 닫으면 스크립트 가 재개되지만 JDBC 연결은 일시중지 상태에서 유지되지 않습니다.
다음 예와 같이 Docs, Forms,
Slides, Sheets는 모두 세 가지 변형으로 제공되는
Ui.prompt 메서드를 사용합니다. 기본 확인 버튼을 재정의하려면 Ui.ButtonSet enum의 값을
buttons 인수로 전달합니다. 사용자의 응답을 평가하려면 prompt의 반환 값을 캡처한 후 PromptResponse.getResponseText을 호출하여 사용자의 입력을 가져오고 PromptResponse.getSelectedButton의 반환 값을 Ui.Button enum과 비교합니다.
function onOpen() {
  SpreadsheetApp.getUi() // Or DocumentApp or SlidesApp or FormApp.
    .createMenu("Custom Menu")
    .addItem("Show prompt", "showPrompt")
    .addToUi();
}

function showPrompt() {
  const ui = SpreadsheetApp.getUi(); // Same variations.

  const result = ui.prompt(
    "Let's get to know each other!",
    "Please enter your name:",
    ui.ButtonSet.OK_CANCEL,
  );

  // Process the user's response.
  const button = result.getSelectedButton();
  const text = result.getResponseText();
  if (button === ui.Button.OK) {
    // User clicked "OK".
    ui.alert("Your name is " + text + ".");
  } else if (button === ui.Button.CANCEL) {
    // User clicked "Cancel".
    ui.alert("I didn't get your name.");
  } else if (button === ui.Button.CLOSE) {
    // User clicked X in the title bar.
    ui.alert("You closed the dialog.");
  }
}
스프레드시트 토스트 메시지
'토스트 메시지'는 Sheets 편집기의 오른쪽 하단에 있는 작은 대화상자 창으로 메시지를 표시하지만 스크립트를 일시중지하지는 않습니다. 사용자 상호작용이 필요하지 않은 상태 메시지 또는 업데이트를 표시하는 데 유용합니다.
다음 예와 같이 Sheets는 메서드를 사용합니다.
Spreadsheet.toast
토스트 메시지는 Sheets에서만 사용할 수 있습니다.
function showToast() {
  SpreadsheetApp.getActiveSpreadsheet().toast("Task completed successfully.");
}
맞춤 대화상자

맞춤 대화상자는 HTML 서비스 사용자 인터페이스를 Docs, Sheets, Slides 또는 Forms 편집기 내에 표시할 수 있습니다.
맞춤 대화상자는 대화상자가 열려 있는 동안 서버 측 스크립트를 일시중지하지 않습니다.
비동기식이므로 대화상자를 여는 서버 측 함수가 즉시 완료됩니다. 맞춤 대화상자에서 서버로 데이터를 다시 전달하려면
google.script API를 클라이언트 측 코드에서 사용합니다.
대화상자는 HTML 서비스 인터페이스의 클라이언트 측에서
google.script.host.close
를 호출하여 자체적으로 닫을 수 있습니다. 대화상자는 다른 인터페이스가 아닌 사용자 또는 자체적으로만 닫을 수 있습니다.
다음 예와 같이 Docs, Forms,
Slides, Sheets는 모두 메서드
Ui.showModalDialog
를 사용하여 대화상자를 엽니다.
Code.gs
function onOpen() {
  SpreadsheetApp.getUi() // Or DocumentApp or SlidesApp or FormApp.
      .createMenu('Custom Menu')
      .addItem('Show dialog', 'showDialog')
      .addToUi();
}

function showDialog() {
  const html = HtmlService.createHtmlOutputFromFile('Page')
      .setWidth(400)
      .setHeight(300);
  SpreadsheetApp.getUi() // Or DocumentApp or SlidesApp or FormApp.
      .showModalDialog(html, 'My custom dialog');
}
Page.html
Hello, world! <input type="button" value="Close" onclick="google.script.host.close()" />
맞춤 사이드바

사이드바는 Docs, Forms, Slides, Sheets 편집기 내에 HTML 서비스 사용자 인터페이스를 표시할 수 있습니다.
사이드바는 대화상자가 열려 있는 동안 서버 측 스크립트를 일시중지하지 않습니다. 클라이언트 측 구성요소는 HTML 서비스 인터페이스의 google.script API를 사용하여 서버 측 스크립트에 비동기 호출을 할 수 있습니다.
사이드바는 HTML 서비스 인터페이스의 클라이언트 측에서
google.script.host.close
를 호출하여 자체적으로 닫을 수 있습니다. 사이드바는 다른 인터페이스가 아닌 사용자 또는 자체적으로만 닫을 수 있습니다.
다음 예와 같이 Docs, Forms,
Slides, Sheets는 모두 메서드
Ui.showSidebar를 사용하여
사이드바를 엽니다.
Code.gs
function onOpen() {
  SpreadsheetApp.getUi() // Or DocumentApp or SlidesApp or FormApp.
      .createMenu('Custom Menu')
      .addItem('Show sidebar', 'showSidebar')
      .addToUi();
}

function showSidebar() {
  const html = HtmlService.createHtmlOutputFromFile('Page')
      .setTitle('My custom sidebar');
  SpreadsheetApp.getUi() // Or DocumentApp or SlidesApp or FormApp.
      .showSidebar(html);
}
Page.html
Hello, world! <input type="button" value="Close" onclick="google.script.host.close()" />
파일 열기 대화상자
Google Picker는 사용자가 Google Drive 파일을 선택하거나 업로드할 수 있는 JavaScript API입니다. HTML 서비스에서 Google Picker 라이브러리를 사용하여 사용자가 기존 파일을 선택하거나 새 파일을 업로드할 수 있는 맞춤 대화상자를 만든 후 선택사항을 스크립트에 다시 전달합니다.
요구사항
Google Apps Script에서 Google Picker를 사용하려면 다음과 같은 몇 가지 요구사항이 있습니다.
스크립트 프로젝트는 표준 Google Cloud 프로젝트를 사용해야 합니다.
동일한 Cloud 프로젝트 번호를
PickerBuilder.setAppId에 전달합니다.drive.file범위를 사용하는 경우Apps Script 프로젝트 매니페스트는 Google Picker API에 필요한 승인 범위를 지정해야
ScriptApp.getOAuthToken가PickerBuilder.setOauthtoken의 올바른 토큰을 반환합니다.PickerBuilder.setDeveloperKey에 설정된 API 키를 Apps Script로 제한합니다. 애플리케이션 제한사항에서 다음 단계를 따르세요.- HTTP 리퍼러 (웹사이트) 를 선택합니다.
- **웹사이트 제한사항** 에서 **항목 추가** 를 클릭합니다.
- 리퍼러 를 클릭하고
*.google.com을 입력합니다. - 다른 항목을 추가하고
*.googleusercontent.com을 리퍼러로 입력합니다. - 완료 를 클릭합니다.
PickerBuilder.setOrigin을 호출합니다.
예
다음 예는 Apps Script의 Google Picker를 보여줍니다.