Google Workspace ডকুমেন্টে ডায়ালগ এবং সাইডবার

Google Docs, Google Sheets, বা Google Forms-এর সাথে সংযুক্ত Google Apps Script প্রোজেক্টগুলো ইউজার-ইন্টারফেস এলিমেন্ট, যেমন আগে থেকে তৈরি অ্যালার্ট, প্রম্পট, টোস্ট, ডায়ালগ এবং সাইডবার প্রদর্শন করতে পারে। এই এলিমেন্টগুলোতে সাধারণত কাস্টম HTML সার্ভিস কন্টেন্ট থাকে এবং এগুলো প্রায়শই মেনু আইটেম থেকে খোলা হয়। Forms-এ, ইউজার-ইন্টারফেস এলিমেন্টগুলো শুধুমাত্র সেই এডিটরের কাছে দৃশ্যমান হয় যিনি ফর্মটি পরিবর্তন করার জন্য খোলেন, কোনো রেসপন্ডেন্টের কাছে নয়।

সতর্কীকরণ ডায়ালগ

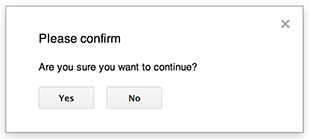
অ্যালার্ট হলো একটি পূর্ব-নির্মিত ডায়ালগ বক্স যা ডকস, শীটস, স্লাইডস বা ফর্মস এডিটরের ভিতরে খোলে। এটি একটি বার্তা এবং একটি ওকে (OK) বাটন প্রদর্শন করে; একটি শিরোনাম এবং বিকল্প বাটনগুলো ঐচ্ছিক। এটি একটি ওয়েব ব্রাউজারের মধ্যে ক্লায়েন্ট-সাইড জাভাস্ক্রিপ্টে window.alert কল করার অনুরূপ।

ডায়ালগটি খোলা থাকা অবস্থায় অ্যালার্টগুলো সার্ভার-সাইড স্ক্রিপ্টকে স্থগিত করে দেয়। ব্যবহারকারী ডায়ালগটি বন্ধ করার পর স্ক্রিপ্টটি আবার চালু হয়, কিন্তু এই স্থগিতাবস্থার সময় JDBC সংযোগগুলো স্থায়ী থাকে না।

নিচের উদাহরণে যেমন দেখানো হয়েছে, Docs, Forms, Slides, এবং Sheets সবগুলোই Ui.alert মেথডটি ব্যবহার করে, যার তিনটি ভ্যারিয়েন্ট রয়েছে। ডিফল্ট OK বাটনটি ওভাররাইড করতে, buttons আর্গুমেন্ট হিসেবে Ui.ButtonSet enum থেকে একটি ভ্যালু পাস করুন। ব্যবহারকারী কোন বাটনটি ক্লিক করেছেন তা মূল্যায়ন করতে, alert এর রিটার্ন ভ্যালুটি Ui.Button enum-এর সাথে তুলনা করুন।

function onOpen() {
  SpreadsheetApp.getUi() // Or DocumentApp or SlidesApp or FormApp.
    .createMenu("Custom Menu")
    .addItem("Show alert", "showAlert")
    .addToUi();
}

function showAlert() {
  const ui = SpreadsheetApp.getUi(); // Same variations.

  const result = ui.alert(
    "Please confirm",
    "Are you sure you want to continue?",
    ui.ButtonSet.YES_NO,
  );

  // Process the user's response.
  if (result === ui.Button.YES) {
    // User clicked "Yes".
    ui.alert("Confirmation received.");
  } else {
    // User clicked "No" or X in the title bar.
    ui.alert("Permission denied.");
  }
}

প্রম্পট ডায়ালগ

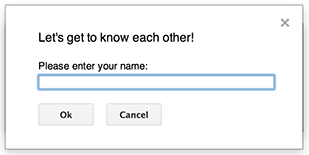
প্রম্পট হলো একটি পূর্ব-নির্মিত ডায়ালগ বক্স যা ডকস, শীটস, স্লাইডস বা ফর্মস এডিটরের ভিতরে খোলে। এটি একটি বার্তা, একটি টেক্সট-ইনপুট ফিল্ড এবং একটি ওকে বাটন প্রদর্শন করে; একটি শিরোনাম এবং বিকল্প বাটনগুলো ঐচ্ছিক। এটি একটি ওয়েব ব্রাউজারের মধ্যে ক্লায়েন্ট-সাইড জাভাস্ক্রিপ্টে window.prompt কল করার অনুরূপ।

ডায়ালগটি খোলা থাকা অবস্থায় প্রম্পটগুলো সার্ভার-সাইড স্ক্রিপ্টকে স্থগিত করে রাখে। ব্যবহারকারী ডায়ালগটি বন্ধ করার পর স্ক্রিপ্টটি আবার চালু হয়, কিন্তু এই স্থগিতাবস্থার সময় JDBC সংযোগগুলো স্থায়ী থাকে না।

নিম্নলিখিত উদাহরণে যেমন দেখানো হয়েছে, Docs, Forms, Slides, এবং Sheets সবগুলোই Ui.prompt মেথডটি ব্যবহার করে, যা তিনটি ভ্যারিয়েন্টে উপলব্ধ। ডিফল্ট OK বাটনটি ওভাররাইড করতে, buttons আর্গুমেন্ট হিসেবে Ui.ButtonSet enum থেকে একটি ভ্যালু পাস করুন। ব্যবহারকারীর প্রতিক্রিয়া মূল্যায়ন করতে, prompt এর রিটার্ন ভ্যালুটি ক্যাপচার করুন, তারপর ব্যবহারকারীর ইনপুট পুনরুদ্ধার করতে PromptResponse.getResponseText কল করুন, এবং PromptResponse.getSelectedButton এর রিটার্ন ভ্যালুটি Ui.Button enum-এর সাথে তুলনা করুন।

function onOpen() {
  SpreadsheetApp.getUi() // Or DocumentApp or SlidesApp or FormApp.
    .createMenu("Custom Menu")
    .addItem("Show prompt", "showPrompt")
    .addToUi();
}

function showPrompt() {
  const ui = SpreadsheetApp.getUi(); // Same variations.

  const result = ui.prompt(
    "Let's get to know each other!",
    "Please enter your name:",
    ui.ButtonSet.OK_CANCEL,
  );

  // Process the user's response.
  const button = result.getSelectedButton();
  const text = result.getResponseText();
  if (button === ui.Button.OK) {
    // User clicked "OK".
    ui.alert("Your name is " + text + ".");
  } else if (button === ui.Button.CANCEL) {
    // User clicked "Cancel".
    ui.alert("I didn't get your name.");
  } else if (button === ui.Button.CLOSE) {
    // User clicked X in the title bar.
    ui.alert("You closed the dialog.");
  }
}

স্প্রেডশিট টোস্ট

"টোস্ট" হলো শীটস এডিটরের নিচের ডান কোণায় থাকা একটি ছোট ডায়ালগ উইন্ডো, যা একটি বার্তা প্রদর্শন করে কিন্তু স্ক্রিপ্টটি স্থগিত করে না। ব্যবহারকারীর হস্তক্ষেপ ছাড়াই স্ট্যাটাস বার্তা বা আপডেট দেখানোর জন্য এটি একটি ভালো উপায়।

নিচের উদাহরণে যেমন দেখানো হয়েছে, শীটস (Sheets) Spreadsheet.toast পদ্ধতিটি ব্যবহার করে। টোস্ট (Toast) শুধুমাত্র শীটস-এই পাওয়া যায়।

function showToast() {
  SpreadsheetApp.getActiveSpreadsheet().toast("Task completed successfully.");
}

কাস্টম ডায়ালগ

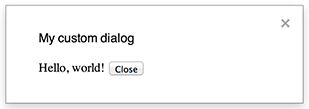
একটি কাস্টম ডায়ালগ ডকস, শীটস, স্লাইডস বা ফর্মস এডিটরের ভিতরে একটি এইচটিএমএল সার্ভিস ইউজার ইন্টারফেস প্রদর্শন করতে পারে।

কাস্টম ডায়ালগ খোলা থাকা অবস্থায় সার্ভার-সাইড স্ক্রিপ্ট স্থগিত করে না । যেহেতু এগুলো অ্যাসিঙ্ক্রোনাস, তাই যে সার্ভার-সাইড ফাংশনটি ডায়ালগটি খোলে, সেটি সাথে সাথেই শেষ হয়ে যায়। কাস্টম ডায়ালগ থেকে সার্ভারে ডেটা ফেরত পাঠাতে, আপনার ক্লায়েন্ট-সাইড কোডে google.script API ব্যবহার করুন।

একটি HTML-সার্ভিস ইন্টারফেসের ক্লায়েন্ট সাইডে google.script.host.close কল করার মাধ্যমে ডায়ালগটি নিজে থেকেই বন্ধ হতে পারে। অন্য কোনো ইন্টারফেসের মাধ্যমে ডায়ালগটি বন্ধ করা যায় না, কেবল ব্যবহারকারী নিজে অথবা এটি নিজেই বন্ধ করতে পারে।

নিচের উদাহরণে যেমন দেখানো হয়েছে, Docs, Forms, Slides এবং Sheets সবগুলোই ডায়ালগ খোলার জন্য Ui.showModalDialog মেথডটি ব্যবহার করে।

কোড.জিএস

function onOpen() {
  SpreadsheetApp.getUi() // Or DocumentApp or SlidesApp or FormApp.
      .createMenu('Custom Menu')
      .addItem('Show dialog', 'showDialog')
      .addToUi();
}

function showDialog() {
  const html = HtmlService.createHtmlOutputFromFile('Page')
      .setWidth(400)
      .setHeight(300);
  SpreadsheetApp.getUi() // Or DocumentApp or SlidesApp or FormApp.
      .showModalDialog(html, 'My custom dialog');
}

পৃষ্ঠা.html

Hello, world! <input type="button" value="Close" onclick="google.script.host.close()" />

কাস্টম সাইডবার

একটি সাইডবার ডকস, ফর্মস, স্লাইডস এবং শীটস এডিটরের ভিতরে একটি এইচটিএমএল সার্ভিস ইউজার ইন্টারফেস প্রদর্শন করতে পারে।

ডায়ালগটি খোলা থাকা অবস্থায় সাইডবার সার্ভার-সাইড স্ক্রিপ্টকে স্থগিত করে না । ক্লায়েন্ট-সাইড কম্পোনেন্টটি HTML-সার্ভিস ইন্টারফেসের জন্য google.script API ব্যবহার করে সার্ভার-সাইড স্ক্রিপ্টে অ্যাসিঙ্ক্রোনাস কল করতে পারে।

একটি HTML-সার্ভিস ইন্টারফেসের ক্লায়েন্ট সাইডে google.script.host.close কল করার মাধ্যমে সাইডবারটি নিজে থেকেই বন্ধ হতে পারে। অন্য কোনো ইন্টারফেস দ্বারা সাইডবারটি বন্ধ করা যায় না, কেবল ব্যবহারকারী বা এটি নিজেই তা বন্ধ করতে পারে।

নিচের উদাহরণে যেমন দেখানো হয়েছে, Docs, Forms, Slides এবং Sheets সবগুলোই সাইডবার খোলার জন্য Ui.showSidebar মেথডটি ব্যবহার করে।

কোড.জিএস

function onOpen() {
  SpreadsheetApp.getUi() // Or DocumentApp or SlidesApp or FormApp.
      .createMenu('Custom Menu')
      .addItem('Show sidebar', 'showSidebar')
      .addToUi();
}

function showSidebar() {
  const html = HtmlService.createHtmlOutputFromFile('Page')
      .setTitle('My custom sidebar');
  SpreadsheetApp.getUi() // Or DocumentApp or SlidesApp or FormApp.
      .showSidebar(html);
}

পৃষ্ঠা.html

Hello, world! <input type="button" value="Close" onclick="google.script.host.close()" />

ফাইল খোলার ডায়ালগ

গুগল পিকার একটি জাভাস্ক্রিপ্ট এপিআই যা ব্যবহারকারীদের গুগল ড্রাইভ ফাইল নির্বাচন বা আপলোড করতে দেয়। এইচটিএমএল সার্ভিসে গুগল পিকার লাইব্রেরি ব্যবহার করে একটি কাস্টম ডায়ালগ তৈরি করুন, যা ব্যবহারকারীদের বিদ্যমান ফাইল নির্বাচন করতে বা নতুন ফাইল আপলোড করতে দেবে, এবং তারপর নির্বাচিত ফাইলটি আপনার স্ক্রিপ্টে ফেরত পাঠান।

আবশ্যকতা

গুগল অ্যাপস স্ক্রিপ্টের সাথে গুগল পিকার ব্যবহার করার জন্য কয়েকটি পূর্বশর্ত রয়েছে:

  • গুগল পিকারের জন্য আপনার পরিবেশ প্রস্তুত করুন

  • আপনার স্ক্রিপ্ট প্রজেক্টে অবশ্যই একটি স্ট্যান্ডার্ড গুগল ক্লাউড প্রজেক্ট ব্যবহার করতে হবে।

    drive.file স্কোপ ব্যবহার করলে PickerBuilder.setAppId তে একই ক্লাউড প্রজেক্ট নম্বরটি দিন।

  • অ্যাপস স্ক্রিপ্ট প্রজেক্ট ম্যানিফেস্টে অবশ্যই গুগল পিকার এপিআই-এর জন্য প্রয়োজনীয় অথরাইজেশন স্কোপগুলো উল্লেখ করতে হবে, যাতে PickerBuilder.setOauthtoken এর জন্য ScriptApp.getOAuthToken সঠিক টোকেনটি রিটার্ন করে।

  • PickerBuilder.setDeveloperKey তে সেট করা API কী-টি Apps Script-এর জন্য সীমাবদ্ধ করুন। Application restrictions- এর অধীনে, এই ধাপগুলি অনুসরণ করুন:

    1. HTTP রেফারার (ওয়েবসাইট) নির্বাচন করুন।
    2. ওয়েবসাইট বিধিনিষেধের অধীনে, একটি আইটেম যোগ করুন-এ ক্লিক করুন।
    3. রেফারার-এ ক্লিক করুন এবং *.google.com লিখুন।
    4. আরেকটি আইটেম যোগ করুন এবং রেফারার হিসেবে *.googleusercontent.com লিখুন।
    5. সম্পন্ন ক্লিক করুন।
  • PickerBuilder.setOrigin কল করুন।

উদাহরণ

নিম্নলিখিত উদাহরণটিতে অ্যাপস স্ক্রিপ্টে গুগল পিকার দেখানো হয়েছে।

কোড.জিএস

পিকার/কোড.জিএস
/**
 * Creates a custom menu in Google Sheets when the spreadsheet opens.
 */
function onOpen() {
  SpreadsheetApp.getUi()
    .createMenu("Picker")
    .addItem("Start", "showPicker")
    .addToUi();
}

/**
 * Displays an HTML-service dialog in Google Sheets that contains client-side
 * JavaScript code for the Google Picker API.
 */
function showPicker() {
  const html = HtmlService.createHtmlOutputFromFile("dialog.html")
    .setWidth(800)
    .setHeight(600)
    .setSandboxMode(HtmlService.SandboxMode.IFRAME);
  SpreadsheetApp.getUi().showModalDialog(html, "Select a file");
}
// Ensure the Drive API is enabled.
if (!Drive) {
  throw new Error("Please enable the Drive advanced service.");
}

/**
 * Checks that the file can be accessed.
 * @param {string} fileId The ID of the file.
 * @return {Object} The file resource.
 */
function getFile(fileId) {
  return Drive.Files.get(fileId, { fields: "*" });
}

/**
 * Gets the user's OAuth 2.0 access token so that it can be passed to Picker.
 * This technique keeps Picker from needing to show its own authorization
 * dialog, but is only possible if the OAuth scope that Picker needs is
 * available in Apps Script. In this case, the function includes an unused call
 * to a DriveApp method to ensure that Apps Script requests access to all files
 * in the user's Drive.
 *
 * @return {string} The user's OAuth 2.0 access token.
 */
function getOAuthToken() {
  return ScriptApp.getOAuthToken();
}

ডায়ালগ.html

পিকার/ডায়ালগ.এইচটিএমএল
<!DOCTYPE html>
<html>
  <head>
    <link
      rel="stylesheet"
      href="https://ssl.gstatic.com/docs/script/css/add-ons.css"
    />
    <style>
      #result {
        display: flex;
        flex-direction: column;
        gap: 0.25em;
      }

      pre {
        font-size: x-small;
        max-height: 25vh;
        overflow-y: scroll;
        background: #eeeeee;
        padding: 1em;
        border: 1px solid #cccccc;
      }
    </style>
    <script>
      // TODO: Replace the value for DEVELOPER_KEY with the API key obtained
      // from the Google Developers Console.
      const DEVELOPER_KEY = "AIza...";
      // TODO: Replace the value for CLOUD_PROJECT_NUMBER with the project
      // number obtained from the Google Developers Console.
      const CLOUD_PROJECT_NUMBER = "1234567890";

      let pickerApiLoaded = false;
      let oauthToken;

      /**
       * Loads the Google Picker API.
       */
      function onApiLoad() {
        gapi.load("picker", {
          callback: function () {
            pickerApiLoaded = true;
          },
        });
      }

      /**
       * Gets the user's OAuth 2.0 access token from the server-side script so that
       * it can be passed to Picker. This technique keeps Picker from needing to
       * show its own authorization dialog, but is only possible if the OAuth scope
       * that Picker needs is available in Apps Script. Otherwise, your Picker code
       * will need to declare its own OAuth scopes.
       */
      function getOAuthToken() {
        google.script.run
          .withSuccessHandler((token) => {
            oauthToken = token;
            createPicker(token);
          })
          .withFailureHandler(showError)
          .getOAuthToken();
      }

      /**
       * Creates a Picker that can access the user's spreadsheets. This function
       * uses advanced options to hide the Picker's left navigation panel and
       * default title bar.
       *
       * @param {string} token An OAuth 2.0 access token that lets Picker access the
       *     file type specified in the addView call.
       */
      function createPicker(token) {
        document.getElementById("result").innerHTML = "";

        if (pickerApiLoaded && token) {
          const picker = new google.picker.PickerBuilder()
            // Instruct Picker to display only spreadsheets in Drive. For other
            // views, see https://developers.google.com/picker/reference/picker.viewid
            .addView(
              new google.picker.DocsView(
                google.picker.ViewId.SPREADSHEETS
              ).setOwnedByMe(true)
            )
            // Hide the navigation panel so that Picker fills more of the dialog.
            .enableFeature(google.picker.Feature.NAV_HIDDEN)
            // Hide the title bar since an Apps Script dialog already has a title.
            .hideTitleBar()
            .setOAuthToken(token)
            .setDeveloperKey(DEVELOPER_KEY)
            .setAppId(CLOUD_PROJECT_NUMBER)
            .setCallback(pickerCallback)
            .setOrigin(google.script.host.origin)
            .build();
          picker.setVisible(true);
        } else {
          showError("Unable to load the file picker.");
        }
      }

      /**
       * @typedef {Object} PickerResponse
       * @property {string} action
       * @property {PickerDocument[]} docs
       */

      /**
       * @typedef {Object} PickerDocument
       * @property {string} id
       * @property {string} name
       * @property {string} mimeType
       * @property {string} url
       * @property {string} lastEditedUtc
       */

      /**
       * A callback function that extracts the chosen document's metadata from the
       * response object. For details on the response object, see
       * https://developers.google.com/picker/reference/picker.responseobject
       *
       * @param {PickerResponse} data The response object.
       */
      function pickerCallback(data) {
        const action = data[google.picker.Response.ACTION];
        if (action == google.picker.Action.PICKED) {
          handlePicked(data);
        } else if (action == google.picker.Action.CANCEL) {
          document.getElementById("result").innerHTML = "Picker canceled.";
        }
      }

      /**
       * Handles `"PICKED"` responsed from the Google Picker.
       *
       * @param {PickerResponse} data The response object.
       */
      function handlePicked(data) {
        const doc = data[google.picker.Response.DOCUMENTS][0];
        const id = doc[google.picker.Document.ID];

        google.script.run
          .withSuccessHandler((driveFilesGetResponse) => {
            // Render the response from Picker and the Drive.Files.Get API.
            const resultElement = document.getElementById("result");
            resultElement.innerHTML = "";

            for (const response of [
              {
                title: "Picker response",
                content: JSON.stringify(data, null, 2),
              },
              {
                title: "Drive.Files.Get response",
                content: JSON.stringify(driveFilesGetResponse, null, 2),
              },
            ]) {
              const titleElement = document.createElement("h3");
              titleElement.appendChild(document.createTextNode(response.title));
              resultElement.appendChild(titleElement);

              const contentElement = document.createElement("pre");
              contentElement.appendChild(
                document.createTextNode(response.content)
              );
              resultElement.appendChild(contentElement);
            }
          })
          .withFailureHandler(showError)
          .getFile(data[google.picker.Response.DOCUMENTS][0].id);
      }

      /**
       * Displays an error message within the #result element.
       *
       * @param {string} message The error message to display.
       */
      function showError(message) {
        document.getElementById("result").innerHTML = "Error: " + message;
      }
    </script>
  </head>

  <body>
    <div>
      <button onclick="getOAuthToken()">Select a file</button>
      <div id="result"></div>
    </div>
    <script src="https://apis.google.com/js/api.js?onload=onApiLoad"></script>
  </body>
</html>

appsscript.json

পিকার/অ্যাপসস্ক্রিপ্ট.json
{
  "timeZone": "America/Los_Angeles",
  "exceptionLogging": "STACKDRIVER",
  "runtimeVersion": "V8",
  "oauthScopes": [
    "https://www.googleapis.com/auth/script.container.ui",
    "https://www.googleapis.com/auth/drive.file"
  ],
  "dependencies": {
    "enabledAdvancedServices": [
      {
        "userSymbol": "Drive",
        "version": "v3",
        "serviceId": "drive"
      }
    ]
  }
}