Page Summary
-
This page provides resources for partners integrating Fast Pair into their products, covering marketing materials, the project lifecycle, and certification processes.
-
Devices must undergo certification before marketing Fast Pair and any extensions like Audio switch, with guidelines and FAQs available for the process.
-
Technical notes address topics such as advertising protocols alongside Fast Pair, optimizing BLE connections, battery notifications, and enabling Fast Pair logging for debugging.
-
Partners can utilize the Fast Pair Validator app for tasks like adjusting TxPower levels and ensuring proper advertisement rotation schemes prior to certification.
-
Detailed instructions are provided on how to enable and extract debug logs for troubleshooting Fast Pair integration issues.
This page describes useful information Partners need for both Fast Pair project planning and system integration.
Fast Pair Materials and Process
This section provides links to general marketing and process information.
Marketing, Branding, and Messaging
Visit our Partner Marketing Hub for guidance on branding and messaging. New partners need to apply for access, while existing partners can already access the content through their Partner Domain account.
Fast Pair Project Lifecycle
See the System Integrator (SI) Roles and Responsibilities page for a high-level description of the project lifecycle and responsibilities for Partners integrating Fast Pair into a product.
Certification Process
Devices implementing Fast Pair must be Certified before a product can be marketed with the feature. The Fast Pair Certification Guideline describes how to prepare for certification and perform pre-certification Self Tests.
The Certification FAQ covers a variety of common questions, including a general description of when full certification (or re-certification) is required.
Devices implementing or using Fast Pair extensions, such as Audio switch, must also be certified. Audio switch has a separate Certification Guideline describing its Self-Test steps and preparation for 3rd Party Lab Certification.
3rd Party Labs can certify Fast Pair and Audio switch sequentially. See the Shipping Devices to 3rd Party Labs page for which labs offer which Certification services.
Technical Notes
This section describes some technical implementation notes to assist Partners with development and integration.
How to Advertise other Protocols Alongside Fast Pair
Some devices may want to support additional features on top of Fast Pair, such as Google Assistant or Eddystone, that require additional advertisement space. Rotating the advertisement data is the best option for these cases. However, the Fast Pair advertisements must still be advertised within the Advertising Interval according to the discoverable mode and not discoverable mode.
Advertisement rotation is tested during the 3rd-Party testing phase of the certification process. Be sure to verify any rotation schemes with the Fast Pair Validator app prior to certification to avoid potential certification delays, retesting, and cost.
Shorten BLE connection interval
To improve building GATT connection performance, the Provider is expected to make the connection interval as short as possible. The expected optimal value is 7.5 ms which is applied to most Seekers.
BLE advertisement and headset connection state
Whether a Fast Pair headset advertises the model ID or account data depends on the headset's BR/EDR discoverable mode, not the connected or disconnected state. Refer to the Fast Pair Service Spec from the links below:
- "When the Provider device is in BR/EDR discoverable (that is, in pairing mode), it shall advertise Fast Pair Model ID Data over BLE." - link
- "When not discoverable (that is, not in pairing mode), the Provider shall advertise Fast Pair Account Data" - link
TxPower
As defined in the specification, the Seeker estimates the distance by the RSSI based on the given TxPower level. The estimated distance is the key factor to determine whether or not to show the notification.
The process to determine TxPower is:
- Measure the actual output of the device using an Android phone at 1 meter away, and then add 41 dBm to that.
- Include this value in the BLE advertisement.
- Include this value with testing phone information in the self-test report.
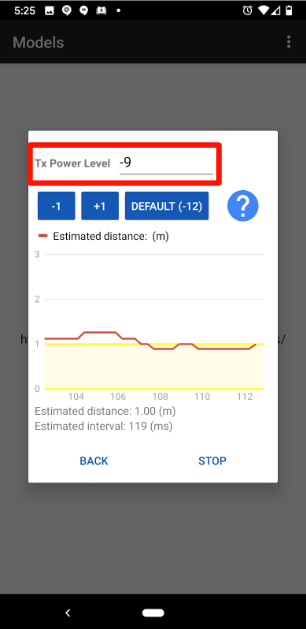
Measure and Set TxPower with the Validator App
The Validator App provides a test for manually adjusting TxPower to the proper level on a DUT. Partners can use this test to determine the proper TxPower level on their DUT prior to Self Test or Certification.
TxPower Measurement Procedure
To measure TxPower with the Validator App:
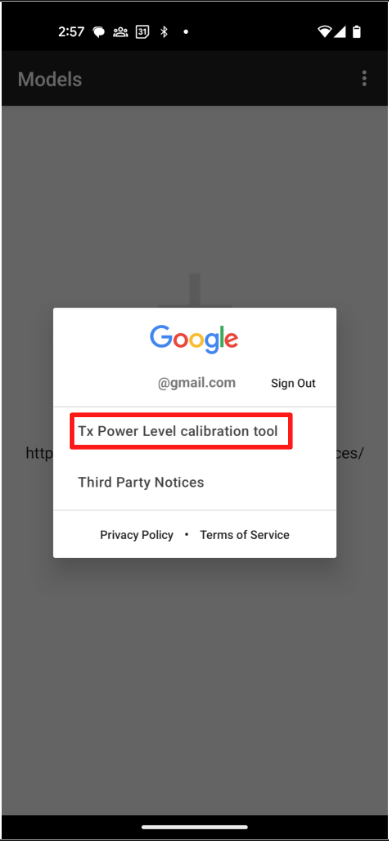
- Open the Validator App on the DUT.
- Open the dot menu at the top of the app:
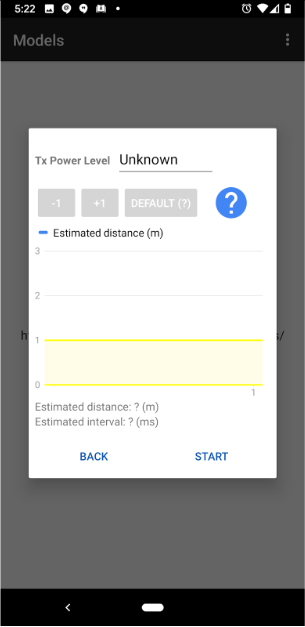
- Place the DUT 1 meter away from the phone and tap the "START" button.
- Select the DUT from the device list.
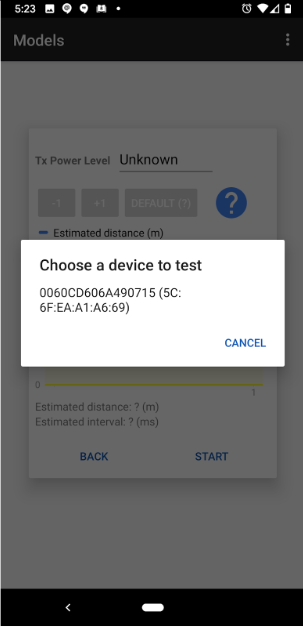
- You can refresh the device list by tapping the "CANCEL" button and re-selecting the "START" button.
- Adjust the red line (representing TxPower) until it barely touches the top of
the yellow region.
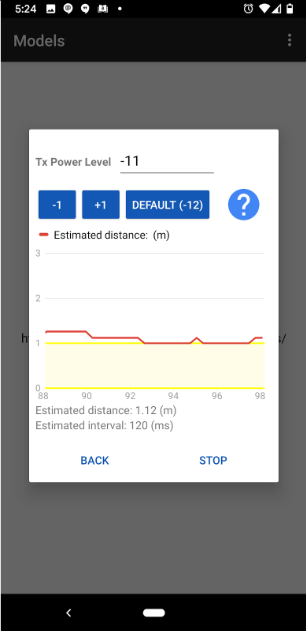
- Use the "-1" button to move the red line towards the yellow region.
- Use the "+1" button to move the red line away from the yellow region.
- Signal interference may make the red line unstable. Try moving to an area with less signal interference if the red line behaves erratically.
- Save the TxPower value and update it in both the DUT and the Device Console.
Battery notifications
As defined in the specification, the Provider can include battery information in the advertisement. The Seeker decides whether to show or hide the battery notification according to the type, either 0b0011 to show battery notification or 0b0100 to hide it. Here are some guidelines on when to include the battery information in the advertisement and which type to be used:
- Include the battery information in the advertisement with show battery
notification
0b0011for at least 8 seconds when the case is opened and both buds are docked. - Include the battery information in the advertisement with hide battery
notification
0b0100for at least 5 seconds when case is closed and both buds are docked. - To be responsive in showing or hiding battery notifications, the advertisement should reflect the real state within 2 seconds.
- There are 2 ways to hide the battery notification:
- Stop including battery information in the advertisement, the Seeker hides the notification after a while (which is set to 20 seconds for now).
- Include the battery information in the advertisement with hide battery
notification
0b0100, the Seeker hides the notification immediately upon getting the advertisement.
- It is optional to include the battery information in the advertisement if there is just one bud docked when case open or closed.
- It is optional to include the battery information in the advertisement when the buds are being removed from the case or being docked at the case.
- To prevent tracking, the Provider should only include raw battery data in the advertisement when needed (not all the time).
The implementation should be described in the self-test result for the Certification.
How to Enable Fast Pair Logging
Ensure you have enabled the Bluetooth HCI snoop log on the device
prior to debugging. Additionally, to prevent key Fast Pair logs from being
redacted for security reasons, join the
Fast Pair Partner Test Google Group
(fast-pair-partner-test@googlegroups.com) with your test Google Accounts.
To capture Fast Pair messages in your debug logs, run:
$ adb logcat -G 16M
$ adb shell setprop log.tag.NearbyMessages VERBOSE
$ adb shell setprop log.tag.NearbyDiscovery VERBOSE
$ adb shell setprop log.tag.FastPair VERBOSE
Google recommends running the preceding commands on every boot sequence.
How to Extract a Debug Log
Run $ adb bugreport to generate a zip file that should contain all of the
data. The zip file generation may take several minutes.
Depending on the Android version, run one of the following commands to get
btsnoop_hic.log:
- For Android 8.x and higher:
shell $ adb pull data/misc/bluetooth/logs logs - For Android 7.x:
shell
$ adb pull sdcard/btsnoop_hci.log